


Headlight removal help
Thread Starter
Burning Brakes

Joined: Dec 2004
Posts: 918
Likes: 5
From: Gainesville FL
My headlight mechanisms look pretty corroded, so I want to clean them up on the bench before dealing with any vacuum issues. How do you remove the entire headlight assembly as a unit? Any tips, pointers, etc. would be greatly appreciated.
Le Mans Master


Joined: Jun 2002
Posts: 8,339
Likes: 24
From: I can walk to MA
They bolt into steel reinforcement bars under the nose of the hood surround.
Warning: If the mechanisms look corroded, be prepared for
bolts that DON'T want to come out. You may be openning a can
of worms.
If I recall correctly, there are (3) bolts along the back side
of each headlight assembly. There are (2) in the front.
The fronts can be a pain to get to. I think I have read that
people have managed to get them through the 'hole', but I would
suggest removing the front valance and other pieces to drop
them out the bottom.
Good luck, and don't say I didn't warn you.

Team Owner


Joined: Jul 2004
Posts: 40,354
Likes: 787
From: Redondo Beach, California
The next time I take a set of headlight assemblies apart, I'm going to carefully save the measurements of all the adjustable parts. For instance give a shot of paint to the headlight flange bearings before removal. This way you can re-install them in the exact position. Similarly I would carefully measure the adjustment settings at the threaded end of the shaft coming out of the headlamp actuator, etc. When you re-install your new parts, try to replicate the original factory adjustment settings.
I found adjusting the headlamp assemblies after rebuilding to be very tedious. I found myself on my back laying underneath the nose of the car making final adjustments after installing the headlamp assemblies.
You'll have to take off the front grill work also. You can do some adjustments through the front grill openings also. (When I did mine I had the hood off and the radiator removed. I think you can get them out with the radiator still in place??) Put a lot of masking tape on the car body where the body surrounds the healight doors. You don't want to chip your paint as you maneuver the assemblies in and out of the car.
I replaced just about everything. It was expensive. I was impressed to learn how the mechanism works. Whoever designed it did a good job I think.
Burning Brakes

Joined: Feb 2005
Posts: 1,235
Likes: 0
From: Mesa AZ
i just did my 75. you need to take the headlight doors off first. if you take the 3 bolts out from one of the pivots, the other pivot on the door will slid out .then there are 5 more bolts. when you pull the support out, you need to push it towards the center of the car and the outer front corner should come out first.
Thread Starter
Burning Brakes
Joined: Dec 2004
Posts: 918
Likes: 5
From: Gainesville FL
Hmmm... Glad I asked about this before charging into the job. I have never worked on the headlights before. Two questions:
1. Can the painted fiberglass top covers be taken off without removing the whole headlight assembly?
2. If the connection between the headlight assembly and the actuator rod is disconnected, can the assembly be manually opened without damaging anything?
I'm thinking that I might be able to get at most of what I wanted to clean and lubricate if I could accomplish 1 and 2 with the headlights still mounted in the car.
Pro

Joined: May 2003
Posts: 601
Likes: 0
From: Nottingham
This is a bit of a pig of a job, actually!
In answer to your questions
1) No, they're not actually fibreglass. They are all part of the aluminium headlight bucket casting, so to get those lids off involves undoing the hinge bolts and lifting the whole lot out, hinges and all.
2) If you undo the clevis rod that connects the actuator and the headlight asembly, then in theory yes, you should be able to manually open/close the doors. But to be honest, If you were only doing this with the intention of manually opening the doors, bear in mind that it's possible without disconnecting this actuator rod...Pull the vacuum hose off the back of the actuator and then you will be able to reach under and push the door up, so it locks in place. Mind your pinkies though, 'cos it'll lock with a bit of a snap!
Once the door is up, you can easily remove the plastic cowling that fits around the light units, to get better access to the mechanism.
If you do decide to take the doors right out, the adjustment when they go back in is lengthy and fiddly, and it's easy to scratch the paint and end up swearing! But it's quite rewarding when it's all done and you've understood how these crazy things work!
Good luck!
Thread Starter
Burning Brakes
Joined: Dec 2004
Posts: 918
Likes: 5
From: Gainesville FL
Thanks for the advice. This weekend, I will try to raise the lights manually. I know that the springs are broken, so I am not sure whether the lights will stay up or not. The Haynes manual cautions you not to manually close the lights, although you can open them manually. Is there a safe way to close the lights if the normal vacuum system doesn't do the job? Given the conditions of the parts I can see, I have no confidence that mine will go back down when I cycle the headlight switch.
Pro
Joined: May 2003
Posts: 601
Likes: 0
From: Nottingham
They should still lock open, because it's not actually the springs that support the weight in the open position...There's a sort of "over-centre" mechanism to do that, and the springs just "help" the actuators.
To lower the lights manually, you need to take the vacuum hose of the FRONT of the actuator first - or it might be easier to disconnect it where it goes from the vacuum relay, either way the object is to vent the front chamber of the actuator to atmosphere.
To lower the lights manually, you need to take the vacuum hose of the FRONT of the actuator first - or it might be easier to disconnect it where it goes from the vacuum relay, either way the object is to vent the front chamber of the actuator to atmosphere.
Corvette Stories
The Best of Corvette for Corvette Enthusiasts

Top 10 Most Explosive Corvettes Ever Made: Power-to-Weight Ratio Ranked!
Joe Kucinski
150 hp to 1,250 hp: Every Corvette Generation Compared by the Specs That Matter
Joe Kucinski
8 Coolest Corvette Pace Cars (and Replicas) of All Time
Verdad Gallardo
Top 10 Corvette Engines RANKED by Peak Torque (70+ Years of Muscle!)
Joe Kucinski
Corvette ZR1X Will Be Pacing the Indy 500, And Could Probably Race, Too!
Verdad Gallardo
Top 10 Corvettes Coming to Mecum Indy 2026!
Brett Foote
Top 10 C9 Corvette MUST-HAVES to Fix These C8 Generation Flaws!
Michael S. Palmer
10 Revolutionary 'Corvette Firsts' Most People Don't Know
Joe Kucinski
5 Reasons to Upgrade to an LS6-Powered Corvette; 5 Reasons to Stay LT2
Michael S. Palmer
Thread Starter
Burning Brakes
Joined: Dec 2004
Posts: 918
Likes: 5
From: Gainesville FL
Ohhhhh. So the actuators can apply force in either direction. Now I'm beginning to understand how these work. The springs act like counterweights to balance the load on the actuator. Now the light is starting to go on in my head (no pun intended).
Le Mans Master
Joined: Jun 2002
Posts: 8,339
Likes: 24
From: I can walk to MA
Originally Posted by Vette Gator
Ohhhhh. So the actuators can apply force in either direction. Now I'm beginning to understand how these work. The springs act like counterweights to balance the load on the actuator. Now the light is starting to go on in my head (no pun intended).
The lights can be lowered manually, but yo uneed to reach in and pull the
linkage forward to get it over the 'locked knee'. Then, light pressure
on the cover will push it down.
The manual probably warns those that might push very hard on the
cover, without unlocking the linkage first.
Good luck

Race Director


Joined: Sep 2004
Posts: 11,874
Likes: 263
From: Arlington Va Current ride 04 vert, previous vettes: 69 vert, 77 resto mod
good post....something is loose on my front pass side headlight mechanism....i'm thinking its either the bracket that connects to the "steel reinforcement" or its the "steel reinforcement" itself....is the steel reinforcement bonded to the car with glue? if the aluminum bracket is broken is there an easy fix short of taking everything apart?
Race Director
Joined: Sep 2004
Posts: 11,874
Likes: 263
From: Arlington Va Current ride 04 vert, previous vettes: 69 vert, 77 resto mod
Originally Posted by 68/70Vette
I found adjusting the headlamp assemblies after rebuilding to be very tedious. I found myself on my back laying underneath the nose of the car making final adjustments after installing the headlamp assemblies.
..
..
thats where i am now on my back ....any body have any instructions on this process?
Thread Starter
Burning Brakes
Joined: Dec 2004
Posts: 918
Likes: 5
From: Gainesville FL
Thanks to everyone for their help and advice in getting my headlights out. Last week, I helped a friend align the ones in his 68 vert, where everything was in nice, restored shape and all the joints moved  . Yesterday, I tackled mine. I would like to have a chat with the GM designer who came up with the location of the outside hinge bolts. My right arm is nothing but scratches from reaching up to get at them. Looks like I was fighting with a cat! As theo said, it is definitely "a pig of a job"! After getting both lights completely out, I can see a bunch of items that will need repaired: siezed hinges, joints frozen, etc. My actuators are also very rusty, and one even has a hole rusted through. Most importantly, though, I can see why my headllights sat 1/4" too low and 1/4" too far back when closed. My header bar is really rusted. It has also detached from the fiberglass and fallen down and backward. There is no question that it will have to be replaced. Is it possible to put in a new header bar without taking the front body off?
. Yesterday, I tackled mine. I would like to have a chat with the GM designer who came up with the location of the outside hinge bolts. My right arm is nothing but scratches from reaching up to get at them. Looks like I was fighting with a cat! As theo said, it is definitely "a pig of a job"! After getting both lights completely out, I can see a bunch of items that will need repaired: siezed hinges, joints frozen, etc. My actuators are also very rusty, and one even has a hole rusted through. Most importantly, though, I can see why my headllights sat 1/4" too low and 1/4" too far back when closed. My header bar is really rusted. It has also detached from the fiberglass and fallen down and backward. There is no question that it will have to be replaced. Is it possible to put in a new header bar without taking the front body off?
Le Mans Master
Joined: Jun 2002
Posts: 8,339
Likes: 24
From: I can walk to MA
Originally Posted by Vette Gator
Thanks to everyone for their help and advice in getting my headlights out. Last week, I helped a friend align the ones in his 68 vert, where everything was in nice, restored shape and all the joints moved . Yesterday, I tackled mine. I would like to have a chat with the GM designer who came up with the location of the outside hinge bolts. My right arm is nothing but scratches from reaching up to get at them. Looks like I was fighting with a cat! As theo said, it is definitely "a pig of a job"! After getting both lights completely out, I can see a bunch of items that will need repaired: siezed hinges, joints frozen, etc. My actuators are also very rusty, and one even has a hole rusted through. Most importantly, though, I can see why my headllights sat 1/4" too low and 1/4" too far back when closed. My header bar is really rusted. It has also detached from the fiberglass and fallen down and backward. There is no question that it will have to be replaced. Is it possible to put in a new header bar without taking the front body off?
. Yesterday, I tackled mine. I would like to have a chat with the GM designer who came up with the location of the outside hinge bolts. My right arm is nothing but scratches from reaching up to get at them. Looks like I was fighting with a cat! As theo said, it is definitely "a pig of a job"! After getting both lights completely out, I can see a bunch of items that will need repaired: siezed hinges, joints frozen, etc. My actuators are also very rusty, and one even has a hole rusted through. Most importantly, though, I can see why my headllights sat 1/4" too low and 1/4" too far back when closed. My header bar is really rusted. It has also detached from the fiberglass and fallen down and backward. There is no question that it will have to be replaced. Is it possible to put in a new header bar without taking the front body off?Yeah ... you just use a lot of clamps to hold it up in place as the adhesive cures.
I had the luxury of my front clip removed when I tackled mine.
It was pretty easy, but must be 10 times more difficult doing it
from the bottom.
Don't forget the side brackets and reinforcements, too.
Also, when in there, check the condition of the nose reinforcement
that the front of the housing bolts into.
Melting Slicks

Joined: Apr 2004
Posts: 2,083
Likes: 2
From: Montreal Qc.
Originally Posted by Vette Gator
Is it possible to put in a new header bar without taking the front body off?
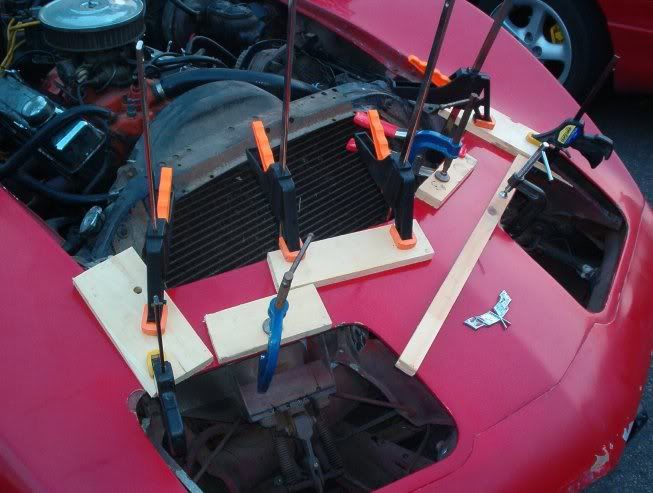
A local Vette guy told me the front end had to be "cut off" but I didn't have to do that! Just hood off/lights out grind out all remnants of the old bar (mine came out in fistfulls of rusty metal...) Clean up the underside with a grinder/sandpaper, test fit the bar and grind away some more. I used two-part epoxy mixed together and poured out of the corner of a big ziploc bag onto the bar, then put the bar in through one of the headlight holes, hold it on with every clamp you can get your hands on.
There were a few threads on this last spring, and some guys recommended bonding adhesive rather than epoxy. The epoxy was messy in my case and ran all over, but it's rock solid attached in there now.
The bad part about it was getting the lights to line up properly again, without the old bar for "reference" points.
My brother and I did this job in about 4-5 hours. He was the epoxy expert, I was the guy with the cuts all over my arms.

Last edited by Star79; May 9, 2005 at 11:03 PM.
Thread Starter
Burning Brakes
Joined: Dec 2004
Posts: 918
Likes: 5
From: Gainesville FL
Originally Posted by NHvette
Also, when in there, check the condition of the nose reinforcement
that the front of the housing bolts into.
that the front of the housing bolts into.
Thanks for pics of mounting the header bar. Right now, I can see where the old adhesive is, and I will find a way to mark this location to get the new one in the same place.
Pro
Joined: May 2003
Posts: 601
Likes: 0
From: Nottingham
Yeah the front "arms" you mention are definitely supposed to be bolted tight. I can't quite picture from your description (and my crappy memory!) whether you are missing any parts there... do you have the assembly manual for you vette? If so, this should show exactly what parts are supposed to be in there. If you don't have a copy, I can have a look in mine for you... let me know
Melting Slicks
Joined: Apr 2004
Posts: 2,083
Likes: 2
From: Montreal Qc.
If they are loose, it's because someone was in there before you (previous owner) and didn't bother to tighten them. That's the way mine were. I waited till I had my bumper off to tighten them, those bolts are as hard to get as the outside headlight adjustment ones.
Thread Starter
Burning Brakes
Joined: Dec 2004
Posts: 918
Likes: 5
From: Gainesville FL
I'll take a look tonight and see what I can find. It looked like those bolts were really difficult to get to with the tight clearance. Since I'm going to have to pull the headlight mounting brackets out to replace the header bar, it should be a lot easier to get a better look afterward. I have the assembly manual for 1978, so it's pretty likely that this portion will be the same as mine. The car has definitely had some body work done during its life. I am missing the emblem on top of the nose (even the holes are filled in) and the Astrovents behind the rear window are gone. I'm not sure whether they were originally present on an early '76 or not, though, so this may be the way it came from the factory. The side windows say Astrovent, although I am not convinced that these are the original doors. Come to think of it, I have a lot of questions about its history that I would like to ask the car!