


Replace Body Mount #4
Thread Starter
Melting Slicks

Joined: Jan 2006
Posts: 3,028
Likes: 2
From: North NJ
Anyone replaced a #4 driver side body mount themselves? My #4 driver side body mount reinforcement has mysteriously disappeared but with no evidence of rust anywhere on the frame or rear components. This is the metal piece that fits on the bottom of the fiberglass pillar that attaches to the body bushing then the frame, right behind the rear wheel-well. Has anyone replaced the 8 body bushings on a C3 vette themselves? If so, how? procedures for lifting the body off the frame enough to replace the bushings/bolts? (not take the body apart and without a hydraulic lift) I'm going with graphite injected polyurethane bushings but don't want to spend the $$$ for a corvette specialty body shop. Any direction you can offer or is it recommended I go with the professionals on this matter? If taken to a shop aprox $?
Thanks
Thanks

Instructor

Joined: Jan 2006
Posts: 102
Likes: 4
From: Cambridge Ohio
I've replaced the #4 mount reinforcements, but the body needs to be lifted from the frame to accomplish this. I'd say at least 3 or 4 inches at that point. I also replaced the nut and cage on the inside of the body too. If I remember correctly the nut and cage need to be attached before the reinforcement. As far as lifting the body, you'll still have to detach most, if not all connections between the body and frame. You might be able to gently jack it up with a hydraulic floor jack at the firewall area and insert wood blocks between the frame and body and work your way around the car......
Hopefully this helps...

Dino
Hopefully this helps...
Dino
Melting Slicks


Joined: Dec 2000
Posts: 3,363
Likes: 303
From: Lansdale 19446 PA
2024 C3 of the Year Finalist- Unmodified
St. Jude Donor '10-'11, '15, '19
There was an article in either CORVETTE FEVER or VETTE a while back that gave a great step by step pictorial on how to do this. Their method did not require the body lift - great for me & my one car garage.
What they suggest is to do one side at a time. PB Blast all 4 on one sside daily for several days. Then, remove each of the 4 mount bolts. #4 and #1 can be removed readily. I placed a 2 x 4 X 36 across the floor pan and jacked the body up far enough to get the mounts & shims out. WRITE DOWN HOW MANY SHIMS COME FROM EACH MOUNT!
Reinstall in reverse. I did both sides on a Saturday with one minor issue. My #4 driver side mount looked like a big C. The outbound side of the top was rusted out. I made a new top & welded it in.
I know this is abreviated but it gives the general idea. I will search for the mag issue if you need it.
Pro


Joined: Nov 2004
Posts: 659
Likes: 0
From: Flower Mound Texas
Originally Posted by vetteman1978
There was an article in either CORVETTE FEVER or VETTE a while back that gave a great step by step pictorial on how to do this. Their method did not require the body lift - great for me & my one car garage.
What they suggest is to do one side at a time. PB Blast all 4 on one sside daily for several days. Then, remove each of the 4 mount bolts. #4 and #1 can be removed readily. I placed a 2 x 4 X 36 across the floor pan and jacked the body up far enough to get the mounts & shims out. WRITE DOWN HOW MANY SHIMS COME FROM EACH MOUNT!
Reinstall in reverse. I did both sides on a Saturday with one minor issue. My #4 driver side mount looked like a big C. The outbound side of the top was rusted out. I made a new top & welded it in.
I know this is abreviated but it gives the general idea. I will search for the mag issue if you need it.
What they suggest is to do one side at a time. PB Blast all 4 on one sside daily for several days. Then, remove each of the 4 mount bolts. #4 and #1 can be removed readily. I placed a 2 x 4 X 36 across the floor pan and jacked the body up far enough to get the mounts & shims out. WRITE DOWN HOW MANY SHIMS COME FROM EACH MOUNT!
Reinstall in reverse. I did both sides on a Saturday with one minor issue. My #4 driver side mount looked like a big C. The outbound side of the top was rusted out. I made a new top & welded it in.
I know this is abreviated but it gives the general idea. I will search for the mag issue if you need it.
Melting Slicks
Joined: Dec 2000
Posts: 3,363
Likes: 303
From: Lansdale 19446 PA
2024 C3 of the Year Finalist- Unmodified
St. Jude Donor '10-'11, '15, '19
Guess I better start digging through my collection of magazines! I will post the mag info as soon as I find it.
Burning Brakes


Joined: Nov 2005
Posts: 1,143
Likes: 0
From: Leander Texas
I just finished this repair. My wife and I pulled the body off on October 13th. I just put it back on by myself On January 6th. It took about 4 hours to remove, and about 2.5 hours to install. While the body was off I repaired the right front most body mount frame post, and the left rear most body mount frame post. I also sand blasted the frame, and coated it with Duraliner truck bed coating, and rebuilt the entire suspension. The front clip I had removed because it was damaged in a wreck by the previous owner.
Here are some pics.
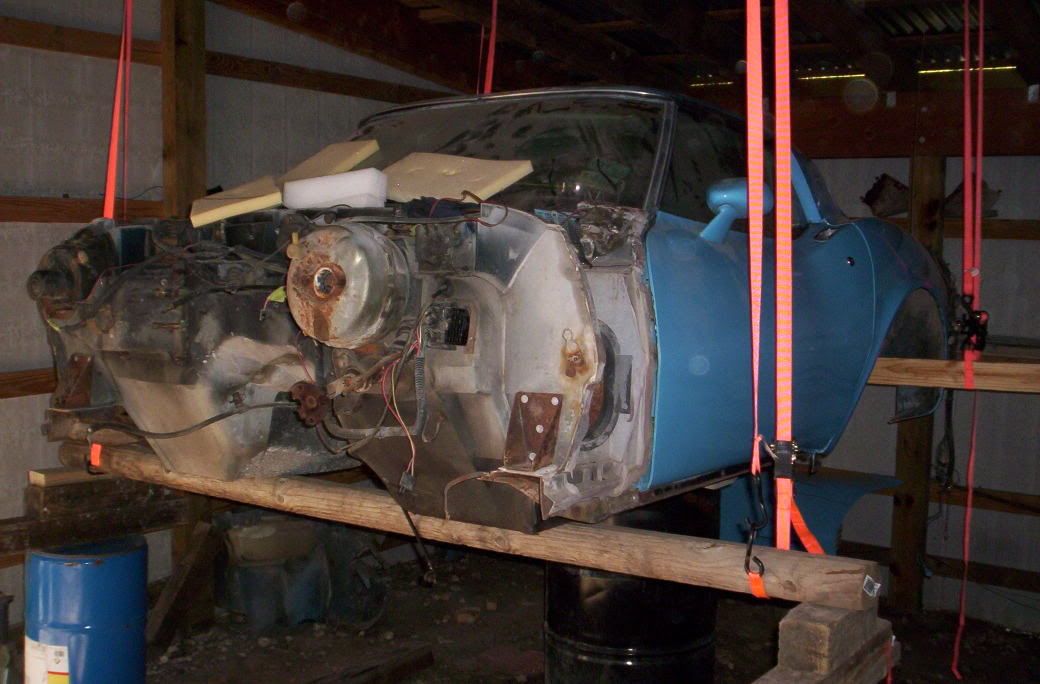
I used 4 ratchet straps too hoist the body up, with 4x4s for support accross under the body once I had lifted it up high enough to allow me to get them between the body & frame. You will have to be sure to support the nose so it doesn't sag, causing it to crack off from the firewall
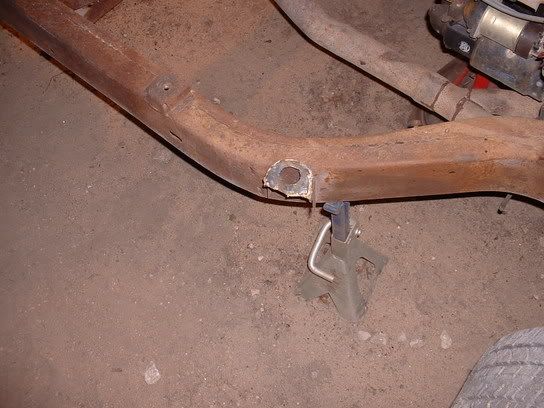
This is the right front frame piller post after repair.
As I found out you may also find many other projects to do once you have the body off.
Good luck.
DR. Jay
Here are some pics.
I used 4 ratchet straps too hoist the body up, with 4x4s for support accross under the body once I had lifted it up high enough to allow me to get them between the body & frame. You will have to be sure to support the nose so it doesn't sag, causing it to crack off from the firewall
This is the right front frame piller post after repair.
As I found out you may also find many other projects to do once you have the body off.
Good luck.
DR. Jay
Corvette Stories
The Best of Corvette for Corvette Enthusiasts

Top 10 Most Expensive Corvettes Ever Sold on Bring A Trailer
Brett Foote
10 Things Every Corvette Owner Needs (2026 Edition)
Michael S. Palmer
8 Most "Only Corvette Owners Understand" Quirks and Problems
Pouria Savadkouei
10 Reasons the C6 Z06 is Still A Performance Benchmark After 20 Years
Joe Kucinski
How Much Horsepower Every Corvette Engine "LOST" in 1972
Joe Kucinski
Top 10 DOs and DON'Ts for Protecting Your Convertible Top!
Michael S. Palmer
Top 10 Most Explosive Corvettes Ever Made: Power-to-Weight Ratio Ranked!
Joe Kucinski
150 hp to 1,250 hp: Every Corvette Generation Compared by the Specs That Matter
Joe Kucinski
8 Coolest Corvette Pace Cars (and Replicas) of All Time
Verdad GallardoMelting Slicks
Joined: Dec 2000
Posts: 3,363
Likes: 303
From: Lansdale 19446 PA
2024 C3 of the Year Finalist- Unmodified
St. Jude Donor '10-'11, '15, '19
Originally Posted by Razorhorn
I'd love to see this article!

The body mount repair article is in the December 2001 Vette mag, Volume 25, No 12. It is mostly a pictorial with instructions in the captions.

CF Veteran

Joined: Aug 2005
Posts: 1,429
Likes: 19
From: Northern CA
St. Jude Donor '10-'12, '25
I'm in the process of removing the body off my 76' and will actually do the lift this weekend. Removing the body mounts was easy, although the cage on the #4 mount on the drivers side rusted out one of the rivets. So I had to cut the other rivet out, remove the cage and used an open end wrench to hold the nut.
If your #4 body mount reinforcement needs to be replaced/fixed you will need to lift the body. As mentioned before, you don't need to remove the entire body, but since you have gone that far you might as well.
Check out this link:
http://hometown.aol.com/bmclau5079/page5.html

If your #4 body mount reinforcement needs to be replaced/fixed you will need to lift the body. As mentioned before, you don't need to remove the entire body, but since you have gone that far you might as well.
Check out this link:
http://hometown.aol.com/bmclau5079/page5.html
Le Mans Master

Joined: Oct 2001
Posts: 5,943
Likes: 3
From: Wildwood IL
This might help you some. It's a switch from early solid to later rubber/poly mounts but the procedure is the same...
The rubber body mounts found on 73-82 Corvettes vastly improved noise and ride over the solid aluminum mounts used on the 68-72 models. It is possible to retrofit the later rubber mounts on 68-72 and reap the benefits of a better ride, less road noise and less risk of fiberglass stress cracks. I recommend buying a body mount kit as it also comes with all new bolts, washers, nuts and shims. These kits can be had for about $150. 1. start by placing the rear of the car on jackstands (rear wheels off the ground) and remove the spare tire carrier. 2. You now have easy access to the rear bumper brackets. There 2 in the center that go to the license plate area of the body, 2 that go to the innermost bumper mounts, and 2 that go to the outer bumper mounts. The rear section of the body is very strong and contrary to the front it does not have to be supported during the lift. 3. Disconnect the antenna grounding strap. 4. Disconnect battery cable where it mounts to the frame. 5. Loosen parking brake adjustment as much as it will go. The adjustment is in the transmission tunnel, before the cable splits off to the wheels. You do not have to completely disconnect the cable. 6. Now for the front. Start by removing the front grills. 7. Remove the one bolt holding the corner bumper bracket to the frame extension. The frame extension is the large piece of flat steel that goes from the front of the frame horns to the bumpers. There's one on each side. 8. Remove 2 bolts on each side holding the frame extension to the frame. Remove frame extensions. 9. IMPORTANT! The next step will disconnect the whole front of the body from the frame. YOU HAVE TO SUPPORT THE FRONT OF THE BODY AT THIS POINT. The weight of the front is enough to collapse the body if you don't!!! 10. Place a floor jack under the center of the front body transverse beam. This is the steel piece just infront of the radiator. 11. Remove 4 bolts (2 each side) holding the body support to the frame. 2 of these bolts were hidden by the frame extension bracket removed in step 8. The other 2 are just rearward from the bolts removed in step 8. 12. Now it is time for the bodymounts. There are a total of 8 mounts. They are referred to as #1-#4 (left and right). #1 is behind the side gills, infront of the firewall. 70-72 owners have it made as the gills remove for easy access. 13. #2 is behind the kickpanels. Remove the sillplates and then the kickpanels. The bolt is now accessible. 14. #3 is behind the door. Remove the rear wheels and then the access plate on the front of the rear wheel well. The bolt is now accessible. 15. #4 is behind the rear wheel and visible after the wheels have been removed. 16. Remove 2 bolts to loosen the master cylinder. Tie the mastercylinder to the alternator so that it clears. You do not have to disconnect the brakelines. 17. Remove the bolts holding the steering column rag-joint together. Don't forget the safety studs. 18. Remove the rocker panels. 19. The body is now separated from the frame 9atleast as much as we need to lift it the required 4"). 20. Place 2 more floor jacks, one on each side, approximately 2/3 back under the doors. Carefully test the rigidness of the birdcage rail by lifting slowly. On mine I had problems with the rail bending, so I had to move the jack back and forth until I found a rigid enough section. 21. SLOWLY lift on all three jacks. As you lift, look in the engine compartment, under the car, etc to make sure everything is moving freely. 22. You will have to lift until you can just see the top of the frame under the doors. 23. Now you can remove all the old mounts. Note any shims that are found. Be aware that shims can stick to the body. They have to be removed as the new mount won't fit with a shim in the way. 24. Mount the new rubber mounts according to instructions. They do not all go in the same way. If shims were used on the old mounts, you can tape the shims to the new rubber mount. Use masking tape. This, by the way, is how the factory did it for ease of installation. 25. All mounts should slide through the holes in the body. If they don't, you may have misaligned panels. On mine, all fit except #3. I had to dremel the holes until the mounts installed properly. 26. Lower body down. 27. Re-attach the front end first, using the highest possible attachment. This is done by lowering the front until the bolt holes line up, install bolts (but do not tighten), lift front as high as it will go and then tighten bolts. 28. re-install all items removed in the earlier step, except the steering column rag-joint. 29. The column will not line up as the body now sits ~3/8" higher than with the solid mounts. Loosen the column where it attaches to the firewall, and also the upper bolts. 30. Push the column down in the engine compartment until it lines up. tighten mounts and re-install rag-joint bolts. 31. Enjoy the new ride!!!
Good Luck
Eddie
It's a switch from early solid to later rubber/poly mounts but the procedure is the same...The rubber body mounts found on 73-82 Corvettes vastly improved noise and ride over the solid aluminum mounts used on the 68-72 models. It is possible to retrofit the later rubber mounts on 68-72 and reap the benefits of a better ride, less road noise and less risk of fiberglass stress cracks. I recommend buying a body mount kit as it also comes with all new bolts, washers, nuts and shims. These kits can be had for about $150. 1. start by placing the rear of the car on jackstands (rear wheels off the ground) and remove the spare tire carrier. 2. You now have easy access to the rear bumper brackets. There 2 in the center that go to the license plate area of the body, 2 that go to the innermost bumper mounts, and 2 that go to the outer bumper mounts. The rear section of the body is very strong and contrary to the front it does not have to be supported during the lift. 3. Disconnect the antenna grounding strap. 4. Disconnect battery cable where it mounts to the frame. 5. Loosen parking brake adjustment as much as it will go. The adjustment is in the transmission tunnel, before the cable splits off to the wheels. You do not have to completely disconnect the cable. 6. Now for the front. Start by removing the front grills. 7. Remove the one bolt holding the corner bumper bracket to the frame extension. The frame extension is the large piece of flat steel that goes from the front of the frame horns to the bumpers. There's one on each side. 8. Remove 2 bolts on each side holding the frame extension to the frame. Remove frame extensions. 9. IMPORTANT! The next step will disconnect the whole front of the body from the frame. YOU HAVE TO SUPPORT THE FRONT OF THE BODY AT THIS POINT. The weight of the front is enough to collapse the body if you don't!!! 10. Place a floor jack under the center of the front body transverse beam. This is the steel piece just infront of the radiator. 11. Remove 4 bolts (2 each side) holding the body support to the frame. 2 of these bolts were hidden by the frame extension bracket removed in step 8. The other 2 are just rearward from the bolts removed in step 8. 12. Now it is time for the bodymounts. There are a total of 8 mounts. They are referred to as #1-#4 (left and right). #1 is behind the side gills, infront of the firewall. 70-72 owners have it made as the gills remove for easy access. 13. #2 is behind the kickpanels. Remove the sillplates and then the kickpanels. The bolt is now accessible. 14. #3 is behind the door. Remove the rear wheels and then the access plate on the front of the rear wheel well. The bolt is now accessible. 15. #4 is behind the rear wheel and visible after the wheels have been removed. 16. Remove 2 bolts to loosen the master cylinder. Tie the mastercylinder to the alternator so that it clears. You do not have to disconnect the brakelines. 17. Remove the bolts holding the steering column rag-joint together. Don't forget the safety studs. 18. Remove the rocker panels. 19. The body is now separated from the frame 9atleast as much as we need to lift it the required 4"). 20. Place 2 more floor jacks, one on each side, approximately 2/3 back under the doors. Carefully test the rigidness of the birdcage rail by lifting slowly. On mine I had problems with the rail bending, so I had to move the jack back and forth until I found a rigid enough section. 21. SLOWLY lift on all three jacks. As you lift, look in the engine compartment, under the car, etc to make sure everything is moving freely. 22. You will have to lift until you can just see the top of the frame under the doors. 23. Now you can remove all the old mounts. Note any shims that are found. Be aware that shims can stick to the body. They have to be removed as the new mount won't fit with a shim in the way. 24. Mount the new rubber mounts according to instructions. They do not all go in the same way. If shims were used on the old mounts, you can tape the shims to the new rubber mount. Use masking tape. This, by the way, is how the factory did it for ease of installation. 25. All mounts should slide through the holes in the body. If they don't, you may have misaligned panels. On mine, all fit except #3. I had to dremel the holes until the mounts installed properly. 26. Lower body down. 27. Re-attach the front end first, using the highest possible attachment. This is done by lowering the front until the bolt holes line up, install bolts (but do not tighten), lift front as high as it will go and then tighten bolts. 28. re-install all items removed in the earlier step, except the steering column rag-joint. 29. The column will not line up as the body now sits ~3/8" higher than with the solid mounts. Loosen the column where it attaches to the firewall, and also the upper bolts. 30. Push the column down in the engine compartment until it lines up. tighten mounts and re-install rag-joint bolts. 31. Enjoy the new ride!!!
Good Luck
Eddie

Drifting

Joined: Nov 2005
Posts: 1,795
Likes: 1
Originally Posted by vetteman1978
Boy! That took a while! I searched a couple hundred mags to fine it.
The body mount repair article is in the December 2001 Vette mag, Volume 25, No 12. It is mostly a pictorial with instructions in the captions.
The body mount repair article is in the December 2001 Vette mag, Volume 25, No 12. It is mostly a pictorial with instructions in the captions.
any ideas where to locate it?
Melting Slicks
Joined: Dec 2000
Posts: 3,363
Likes: 303
From: Lansdale 19446 PA
2024 C3 of the Year Finalist- Unmodified
St. Jude Donor '10-'11, '15, '19
My wife was able to make 10 copies of the article today. Some of the pages did get cut off but I think it can be read. PM your address & I will get it out. I thought about scanning it and making it a pdf but I do not want to destroy the mag.
Le Mans Master


Joined: Oct 2004
Posts: 5,269
Likes: 54
From: Orlando Florida
St. Jude Donor '05
Try this:
http://forums.corvetteforum.com/show...um_id=3&arch=1
and PM NHvette, maybe the PDF file with all the photos is still on his server.
http://forums.corvetteforum.com/show...um_id=3&arch=1
and PM NHvette, maybe the PDF file with all the photos is still on his server.