

Installing Battery Cutoff switch

Thread Starter
Melting Slicks

Joined: Jan 2006
Posts: 3,028
Likes: 2
From: North NJ
I bought this switch at Corvettes at Carsile last year really cheap. You can find it at any autoparts store.
http://www.batterymart.com/p-battery...ff-switch.html
I wanted the flaming river big switch with the lazer cut key but all the distributors have been very poor with their communication and knowledge of getting extra keys cut so I went and installed the big red key.http://www.flamingriver.com/index.cf...prod/prd66.htm
Hardest part was to decide where to put it.
I wanted it somewhat hidden so I could remove the red key and it serve as an antitheft device. BUT...I needed it handy enough I could reach it to turn it on and off without breaking my back to get into the rear compartments.
Right between the seats seemed like a perfect spot.
Follow along....not a difficult task but it takes some planning.
Before anything. I mocked up the center consul to see what space requirements I had.


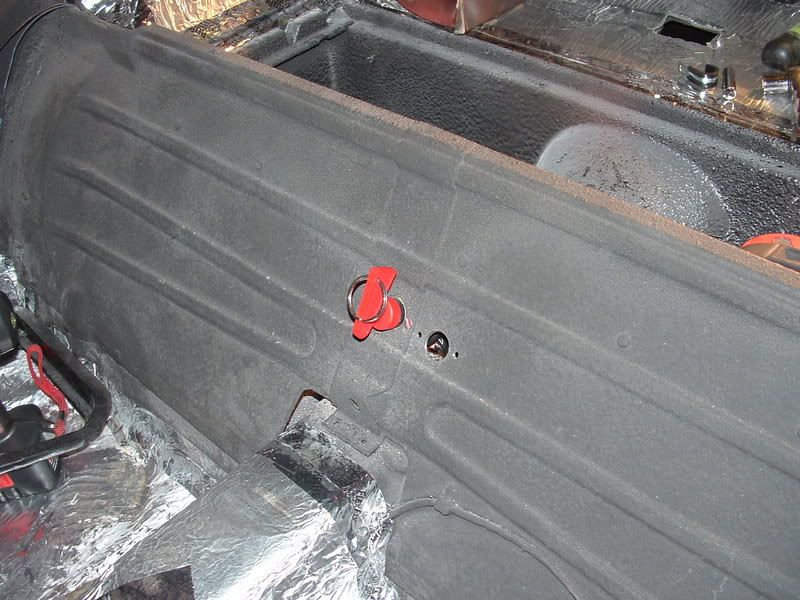
You will notice in my below pics that there is a second hole cut

I cut the first hole b/c this stupid fiberglass parallelogram was in the center and I didn't want to move it and there wasn't enough room in the compartments to put the switch. After cutting the hole with a step drill I noticed that the parallelogram was lose and not really serving a purpose so I seperated it with a putty knife and took it out.

With that fiberglass peice removed I could properly center the switch so when the seats are in the car the switch will look much better being directly in the center of the two seats.
I picked a spot that looked good from the front and gave me enough clearance around the perimeter of the switch in the back and drilled a starter hole. Then used a step drill to enlarge the hole stopping every few knotches to see what fit the switch. Had to buy a larger step drill to accomodate the switch as it is larger than 3/4". (Note: step drills are the most overpriced bit in my arsenal, $45 for the larger step drill bit from Sears)

After I drilled the hole and fitted the switch from the back I inserted the switch from the front towards the rear of the car.
I did this so I could drill the mounting holes so I knew they would line up perfectly. (See above pic)
I made sure the hole fit the switch very snuggly so I could cut a small diameter hollow pipe and make two standoffs so I could firmly install the switch so it barely stuck through the surface b/w the seats. With the carpet and without the red key it would be almost invisible.
Look closely and you will see the standoffs. Measured my depth with a ruler then cut the pipe a little larger and used a file to make it smooth. Also put washers b/w the pipe and switch.

The bolts and nuts used are 10-24 and were 3 inches long with nylock nuts but I cut the bolts down to size, probably aprox 2.5" in length.
I resessed the holes in the front to make way for the cone shaped head so it would leave a nice smooth surface.
I'm sure many of you are like, "What the heck did Bubba do to those wires!!!", well its not bubba...its Brett. Don't think we're related.

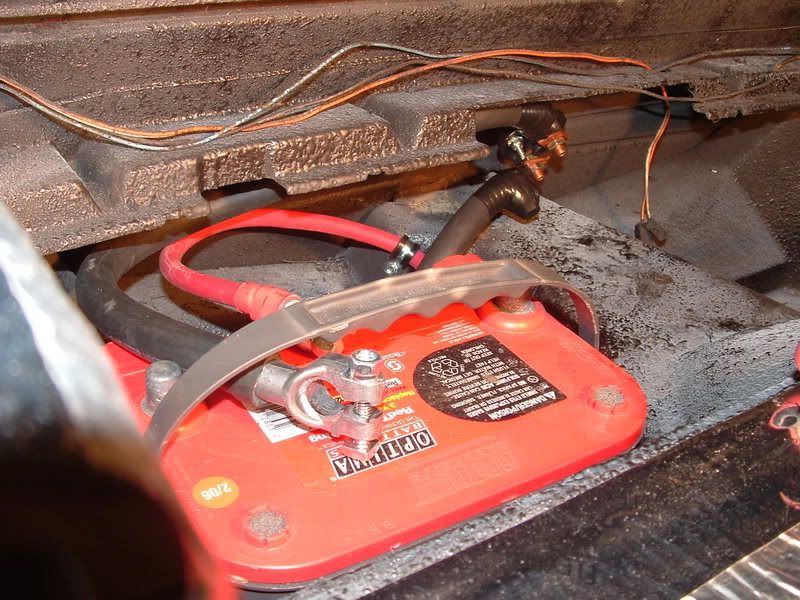
I got the power/ground cables from Summit in a kit form. But I prematurely cut the ground cable before i decided to install the switch so I went to a local autoparts store and bought a 3ft premade stranded ground cable. Actually looked stronger and better than the summit cable. I first installed the ground to the frame. Make sure you scrape away any paint or dirt so the cable has a clean contact with the frame.

Insert the ground cable from inside the box as the small end that mounts to the frame is small enough to fit thru any grommet hole. The terminal side won't fit. duhh
Then install the bolt and star washer to the frame and figure out how much slack you want to leave. Reinstall any grommets. Then figure out how you want to run the ground to the switch.
NOTE: My car is not a show car nor is it even remotely close to NCRS original. I am building a performance fun car I can enjoy and depend on. I could have left the ground cable alone but i wanted to prevent any shorting from the positive and ground rubbing against eachother from engine/driving vibration. So I found an old spare hot water hose from the heater core and put it around the ground cable. This will insulate the cable from any rubbing on anything. May look a little bubba but it will work and I think I made it look clean.
My pops gave me some neat brass clamps that sandwiches the ends of the stranded batter cables with a bolt and gives you the mounting option in the below picture. These clamps worked out perfectly.
Had a pic of the clamp but can't find it right now.
After I put the clamps and positioned them for maximum clearance b/w eachother I used electric tape to seal and protect.

I must have repositioned and tweeked the ground and positive cables a million times to get maximum clearance b/w the three cables. Do all this tweeking before you tape or crimp anything up. In the end I used a fuel line rubber hose clamp to pull the positive wire away from the negative and switch. You can see the shiny thing behind the negative cable hose in the below pic.
In the end I am very pleased with the outcome. Still have to test it but I think I did a great job in keeping it simple, clean and effective.
I will build a sheet metal case around the switch to prevent any theif from trying to jump the two terminals on the switch.
I think it will also confuse the theif for a split second when he looks into the battery compartment and sees a red positive wire and hot water hose
Finished product prior to boxing in the switch and fiberglassing the stupid 1st hole.
As always, hope this helps you guys out.
I still need to figure out what gauge wire and fuse to run from the positive side to the radio and accessories.
Comments/ Ideas?
http://www.batterymart.com/p-battery...ff-switch.html
I wanted the flaming river big switch with the lazer cut key but all the distributors have been very poor with their communication and knowledge of getting extra keys cut so I went and installed the big red key.http://www.flamingriver.com/index.cf...prod/prd66.htm
Hardest part was to decide where to put it.
I wanted it somewhat hidden so I could remove the red key and it serve as an antitheft device. BUT...I needed it handy enough I could reach it to turn it on and off without breaking my back to get into the rear compartments.
Right between the seats seemed like a perfect spot.
Follow along....not a difficult task but it takes some planning.
Before anything. I mocked up the center consul to see what space requirements I had.
You will notice in my below pics that there is a second hole cut
I cut the first hole b/c this stupid fiberglass parallelogram was in the center and I didn't want to move it and there wasn't enough room in the compartments to put the switch. After cutting the hole with a step drill I noticed that the parallelogram was lose and not really serving a purpose so I seperated it with a putty knife and took it out.
With that fiberglass peice removed I could properly center the switch so when the seats are in the car the switch will look much better being directly in the center of the two seats.
I picked a spot that looked good from the front and gave me enough clearance around the perimeter of the switch in the back and drilled a starter hole. Then used a step drill to enlarge the hole stopping every few knotches to see what fit the switch. Had to buy a larger step drill to accomodate the switch as it is larger than 3/4". (Note: step drills are the most overpriced bit in my arsenal, $45 for the larger step drill bit from Sears)
After I drilled the hole and fitted the switch from the back I inserted the switch from the front towards the rear of the car.
I did this so I could drill the mounting holes so I knew they would line up perfectly. (See above pic)
I made sure the hole fit the switch very snuggly so I could cut a small diameter hollow pipe and make two standoffs so I could firmly install the switch so it barely stuck through the surface b/w the seats. With the carpet and without the red key it would be almost invisible.
Look closely and you will see the standoffs. Measured my depth with a ruler then cut the pipe a little larger and used a file to make it smooth. Also put washers b/w the pipe and switch.
The bolts and nuts used are 10-24 and were 3 inches long with nylock nuts but I cut the bolts down to size, probably aprox 2.5" in length.
I resessed the holes in the front to make way for the cone shaped head so it would leave a nice smooth surface.
I'm sure many of you are like, "What the heck did Bubba do to those wires!!!", well its not bubba...its Brett. Don't think we're related.
I got the power/ground cables from Summit in a kit form. But I prematurely cut the ground cable before i decided to install the switch so I went to a local autoparts store and bought a 3ft premade stranded ground cable. Actually looked stronger and better than the summit cable. I first installed the ground to the frame. Make sure you scrape away any paint or dirt so the cable has a clean contact with the frame.
Insert the ground cable from inside the box as the small end that mounts to the frame is small enough to fit thru any grommet hole. The terminal side won't fit. duhh
Then install the bolt and star washer to the frame and figure out how much slack you want to leave. Reinstall any grommets. Then figure out how you want to run the ground to the switch.
NOTE: My car is not a show car nor is it even remotely close to NCRS original. I am building a performance fun car I can enjoy and depend on. I could have left the ground cable alone but i wanted to prevent any shorting from the positive and ground rubbing against eachother from engine/driving vibration. So I found an old spare hot water hose from the heater core and put it around the ground cable. This will insulate the cable from any rubbing on anything. May look a little bubba but it will work and I think I made it look clean.
My pops gave me some neat brass clamps that sandwiches the ends of the stranded batter cables with a bolt and gives you the mounting option in the below picture. These clamps worked out perfectly.
Had a pic of the clamp but can't find it right now.
After I put the clamps and positioned them for maximum clearance b/w eachother I used electric tape to seal and protect.
I must have repositioned and tweeked the ground and positive cables a million times to get maximum clearance b/w the three cables. Do all this tweeking before you tape or crimp anything up. In the end I used a fuel line rubber hose clamp to pull the positive wire away from the negative and switch. You can see the shiny thing behind the negative cable hose in the below pic.
In the end I am very pleased with the outcome. Still have to test it but I think I did a great job in keeping it simple, clean and effective.
I will build a sheet metal case around the switch to prevent any theif from trying to jump the two terminals on the switch.
I think it will also confuse the theif for a split second when he looks into the battery compartment and sees a red positive wire and hot water hose
Finished product prior to boxing in the switch and fiberglassing the stupid 1st hole.
As always, hope this helps you guys out.
I still need to figure out what gauge wire and fuse to run from the positive side to the radio and accessories.
Comments/ Ideas?


