


"Custom" Electric fan brackets lets see them!
Thread Starter
Melting Slicks


Joined: Jun 2005
Posts: 2,938
Likes: 2
From: Arkansas
I have dual spal fans and right now I'm using those zip style ties to as an attachment to the radiator. I realize this is a big 
I was wanting to see pictures of some of the creativity you guys sued to make your "custom" electric fan brackets.
I need some ideas and inspiration on what direction to take with mine. I seen that "Be cool" makes a custom bracket set....but I'm not sure if that'll work in my application and $80 is a lot to gamble with if they don't.
Thanks again
Race Director


Joined: Sep 2002
Posts: 10,362
Likes: 5
From: San Diego - Deep Within The State of CONFUSION!
I have dual spal fans and right now I'm using those zip style ties to as an attachment to the radiator. I realize this is a big
I was wanting to see pictures of some of the creativity you guys sued to make your "custom" electric fan brackets.
I need some ideas and inspiration on what direction to take with mine. I seen that "Be cool" makes a custom bracket set....but I'm not sure if that'll work in my application and $80 is a lot to gamble with if they don't.
Thanks again
For the bottom, I also used an OEM device. The smal brackets at the bottom of the radiator support that used to mount the lower area of the shroud. I cut a piece of 1.25" flat aluminum just an inch wider than the max width of these two brackets. They are very strong.
I then drilled it to fit holes in the Dual Spal shroud. So after the top of the Spal setup was bolted in and the setup was hanging, I get under the car and did two things simultaneously: Slipped the aluminum flat piece in behind the lower shroud brackets, and with the other hand I bolted it to the Spal shroud.
This setup is strong as it uses the OEM brackets. And it holds the Spal setup right up against the radiator. (I covered the face of the Spal shroud with foam insulation for radiator protection).
This is now on it's third summer since I put it together. Very clean, simple and effective. My car runs 185* with A/C off and 190-195* with the A/C on.
Melting Slicks
Joined: Nov 2001
Posts: 2,659
Likes: 7
From: Katy (Houston) TX
CI 7-8 Veteran
I don't have pics of mine but I found a guy that would do aluminum welding and had him weld 2 horizontal aluminum strips, one across the top and bottom of the back side of the radiator. He also welded in some studs to the strips to mount the fans to the existing mounting holes. Works like a charm.
Race Director
Joined: Sep 2002
Posts: 10,362
Likes: 5
From: San Diego - Deep Within The State of CONFUSION!
I dug deep into my pics and found some. There were a lot of shots of other crap that did NOT work but here's some finals:
From the TOP: You can see one of the OEM top brackets here:

Here's a better overview:


Wiring is on left fender liner but I am going to relocate it:

My total cost for this setup was the cost of the flat aluminum bars and a few hours' time.
From the TOP: You can see one of the OEM top brackets here:
Here's a better overview:
Wiring is on left fender liner but I am going to relocate it:
My total cost for this setup was the cost of the flat aluminum bars and a few hours' time.
Team Owner


Joined: Jul 1999
Posts: 65,492
Likes: 230
From: Orange Park Florida
IMO, the correct/best way to do this is....drill holes in the back side of the rad support U clips/channels...the brackets that hold the rad in place...1/4-20 seems fine, I used stainless hardware....
find some hardware store 1" angle aluminum....2--3' pieces will be fine....maybe need 2" for one of the,,,,I forget....I made mine out of scrap I had laying around....but the concept is valid...
notch the ends to fit the rad mounts...you will find with proper orientation, the Dual Spal fans will fit the new brackets....orient to the pass side a bit, so as avoid notching the fans a bit to clear the driver's uper arm like I had to ...on account of just plain tired out/lazy...takes your pick....
so the use of stiffer aluminum flashing, like used in roofing or gutter work....each side cut the pieces to go off the fan shroud to intersect with the edge of the rad core....the weight is carried by the top and bottom cross supports....the flashing is bolted to the fan shrouds and is slightly tensioned against the rad tanks.....
now take a piece of flashing and fold/bend it to fit into the bottom section/flange of the support, and rad area...bend it around to fit under the 4 fan bolts, let the curved tension of the aluminum flashing lay straight along the bottom of the rad support...
on top I happened to use a rubber door sweep/wind/water with aluminum support channel....cut to fit, and screwed into top support...lays nice and neat against top of radiator....
this way, the support is carried by the 4 bolts off the rad flanges...two up top, and two on bottom....the fane never touch the rad in any meaningful way...just the flashing....and top sweep/whatever you like
I did this thing with the entire support/rad outta the car, and knew I needed a way to do this with the fan entire independant of the radiator...I had one tear a rad to junk years ago in a fender bender costing less the 800 to fix....fans ties to radiators I don't like, in any form...I get nervous about that.....
now Tom Dewitt has tied HIS fans to HIS radiator directly...but he has done enough of this to know HIS concept works.....
I didn't....so I chose another way....I have Toms' Dual Spals, but not his radiator...since i'ts a small block, I just couldn't see 500 bux for something that a BB could use in Florida....
Thread Starter
Melting Slicks
Joined: Jun 2005
Posts: 2,938
Likes: 2
From: Arkansas
Thanks for the info everyone I was looking at these brackets by "Be cool", they look like they would slide over the lip on my aluminum radiator but I was concerned how long they were and if they would fit my radiator/ fan size.
They aren't cheap

Has anyone used a pair of these that could give me some demensions? I emailed "be cool" but you never how long they will take ot get back with you, if they ever do.
Melting Slicks


Joined: Nov 2003
Posts: 2,668
Likes: 119
From: St. Charles Mo
CI 5 & 8 Veteran
I purchased the BeCool / dual Spal fan kit a few years back, before I became familiar with Dewitt. The radiator has worked fine for me on Project RamJet, but when I first assembled the fan kit the brackets they provided were a POS. They could easily slide side to side with little resistance. I opted to tack weld the brackets to the upper and lower radiator frame structure which solved that problem. I don't know which is worse, thru the core tie wraps or a fan assemble sliding all over the place. Anyway here is a pic of what I did. I want to put a more decorative cover over the top of the core support / radiator to hide the brackets......when I can get a " Round To-it" 

Bullshark
Bullshark
Thread Starter
Melting Slicks
Joined: Jun 2005
Posts: 2,938
Likes: 2
From: Arkansas
Thats looks pretty nice to me , are you using "be cools" dual fan bar along with those brackets or did you make something to mount to out of aluminum stock. Jegs wants around $59 for the dual fan bracket pictured below, and it seems like I can make something similar out of 1" flat stock from lowes for around $12 or less. Is there any special to those brackets?

, are you using "be cools" dual fan bar along with those brackets or did you make something to mount to out of aluminum stock. Jegs wants around $59 for the dual fan bracket pictured below, and it seems like I can make something similar out of 1" flat stock from lowes for around $12 or less. Is there any special to those brackets?
Corvette Stories
The Best of Corvette for Corvette Enthusiasts

150 hp to 1,250 hp: Every Corvette Generation Compared by the Specs That Matter
Joe Kucinski
8 Coolest Corvette Pace Cars (and Replicas) of All Time
Verdad Gallardo
Top 10 Corvette Engines RANKED by Peak Torque (70+ Years of Muscle!)
Joe Kucinski
Corvette ZR1X Will Be Pacing the Indy 500, And Could Probably Race, Too!
Verdad Gallardo
Top 10 Corvettes Coming to Mecum Indy 2026!
Brett Foote
Top 10 C9 Corvette MUST-HAVES to Fix These C8 Generation Flaws!
Michael S. Palmer
10 Revolutionary 'Corvette Firsts' Most People Don't Know
Joe Kucinski
5 Reasons to Upgrade to an LS6-Powered Corvette; 5 Reasons to Stay LT2
Michael S. Palmer
2027 Corvette vs The World: Every C8 vs Its Closest Competitor
Joe KucinskiTeam Owner
Joined: Jul 1999
Posts: 65,492
Likes: 230
From: Orange Park Florida
IMO, the correct way to support ANY fan structure is with the rad support, NOT the rad....unless you in Tom's situation, knowing the rad WILL take the stresses.....allmost guaranfreekingTEED you will have a busted radiator....
support the fans off the steel support/brackets....NOT the rad...
support the fans off the steel support/brackets....NOT the rad...
Melting Slicks
Joined: Nov 2003
Posts: 2,668
Likes: 119
From: St. Charles Mo
CI 5 & 8 Veteran
IMO, the correct way to support ANY fan structure is with the rad support, NOT the rad....unless you in Tom's situation, knowing the rad WILL take the stresses.....allmost guaranfreekingTEED you will have a busted radiator....
support the fans off the steel support/brackets....NOT the rad...
support the fans off the steel support/brackets....NOT the rad...
Fabricating brackets that attach the fan assembly to the core support obviously provides less stress on the radiator, but tack welding the four brackets to the upper and lower radiator frame structure, which IMHO is more than adequate to hold the fan assembly was a whole lot easier and is structurally sound. It was the unsupported sliding that I thought was a piece of chit. I see little difference between my setup now, and Dewitt's structurally. Using tie straps through the core is unacceptable from my perspective. I'll take that bet

Bullshark

Former Vendor
Joined: Jan 2000
Posts: 5,593
Likes: 631
From: Brighton
The brackets we use for the dual spals were designed to fit the factory GM hat channels and our Direct Fit aluminum rads. If you still have the GM core and not an aftermarket replacement, these brackets will work perfect. We sell them separately (SP002) for $40/set with hardware.

Melting Slicks
Joined: Jan 2003
Posts: 2,877
Likes: 13
From: Doha
St. Jude Donor '08
I have the direct fit aluminum radiator and dual spals combo from Dewitt's.
Day and night difference!. With the stock c/b radiator and mechanical 7 blade fan with clutch I couldnt drive my BB '71 if its more than 100F, bow I can drive it around town with more than 100F and A/C on with engine temp on or below 210F.
Thats in the harsh enviroment of Qatar!
Day and night difference!. With the stock c/b radiator and mechanical 7 blade fan with clutch I couldnt drive my BB '71 if its more than 100F, bow I can drive it around town with more than 100F and A/C on with engine temp on or below 210F.
Thats in the harsh enviroment of Qatar!
Last edited by HamadUP; Aug 8, 2007 at 01:46 AM.
Thread Starter
Melting Slicks
Joined: Jun 2005
Posts: 2,938
Likes: 2
From: Arkansas
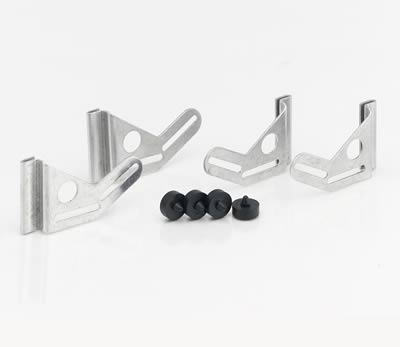
Well I bit the bullet and ordered a set of “Be Cools” 72104 universal fan brackets from Jegs. They arrive yesterday………they were missing the rubber bumpers that both the Jegs website AND the instructions said they came with.
This is the picture Summit is currently using....see the bumpers? They help protect the radiator....
My first thought was they forgot to put them in the box, so I called Jegs and explained my problem.
She called “Kirk” at Be Cool to see about sending me a set, he told her they discontinued the rubber bumpers and they don’t come with the brackets anymore. They come with the fans, he gave her another part number which Jegs showed they didn’t have in stock.
At this point she couldn’t give me any resolution but told me I could call Kirk and talk to him.
I called Kirk at Be Cool, and explained my problem….I told him that there were supposed to be rubber bumpers with these brackets and that both the Jegs website AND the instructions said so too. He said they discontinued the rubber bumper after the first of the year and Jegs hasn’t obviously updated their site yet.
He said they started using “Pads” in place of the bumpers but weren’t included with the brackets. He gave me a part number and said that I would need to buy them.
The whole time this guy was a total ***** to me, I felt with the money these brackets cost and the fact that I was mislead……he could have been a standup guy and said “no problem, we’ll get what you need out today!” He gave me no resolution to their error in their instructions, like my business didn’t matter. I ended up hanging up on him…….
Sooo……I called Jegs back one last time and explained the error and I wanted what I paid for, she called Kirk back……few minutes later she told me they were drop shipping a set of pads out to me today…..most likely at Jegs expense.
I realize four rubber bumpers don’t amount to much and I probably could have went to Lowes and got what I needed to “rig something up”……but for the price I paid for four pieces of bent aluminum and the fact that both the website and be-cool’s instructions ALSO said the bumpers came with the brackets……I just wanted what I paid for.
The point being, because of Kirk and the reflection he has given me about how the Be-Cool company handles things……..he has definitely lost my business. I mean if he gave me a hassle of a set of brackets……what kind of problems will I have with a $500 radiator?
Last edited by 1982CorvetteDude; Aug 10, 2007 at 12:48 PM.
Thread Starter
Melting Slicks
Joined: Jun 2005
Posts: 2,938
Likes: 2
From: Arkansas
I got the rubber bumpers in a few days ago 
I started working on my custom mounting bracket bar this morning. What I ended up was this:
I went to lowes and purchased:
1. (6) 1/4 - 20 x 1-1/4" nuts and bolts
2. a 1/4" tap
3. 1/4" thick aluminum bar 1" x 4' long.
I cut the aluminum bar into (2) 2 foot pieces and measured out the hole demensions according to the spal print. This gave me my upper and lower mounts.
I drilled and tapped the holes to give the 1/4-20 bolts something to "bite" to.......it made it easier lining everything up with the radiator still in the car. Plus it made the attachment more solid since the bolts are tapped in.
Then I attached a 1" wide strip of closed cell foam to the back of the bar so it wouldn't damage my radiator when mounted.
I think it turned out pretty good


The only other thing I need to do is remove those stock clothes hanger support rod thingy's they are distorting my radiator lip.....and could cause failure later on.
But if I had the stock style radiator instead of an aftermarket with a "lip" I would have have went with a pair of Dewitt's brackets
I started working on my custom mounting bracket bar this morning. What I ended up was this:
I went to lowes and purchased:
1. (6) 1/4 - 20 x 1-1/4" nuts and bolts
2. a 1/4" tap
3. 1/4" thick aluminum bar 1" x 4' long.
I cut the aluminum bar into (2) 2 foot pieces and measured out the hole demensions according to the spal print. This gave me my upper and lower mounts.
I drilled and tapped the holes to give the 1/4-20 bolts something to "bite" to.......it made it easier lining everything up with the radiator still in the car. Plus it made the attachment more solid since the bolts are tapped in.
Then I attached a 1" wide strip of closed cell foam to the back of the bar so it wouldn't damage my radiator when mounted.
I think it turned out pretty good
The only other thing I need to do is remove those stock clothes hanger support rod thingy's they are distorting my radiator lip.....and could cause failure later on.
But if I had the stock style radiator instead of an aftermarket with a "lip" I would have have went with a pair of Dewitt's brackets
Last edited by 1982CorvetteDude; Aug 18, 2007 at 11:21 AM.