


Electrical Gremlin

Thread Starter
Advanced

Joined: Sep 2005
Posts: 93
Likes: 0
From: Everett WA
I'm in the final stages of my restoration. Everything is done accept some trim and two electrical gremlins. I need some help I'm out of my league.
The right turn signal blinks very fast, and very short. It doesn't even fully come on. When I turn the headlights on, the right turn signal indication comes on and stays on and the turn signal stops working. The left turn signal works fine. It seem to me like a floating ground, but I cann't find any. Anyone have an idea where to look for a ground that only affects one turn signal.
My other problem, possibly, but not likely related, it I have a drain on the battery. Its fairly large, it kills the battery every night. I took off the battery cable and can it though my ammeter and its not showing any current. Its a magic drain that is not measurablr .
Thanks for all your help
Intermediate

Joined: Aug 2007
Posts: 38
Likes: 0
From: dallas ga
GT Your problems may be related.Put a voltmeter in series with the battery, you should pull either battery terminal off and hook up one lead to the battery post and the other to the terminal end,you could have as high as a 12 drain going on.first dissconect the alternator to see if it goes away.I have seen alternators even fresh rebuilds have a bad diode and while the alternator may charge ,it could drain the battery with a bad diode trio,rectifier bridge, or regulator.After that start unplugging one item at a time until the voltage goes away with everything off key out of the ignition.Your battery is being drained and the voltmeter will tell you if that battery is seing a path to ground somewhere, could be another component or wire causing a problem.If the Alternator checks out ok (isn't draining the battery) the next place I would go is the steering column wiring turn signal switch, flasher unit.The flasher on my 74 is on the backside of the right hand dash panel. hope these ideas were helpful
Instructor
Joined: Mar 2007
Posts: 223
Likes: 0
From: Henryville Indiana
I had a similar problem on a 56 .The turn signal would not go off in the 1 side and the other side worked ok.
Had a PAINLESS wiring harness in the car.The 2 wires on the turn signal socket were reversed when the harness was assembled.Caused the bulb to stay on and the bulb to be twice as bright as the other side.
Had a PAINLESS wiring harness in the car.The 2 wires on the turn signal socket were reversed when the harness was assembled.Caused the bulb to stay on and the bulb to be twice as bright as the other side.
Race Director

Joined: May 2006
Posts: 16,528
Likes: 53
From: Dayton, Ohio
GT I dont think your problems are related.On the right signal I would have to agree with you on the ground issue but before you do anything rplace the bulb with a know good one.Usually with lack of ground the light dont flash at all so look at the bulb filements and make sure inside the bulb the 2 filements are not touching each other.One very weak link I have found in the front signals on your 78 is the connector between thw signal and the chassis harness.Its a real pain to clean the contacts inside.I have been eliminating it.If you want to be sure a ground is the problem-create a new ground.Pierce (with a needle)the black ground wire going to the right signal on the signal side of the connector-run a wire from the needle to the alternator case ground.If this works its in the connector.The test below looks complicated but it is a test for both courtesy light systems.Once you get started it wont take any longer than 15 min. to find the circuit that is doing the draining.
Battery Drain Test-easy to do with pics
There seems to have been alot of battery drain issues lately.Thought I would write down this fairly easy way to check for battery drain and share it.All you need is an inexpensive 12 volt test light and a short piece of wire. A test light like this one will be very useful for other 12 volt electrical issues.When you go to this link put in your Zip code.http://www.partsamerica.com/ProductD...egoryCode=3391
Use a bulb type of test light for this test procedure not an LED type.
If you have a C3 and “DO NOT” have delayed courtesy lights and your courtesy lights work this is “my” way to check for battery drain Put both windows down and make sure everything is turned off. Disconnect the negative battery cable and put your 12-volt test light between the (-) battery terminal and the (-) battery cable. Here is a picture to help.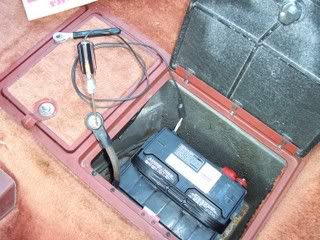 With the driver’s door open the test light should be lit. Make sure everything is turned off and close the driver’s door. Wait several minutes (clock step). If the test light stays out completely (no low glow) you have no battery drain.
If the test light is on or even a low glow you have a drain on your battery. (bright bulb is heavy drain ,dim bulb is low drain) First thing I do is push on the doors and watch test light then lean in through the window and push on things with lights like the glove box door, visor light, map lights and the rear center compartment and watch to see if test light flickers or goes out if so you have found your drain. Second thing I do is open the drivers door and remove the courtesy light fuse, if the test light goes out then the drain is in the courtesy light circuit. If the light remains lit continue to remove fuses until the light goes out and that will be the circuit with the drain. If the test light doesn’t go out then the drain is in a circuit not protected by the fuse box.
“Clock step” Info-clocks can be a pain.
Above when you closed the door if the test light went out but came back on shortly afterwards it’s the clock trying to wind and its drawing too much. Disconnect the power to the clock and retest.
If you determine your draw is in the courtesy light circuit disconnect the power to the clock and retest. If this doesn’t eliminate the draw you can now move on to other items on the courtesy light circuit.
OVERNIGHT CLOCK TEST-I use this alot on mechanical clocks on cars that have intermittent power drains.Leave test light hooked up as above and let clock continue to run through the test light all night.If you come out in the morning and the light is off then the clock is in good shape.If the light is on the clock will have stopped and you should have the clock checked or replace it.
If you have a C3 and “HAVE” delayed courtesy lights and they work and turn off after 30 seconds this is “my” way to check for battery drain. Put both windows down and make sure everything is turned off. Disconnect the negative battery cable and put your 12-volt test light between the (-) battery terminal and the (-) battery cable. Here is a picture to help. With the driver’s door open the test light should be lit Make sure everything is turned off and close the driver’s door. The test light should still be lit because the delay relay is engaged. Now (and lets call this the “jumper” step) lean in through the driver’s window with a small piece of wire to use as a jumper (white wire in the pic.) connect the jumper from the (-) battery terminal to the (-) battery cable. Your courtesy lights will come on and the test light will go out --wait for your courtesy lights to go off --remove the jumper lead. Wait several minutes (clock step). If the test light stays out you have no battery drain. If the test light comes back on you have a drain on your battery. Just to be sure do the “jumper” step again to make sure the delay relay was off. If the test light came on again open the driver’s door and remove the courtesy light fuse, if the test light goes out then the drain is in the courtesy light circuit. If the light remains on continue to remove fuses until the light goes out and that will be the circuit with the drain. If the test light doesn’t go out then the drain is in a circuit not protected by the fuse box.
“Clock step” Info-clocks can be a pain. Above after you removed the jumper the test light went out but came back on shortly afterwards it’s probably the clock trying to wind and it’s drawing too much (plus it reset the delay relay). Disconnect the power to the clock and retest as above.
Interior light delay relay –The “jumper” step turns the relay off but the relay will reset and try to turn on the interior lights at the drop of a hat causing the test light to come back on. Any draw will reset it. If you find that removing the courtesy light fuse eliminates your battery draw then the “simplest” way to continue testing is to disconnect the delay relay. In the 5 wire connector you pull off the relay are 2 white wires- connect a jumper between them. This will make your car temporarily a “non-delayed interior light system”. Now you can test using the “DO NOT” have delayed courtesy lights procedure above. If you choose not to bypass the delay relay you will have to use the “jumper” step every time you trigger the relay.
Multimeter Testing—In my opinion you don’t need the multimeter to check for battery drain down to very acceptable levels. However if you want to use one in place of the test light you need a multimeter that will take a heavy amp draw or you will smoke your meter or blow the internal fuse and you must be on the amp.setting not volt setting.
Battery Drain Test-easy to do with pics
There seems to have been alot of battery drain issues lately.Thought I would write down this fairly easy way to check for battery drain and share it.All you need is an inexpensive 12 volt test light and a short piece of wire. A test light like this one will be very useful for other 12 volt electrical issues.When you go to this link put in your Zip code.http://www.partsamerica.com/ProductD...egoryCode=3391
Use a bulb type of test light for this test procedure not an LED type.
If you have a C3 and “DO NOT” have delayed courtesy lights and your courtesy lights work this is “my” way to check for battery drain Put both windows down and make sure everything is turned off. Disconnect the negative battery cable and put your 12-volt test light between the (-) battery terminal and the (-) battery cable. Here is a picture to help.
With the driver’s door open the test light should be lit. Make sure everything is turned off and close the driver’s door. Wait several minutes (clock step). If the test light stays out completely (no low glow) you have no battery drain.If the test light is on or even a low glow you have a drain on your battery. (bright bulb is heavy drain ,dim bulb is low drain) First thing I do is push on the doors and watch test light then lean in through the window and push on things with lights like the glove box door, visor light, map lights and the rear center compartment and watch to see if test light flickers or goes out if so you have found your drain. Second thing I do is open the drivers door and remove the courtesy light fuse, if the test light goes out then the drain is in the courtesy light circuit. If the light remains lit continue to remove fuses until the light goes out and that will be the circuit with the drain. If the test light doesn’t go out then the drain is in a circuit not protected by the fuse box.
“Clock step” Info-clocks can be a pain.
Above when you closed the door if the test light went out but came back on shortly afterwards it’s the clock trying to wind and its drawing too much. Disconnect the power to the clock and retest.
If you determine your draw is in the courtesy light circuit disconnect the power to the clock and retest. If this doesn’t eliminate the draw you can now move on to other items on the courtesy light circuit.
OVERNIGHT CLOCK TEST-I use this alot on mechanical clocks on cars that have intermittent power drains.Leave test light hooked up as above and let clock continue to run through the test light all night.If you come out in the morning and the light is off then the clock is in good shape.If the light is on the clock will have stopped and you should have the clock checked or replace it.
If you have a C3 and “HAVE” delayed courtesy lights and they work and turn off after 30 seconds this is “my” way to check for battery drain. Put both windows down and make sure everything is turned off. Disconnect the negative battery cable and put your 12-volt test light between the (-) battery terminal and the (-) battery cable. Here is a picture to help.
With the driver’s door open the test light should be lit Make sure everything is turned off and close the driver’s door. The test light should still be lit because the delay relay is engaged. Now (and lets call this the “jumper” step) lean in through the driver’s window with a small piece of wire to use as a jumper (white wire in the pic.) connect the jumper from the (-) battery terminal to the (-) battery cable. Your courtesy lights will come on and the test light will go out --wait for your courtesy lights to go off --remove the jumper lead. Wait several minutes (clock step). If the test light stays out you have no battery drain. If the test light comes back on you have a drain on your battery. Just to be sure do the “jumper” step again to make sure the delay relay was off. If the test light came on again open the driver’s door and remove the courtesy light fuse, if the test light goes out then the drain is in the courtesy light circuit. If the light remains on continue to remove fuses until the light goes out and that will be the circuit with the drain. If the test light doesn’t go out then the drain is in a circuit not protected by the fuse box.“Clock step” Info-clocks can be a pain. Above after you removed the jumper the test light went out but came back on shortly afterwards it’s probably the clock trying to wind and it’s drawing too much (plus it reset the delay relay). Disconnect the power to the clock and retest as above.
Interior light delay relay –The “jumper” step turns the relay off but the relay will reset and try to turn on the interior lights at the drop of a hat causing the test light to come back on. Any draw will reset it. If you find that removing the courtesy light fuse eliminates your battery draw then the “simplest” way to continue testing is to disconnect the delay relay. In the 5 wire connector you pull off the relay are 2 white wires- connect a jumper between them. This will make your car temporarily a “non-delayed interior light system”. Now you can test using the “DO NOT” have delayed courtesy lights procedure above. If you choose not to bypass the delay relay you will have to use the “jumper” step every time you trigger the relay.
Multimeter Testing—In my opinion you don’t need the multimeter to check for battery drain down to very acceptable levels. However if you want to use one in place of the test light you need a multimeter that will take a heavy amp draw or you will smoke your meter or blow the internal fuse and you must be on the amp.setting not volt setting.
Last edited by ...Roger...; Dec 1, 2007 at 07:22 AM.
Race Director
Joined: May 2006
Posts: 16,528
Likes: 53
From: Dayton, Ohio
You said when you turn on the lights the right dash indicator comes on.That usually means the parking light circuit is backfeeding through the turn signal circuit wire.
If its backfeeding through the ground of the bulb the signal just doesnt flash.
If its backfeeding through the pos. filiment of the bulb the signal flashes really fast because their is an extra filiment heating up the flasher and that makes it flash fast.This seems to be what you have happening.I would pull that right bulb out and see if the filiments are touching inside.
Melting Slicks


Joined: Mar 2005
Posts: 2,095
Likes: 299
From: Midlothian VA
I'm in the final stages of my restoration. Everything is done accept some trim and two electrical gremlins. I need some help I'm out of my league.
The right turn signal blinks very fast, and very short. It doesn't even fully come on. When I turn the headlights on, the right turn signal indication comes on and stays on and the turn signal stops working. The left turn signal works fine. It seem to me like a floating ground, but I cann't find any. Anyone have an idea where to look for a ground that only affects one turn signal.
My other problem, possibly, but not likely related, it I have a drain on the battery. Its fairly large, it kills the battery every night. I took off the battery cable and can it though my ammeter and its not showing any current. Its a magic drain that is not measurablr .
Thanks for all your help
The right turn signal blinks very fast, and very short. It doesn't even fully come on. When I turn the headlights on, the right turn signal indication comes on and stays on and the turn signal stops working. The left turn signal works fine. It seem to me like a floating ground, but I cann't find any. Anyone have an idea where to look for a ground that only affects one turn signal.
My other problem, possibly, but not likely related, it I have a drain on the battery. Its fairly large, it kills the battery every night. I took off the battery cable and can it though my ammeter and its not showing any current. Its a magic drain that is not measurablr .
Thanks for all your help
Use of standard duty bulbs (in place of HD bulbs) can cause slow flashing. Slow flashing can also be caused by corrosion.
Thread Starter
Advanced
Joined: Sep 2005
Posts: 93
Likes: 0
From: Everett WA
Thanks for all the help. It was two seperate issues. The bulb issue was caused by a bad bulb in the front end. The battery drain was caused by the curtesy lights timer and the anti theft system.
As far as I can tell pulling the relay on the antitheft system should have not effect on me.
Anyone have any experiance trouble shooting the courtesy light timer box. It looks like a fairly simple circuit. I'm just not sure how to test it.
Thanks again everyone.
As far as I can tell pulling the relay on the antitheft system should have not effect on me.
Anyone have any experiance trouble shooting the courtesy light timer box. It looks like a fairly simple circuit. I'm just not sure how to test it.
Thanks again everyone.
Corvette Stories
The Best of Corvette for Corvette Enthusiasts

Top 10 Most Expensive Corvettes Ever Sold on Bring A Trailer
Brett Foote
10 Things Every Corvette Owner Needs (2026 Edition)
Michael S. Palmer
8 Most "Only Corvette Owners Understand" Quirks and Problems
Pouria Savadkouei
10 Reasons the C6 Z06 is Still A Performance Benchmark After 20 Years
Joe Kucinski
How Much Horsepower Every Corvette Engine "LOST" in 1972
Joe Kucinski
Top 10 DOs and DON'Ts for Protecting Your Convertible Top!
Michael S. Palmer
Top 10 Most Explosive Corvettes Ever Made: Power-to-Weight Ratio Ranked!
Joe Kucinski
150 hp to 1,250 hp: Every Corvette Generation Compared by the Specs That Matter
Joe Kucinski