When you click on links to various merchants on this site and make a purchase, this can result in this site earning a commission. Affiliate programs and affiliations include, but are not limited to, the eBay Partner Network.
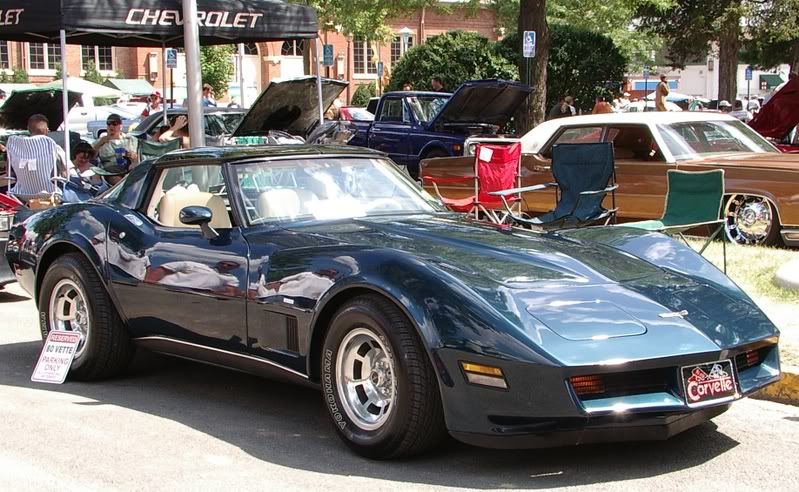
i am replacing my front bumper on my 73, with a glass bumper . i am thinking about glassing it in. i am going to paint the car ,does any one know the correct way to do this? i don't want to see stress cracks after a few years? or will they happen no mater what?
I Have Seen This Done On Several Cars, I Do Not Know What Material Was Used. The Owner Of One Of The Cars Said It Was Done Before He Purchased It. All Of Them Had Stress Cracks! I Considered Doing This To My 73 But After Thinking About All The Time And Work Involved In Getting It Right, No Way(Bumping Into Something Or Getting Bumped Into) It Has Taken Me Many Hours Getting My Bumper Reveal Lines Perfect Not Doing Any Glass Work At All. Consider Hole Shot, 2nd Gear Talking About Stress Whew!!!!!!!!!!!!!! LET ME KNOW IF YOU ARE SURE THIS IS THE WAY YOU WANT YOUR BUMPER DONE AND I WILL HELP YOU IF YOU WANT IT. PEACE
Last edited by vett us all; 06-07-2008 at 07:46 PM.
Currently doing the front bumper on the 73 I co-own with Tinkerbell in Texas and we have decided not to glass in and to allow the front clip and bumper to be as per the factory. We can not see how the two sections will not stress and crack in the joint over a few years and we have a desire to show and drive the car. That is just our opinion and you should do what you feel is right for you and your car.
Have a great day.
I would not do it. It will only come back to haunt you.
How so? Why do you say that? I disagree. I glassed in my bumpers years ago and they haven't come back to haunt me any more than other options. If I had to do it all over again, I would definitely glass them in again!!
Sorry. I responded to someone else's post but didn't answer your question. My Corvette is an '80, not a '73, but I think the process would be quite similar.
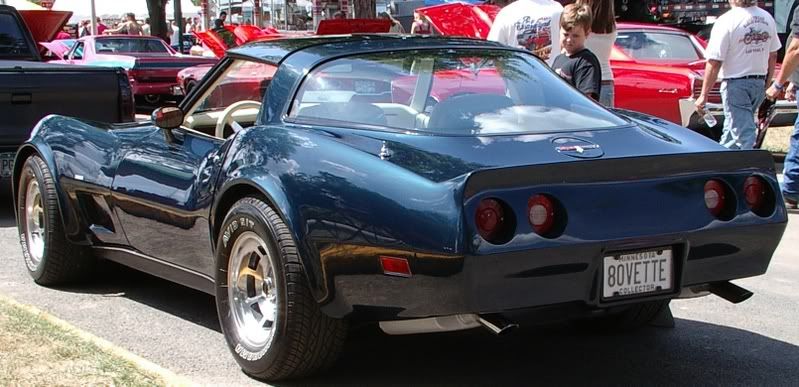
I was not originally planning to go seamless but I was having too much trouble getting the seams to even as I wanted them. I'm really glad I decided to hide the seams. I get more compliments on the bumpers than anything else on my car.
The front cover is fiberglass and the rear is Truflex. The only reason for the difference is that I able to buy the Truflex rear cover on eBay for a fraction of the cost of a fiberglass cover from any of the catalog places. In hindsight, the fiberglass is better if you're going seamless because flexing could cause cracks in the future.
I had absolutely no advice or guidance on how to mount the bumpers to go seamless, but I knew the seams would crack over time if they weren't rock solid.
Both the body and covers have a flange at the seam. The first thing I did was to "mount" the cover in close proximity using 1" C clamps, bar clamps, and rope clamps. (I bought a BUNCH of cheap 1"ers on sale at Northern or Harbor.) I worked my way from the center outward to get the cover to line up as close as possible and tightened the clamps as I went.
Once the cover edge was reasonable close to the body edge, I marked each hole in the cover through the hole in the body with cheap fingernail polish. (No pen or pencil was long enough to fit in the hole far enough to make a clear mark. The nail polish brush fit in there OK.) Then I removed the cover and drilled holes for #10 stainless steel machine screws.
I wanted to spread the compression force of the machine screws over the widest area possible, so I made my own rectangular 1" x 1/2" fender washers" out of 1/8" flat aluminum from the hardware store for each end of each bolt. (Drill the holes before you cut each washer off the strip of aluminum.) I used 1' #10 machine screws with nylon insert lock nuts. In hindsight, I wish I had something with a hex head to make it easier to hold the bolt/screw when I was tightening the lock nuts.
I knew I needed some filler material to work with when smooth the seam, so I used a 4" disk grinder with a fine grit sanding disk to make tapering strip about 1" wide and 1/16"-1/8" deep on the outside surface of the body and cover at the mating edges.
When it was time to mount the cover to the body, I put the machine screws, aluminum washers, and lock nuts through the flanges but only put the nuts on far enough to catch the screw. That left me a nice gap between the body and cover to push in some bonding filler. (I don't remember what brand it was, but I got it from a local paint & body supplies store.) Be sure you pick a material with a long working time.
Filling the gap and tightening the nuts is a two-person job. My wife helped me fill the gap with filler and then pushed or pulled the cover to match the body and cover as close as possible as I tightened the lock nuts from below. Have a putty knife ready to take off the excess that squeezes out to save sanding later.
Once that's done, the rest of the job is standard fill-and-sand, fill-and-sand, fill-and-sand, fill-and-sand, ... until you get the seams smooth and flat.
I just finished attaching an Ecklers fiberglass front bumper to my 75 convertible. I didn't have much choice because of so much previous damage to the front end, nothing fits. I used adhesive between the bumper and body, bolts as original, then ground a 2 inch wide depression along the seam. I then laid in fiberglass mat and resin and ground smooth. All of this was per suggestions from this forum. I'm fairly confident that stress cracks won't be a issue mostly because of the resin and mat. I also have an Ecklers rear fiberglass bumper which I will only bolt on as original because it fits.
Good Luck !
Larry
How so? Why do you say that? I disagree. I glassed in my bumpers years ago and they haven't come back to haunt me any more than other options. If I had to do it all over again, I would definitely glass them in again!!
Thread revival! I wonder how things are 10 years later?
How hard is it to acces the front and rear lights btw? Or did you remove the front and rear crash thingies ( on the rear the thing with the 2 damper-like things on, cant think of the name)
You don't have cracks cuz you bonded the bumper to the car instead of screwing it on and bondo-ing the gap. Nicely done, especially for figuring it out yourself!
i've sort of been on the lookout for a C3 again, when i stumbled on a '75 last fall that i went and test drove and thought it was awesome. sadly they guy wanted too much.
the one thing is just numbers alone, for each year you list:
74-37502
75-38465
76-46558
77-49213 (74-77 available cars=171,738)
78-46776
79-53807 (778-79 available cars=147,359)
Based on #s alone, you have a bigger span of the 74-77 vs. the 78-79, but in all honesty, i see a lot more cars for sale when i'm looking that are 78-79, vs the 74-77. And certainly i'll see more 75, 76, 77 than I will see 74s but that span from my looking seems a bit sparser. there just seems to be more 78-79s available for sale. i think as the above folks say, it really comes down to what you are looking for, 77 and before is the classic C3 look, the 78s and after are the updated bubble window....but as stated above, they are all basically 95% the same car from year to year......good luck!

 06-07-2008, 04:23 PM