


Steering column movement
Thread Starter
Melting Slicks


Joined: Mar 2005
Posts: 2,187
Likes: 7
From: Chetwynd B.C.
Not sure where to start looking. I have about 1/2 to 1 inch of movement in my steering wheel. The movement is IN AND OUT (versus side to side or play in the steering).
My Rag joint looks good. The steering column slides in and out to the rag joint (rag joint flexes) and NOT into the steering box.
The place with the most movement is in the area I have circle along with the flexing of the rag joint. It also look like there is a bushing(?) just on the left side of the circle where the shaft goes into and it looks like it is coming out on the top. Everything else seems very tight.

(I have a high res copy of this picture if this isn't enuf)
I drove the car most of the summer with this problem but am a little worried about it and figure now is the time to fix it.
Thanx for any and all help. I'm sure someone of the 200,000+ members will be able to help me here.
shmoky
My Rag joint looks good. The steering column slides in and out to the rag joint (rag joint flexes) and NOT into the steering box.
The place with the most movement is in the area I have circle along with the flexing of the rag joint. It also look like there is a bushing(?) just on the left side of the circle where the shaft goes into and it looks like it is coming out on the top. Everything else seems very tight.
(I have a high res copy of this picture if this isn't enuf)
I drove the car most of the summer with this problem but am a little worried about it and figure now is the time to fix it.
Thanx for any and all help. I'm sure someone of the 200,000+ members will be able to help me here.
shmoky

Le Mans Master


Joined: Jul 2000
Posts: 6,001
Likes: 113
From: Saginaw Michigan
I am afraid that you that you have some serious problems with your steering column. The steering shaft is supposed to be located by the upper bearing just under your steering wheel hub and also a lower bearing 5 just behind the fluted plastic part in your picture.
There should be two wire rings (13 and 5694191) one on either side of the upper column bearing. If you remove the column from the car and you remove the wire ring on the steering wheel side of the steering shaft, the whole steering shaft should be able to slide down through the steering column.
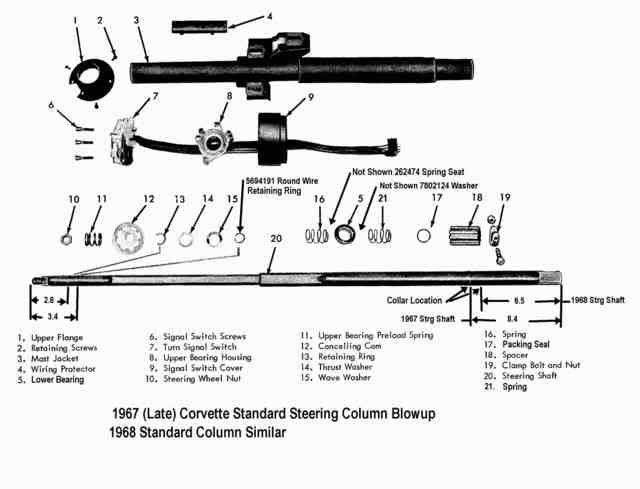
The upper bearing is not shown in the above drawing because it is supposed to be permanently part of the bearing housing 8. It should be a press fit in the die cast housing that is bolted into the column head just behind the turn signal switch 7. If the wire rings are in place that bearing must be moving in and out of the housing in order for the steering shaft to move the 1/2 to one inch that you describe.
Now there must be another problem this time with the lower column bearing 5 as well. That bearing should be a press fit into the lower column jacket. The steering shaft should slide through the lower bearing with its initial position dictated by the upper bearing and retaining rings. Then everything is snugged up by pressing the fluted part 18 up against the lower bearing and the clamp 19 with the nut and bolt positioned behind it for a positive location.
If the upper bearing is in good shape you may need to expoxy glue the outer case back into the upper bearing housing 8.
Jim
There should be two wire rings (13 and 5694191) one on either side of the upper column bearing. If you remove the column from the car and you remove the wire ring on the steering wheel side of the steering shaft, the whole steering shaft should be able to slide down through the steering column.
The upper bearing is not shown in the above drawing because it is supposed to be permanently part of the bearing housing 8. It should be a press fit in the die cast housing that is bolted into the column head just behind the turn signal switch 7. If the wire rings are in place that bearing must be moving in and out of the housing in order for the steering shaft to move the 1/2 to one inch that you describe.
Now there must be another problem this time with the lower column bearing 5 as well. That bearing should be a press fit into the lower column jacket. The steering shaft should slide through the lower bearing with its initial position dictated by the upper bearing and retaining rings. Then everything is snugged up by pressing the fluted part 18 up against the lower bearing and the clamp 19 with the nut and bolt positioned behind it for a positive location.
If the upper bearing is in good shape you may need to expoxy glue the outer case back into the upper bearing housing 8.
Jim
Last edited by Jim Shea; Dec 2, 2008 at 11:30 PM.
Thread Starter
Melting Slicks
Joined: Mar 2005
Posts: 2,187
Likes: 7
From: Chetwynd B.C.
Hi Tim,
what year is your car? (If you fill out your profile it would help). Also how hard was it to remove your column? I should be attempting this soon and was just wondering.
shmoky
what year is your car? (If you fill out your profile it would help). Also how hard was it to remove your column? I should be attempting this soon and was just wondering.
shmoky

Racer

Joined: Jul 2006
Posts: 315
Likes: 0
Hello Shmoky,
My car is a 68 with a lot of mods.
Column removal? Well, I found that it was not too bad a project because there was no heavy lifting; no oil, no grease, no braker bars, no need for an assistant, no special gm tools - just standard sockets and wrenches. I just finished a700-R4 rebuild on my 85 driver and I got to tell you there were about a million parts in there to keep track of and all kinds of special tools. This was a no brainer compared to that.
You need room to work and it would help if you were double jointed. There are only a couple of bolts underneath the dash and on the firewall and that's about it ... except for the rag joint and wiring harness. The service manual has an exploded drawing.
So, you probably should remove the seat so you can turn over and slide under there to get a good look at the wiring harness and firewall bolts.
I removed the guages to inspect and clean and verify the wiring was good. I had the rag joint and the complete steering and suspension off the front so the column just came out pretty easy. I actually took out the column to remove the pedal assembly so I could build a plate for the hydroboost to bolt to. I'm going to paint the floor and replace the firewall gasket so for me it was part of a resto/upgrade not a repair. I'm not sure what the chevy repair guide would say?
Thread Starter
Melting Slicks
Joined: Mar 2005
Posts: 2,187
Likes: 7
From: Chetwynd B.C.
Thanx for the help. I have more questions and hope Jim can help me out here.
I have pulled the column out of the car and got it all apart and found that the bearings need replacing (both top and bottom). Where do I order them? Is there such a thing as a kit for some of the extra parts that may need replacing? (springs, thrust washers, wave ring, parking seal etc.)
The item circled I think is the parking seal. How do I get it off. It looks like it is welded on. Do I just need a bigger hammer hehehe? The spring you see is stuck/wedged under it. There was another spring but not sure if it was a separate one or just part of this one. The spacer is just there and will slide off easily


The red arrow I�m not sure what it is. Looks like maybe a sleeve. It breaks apart if I try to remove it. Do you know what it is and how to remove it?
The blue arrow item is inside but will slide in and out but not all the way out as the �sleeve� holds it inside. What is it?
Are there some specific instructions for the 68 that is different from the other years? I will need some BIG help when I put it all back together.
Thanx for all the help in this puzzle.
shmoky
I have pulled the column out of the car and got it all apart and found that the bearings need replacing (both top and bottom). Where do I order them? Is there such a thing as a kit for some of the extra parts that may need replacing? (springs, thrust washers, wave ring, parking seal etc.)
The item circled I think is the parking seal. How do I get it off. It looks like it is welded on. Do I just need a bigger hammer hehehe? The spring you see is stuck/wedged under it. There was another spring but not sure if it was a separate one or just part of this one. The spacer is just there and will slide off easily
The red arrow I�m not sure what it is. Looks like maybe a sleeve. It breaks apart if I try to remove it. Do you know what it is and how to remove it?
The blue arrow item is inside but will slide in and out but not all the way out as the �sleeve� holds it inside. What is it?
Are there some specific instructions for the 68 that is different from the other years? I will need some BIG help when I put it all back together.
Thanx for all the help in this puzzle.
shmoky
Racer
Joined: Jul 2006
Posts: 315
Likes: 0
Le Mans Master
Joined: Jul 2000
Posts: 6,001
Likes: 113
From: Saginaw Michigan
First of all I would like to commend you on your photographs. They make analysis and descriptions much, much easier.
Your blue arrow is pointing to a plastic bushing that should be up inside the column jacket about 9 inches from the end of the jacket. Refering to the blowup drawing a couple posts back, it just keeps the steering shaft (20) central to the column mast jacket (3).
The part that you have encircled in red is a collar that is a permanent part of the steering shaft. It should not come off. The edge of that collar should be 8.4 inches from the very end of the steering shaft.
There should be two small springs in the lower bearing package (the blowup drawing only shows one. I think you make reference to there being two springs in your photo. They are identical.
Using the blowup as somewhat of a reference. Here is how I think that the lower bearing parts go together. First insert the steering shaft
(20) into the mast jacket (3). Then install the first small spring (16). Then the 262474 spring seat. Install the lower bearing (5) into the lower end of the mast jacket (I think it is a slight press fit.) Install 7802124 washer. Install the second small spring (16). The part that is labeled PARKING SEAL (17) should be called a PACKING SEAL. It should install on the end of the plastic spacer (18) and seal between it and the lower bearing. Install the spacer and seal. Then install the clamp, nut & bolt (19).
Several of the parts are available from Doc Rebuild (listed below). Also Corvette Steering Service but they do not list part numbers on their websight. I couldn't find the bearings any other places.
67-68 Lower Bearing #6521139
67-68 Lower Bearing Spring #6521110 (2 Req)
67-68 Upper Bearing only #6521108
Jim
Last edited by Jim Shea; Dec 3, 2008 at 08:26 AM.
Corvette Stories
The Best of Corvette for Corvette Enthusiasts

Top 10 Most Expensive Corvettes Ever Sold on Bring A Trailer
Brett Foote
10 Things Every Corvette Owner Needs (2026 Edition)
Michael S. Palmer
8 Most "Only Corvette Owners Understand" Quirks and Problems
Pouria Savadkouei
10 Reasons the C6 Z06 is Still A Performance Benchmark After 20 Years
Joe Kucinski
How Much Horsepower Every Corvette Engine "LOST" in 1972
Joe Kucinski
Top 10 DOs and DON'Ts for Protecting Your Convertible Top!
Michael S. Palmer
Top 10 Most Explosive Corvettes Ever Made: Power-to-Weight Ratio Ranked!
Joe Kucinski
150 hp to 1,250 hp: Every Corvette Generation Compared by the Specs That Matter
Joe Kucinski
8 Coolest Corvette Pace Cars (and Replicas) of All Time
Verdad Gallardo
Thread Starter
Melting Slicks
Joined: Mar 2005
Posts: 2,187
Likes: 7
From: Chetwynd B.C.
WOW thanx for the replies I find it easier to post pics as my mechanical descriptions are usually poor. I will print these out and save them.
Jim, I went out right away and measured the distance of that collar from the end of the shaft. (6 1/2 inches)

What is wrong here? Did that collar move? How could it if it is a permanent part of the steering? HELP I'm really worried now. Note that the spring end is wedged under this collar. Also Jim in my second picture with the two arrows.... what is the first arrow pointing at. Is that a bearing race??
Along with your recommended parts should I also order a lower bearing race? If so will a 63-66 lower bearing race 6521107 work? How about a thrust bearing washer? If so will a 63-66 lower bearing thrust washer6521120 work? Jim, if these parts won't work where can I get the proper ones?
I really need this to be fixable as I can't spend the $1500 to install a new column (although a tilt would be nice).
thanx again Jim,
shmoky
I find it easier to post pics as my mechanical descriptions are usually poor. I will print these out and save them. Jim, I went out right away and measured the distance of that collar from the end of the shaft. (6 1/2 inches)
What is wrong here? Did that collar move? How could it if it is a permanent part of the steering? HELP
I'm really worried now. Note that the spring end is wedged under this collar. Also Jim in my second picture with the two arrows.... what is the first arrow pointing at. Is that a bearing race??Along with your recommended parts should I also order a lower bearing race? If so will a 63-66 lower bearing race 6521107 work? How about a thrust bearing washer? If so will a 63-66 lower bearing thrust washer6521120 work? Jim, if these parts won't work where can I get the proper ones?
I really need this to be fixable as I can't spend the $1500 to install a new column (although a tilt would be nice).
thanx again Jim,
shmoky
Le Mans Master
Joined: Jul 2000
Posts: 6,001
Likes: 113
From: Saginaw Michigan
Well we learn something everyday. Although the 1967 C3 steering column is exactly the same overall length as the 1968 column; and the lower bearing package is the same; the actual location of the package is slightly different from one to the other. Schmoky, that picture with the tape measure finally clued me into my mistake.
However, my engineering drawing still scales to 6.9 inches to the edge of the collar compared to the 6.5 inch measurement on your tape. The plastic bushing should be up inside the steering column jacket at 7.9 inches from the end of the jacket.
No, the 1965-66 lower bearing and parts will not fit your column. The lower bearing (GM #7800407) is the same for all 1967-68 Corvette columns. But it is unique to Corvette and no other GM column lower bearings will fit (except possibly 67-68 Corvair columns).
JACKPOT! The Corvette Steering Service websight - wwwcorvettesteering.com lists the following:
67-68 Lower Bearing Kit 1967 2nd Design all 68s
2 springs, flat washer & split washer/wedge $68
65-66 Upper & Lower Strg Column Bearing (tele) Also sold as 67-68 Upper Bearing without housing $45
67-68 Upper Strg Column Bearing (in housing) reconditioned used (all columns reg & tele) $140
I am not sure what the split washer/wedge is but you definately can use the other parts! I am also not sure how we reconcile the 0.4 inch difference between your actual steering shaft/collar and my drawing. You will have to try and fit the parts together once you have the kit in hand.
I can only guess that the identified by the red arrow is actually the outer race. I just don't know.
Good luck,
Jim
Last edited by Jim Shea; Dec 1, 2008 at 04:01 PM.
Thread Starter
Melting Slicks
Joined: Mar 2005
Posts: 2,187
Likes: 7
From: Chetwynd B.C.
Damnnn I like this site. Problem solved and a location for parts all withing 24hrs.
Jim, I phone the Corvette Steering company and talked to the owner and we discussed the parts and he will ship them as soon as I order them. I want to check a couple of things but won't have time until Wednesday. Will order parts then.
I will post pictures after I get it all back together and let/show you how it went together. I believe that the red arrow is the race also.
shmoky
Thread Starter
Melting Slicks
Joined: Mar 2005
Posts: 2,187
Likes: 7
From: Chetwynd B.C.
Le Mans Master
Joined: Jul 2000
Posts: 6,001
Likes: 113
From: Saginaw Michigan
Below is an updated 1967 (Late) and 1968 Corvette Standard Steering Column Blowup drawing. It now includes the lower bearing package.
Schmoky,
Your 6.5 inch dimension is correct. My conversion factor was incorrect when I calculated the distance. Note, I have included the dimension on my updated blowup.
Jim
Schmoky,
Your 6.5 inch dimension is correct. My conversion factor was incorrect when I calculated the distance. Note, I have included the dimension on my updated blowup.
Jim
Last edited by Jim Shea; Dec 2, 2008 at 11:33 PM.
Le Mans Master
Joined: Jul 2000
Posts: 6,001
Likes: 113
From: Saginaw Michigan
I have just posted a new paper on the www.corvettefaq.com websight. It is entitled 67(Late) & 68 Corvette Standard Steering Column Disassembly & Repair Paper #1.
http://jimshea.corvettefaq.com/wp-co...y-repair_1.doc
It covers the removal of the steering wheel, horn parts, turn signal lever, and replacing the turn signal switch. It also includes the steering column blowup drawing (with corrections from the 1968 Chevrolet Chassis Service Manual.)
I am working on Disassembly & Repair Paper #2 which will include replacing the upper and lower bearings.
Jim