


Rear trailing arm removal

Thread Starter
Instructor

Joined: Mar 2009
Posts: 187
Likes: 1
From: WA
Having issues with the front bolt on the rear trailing arm. I've WD40'd the heck out of it, beat the outside end with a hammer and no budge. I'm considering the option of using a sawzall (which I don't currently own which is why I have gone straight to this) and wanted to know exactly where are you cutting with the sawzall? From all the posts I've read, it appears people are cutting on each side of the trailing arm but inside the bracket on the frame. The way I'm looking at this area, that is where the shims are located.
Do the shims become a casualty of war? How do I know what shims go back in there if I cut the crap out of my shims?
TIA... Brent
Do the shims become a casualty of war? How do I know what shims go back in there if I cut the crap out of my shims?
TIA... Brent
Racer
Joined: Apr 2007
Posts: 492
Likes: 3
From: Temecula CA
If you start the cut carefully, you can still tell how many shims are needed on each side. If the the bolts are that rusty, the shims will be rusty too. So, you'll probably want to replace them anyway. They are relatively cheap, in the big scheme of things. I used a really long blade, and as the blade wore, I cut the end off, thus moving to fresh teeth on the blade. I still went through a bunch of blades.
After all of that cutting, I got the t-arms out, but (get this!) the little stubs of the bolts were still frozen in the holes in the frame. I had to pound the heck out of them to get them to finally pop out!
Temvette72
After all of that cutting, I got the t-arms out, but (get this!) the little stubs of the bolts were still frozen in the holes in the frame. I had to pound the heck out of them to get them to finally pop out!
Temvette72
Thread Starter
Instructor
Joined: Mar 2009
Posts: 187
Likes: 1
From: WA
Two things to try before the sawzall.
Put a 5/8 box wrench on the bolt head on the inboard side and see if you can work the bolt back and forth to break it loose.
Option 2 is an air impact gun with a mushroom head bit.
If you must use a sawzall make note of the shim pack on each side of the ta.
What year are you working with and do you have a long cotter pin running through the shim pack pocket? If so you proabably have the slotted shims which are a lot easier to get out than the 68 - 70 ones.
If not go back with slotted stainless steel shims and drill the pockets for a 3/16" long cotter pin.
Thread Starter
Instructor
Joined: Mar 2009
Posts: 187
Likes: 1
From: WA
Correction.... I now know about the Cotter Pin. It was buried underneath a bunch of crud. I'm going to try and take that out so I can remove the shims. Maybe the bolt will come out easier without the shims.
Race Director

Joined: May 2006
Posts: 16,528
Likes: 53
From: Dayton, Ohio
Once the shims are out removing the bolt or cutting it off is easy. Removing the shims is the toughest part.
Le Mans Master


Joined: Dec 1999
Posts: 8,627
Likes: 1
From: Houston Texas
CI 1-2-3-4-5-6-7-8-9-10 Vet
St. Jude Donor '03-'04-'05-'06-'07-'08-'09

You will have plenty of room once the shims are out. Will need to realign the rear end anyway so if everything else is rusty, just toss it all out.
If you haven't found the cotter pin yet (or for others reading along), look in picture below with new offset TA installed but unshimmed. You will see a black "dot" which is where the cotter pin goes.

Here's what it's supposed to look like when it is all done!


Good luck in your adventure!!
Doug
Thread Starter
Instructor
Joined: Mar 2009
Posts: 187
Likes: 1
From: WA
You will have plenty of room once the shims are out. Will need to realign the rear end anyway so if everything else is rusty, just toss it all out.
If you haven't found the cotter pin yet (or for others reading along), look in picture below with new offset TA installed but unshimmed. You will see a black "dot" which is where the cotter pin goes.
Here's what it's supposed to look like when it is all done!
Good luck in your adventure!!
Doug
Edit: Nevermind, I forgot who I was talking to. Love you build!
Last edited by 71_S-Ray; Jun 28, 2009 at 03:17 PM.
Thread Starter
Instructor
Joined: Mar 2009
Posts: 187
Likes: 1
From: WA
It took some battered up hands and a few hours, but I finally got the shims out. There's a couple metal hard lines that appear to be in the way of the bolt, so not sure how I'm going to get the bolt out and even if I do, I have no idea if I'll be able to get a new bolt back in. Geesh, what a horrible design... 
Corvette Stories
The Best of Corvette for Corvette Enthusiasts

Top 10 Most Expensive Corvettes Ever Sold on Bring A Trailer
Brett Foote
10 Things Every Corvette Owner Needs (2026 Edition)
Michael S. Palmer
8 Most "Only Corvette Owners Understand" Quirks and Problems
Pouria Savadkouei
10 Reasons the C6 Z06 is Still A Performance Benchmark After 20 Years
Joe Kucinski
How Much Horsepower Every Corvette Engine "LOST" in 1972
Joe Kucinski
Top 10 DOs and DON'Ts for Protecting Your Convertible Top!
Michael S. Palmer
Top 10 Most Explosive Corvettes Ever Made: Power-to-Weight Ratio Ranked!
Joe Kucinski
150 hp to 1,250 hp: Every Corvette Generation Compared by the Specs That Matter
Joe Kucinski
8 Coolest Corvette Pace Cars (and Replicas) of All Time
Verdad Gallardo
Burning Brakes

Joined: Jun 2008
Posts: 1,086
Likes: 1
From: Michigan
If you are going to cut the bolts off remember that a high quality blade designed for metal will be required. Those are hardened bolts so get a good blade.
Before you cut have you tried CRC freeze off? I have had incredible luck with removing bolts that I swore would never come off. The spray is extremely cold when it hits the bolt. That along with a wrap to shock the bolt/nut and fasteners that would not come off with any other spray just comes right off. No need to spray and wait overnight either.
Also, have you tried heat? It's the same principle but in the opposite temp direction. Heating the fastener with a hand held map gas torch works well also. Just be careful with the flame.
Best of luck.
Race Director


Joined: Dec 1999
Posts: 19,610
Likes: 778
From: Forked River NJ
Correct on this. A 14 or 18 tooth blade will do the job. Make sure you get a good bimetal blade, I prefer a Lenox blade because I work for Lenox. Don't cheap out here, there is plenty of garbage out there. 1 will do it fine but most buy two. I have cut many a hardened bolt out with these. You can find them in HD or Lowes. A little cutting fluid will help also.
I use a set of long needle nose pliers to reinstall these bolts.


Race Director
Joined: May 2006
Posts: 16,528
Likes: 53
From: Dayton, Ohio

Team Owner


Joined: Mar 2002
Posts: 24,160
Likes: 78
 There's already a hole in them for the cotter pin.
Team Owner
Joined: Mar 2002
Posts: 24,160
Likes: 78

Thread Starter
Instructor
Joined: Mar 2009
Posts: 187
Likes: 1
From: WA
I can be one stupid stubborn SOB sometimes... 
Although there were some encouraging posts on how to remove the front trailing arm bolt, I should've listened to the large majority and bought a sawzall in the first place. I tried literally for hours trying to get that bolt out which included spending a ton of time looking for ideas outside of buying a sawzall here on the forums, battering up my knuckles, throwing tools, and even consuming lots of beer to no success at all.
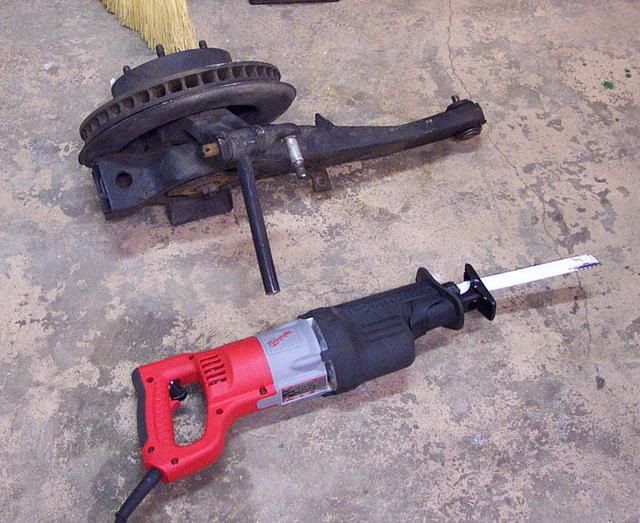
So today, I finally decided to buy a sawzall. Best freaking $120.00 I've ever spent!!!! I cut the bolt on both side of the T/A in 16 MINUTES!!! Someone please bop me on the head and next time tell me not to be so darn stubborn!!!
Thanks again to all who provided assistance. It's because of you that I would have even considered buying the sawzall and the funny thing is... I actually am not dreading the left side now.
Although there were some encouraging posts on how to remove the front trailing arm bolt, I should've listened to the large majority and bought a sawzall in the first place. I tried literally for hours trying to get that bolt out which included spending a ton of time looking for ideas outside of buying a sawzall here on the forums, battering up my knuckles, throwing tools, and even consuming lots of beer to no success at all.
So today, I finally decided to buy a sawzall. Best freaking $120.00 I've ever spent!!!! I cut the bolt on both side of the T/A in 16 MINUTES!!! Someone please bop me on the head and next time tell me not to be so darn stubborn!!!
Thanks again to all who provided assistance. It's because of you that I would have even considered buying the sawzall and the funny thing is... I actually am not dreading the left side now.