


 Good luck, that bolt can be a real pain.


Front Bumper Just Won't Come Off!!!!
Thread Starter
Senior Member


Joined: Jan 2008
Posts: 12,146
Likes: 2,038
From: Easton, PA
St. Jude Donor '10
My new 71 project car has a stubborn front bumper. I have removed the two inner bolts, the two bolts located mid way between the center and the ends, and now attempting to remove the two end bolts but they just spin. I believe there is a nut held in place by a bracket on the inside of the bumper (AIM) and there appears to be no where to get anything in there to hold them in place so I cannot get those bolts out. Please, if you know I am missing something tell me before I dig out the cutter and start whacking away at this darn thing. 
Thank you and best regards,
David
Thank you and best regards,
David

Burning Brakes


Joined: Jul 2004
Posts: 763
Likes: 42
From: Detroit MI
St. Jude Donor '05-'06-'07-'08-'09-'10
Yep, you are correct. There is a cage nut mounted within the bumper which has probably rounded off. I had the same problem on my 1970. I ended up cutting the head of the bolt off to remove the bumper.
Its a suckey job from what I can recall. if you do this, you are going to re-attach the center bolts to hold it in place.
After I got it off, I cut the old cage bolt out and installed a new one.
Its a suckey job from what I can recall. if you do this, you are going to re-attach the center bolts to hold it in place.
After I got it off, I cut the old cage bolt out and installed a new one.
Thread Starter
Senior Member
Joined: Jan 2008
Posts: 12,146
Likes: 2,038
From: Easton, PA
St. Jude Donor '10
Yep, you are correct. There is a cage nut mounted within the bumper which has probably rounded off. I had the same problem on my 1970. I ended up cutting the head of the bolt off to remove the bumper.
Its a suckey job from what I can recall. if you do this, you are going to re-attach the center bolts to hold it in place.
After I got it off, I cut the old cage bolt out and installed a new one.
Its a suckey job from what I can recall. if you do this, you are going to re-attach the center bolts to hold it in place.
After I got it off, I cut the old cage bolt out and installed a new one.
I will get out Mr. Dremel tomorrow and see if I can get him up in there...tight spot. I appreciate the tip.

David
Former Vendor
Joined: Aug 2006
Posts: 76,656
Likes: 1,853
From: Jeffersonville Indiana 812-288-7103
St. Jude Donor '08-'09-'10-'11-'12-'13-'14-'15
You might want to introduce Mr. Die Grinder to the bolt over the Dremel. You purchase bits for it with extended shafts and rounded ends. A Dremel will do it, but you'll take all day and use a dozen or so bits.
Ernie
Last edited by Willcox Corvette; Sep 19, 2009 at 11:12 PM.
Corvette Stories
The Best of Corvette for Corvette Enthusiasts

Every 2027 Corvette Engine Explained
Joe Kucinski
Designer Imagines A Corvette That Looks More Like a Corvette Than the Corvette
Verdad Gallardo
10 Ugly Corvettes That We Still Kinda Love
Joe Kucinski
Top 10 Most Expensive Corvettes Ever Sold on Bring A Trailer
Brett Foote
10 Things Every Corvette Owner Needs (2026 Edition)
Michael S. Palmer
8 Most "Only Corvette Owners Understand" Quirks and Problems
Pouria Savadkouei
10 Reasons the C6 Z06 is Still A Performance Benchmark After 20 Years
Joe Kucinski
How Much Horsepower Every Corvette Engine "LOST" in 1972
Joe Kucinski
Top 10 DOs and DON'Ts for Protecting Your Convertible Top!
Michael S. Palmer
Thread Starter
Senior Member
Joined: Jan 2008
Posts: 12,146
Likes: 2,038
From: Easton, PA
St. Jude Donor '10
I introduced Mr. Bumper Bolts to Mr. Dremel. After four changes of cutting wheels I got them off. I did buy a nice Dewalt Grinder but it was just too big to get up in there, so I had to fall back on the Dremel. Bottom line, after about an hour the front bumper is off.
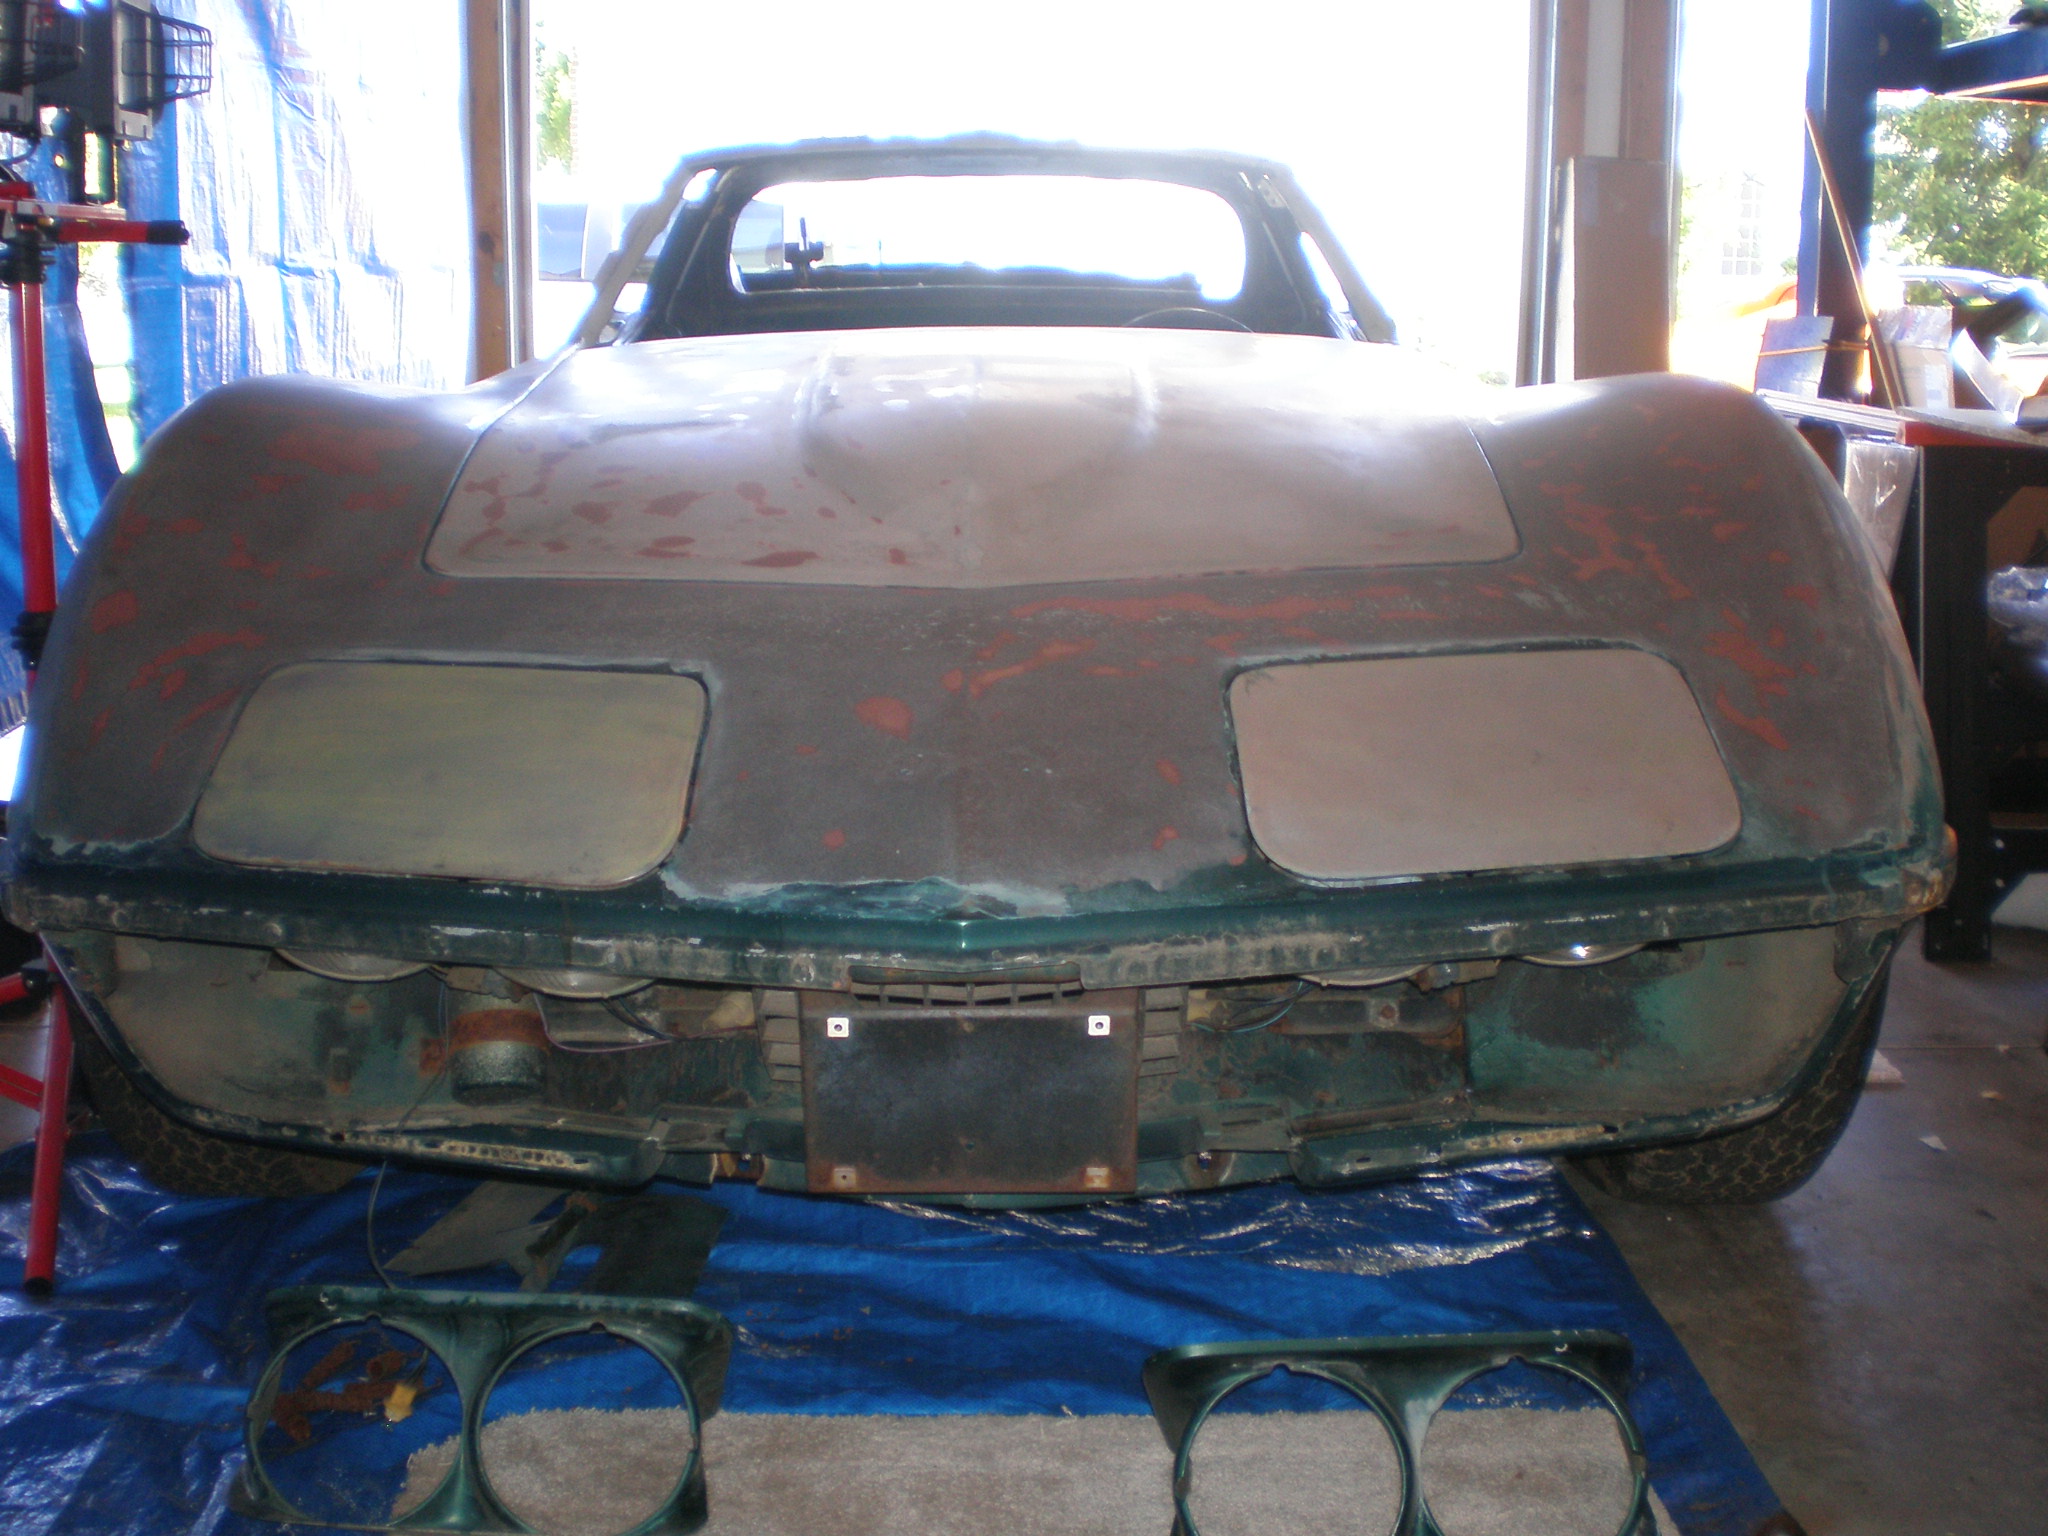
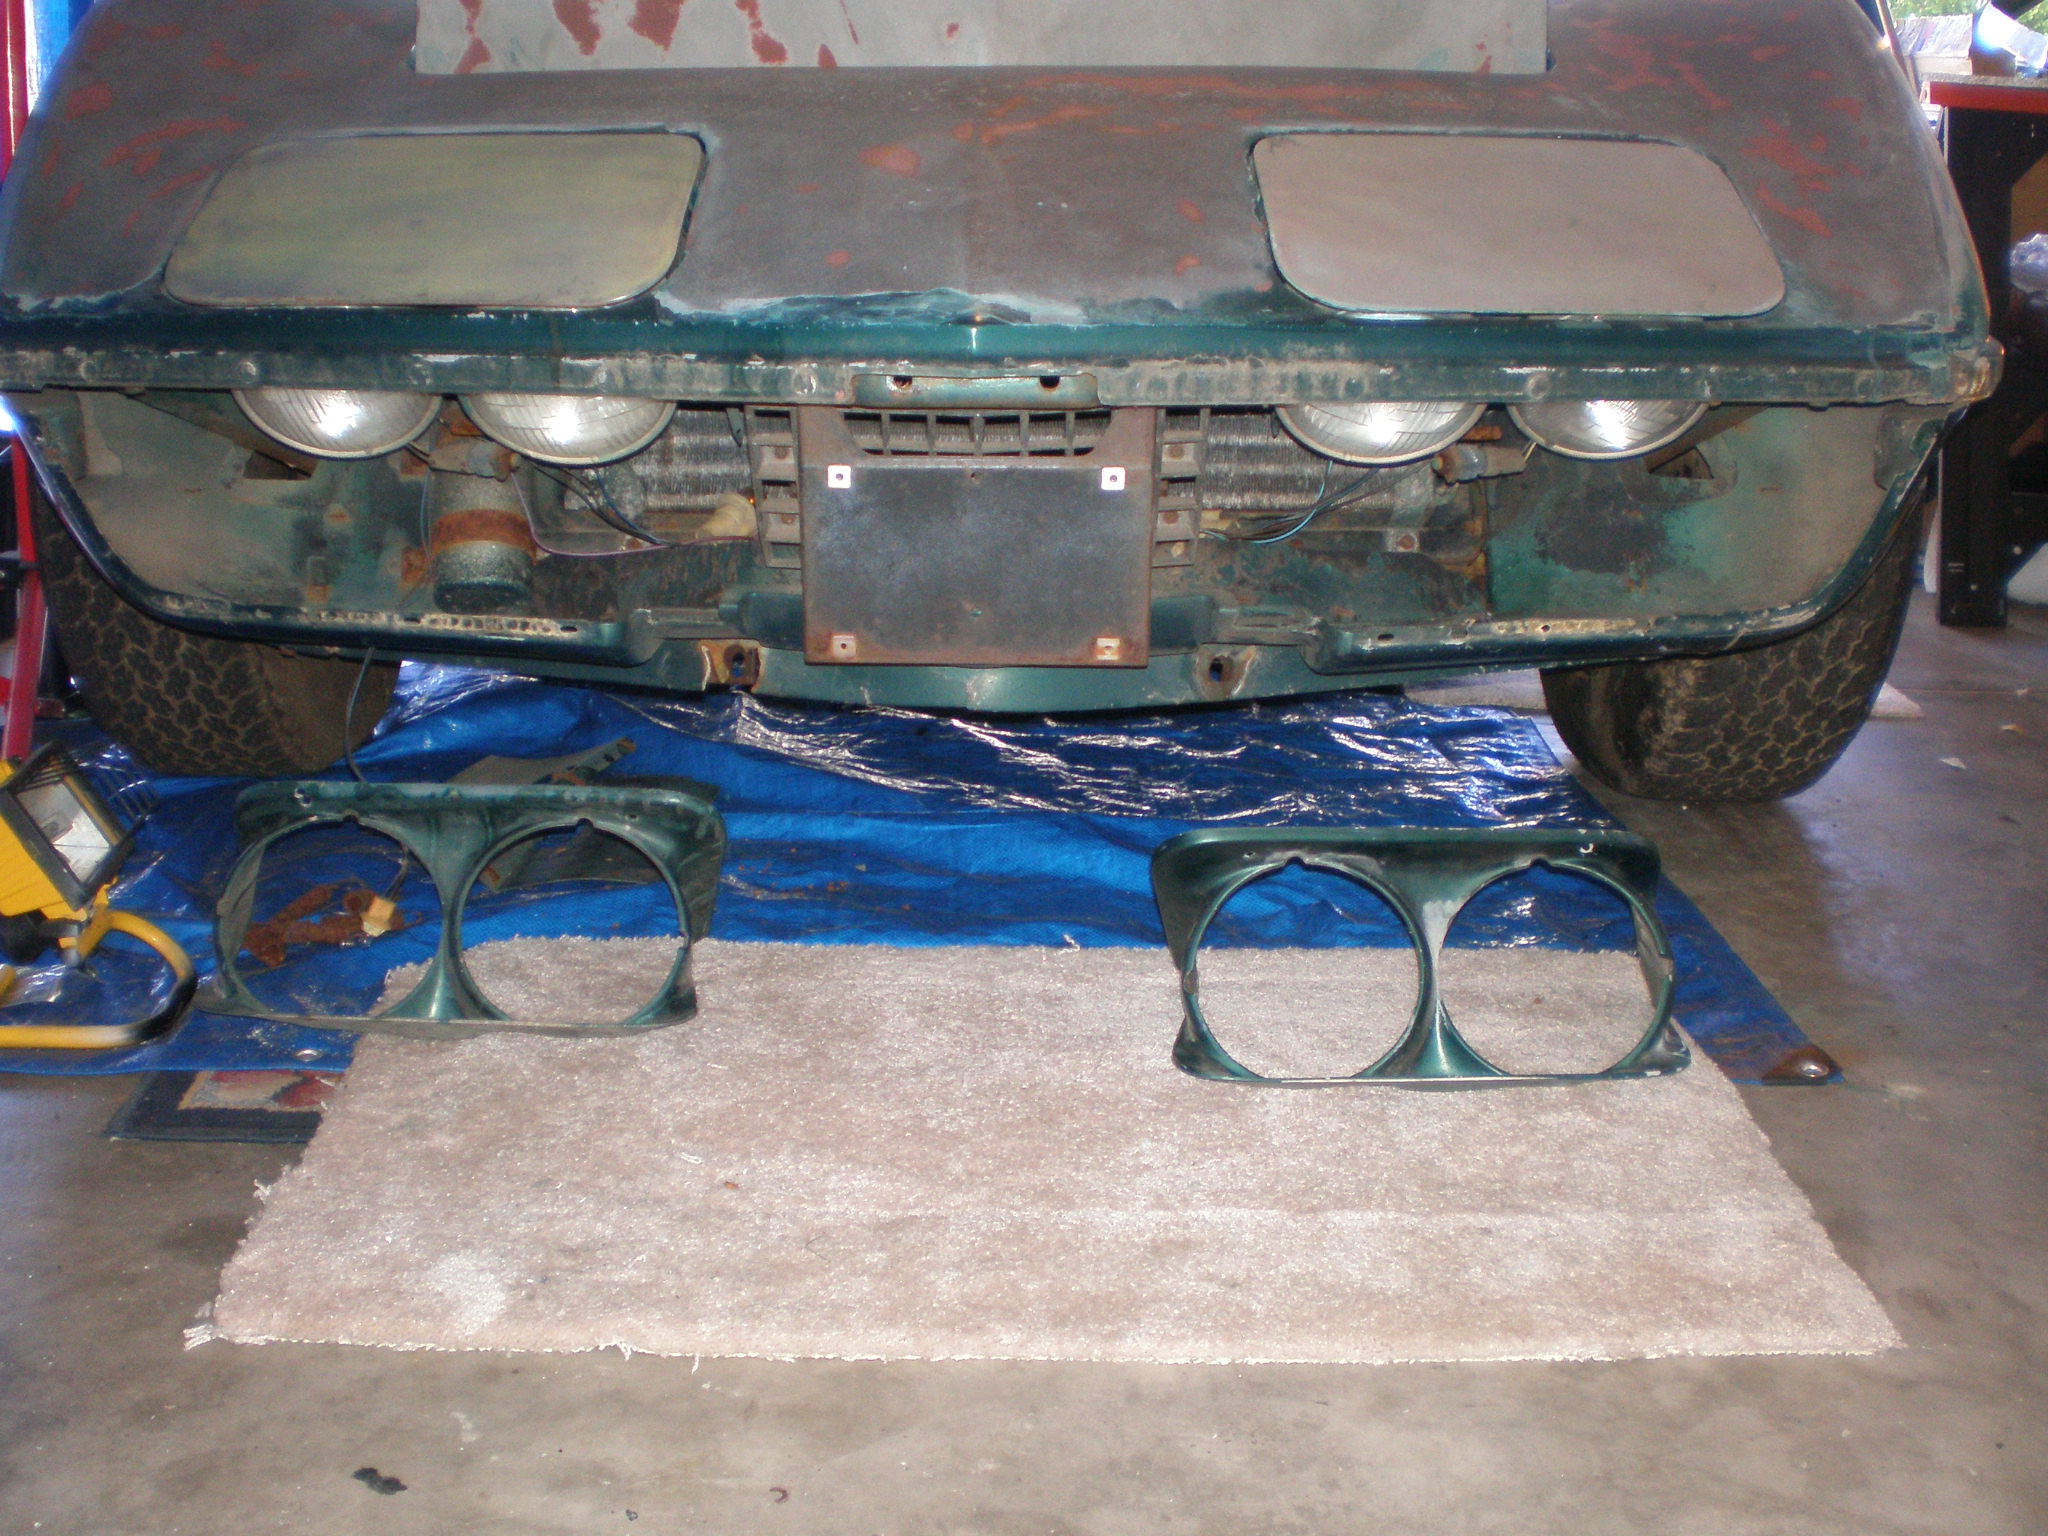
But wait, there's more to the story. I also managed to take off the two front headlight bezels and guess what? Yep, another mystery presented itself. If you look at the pictures closely, especially the drivers side, inside, you notice there is a fiberglass patch in there that is broken loose. But that's not all. The passenger headlight bezel is metal. The driver headlight bezel is plastic. So how does that happen? Gee, I wonder. And also, there are no signs of a headlight washer systme in this car...was that an option or supposed to be there? The metal bezel is spot on for the correct color of the Brandshatch Green color though, so we at least know it was there longer than the driver bezel. If you look at the second picture, focus in on the passenger bezel area and behind it you will see the springs from the headlight assembly. They flex, but not much. Rusty.
The front bumper looks pretty good and I think it can be cleaned up nicely. The lower guard assemblies are very rusty though and they were filled with critter nesting materials and nuts. Must of been cozy up in there.
For the record, and to date, that makes nine critter nests I have destroyed in the beginning phases of my restoration project. I hope they can forgive me.
I was up and at it early today, then had a day filled with fun with my wife. Good day even though the accomplishments were minor.
David
Former Vendor
Joined: Aug 2006
Posts: 76,656
Likes: 1,853
From: Jeffersonville Indiana 812-288-7103
St. Jude Donor '08-'09-'10-'11-'12-'13-'14-'15
I introduced Mr. Bumper Bolts to Mr. Dremel. After four changes of cutting wheels I got them off. I did buy a nice Dewalt Grinder but it was just too big to get up in there, so I had to fall back on the Dremel. Bottom line, after about an hour the front bumper is off.
Attachment 47643069
Attachment 47643070
But wait, there's more to the story. I also managed to take off the two front headlight bezels and guess what? Yep, another mystery presented itself. If you look at the pictures closely, especially the drivers side, inside, you notice there is a fiberglass patch in there that is broken loose. But that's not all. The passenger headlight bezel is metal. The driver headlight bezel is plastic. So how does that happen? Gee, I wonder. And also, there are no signs of a headlight washer systme in this car...was that an option or supposed to be there? The metal bezel is spot on for the correct color of the Brandshatch Green color though, so we at least know it was there longer than the driver bezel. If you look at the second picture, focus in on the passenger bezel area and behind it you will see the springs from the headlight assembly. They flex, but not much. Rusty.
The front bumper looks pretty good and I think it can be cleaned up nicely. The lower guard assemblies are very rusty though and they were filled with critter nesting materials and nuts. Must of been cozy up in there.
For the record, and to date, that makes nine critter nests I have destroyed in the beginning phases of my restoration project. I hope they can forgive me.
I was up and at it early today, then had a day filled with fun with my wife. Good day even though the accomplishments were minor.
David
The metal bezel is original, the fiberglass one is the GM service replacement bezel. Someone replaced the bezel.
Food on the table so I gotta run. I'll look at the pics and read the rest in a minute!
Ernie
Pro


Joined: Mar 2004
Posts: 640
Likes: 1
From: Mertztown Pa
If yours was an early 71 it might have the headlight washers. My buddys 71 does not have the washers, but it does have the 5 port washer pump. When I looked at yours it had a 3 port pump, but that does not mean someone did not replace the original. I also heard some early 71s did not have the headlight washers, but they has the hoses that went to the lights but they were blocked off.

Burning Brakes


Joined: Aug 2008
Posts: 878
Likes: 55
From: Deep South Denmark
No headlight washers installed on '71 models.
The early ones have the 5 port washer pump (left overs from the '70 production) but no headlight washers installed.
My '71 B is like that
The early ones have the 5 port washer pump (left overs from the '70 production) but no headlight washers installed.
My '71 B is like that
Thread Starter
Senior Member
Joined: Jan 2008
Posts: 12,146
Likes: 2,038
From: Easton, PA
St. Jude Donor '10
I appreciate all your help and knowledge sharing. New front Bezels are on the way and will be stored for use later on the rebuild of the car. I will get the remainder of the paint stripping done tonight and then head to the interior to get the adhesive off the car. New windshield pillar posts have been found and will be shipped in the next week. I will get the lower left dash pad out so it is not in the way for windshield work coming after that point.
Thanks for all your help.
David
Thanks for all your help.
David