


 Ouch, can't help you on that one. For anyones reference, this is #3

number three body mount help please!

Thread Starter
Navigator

Joined: Oct 2009
Posts: 9
Likes: 1
From: Kinston North Carolina
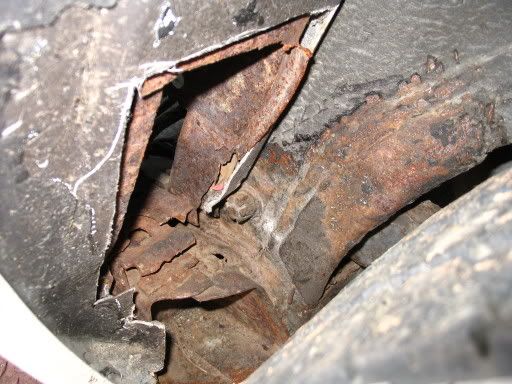
Deep into the project of replacing my body mounts, I found out that the number three mount on the drivers side behind the door is rotted clean out. The rest of the mounts on both sides are fine. What happened is that the previous owner broke the fiberglass shield that goes right below the access hole to keep water from getting on the frame. All the other bolts are loose or out, and I need to get this project finished. This is the last thing that I have to do to be able to drive this car. Just finished a complete rear end restore this is all I have left. Please help!!
thanks,
Joe
thanks,
Joe
Melting Slicks


Joined: Aug 2005
Posts: 2,683
Likes: 34
From: Working on the car NY
I do believe you'll need a new nut cage welded on. Unlike the rear mounts (#4 and #8) which can be dealt with without welding on new cages cause you can catch a nut on them, 2's, 3's, 6's and #7, don't work that way. Others please chime in.
ps. you mean just the nut cage is rotted don't ya - and not also that section of frame - cause that's REAL trouble.
ps. you mean just the nut cage is rotted don't ya - and not also that section of frame - cause that's REAL trouble.
Melting Slicks
Joined: Oct 2008
Posts: 2,154
Likes: 69
From: Regina Sk Canada
Do you mean the metal channel the is rivited to the body?

Mine were not too bad. I made metal plates for top and bottom and seam sealed it all together. Mind you i have the body off the frame at this point too which made it easier.


Mine were not too bad. I made metal plates for top and bottom and seam sealed it all together. Mind you i have the body off the frame at this point too which made it easier.
Melting Slicks
Joined: Aug 2005
Posts: 2,683
Likes: 34
From: Working on the car NY
Safety Car


Joined: Aug 2001
Posts: 3,685
Likes: 202
From: Waterford Mi
I had to replace my rocker channels because they rusted out. You will need to weld in the rear insert only but the body does have to be raised to do that.
Rocker channel repair
Rocker channel repair
Thread Starter
Navigator
Joined: Oct 2009
Posts: 9
Likes: 1
From: Kinston North Carolina
I had to replace my rocker channels because they rusted out. You will need to weld in the rear insert only but the body does have to be raised to do that.
Rocker channel repair
Rocker channel repair
thanks for all the help everyone!
Corvette Stories
The Best of Corvette for Corvette Enthusiasts

Top 10 Most Expensive Corvettes Ever Sold on Bring A Trailer
Brett Foote
10 Things Every Corvette Owner Needs (2026 Edition)
Michael S. Palmer
8 Most "Only Corvette Owners Understand" Quirks and Problems
Pouria Savadkouei
10 Reasons the C6 Z06 is Still A Performance Benchmark After 20 Years
Joe Kucinski
How Much Horsepower Every Corvette Engine "LOST" in 1972
Joe Kucinski
Top 10 DOs and DON'Ts for Protecting Your Convertible Top!
Michael S. Palmer
Top 10 Most Explosive Corvettes Ever Made: Power-to-Weight Ratio Ranked!
Joe Kucinski
150 hp to 1,250 hp: Every Corvette Generation Compared by the Specs That Matter
Joe Kucinski
8 Coolest Corvette Pace Cars (and Replicas) of All Time
Verdad Gallardo
Former Vendor
Joined: Apr 2009
Posts: 766
Likes: 3
From: Charlotte North Carolina 704-394-5150
jcjustice,
I (we) may need a better photo. The rust appears to be extensive...but it is had to tell in the photo what I am looking at because I ...for myself...need more pictures and one that is a bit further away so I can get a reference to the problem.
To post a photo, click on "go advanced"...beneath the "quick reply" area when you respond to a post.
When that screeen comes up. In the upper toolbar, you will see a "smiley face"...to the right of it is a "paperclip". Click on that and then the attachment screen will come up so you can insert your photo file(s).
"DUB"
Le Mans Master

Joined: Dec 2007
Posts: 6,422
Likes: 591
From: McHenry Illinois
DUB, I believe that only works for supporting vendors, the regular members must use a photo hosting site. this is a pretty good tutorial.
http://forums.corvetteforum.com/help...al-inside.html
or here
http://photos.imageevent.com/durango...g%20Images.pdf
http://forums.corvetteforum.com/help...al-inside.html
or here
http://photos.imageevent.com/durango...g%20Images.pdf
Team Owner


Joined: Nov 1999
Posts: 26,679
Likes: 17
From: This vette goes to 11 Milford MA
St. Jude Donor '03-'05
That part of the body tends to rust out. I ended up cutting the access hole larger and cutting the cap off the frame end to get in there. You can buy a repair panel that goes in there.
Thread Starter
Navigator
Joined: Oct 2009
Posts: 9
Likes: 1
From: Kinston North Carolina
Thread Starter
Navigator
Joined: Oct 2009
Posts: 9
Likes: 1
From: Kinston North Carolina
http://i748.photobucket.com/albums/x...ice1/jk471.jpg
http://i748.photobucket.com/albums/x...ice1/jk463.jpg
http://i748.photobucket.com/albums/x...ice1/jk463.jpg
Finally figured out how to post pictures thanks for the info on how to do it, but I still need any suggestions about repairing this mount without taking the body off?
thanks
joe
http://i748.photobucket.com/albums/x...ice1/jk463.jpg
http://i748.photobucket.com/albums/x...ice1/jk463.jpg
Finally figured out how to post pictures thanks for the info on how to do it, but I still need any suggestions about repairing this mount without taking the body off?
thanks
joe

Advanced
Joined: Jul 2009
Posts: 59
Likes: 0
Mine are rusted out at each hole before and after door, also the channel where the rocker mouldings mount.My thoughts were to buy the replacement channels and cut the length on the inside of the new channel, remove the rusted out section on the outside rocker area with a cutoff wheel, then slide the new channel into it (locating body mounting holes) and plug weld them in place. I'd be sandwiching it between the old channel and the removed outer rocker area. It would be a long tiring repair but what else can I do? The body is off the frame.
Any suggestions?
Any suggestions?
Last edited by rcrchsr16; Nov 4, 2009 at 10:13 PM. Reason: added text
Former Vendor
Joined: Apr 2009
Posts: 766
Likes: 3
From: Charlotte North Carolina 704-394-5150
Mine are rusted out at each hole before and after door, also the channel where the rocker mouldings mount.My thoughts were to buy the replacement channels and cut the length on the inside of the new channel, remove the rusted out section on the outside rocker area with a cutoff wheel, then slide the new channel into it (locating body mounting holes) and plug weld them in place. I'd be sandwiching it between the old channel and the removed outer rocker area. It would be a long tiring repair but what else can I do? The body is off the frame.
Any suggestions?
Any suggestions?
This can throw off your rocker panel alignment....due the new panel being set down and back from where it needs to be...originally.
This area is always a problem for me...because depending on how much rust has eaten away at the steel structure..."patching" it up is a royal pain...unless fiberglass panels are removed and the body supported correectly...so new parts can be installed and welded...and rust prevention chemicals can be applied...so this problem does not occur again. Any time the 'birdcage" has been damaged...correct repairs can be a nightmare in time and effort.
"DUB"
Former Vendor
Joined: Apr 2009
Posts: 766
Likes: 3
From: Charlotte North Carolina 704-394-5150
http://i748.photobucket.com/albums/x...ice1/jk471.jpg
http://i748.photobucket.com/albums/x...ice1/jk463.jpg
http://i748.photobucket.com/albums/x...ice1/jk463.jpg
Finally figured out how to post pictures thanks for the info on how to do it, but I still need any suggestions about repairing this mount without taking the body off?
thanks
joe
http://i748.photobucket.com/albums/x...ice1/jk463.jpg
http://i748.photobucket.com/albums/x...ice1/jk463.jpg
Finally figured out how to post pictures thanks for the info on how to do it, but I still need any suggestions about repairing this mount without taking the body off?
thanks
joe
Call me and I will give you my temp fix...which could last for many years...but it all depends on how strong the metal is at the area where the body mount bushing is located. If the metal is weak and thin...then my idea will not work...and will be a waste of time.
I do not have a "crystal ball" or a "magic wand"...and "side-stepping" a repair that requires dis-assembly and parts removal to get it "right"...IS YOUR CHOICE. Sometimes...things are what they are...and require proper repair procedures to maintain structural integrity. Keep this in mind...when making your decision.
"DUB" (704)394-5150 EST M-F 8:30-5:00
Thread Starter
Navigator
Joined: Oct 2009
Posts: 9
Likes: 1
From: Kinston North Carolina
I appreciate all the help with this. That is exactly what I am looking for a quick fix that will last a couple of years until I am able to afford to remove the entire body. I will be contacting you soon.
thanks
joe
thanks
joe
Advanced
Joined: Jul 2009
Posts: 59
Likes: 0
I hear what you're saying Grandmaster. I do have the body off the frame, but I am very hesitant to remove all the fiberglass to repair this area. I beleive you are talking about removing fiberglass from the sills down, forward and backwards to the area where the 2 mounts are. That's a helluva lot of damage in itself self-inflicted and since I'm more well versed in metal fabrication, and very much a learning stage novice (getting much better every day) on repairing fiberglass that will not appear repaired, my ideas were to deal with the rust without disturbing the fiberglass too much.
I think that what you are saying is that I would be mounting the body higher if I do the repair by sandwiching a new channel in there. I agree. And what I'm not sure of is if the channel would sit in there perfectly flat- in a perfect world- just adding the thickness of the channel itself to the overall height the body would sit higher on the frame. So it's well taken that if I were to repair it would be better to make metal plates and weld them into the rusted area far enough to get to solid metal and as flush as possible.
My channels are like pictures on this very posting, just rusted at each hole. Mine are not as bad as some of these pictures show. But hey do have an added bad spot where the rocker moulding screws are, maybe a 6-8" area. I won't be removing the whole channel for this since it's only purpose is to mount the mouldings. I'll just cut out the area with a muffler cutter with a 3" cutoff wheel, use a piece of new channel and weld in.
I do intend to remove as much scale and loose surface rust and spray the entire repair with POR-15 and hand brush the inner bolt mounting areas as well.
I also thought about the criticality of the location of the holes themselves in correspondence to the frame mounts. In fact, that's why I first thought of a channel insert idea so I know I'd be in the right locations. I will buy a whole new channel anyway to use as a guide for location before using them for the pieces I need. I got to wonder, considering the marginal quality of replacement parts were for my Chevelle restoration, how close the holes will be on those, eh? Guess that's a subject for a different post!
Thanks for your ideas on this and you've added to my concerns and will seriously consider what you wrote before coming to a final plan for repairs. Pleas feel free to write back!