


Lower strut rod mount mods for heims?
Thread Starter
Pro


Joined: Oct 2004
Posts: 573
Likes: 0
From: Stafford VA
Going to make or buy new strut rods with heims. To improve handling, I have read that the strut rod holes should be lowered. Since I need to fix the slotted holes anyhow, I'd like to fix it for improved handling. I can TIG weld and have lots of chromoly plate in various thickness. Does anyone have any pictures of how they modified their center strut rod mount for heims and especially interested in mods to lower the strut rod mounting location. Thanks!
Race Director


Joined: May 2006
Posts: 18,742
Likes: 2,583
why dont you just buy smart struts and eliminate the modifcation since it's part of the package?
http://forums.corvetteforum.com/c3-t...rt-struts.html
http://forums.corvetteforum.com/c3-t...rt-struts.html
Le Mans Master


Joined: Apr 2007
Posts: 7,353
Likes: 72
From: Graceland in a Not Correctly Restored Stingray
Due to their having vertical rather than horizontal slots, which facilitate relatively easy camber curve adjustment, I myself have bought the VBP bracket (avialable separately, #52000B), but will be fabbing up camber lock plates in leiu of using the eccentrics for use with my heim-jointed rods. The eccentrics may be fine for many, but IMOE they just don't hold well under heavy loads. FWIW, the top of the slot in the SS bracket will lower the inner links ~1/2" below C3 OEM height (the amount recommended by Greenwood). Unless they've addressed the problem since I pointed it out to them, the 4 mounting bolt holes will need bushed down...
Last edited by TheSkunkWorks; Jan 1, 2011 at 02:58 PM.

Team Owner

Joined: Jul 2004
Posts: 40,412
Likes: 792
From: Redondo Beach, California
[QUOTE=TheSkunkWorks;1576379114]The VBP bracket has, as pointed out by SkunkWorks, overly large mounting holes, creating a concern that the bracket will slide around. A solution is to use the stock GM bracket and mod it for a lower attachment point. The stock GM bracket fits exactly to the differential case, the aftermarket bracket doesn't. Mod-ing the stock GM bracket requires cuting the attachment brackets and welding them on lower. You get this with the Toms Differential strut rods..cash register goes ka-ching $$$$$$$.
Thread Starter
Pro
Joined: Oct 2004
Posts: 573
Likes: 0
From: Stafford VA
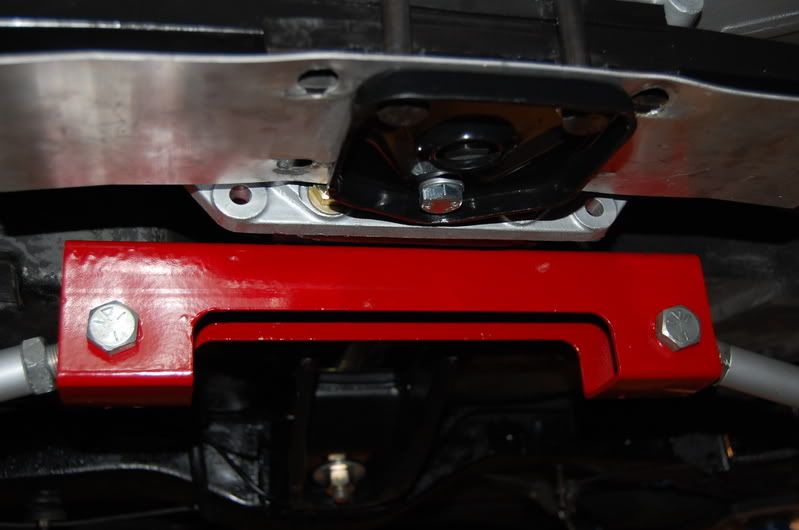
That's the picture I was after, thanks c69vete! Did you do anything to strengthen the bracket after removing the eccentric plates? I was thinking that it might also be worth strengthening the OEM mounting bracket by enclosing the end or bottom similar to the picture of the red bracket Bee Jay posted on the other thread. Thoughts?
Drifting


Joined: Jul 2004
Posts: 1,695
Likes: 65
From: Kissimmee fl
Finalist 2021 C3 of the Year - Modified
2017 C3 of Year Finalist
Cruise-In VIII Veteran
St. Jude Donor '07
Yes, I did just that. The shiney metal you see on the outside is 3/16 th in. stainless steel, polished. The original bracket was lengthened with 1/8th plate inside to match the final shape of what you see. Solid tig welded. I also use 5/8th in. bolts on the bracket end instead of the factory 1/2 in with reducing washers. That way all the heim joints use the same size bolt. my spacers are 5/8th in S/S nuts with the threads drilled outand if i remember right, they are the stock thickness and fit great.
The bracket in the above picture that I removed was from a c-2 and was higher tham the c-3 bracket. When I drilled the new hole for the bolt I lowered it about 3/4 in. from the stock .

The bracket in the above picture that I removed was from a c-2 and was higher tham the c-3 bracket. When I drilled the new hole for the bolt I lowered it about 3/4 in. from the stock .
Last edited by c69vete; Jan 1, 2011 at 09:36 PM.
Corvette Stories
The Best of Corvette for Corvette Enthusiasts

Top 10 Most Expensive Corvettes Ever Sold on Bring A Trailer
Brett Foote
10 Things Every Corvette Owner Needs (2026 Edition)
Michael S. Palmer
8 Most "Only Corvette Owners Understand" Quirks and Problems
Pouria Savadkouei
10 Reasons the C6 Z06 is Still A Performance Benchmark After 20 Years
Joe Kucinski
How Much Horsepower Every Corvette Engine "LOST" in 1972
Joe Kucinski
Top 10 DOs and DON'Ts for Protecting Your Convertible Top!
Michael S. Palmer
Top 10 Most Explosive Corvettes Ever Made: Power-to-Weight Ratio Ranked!
Joe Kucinski
150 hp to 1,250 hp: Every Corvette Generation Compared by the Specs That Matter
Joe Kucinski
8 Coolest Corvette Pace Cars (and Replicas) of All Time
Verdad Gallardo
Thread Starter
Pro
Joined: Oct 2004
Posts: 573
Likes: 0
From: Stafford VA
Started this project today with a sandblasted and primered strut mount.

Drilled the spot welds

And used an air chisel to remove the eccentric brackets. Ignore the blood, the air chisel bit me but duct tape, as always, stopped the bleeding.

Tomorrow, I will box the ends of the bracket, drill and weld the tabs, and maybe add some lateral supports to the inside of tabs. Tabs are .125" chromoly.

Drilled the spot welds
And used an air chisel to remove the eccentric brackets. Ignore the blood, the air chisel bit me but duct tape, as always, stopped the bleeding.
Tomorrow, I will box the ends of the bracket, drill and weld the tabs, and maybe add some lateral supports to the inside of tabs. Tabs are .125" chromoly.
Last edited by UBETRUN; Jan 2, 2011 at 12:06 AM.
Thread Starter
Pro
Joined: Oct 2004
Posts: 573
Likes: 0
From: Stafford VA
Finished up today, no new blood. 
On my bracket, 1/2" drop is right at the edge of the factory metal so that's where the hole went.

Did both sides

Boxed the ends but may have to trim if the strut rods interfere.

And tacked the tabs on the inside.

Coat of primer while I decide whether to paint or powdercoat.

I don't mind constructive criticism, especially if anyone thinks this isn't safe.
On my bracket, 1/2" drop is right at the edge of the factory metal so that's where the hole went.
Did both sides
Boxed the ends but may have to trim if the strut rods interfere.
And tacked the tabs on the inside.
Coat of primer while I decide whether to paint or powdercoat.
I don't mind constructive criticism, especially if anyone thinks this isn't safe.
Crackin' on...


Joined: Jun 2003
Posts: 9,447
Likes: 124
From: Somewhere in Tucson AZ
St. Jude Donor '09
Question though: Looks like the hole is really, really close to the edge of the tab with very little material at the bottom. What is the loading in that direction, do you know? Wondering if it wouldn't have been more "beefy" by putting a little less of the tab on the bracket, or making the tab just a little bit longer to leave more material (and strength) at the bottom of the hole?
All in all, it looks great so far, and also wonder if you'd make another for me??
 (I have NO skillz for welding! Not like that anyway! Great work!)
Drifting
Joined: Jul 2004
Posts: 1,695
Likes: 65
From: Kissimmee fl
Finalist 2021 C3 of the Year - Modified
2017 C3 of Year Finalist
Cruise-In VIII Veteran
St. Jude Donor '07
The loading of these brackets shound be either pushing into the pumpkin or pulling away from the pumpkin. There is very little strain on them going down the road in a straight line. Going around curves or slinging the rear end around is when you would produce the most strain on the brackets.
UBETRUN, the only thing I see is with only one thickness of metal below the original bracket, any spacer you fabricate will have to be stepped to keep the clamping pressure even when you assemble.
UBETRUN, the only thing I see is with only one thickness of metal below the original bracket, any spacer you fabricate will have to be stepped to keep the clamping pressure even when you assemble.
Race Director


Joined: Aug 1999
Posts: 18,126
Likes: 174
From: WI
Thread Starter
Pro
Joined: Oct 2004
Posts: 573
Likes: 0
From: Stafford VA
No criticism here as I'm not very knowledgeable on this (but trying to learn!)
Question though: Looks like the hole is really, really close to the edge of the tab with very little material at the bottom. What is the loading in that direction, do you know? Wondering if it wouldn't have been more "beefy" by putting a little less of the tab on the bracket, or making the tab just a little bit longer to leave more material (and strength) at the bottom of the hole?
Question though: Looks like the hole is really, really close to the edge of the tab with very little material at the bottom. What is the loading in that direction, do you know? Wondering if it wouldn't have been more "beefy" by putting a little less of the tab on the bracket, or making the tab just a little bit longer to leave more material (and strength) at the bottom of the hole?
Thread Starter
Pro
Joined: Oct 2004
Posts: 573
Likes: 0
From: Stafford VA
Melting Slicks

Joined: Jan 2004
Posts: 3,247
Likes: 210
From: Detroit MI

Different ways to skin a cat, but still achieve the same goal.
Last edited by 69autoXr; Jan 4, 2011 at 12:26 AM.
Race Director
Joined: Aug 1999
Posts: 18,126
Likes: 174
From: WI
you mean like welding on 4 plates with a 5/8 hole in each plate?
PS: while you were trying to re-engineer your strut rod bracket you might have thought about plating the bottom to increase it`s strength...
Last edited by redvetracr; Jan 4, 2011 at 12:30 AM.
Drifting
Joined: Jul 2004
Posts: 1,695
Likes: 65
From: Kissimmee fl
Finalist 2021 C3 of the Year - Modified
2017 C3 of Year Finalist
Cruise-In VIII Veteran
St. Jude Donor '07
The bolts included in these kits are 1/2 in. and require bushing washers to tighten up in the 5/8 in. ID of the bushing (stock rubber style) or a 5/8 in. heim joint. Using the 5/8 in. bolt means less parts involved.
Thread Starter
Pro
Joined: Oct 2004
Posts: 573
Likes: 0
From: Stafford VA
Exactly, got to weld on plates with 5/8" holes and if welding the plates to the stock eccentric brackets, got to weld the brackets up solid too with only spot welds holding them on from the factory.
Agree completely that the stock bracket could be a lot stronger, that's why I'm changing gears and going with a design similar to the red one above in chromoly. I found rectangular chromoly tube in different sizes so it shouldn't be difficult to make a bracket that's both elegant and strong.
It's winter here, got to find things to keep busy and the strut rod bracket is this week's fun.

Melting Slicks
Joined: Jan 2004
Posts: 3,247
Likes: 210
From: Detroit MI
The point was you can make plates to center the heim in the slot to lock it in place. I'd think that someone with any fab ability could figure out to put any size hole necessary for the parts they were using. I didn't say "buy this kit".