






1980 Horn Blows Constantly
Thread Starter
Intermediate

Joined: Aug 2010
Posts: 32
Likes: 0
From: Corpus Christi TX
 1980 Horn Blows Constantly
I have just finished the rebuild and installation of my column. I have installed all new horn related parts since "Bubba" had a toggle switch rigged up to operate the parts. My problem is now as soon as I connect the battery, the horns start blowing. Also my horn button doesn't seem to have any recoil to it. It seems like it is depressed all the time. Any help that you can give this newbie is always appreciated.

Drifting

Joined: Aug 2009
Posts: 1,635
Likes: 8
From: Enid Oklahoma
I have just finished the rebuild and installation of my column. I have installed all new horn related parts since "Bubba" had a toggle switch rigged up to operate the parts. My problem is now as soon as I connect the battery, the horns start blowing. Also my horn button doesn't seem to have any recoil to it. It seems like it is depressed all the time. Any help that you can give this newbie is always appreciated.

Le Mans Master


Joined: Jul 2000
Posts: 6,001
Likes: 112
From: Saginaw Michigan
It sounds to me as if you need a new (or you need to rebuild) your upper horn contact. It is the part on top of your steering column where your horn cap snaps into.
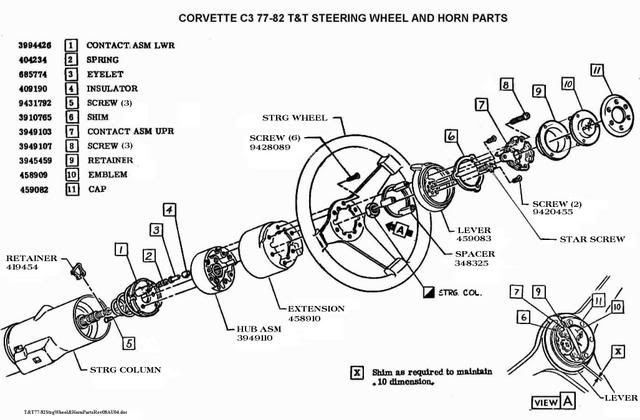
It is part #7 (GM part number 3849103). It is available through GM dealers and also through most Corvette suppliers. Also there are kits available to rebuild your horn contact. The kit comes with new plastic rivets to reassemble the contact.
Jim
It is part #7 (GM part number 3849103). It is available through GM dealers and also through most Corvette suppliers. Also there are kits available to rebuild your horn contact. The kit comes with new plastic rivets to reassemble the contact.
Jim
Thread Starter
Intermediate
Joined: Aug 2010
Posts: 32
Likes: 0
From: Corpus Christi TX
A spring was mentioned earlier but I don't see it on the diagram. Also when I ordered the replacement parts I only got one shim. Does it take more than one? All parts are new except for parts 9, 10 & 11. Is there a proper orientation that all the parts need to be positioned in other than the order in which they are shown in the above picture? Thanks for all of the help.
Le Mans Master
Joined: Jul 2000
Posts: 6,001
Likes: 112
From: Saginaw Michigan
If you have a standard production steering wheel, the above picture is exactly how the parts should go together.
The shim(s) is to make sure that you have sufficient clearance so that when you rotate the telescope locking lever (459083) that it won't scrape on the sorrounding parts. The shim and lever shouldn't have anything to do with your horn.
I think that the spring (that is talked about) is actually inside the upper horn contact #7. If you got a new one in your package of parts, it probably isn't the problem.
There are two other springs. One is small spring #2 which pushes up on the eyelet #3. If you put these parts together incorrectly, I would think that your horn wouldn't blow, (not the opposite problem.)
The other spring is the big spring attached to the lower horn contact #1. There should be a small plastic cover inside the steering column head. (That tan thing in the following picture.)
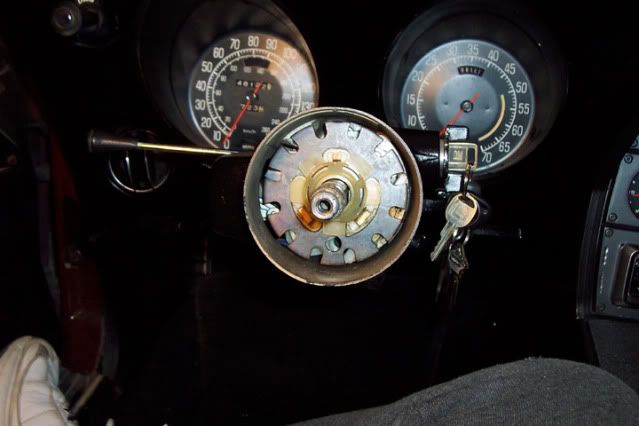
You must have that cover in place, otherwise the big spring will be touching various metal parts in the steering column head and your horns will blow all the time. That plastic part becomes very brittle with time and might be your problem. It is readily available at dealerships and various Corvette suppliers.
Jim
Jim
The shim(s) is to make sure that you have sufficient clearance so that when you rotate the telescope locking lever (459083) that it won't scrape on the sorrounding parts. The shim and lever shouldn't have anything to do with your horn.
I think that the spring (that is talked about) is actually inside the upper horn contact #7. If you got a new one in your package of parts, it probably isn't the problem.
There are two other springs. One is small spring #2 which pushes up on the eyelet #3. If you put these parts together incorrectly, I would think that your horn wouldn't blow, (not the opposite problem.)
The other spring is the big spring attached to the lower horn contact #1. There should be a small plastic cover inside the steering column head. (That tan thing in the following picture.)
You must have that cover in place, otherwise the big spring will be touching various metal parts in the steering column head and your horns will blow all the time. That plastic part becomes very brittle with time and might be your problem. It is readily available at dealerships and various Corvette suppliers.
Jim
Jim

Former Vendor
Joined: Aug 2006
Posts: 76,656
Likes: 1,851
From: Jeffersonville Indiana 812-288-7103
St. Jude Donor '08-'09-'10-'11-'12-'13-'14-'15
This is 2 3 and 4

I'm guessing you need 7 or the insulating rivets.
http://willcoxcorvette.com/product_i...oducts_id=8145
http://willcoxcorvette.com/product_i...oducts_id=4792

I'm guessing you need 7 or the insulating rivets.
http://willcoxcorvette.com/product_i...oducts_id=8145
http://willcoxcorvette.com/product_i...oducts_id=4792
Last edited by Willcox Corvette; Feb 6, 2011 at 05:54 PM.
Corvette Stories
The Best of Corvette for Corvette Enthusiasts

10 Reasons the C6 Z06 is Still A Performance Benchmark After 20 Years
Joe Kucinski
How Much Horsepower Every Corvette Engine "LOST" in 1972
Joe Kucinski
Top 10 DOs and DON'Ts for Protecting Your Convertible Top!
Michael S. Palmer
Top 10 Most Explosive Corvettes Ever Made: Power-to-Weight Ratio Ranked!
Joe Kucinski
150 hp to 1,250 hp: Every Corvette Generation Compared by the Specs That Matter
Joe Kucinski
8 Coolest Corvette Pace Cars (and Replicas) of All Time
Verdad Gallardo
Top 10 Corvette Engines RANKED by Peak Torque (70+ Years of Muscle!)
Joe Kucinski
Corvette ZR1X Will Be Pacing the Indy 500, And Could Probably Race, Too!
Verdad Gallardo
Top 10 Corvettes Coming to Mecum Indy 2026!
Brett Foote

Le Mans Master
Joined: Jul 2000
Posts: 6,001
Likes: 112
From: Saginaw Michigan
The parts above:
The upper horn contact - if the plastic rivets are broken or the contact is somehow screwed up, your horn could blow continuously.
The eyelet, spring, and insulator - I really can't figure how they could be screwed up to make your horn blow continuously. If the horn didn't work, I can see these parts being screwed up. But their function is to transmit 12V to the upper horn contact, nothing else.
Jim
The upper horn contact - if the plastic rivets are broken or the contact is somehow screwed up, your horn could blow continuously.
The eyelet, spring, and insulator - I really can't figure how they could be screwed up to make your horn blow continuously. If the horn didn't work, I can see these parts being screwed up. But their function is to transmit 12V to the upper horn contact, nothing else.
Jim

Acct suspended by request 19 April 2011
Joined: Jul 2009
Posts: 478
Likes: 0
From: La Porte In
I rebuilt my 78 upper horn last summer. Bought the whole kit from Corvette Central. There should be 3 shims. I used every part in the kit. I also bought a shop manual for my 78 from CC. Sounds like to me you have something to tight. Or you didn't put the spacer ring in for telescopic.
Thread Starter
Intermediate
Joined: Aug 2010
Posts: 32
Likes: 0
From: Corpus Christi TX
Thanks for all the help. All of the parts are brand new. Everything was put together according to the AIM but I only received 1 shim. Is the horn button supposed to have some play or spring action to it? It seemed to me that it was pretty solid. I can't figure out how it should go on to allow me to push it to blow the horn.
Drifting


Joined: Mar 2006
Posts: 1,369
Likes: 79
From: West Coast
I just got done removing steering wheel to do a simple headlight switch , and there were 3 shims in my 81' , there was one on top and two below the main retainer ring, my guess would be need more shims!

, and there were 3 shims in my 81' , there was one on top and two below the main retainer ring, my guess would be need more shims!
Le Mans Master
Joined: Jul 2000
Posts: 6,001
Likes: 112
From: Saginaw Michigan
This is how a T&T locking plate and c-clip go together. Note that there are long flats and short flats on the upper steering shaft yoke. You need to orient the cancelling cam and the locking plate.
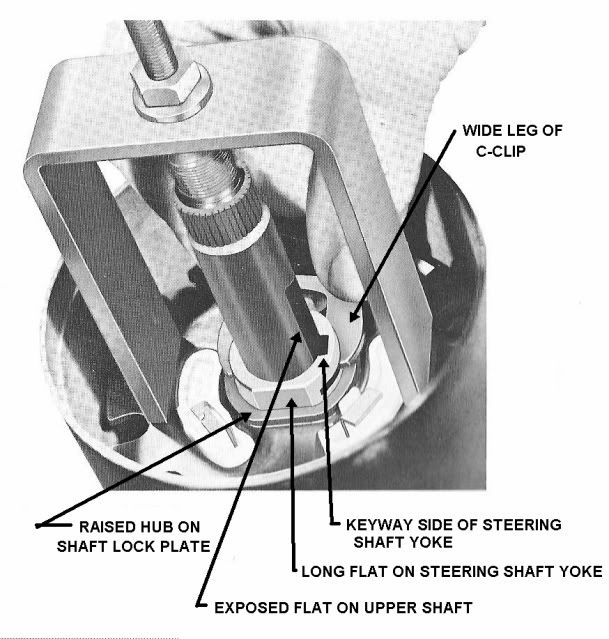
Place the upper bearing preload spring, the cancelling cam, and the shaft lock onto the upper end of the shaft yoke. Note, the steering shaft yoke has two flats on opposite sides of the open end. The flats are not equal in length. Assemble the flat on the cancelling cam so that it matches the long flat on the shaft yoke. Note the location of the long flat with respect to the keyway shown in the above pic. Also, the hub on the shaft lock is raised on one side. The raised hub must be pointing toward the steering wheel as the shaft lock is assembled on the shaft yoke.
Reinstall the locking rod and the “star” screw/set screw. Telescope the upper shaft #41 inward so that the bridge tool can be installed. There must still be some exposed flat on the upper shaft. Tighten the “star” screw with a phillips screwdriver (or you might have to use a #12 set screw with an allen wrench) to lock the shaft in place. Now compress the shaft lock plate with the special bridge tool or by hand. Install the c-clip with the wider leg of the clip on the keyway side of the steering shaft yoke (see the above pic.)
Caution: The c-clip is a critical safety part. If it is omitted or not engaged properly, the entire steering wheel and the upper steering shaft will be able to be pulled right out of the steering column at any time.
Jim
Place the upper bearing preload spring, the cancelling cam, and the shaft lock onto the upper end of the shaft yoke. Note, the steering shaft yoke has two flats on opposite sides of the open end. The flats are not equal in length. Assemble the flat on the cancelling cam so that it matches the long flat on the shaft yoke. Note the location of the long flat with respect to the keyway shown in the above pic. Also, the hub on the shaft lock is raised on one side. The raised hub must be pointing toward the steering wheel as the shaft lock is assembled on the shaft yoke.
Reinstall the locking rod and the “star” screw/set screw. Telescope the upper shaft #41 inward so that the bridge tool can be installed. There must still be some exposed flat on the upper shaft. Tighten the “star” screw with a phillips screwdriver (or you might have to use a #12 set screw with an allen wrench) to lock the shaft in place. Now compress the shaft lock plate with the special bridge tool or by hand. Install the c-clip with the wider leg of the clip on the keyway side of the steering shaft yoke (see the above pic.)
Caution: The c-clip is a critical safety part. If it is omitted or not engaged properly, the entire steering wheel and the upper steering shaft will be able to be pulled right out of the steering column at any time.
Jim
Le Mans Master
Joined: Jul 2000
Posts: 6,001
Likes: 112
From: Saginaw Michigan
Shims
With respect to shims; There is a "View A" in the steering column blowup above. It says to use sufficient shims so that there is a 0.10 gap between the lower edge of the horn cap (11) and the telescope locking lever (459083). Now with the cap assembly installed there should be this gap. When you depress the horn cap the gap should close and the upper horn contact should be compressed completing the circuit to ground. So if your horn cap is hard against the lever, it might be preventing the cap from compressing the upper horn contact.
You should be able to remove the horn cap assembly and depress the upper horn contact with your fingers without the cap. This will eliminate any interference with the locking lever and should tell you if the horn now works.
Jim
You should be able to remove the horn cap assembly and depress the upper horn contact with your fingers without the cap. This will eliminate any interference with the locking lever and should tell you if the horn now works.
Jim
Acct suspended by request 19 April 2011
Joined: Jul 2009
Posts: 478
Likes: 0
From: La Porte In
If the horn blows all of the time the shaft in the contact ring is hitting the spring and pushing it causing it to blow. So you need some space in between there. If the cap doesn't have play to tight. Shims or something are missing. That simple look at my other reply
