


C3 1977 Spark Plug Wire Question
Thread Starter
Advanced

Joined: Jun 2011
Posts: 73
Likes: 0
Absolutely new to this, so please forgive me for probably sounding silly 
Plan to replace spark plugs this weekend in addition to re-routing the wires. Done all the research on marking the wires in the right firing order etc. Some questions,
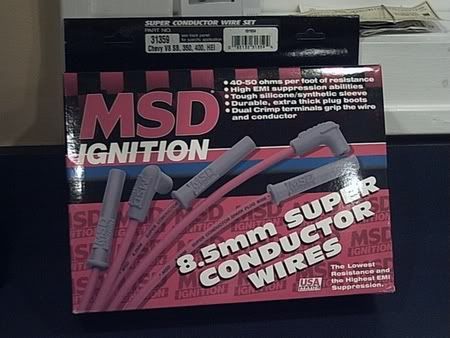
1. Any recommendation on wires? - Looking to get Taylor Spiro-Pros or Moroso wires form Ecklers.
2. Ecklers recommends using the Moroso with headers - (dumb question alert) what is a header and how do I know if I have them??
3. Plan to re-route the wires over the valve covers and down the side. Looks like they will pass over exhaust manifolds - is this a bad idea? Anyone done this before and have any suggestions? Won't the wires just melt away?
4. After looking at it from the top and under the car, it appears to be a beast of a job, any suggestions on how best to work on this. Looks like the 1, 3, 5, 7, 6 & 8 plugs can be accessed from the top or bottom - with some feeling etc and the 2 & 4 accessed from the bottom only. Any suggestions will be appreciated!!!
5. Anyone have pictures of wire re-routes over the valve covers?
Thanks guys!
Plan to replace spark plugs this weekend in addition to re-routing the wires. Done all the research on marking the wires in the right firing order etc. Some questions,
1. Any recommendation on wires? - Looking to get Taylor Spiro-Pros or Moroso wires form Ecklers.
2. Ecklers recommends using the Moroso with headers - (dumb question alert) what is a header and how do I know if I have them??
3. Plan to re-route the wires over the valve covers and down the side. Looks like they will pass over exhaust manifolds - is this a bad idea? Anyone done this before and have any suggestions? Won't the wires just melt away?
4. After looking at it from the top and under the car, it appears to be a beast of a job, any suggestions on how best to work on this. Looks like the 1, 3, 5, 7, 6 & 8 plugs can be accessed from the top or bottom - with some feeling etc and the 2 & 4 accessed from the bottom only. Any suggestions will be appreciated!!!
5. Anyone have pictures of wire re-routes over the valve covers?
Thanks guys!
Team Owner


Joined: Jun 2000
Posts: 38,923
Likes: 1,482
From: Southbound
Cruise-In II Veteran
Stock GM.
Tube headers are aftermarket exhausts. Cast iron is stock.
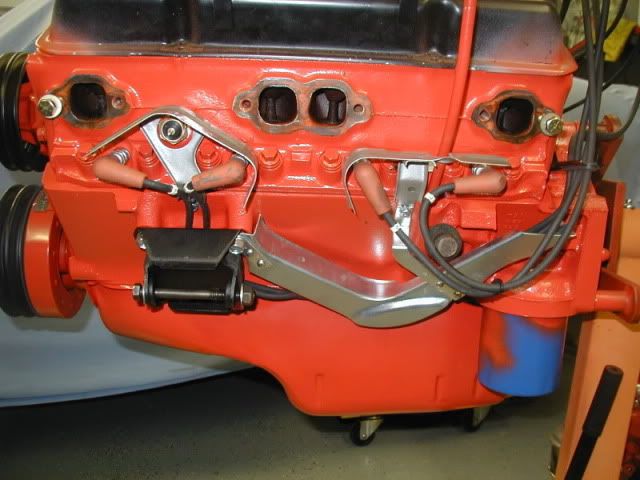
Yes. GM routed the wires down the rear of the block and behind the factory exhaust to keep them from burning.
Best is to pay someone else to do it. Next to that, beer helps. If the OEM wires have never been changed, expect to find #1 and #3, #2 and #4 running under the engine mounts on their respective sides.

...what is a header and how do I know if I have them?...
...Plan to re-route the wires over the valve covers and down the side. Looks like they will pass over exhaust manifolds - is this a bad idea?...
...After looking at it from the top and under the car, it appears to be a beast of a job, any suggestions on how best to work on this...
Last edited by Easy Mike; Jun 28, 2011 at 01:57 PM.
Thread Starter
Advanced
Joined: Jun 2011
Posts: 73
Likes: 0
Thanks for the pictures and comments, this forum is awesome! - started working on it yesterday. Having the hardest time accessing the plugs on the passenger side, especially #6 & #8. There is a shield in the way, pretty straightforward to remove, but IMPOSSIBLE TO REACH!!! Ahhh ..... FRUSTRATING!!
Drifting

Joined: Jun 2007
Posts: 1,404
Likes: 1
From: Ansonia/NYC CT
If you come at it from the bottom, it's cake. Though, if they are the orig wires, the boots can tend to be REALLY stuck on there.
As for wires, I know someone said stock GM, but I SWEAR by the yellow Accel wires.
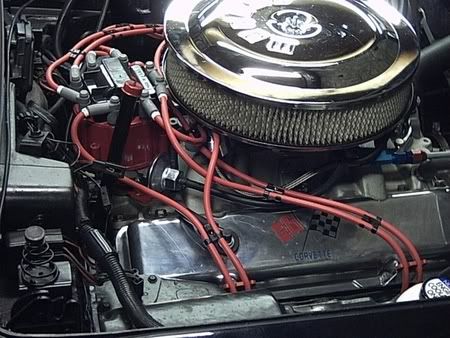
As for routing them over the valve covers, no problem. Just make sure you specify that when ordering your wires. If possible, order with a living, thinking, breathing person, to ensure you get the right thing, otherwise your wires will be awfully long. The only heat issues you have are the intake, which is the thing your carb and aircleaner sit on, just ahead of the distributer, and the exhaust manifold, which is connected to the 4 ports on each side adjacent the plug boots. Keep the wires off of those 2 things, and you have nothing to worry about.
Make SURE you put a healthy amount of dialectric grease on the plugs before putting the new boots on.
Welcome to the club.
As for wires, I know someone said stock GM, but I SWEAR by the yellow Accel wires.
As for routing them over the valve covers, no problem. Just make sure you specify that when ordering your wires. If possible, order with a living, thinking, breathing person, to ensure you get the right thing, otherwise your wires will be awfully long. The only heat issues you have are the intake, which is the thing your carb and aircleaner sit on, just ahead of the distributer, and the exhaust manifold, which is connected to the 4 ports on each side adjacent the plug boots. Keep the wires off of those 2 things, and you have nothing to worry about.
Make SURE you put a healthy amount of dialectric grease on the plugs before putting the new boots on.
Welcome to the club.
Corvette Stories
The Best of Corvette for Corvette Enthusiasts

Corvette & Porsche 911: How Two Icons Conquered the Last 25 Years
Joe Kucinski
2027 Chevrolet Silverado 1500 First Look: Everything You NEED to Know!
Michael S. Palmer
5 Best & 5 Worst Corvette Daily Drivers
Joe Kucinski
The Headlights of Every Corvette Generation Explained
Joe Kucinski
5 Best & 5 Most Overrated Corvette Track Packages of All Time!
Joe Kucinski
Every 2027 Corvette Engine Explained
Joe Kucinski
Designer Imagines A Corvette That Looks More Like a Corvette Than the Corvette
Verdad Gallardo
10 Ugly Corvettes That We Still Kinda Love
Joe Kucinski
Top 10 Most Expensive Corvettes Ever Sold on Bring A Trailer
Brett Foote
Thread Starter
Advanced
Joined: Jun 2011
Posts: 73
Likes: 0
Kevin and Bob, its up on jack stands and getting to it from under. There are a bunch of shields in the way that are really hard to take off, but after taking off the wheel and with some penetrating oil, was able to do so.
Tried taking off the first spark, was fused in there pretty good, broke it in half and after 2.5 hours, got the first plug out with a bunch of cuts and bruises!
Kevin, thanks for the ideas on over valve routing - made the mistake of ordering pre-cut wires, now they don't fit, have to send them back and buy new ones that I can measure and crimp.
Poof, its been 2 days and I have succeeded in taking out one plug, obviously a rookie here!
BTW, any thing I should be aware of when installing the plugs? I have gapped them to .045 (under hood specs) and put some anti seize on the plug threads.
Thanks again for the help
Tried taking off the first spark, was fused in there pretty good, broke it in half
and after 2.5 hours, got the first plug out with a bunch of cuts and bruises!Kevin, thanks for the ideas on over valve routing - made the mistake of ordering pre-cut wires, now they don't fit, have to send them back and buy new ones that I can measure and crimp.
Poof, its been 2 days and I have succeeded in taking out one plug, obviously a rookie here
!BTW, any thing I should be aware of when installing the plugs? I have gapped them to .045 (under hood specs) and put some anti seize on the plug threads.
Thanks again for the help
Drifting
Joined: Jun 2007
Posts: 1,404
Likes: 1
From: Ansonia/NYC CT
Hey, pros bust there knuckles on old spark plugs, too. Fact is, no matter how many you do, they remain a pain in the @$$.
Try hitting them with penatrating oil the night before you plan on working...PB blaster SHOULD work it's way through the rubber boot, making it easier to remove from the plug itself.
As said before, when putting the new plugs in, make sure to hit them with grease, all over it. It'll keep them from arching or miss firing.
Race Director


Joined: Sep 2004
Posts: 11,874
Likes: 263
From: Arlington Va Current ride 04 vert, previous vettes: 69 vert, 77 resto mod
only tip i can think if is to use an off set box end wrench on the front pass side plug if you have headers...it makes life alot easier
Thread Starter
Advanced
Joined: Jun 2011
Posts: 73
Likes: 0
Poof, 9 hours later, got the driver side and the # 2 plug on the passenger side changed. Popped my left shoulder, crap from under the car fell into my eyes (brought protective glasses later) and cuts all over the place :'(!!
I sprayed the hell out of it with penetrating oil, no luck with the 4,6 & 8 plug. Did try a number of wrenches, adapters, flexible etc - plugs are in there good, but the lack of space makes it way worse.
Either way, 5 new plugs and 3 old - any harm driving with that until I get to the last 3 plugs next weekend?
Kevin, coated the hell out of it with grease!


Race Director
Joined: Sep 2004
Posts: 11,874
Likes: 263
From: Arlington Va Current ride 04 vert, previous vettes: 69 vert, 77 resto mod
Thread Starter
Advanced
Joined: Jun 2011
Posts: 73
Likes: 0
Question:
Is the chrome shielding really a necessity?
I took of the chrome shielding from the distributor and the side shields for the wires. Almost seems like this was just a engine bay dress up option but also heard that it helps again radio inteference.
Also, is it ok to keep the heat shields off under the headers? Almost seems like they are unnecessary especially if the wires are routed over the valve covers. Maybe they could burn the boots if left off?


Heel & Toe
Joined: Jun 2011
Posts: 22
Likes: 6
My 1976 was running poorly so after the fuel pump didn't make a difference - decided to work on the Plugs/Wires/Cap/Rotor next - all which were original.
Plugs had to be original - one fell apart when I tried pulling the boot off, the others ranged from burnt, to a couple with the porcelain electrode missing the insulating porcelain layer on the spark side. Yes these are a PAIN to replace - lots of sacrificial skin, blood, and a couple of carefully chosen words.
Cap and rotor were easy - but condition of rotor was dreadful - pitted, corroded. Cap spark points had heavy pitting on them. Cleaned and oiled components while open and before reassembly.
Best was the wires - lots of FUN FUN FUN. I bought a set of AC Delcos on ebay and yes I found the challenge to be a royal PITA - especially the ones going through the front motor mounts. After jacking the car I did find it a little - make that real little easier - but it would have been impossible to do this from the top.
Final result - this fired up and now accelerates without issue. This used to have a definitive skip, and when accelerating you would feel the motor bog down as RPMs increased on hard acceleration - I was originally going to look at dropping the tank if this didn't resolve my driveability issue. Now a VERY injured but happy camper.
Advanced
Joined: Jul 2015
Posts: 98
Likes: 1
From: Bayville New Jersey
I realize this is an old thread but doing the wires myself on my 76 and the question i have is does the motor mount have to come out to get the wire ends thru or can they snake thru
and does the starter have to come out to remove the r/s rear wires
tia
or any other hints just got a set of delco wires the ones on there are the original packard ones and original plugs car has 40,000 miles
and does the starter have to come out to remove the r/s rear wires
tia
or any other hints just got a set of delco wires the ones on there are the original packard ones and original plugs car has 40,000 miles