
Installing screw in studs in Vortec heads.
 09-08-2011, 02:45 PM
#1
Melting Slicks

Thread Starter

Just because its something I've just done, thought I would post up some pics for other n00bs like me starting out on an engine build.
First we take one Vortec head.
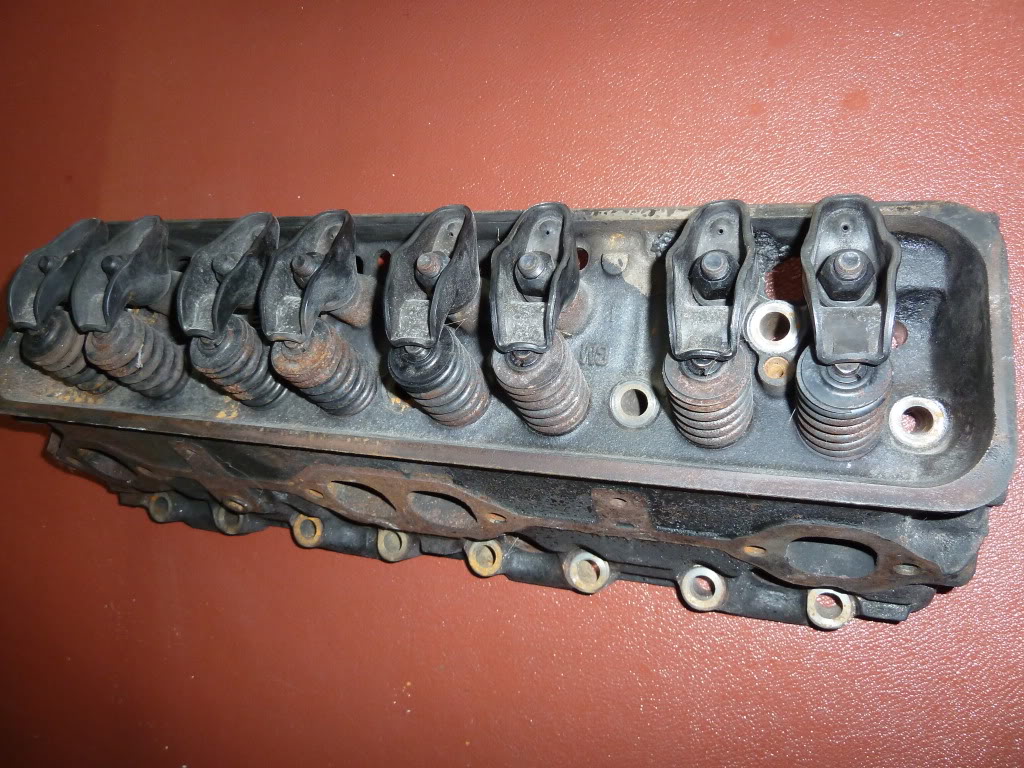
Remove the stamped rocker arms....
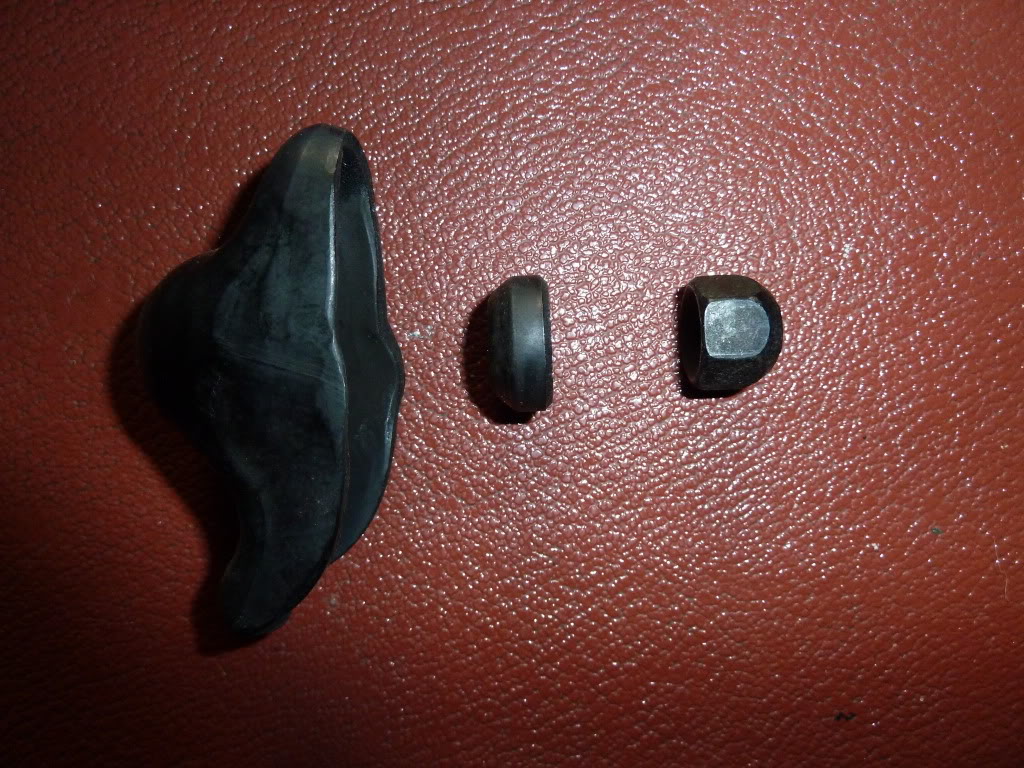
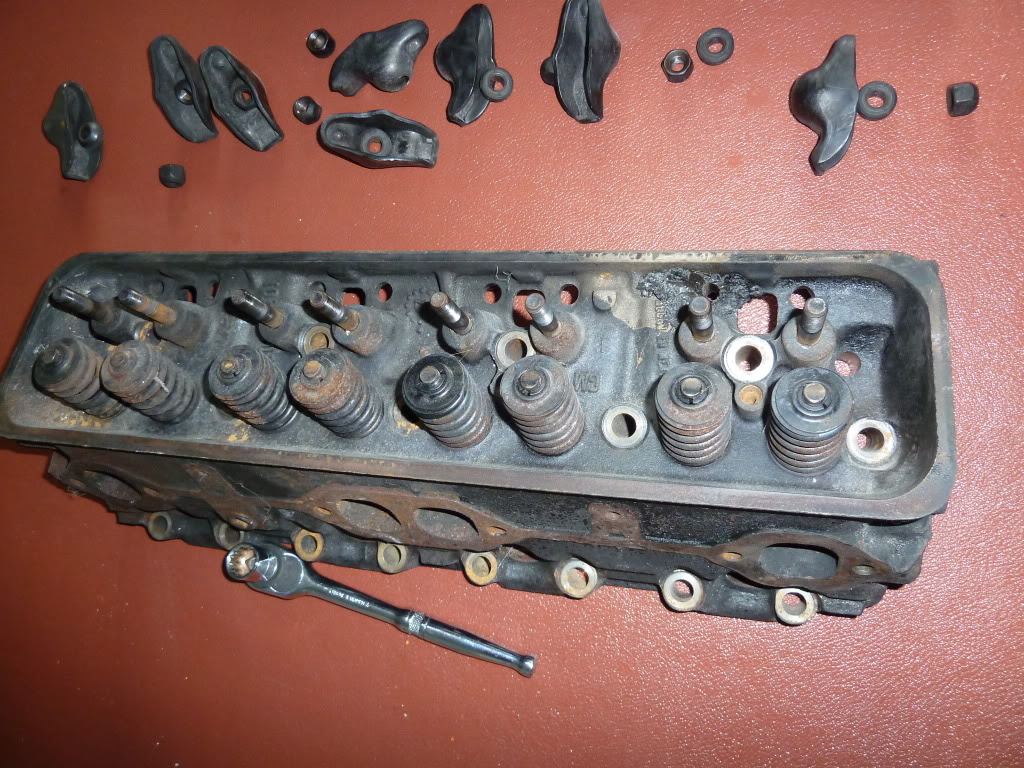
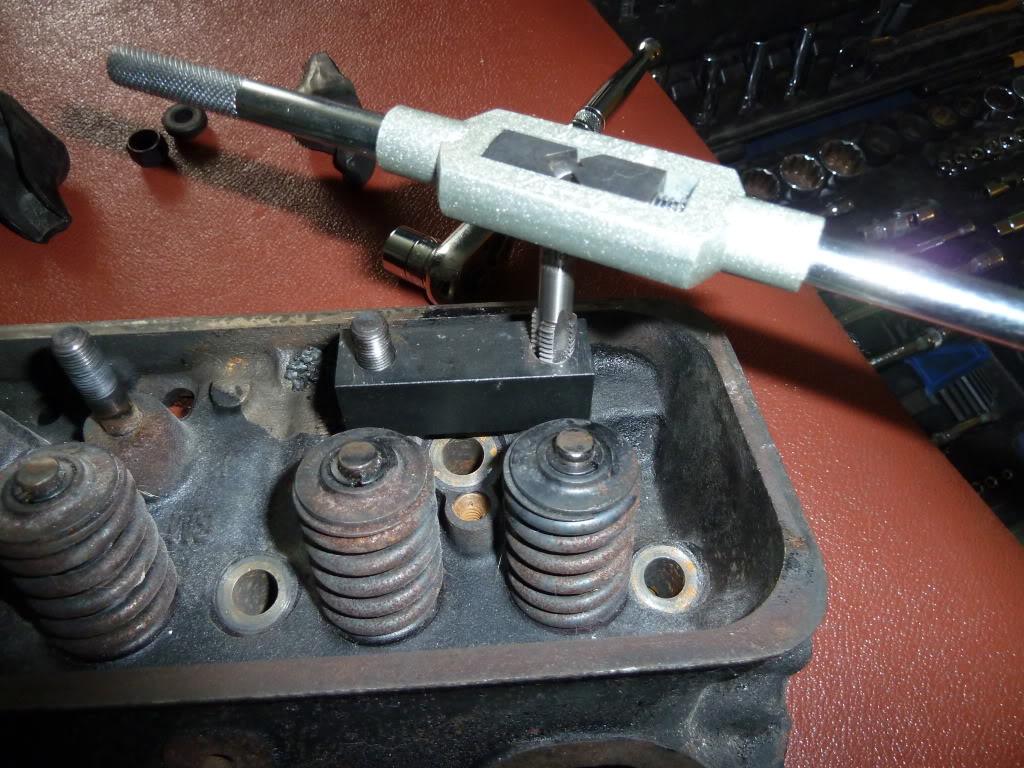
Then using a washer stack, tighten the nut and it slowly pulls out the stud.
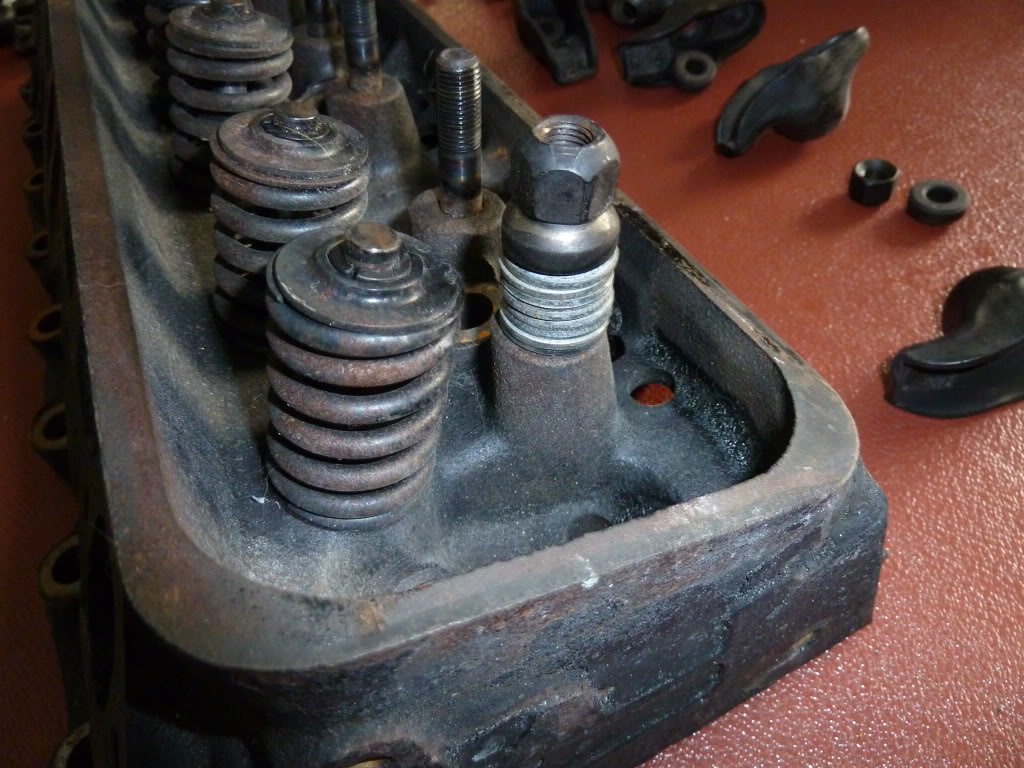
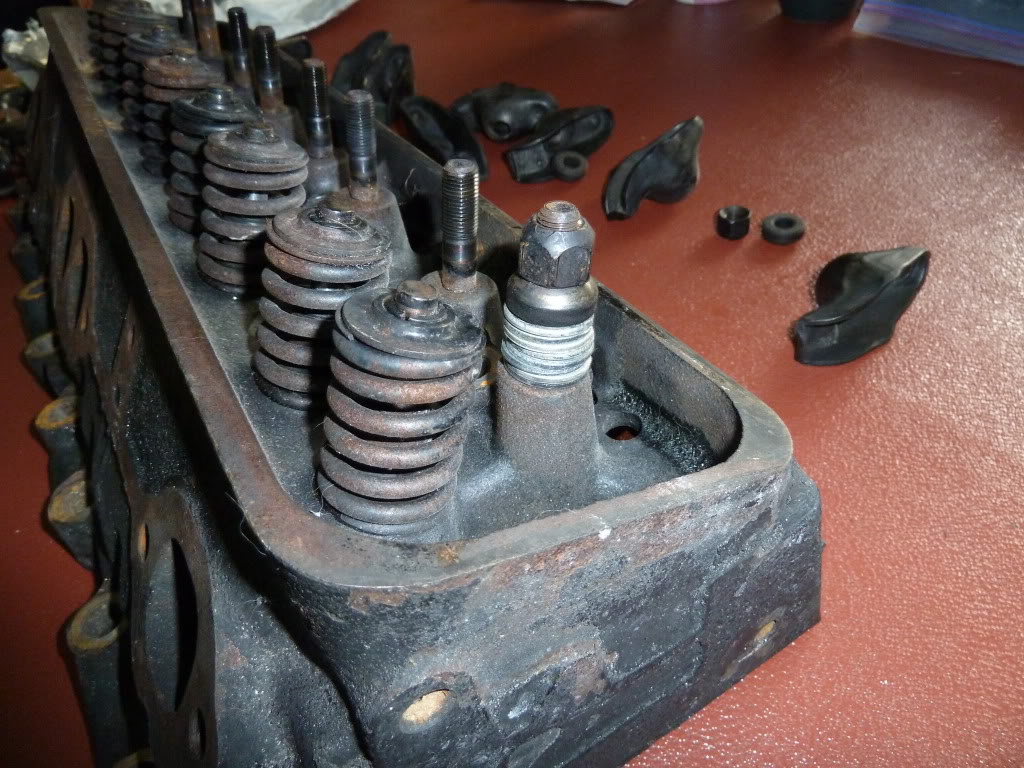

Check the diameter of the hole. I will be using 7/16 UNC taps for which the drill size is 'U' or 9.4mm As you can see, the hole is already correctly sized ready for tapping.
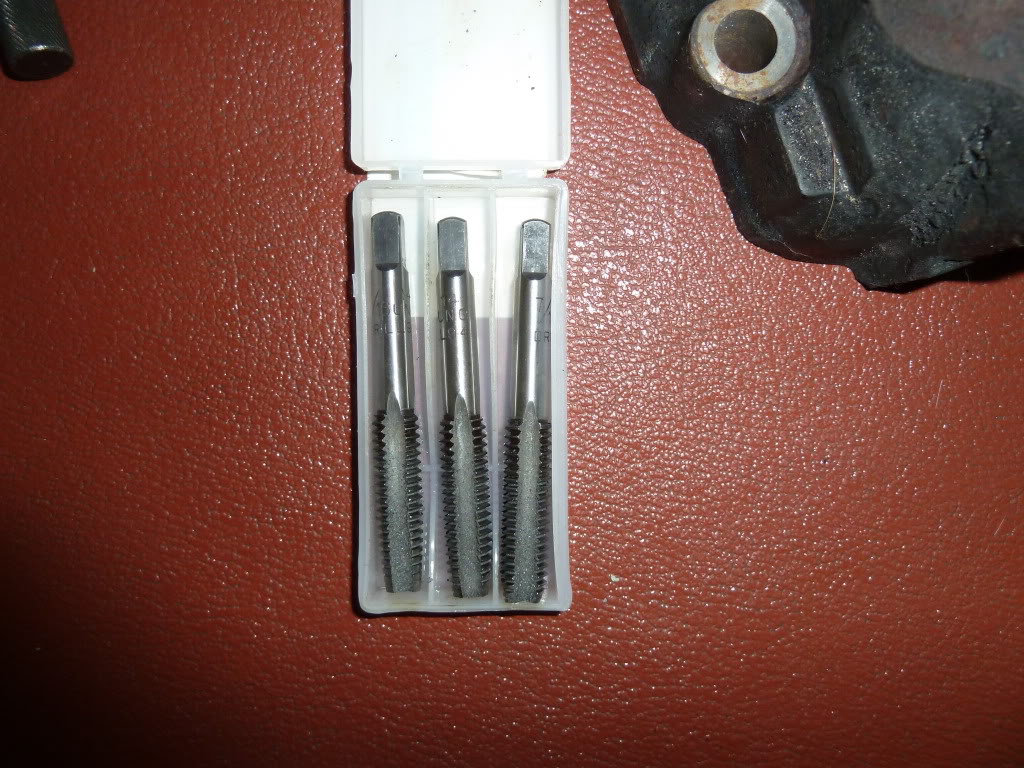
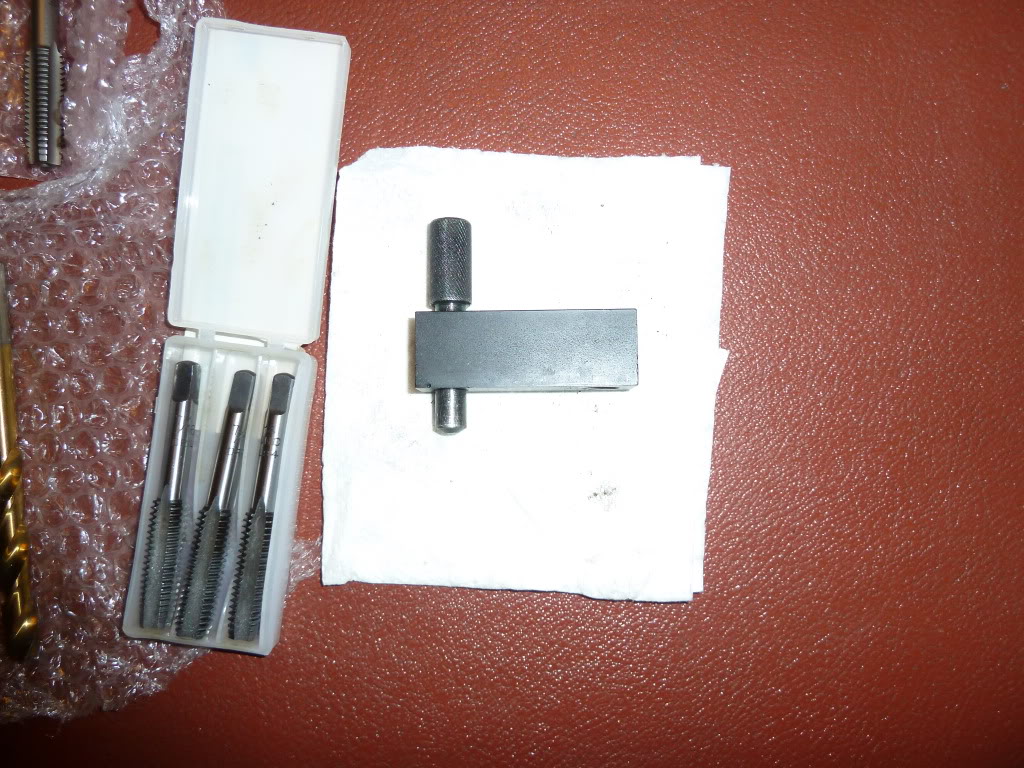
Taps.
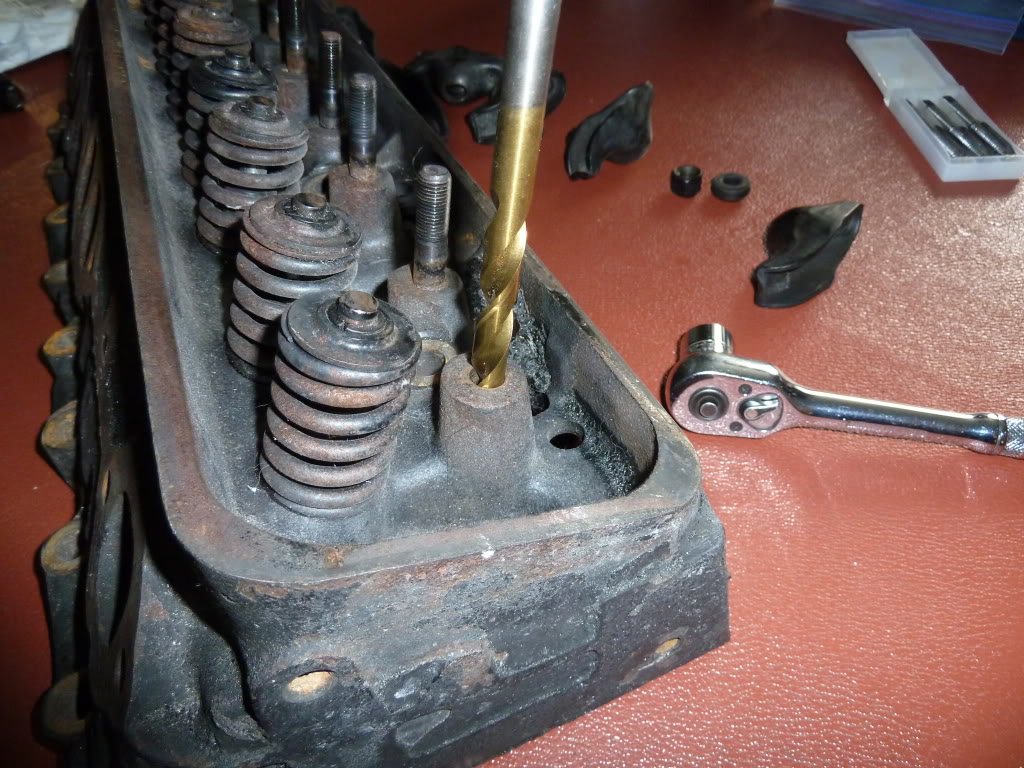
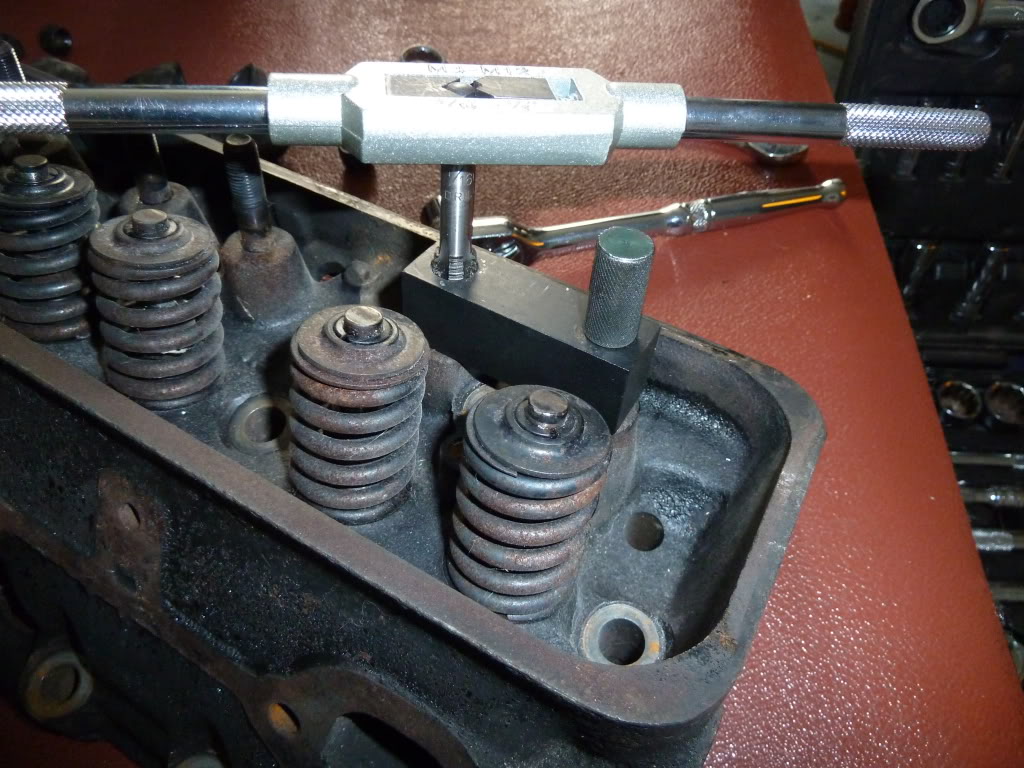
Using this tool from Summit Racing to ensure correct alignment of tap in hole,
We begin the process of hand tapping the hole.
Repeat as required.
After about an hour you have the finished head.
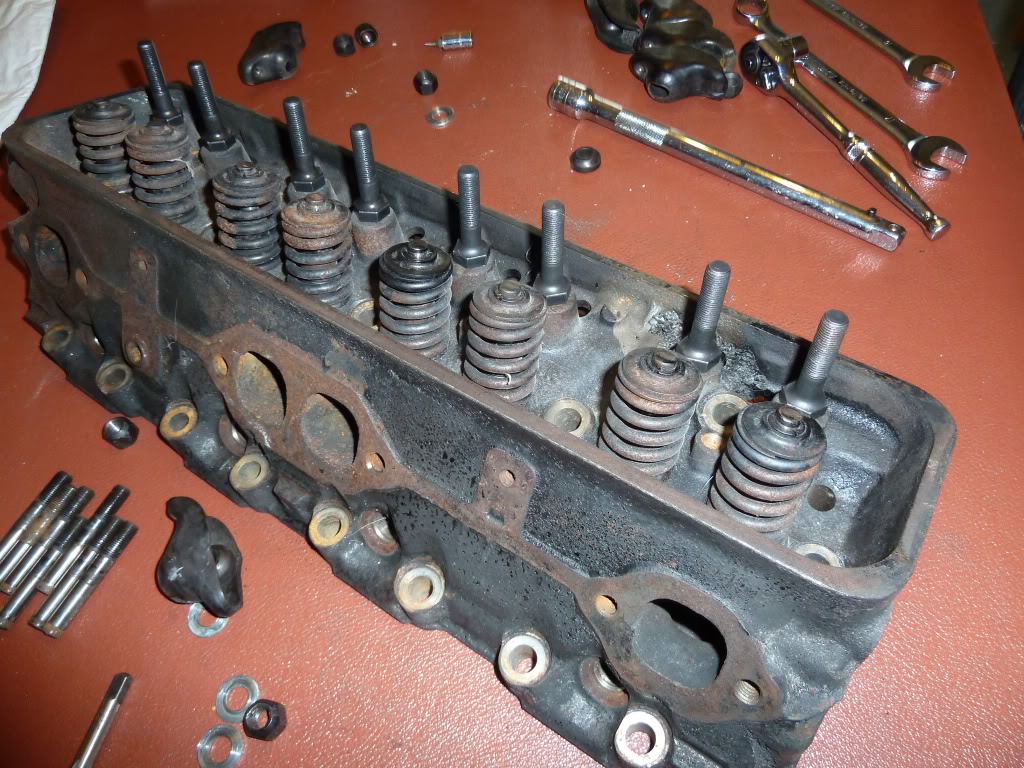
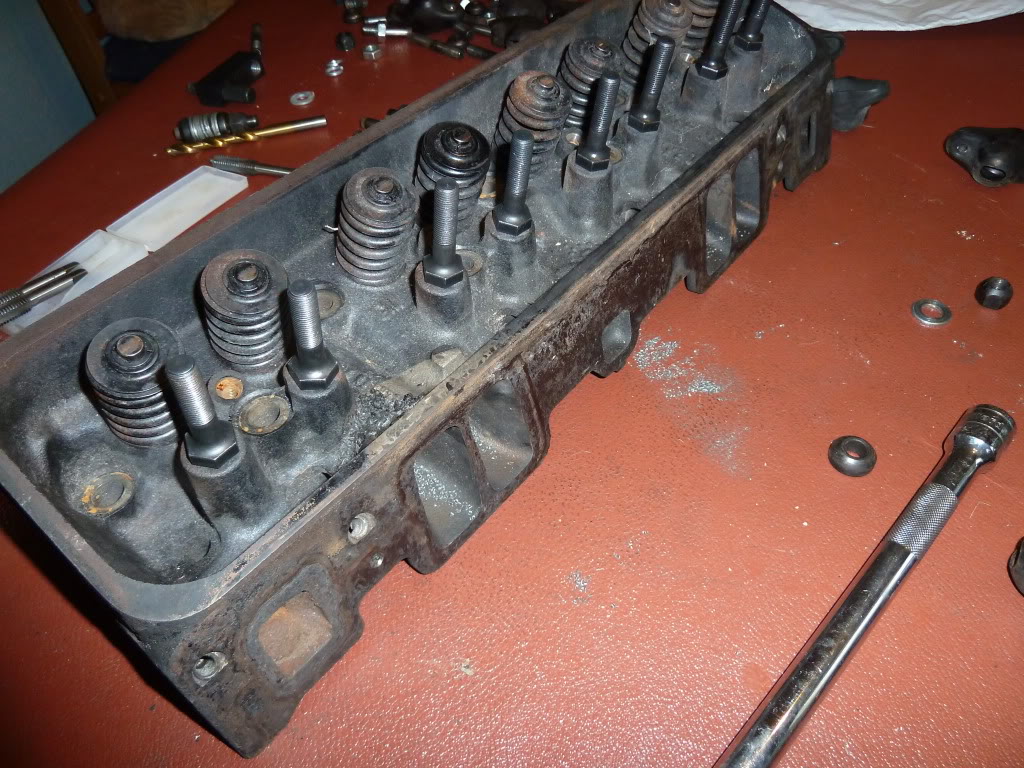
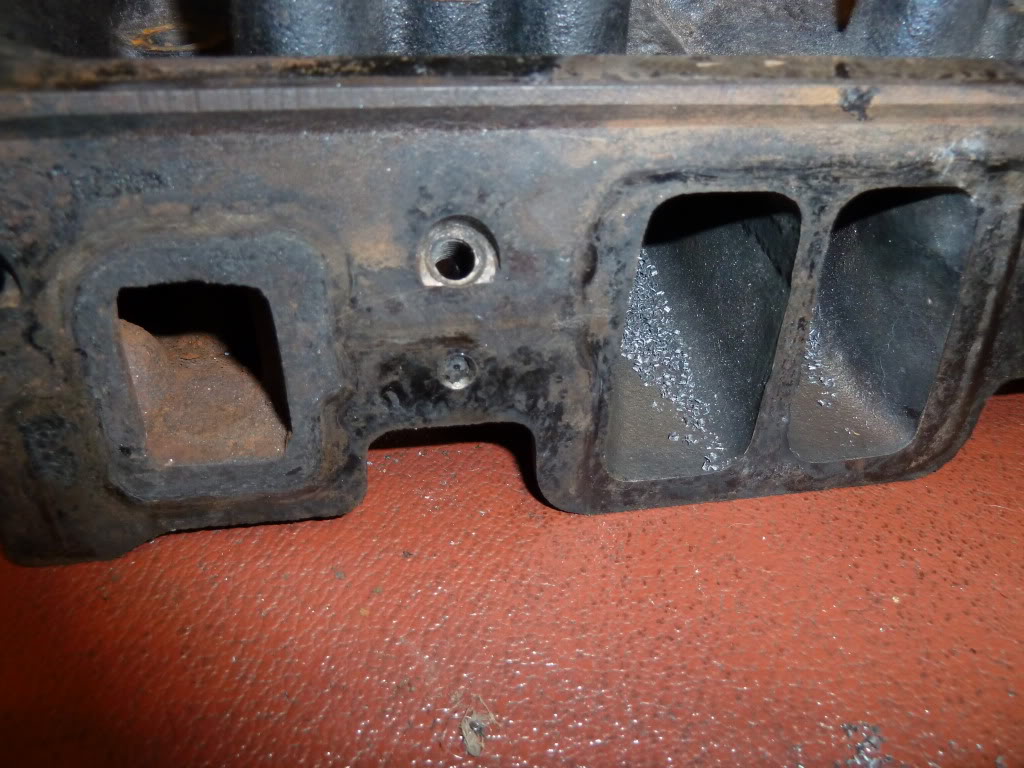
One question, the small hole shown here below the manifold bolt hole seems to be plugged with a black sealant. What is the hole and what is it for?
First we take one Vortec head.
Remove the stamped rocker arms....
Then using a washer stack, tighten the nut and it slowly pulls out the stud.
Check the diameter of the hole. I will be using 7/16 UNC taps for which the drill size is 'U' or 9.4mm As you can see, the hole is already correctly sized ready for tapping.
Taps.
Using this tool from Summit Racing to ensure correct alignment of tap in hole,
We begin the process of hand tapping the hole.
Repeat as required.
After about an hour you have the finished head.
One question, the small hole shown here below the manifold bolt hole seems to be plugged with a black sealant. What is the hole and what is it for?
Last edited by jotto; 09-08-2011 at 02:50 PM.
 09-08-2011, 03:28 PM
#2
Le Mans Master


nice job.
that hole is for the alignment tab on the gasket sets. someone before you probably gooped up their gaskets with RTV. clean the sealant out of the hole before you put your intake gaskets on.
that hole is for the alignment tab on the gasket sets. someone before you probably gooped up their gaskets with RTV. clean the sealant out of the hole before you put your intake gaskets on.
 09-08-2011, 04:03 PM
#4
Le Mans Master


Great pics!
The jig should also be used during drilling to ensure the drilled hole is concentric in all respects to the boss. The existing hole kinda guides it, but the straighter the better
Typically in this application shoulderless studs are used as the top of the stud boss isn't machined flat...so the studs end up being quite a bit taller and inconsistent height due to casting differences. If shouldered studs are used, then the stud boss should be machined flat and to a consistent height. This can be done at home...but best done by a shop.
Finally, if the rockers/***** are going to be reused you'll want to zip-tie them together as they do "take a set" and wear in together. New Vortec rockers/***** are available pretty cheap from GMPP.
Last edited by billla; 09-08-2011 at 04:07 PM.
09-08-2011, 04:08 PM
#5
Melting Slicks
Thread Starter
Thanks for the replies and the info.
qwank, will clean out the hole, no problimes.
Mike, Thanks! lol. The tool from summit worked really well.
Bill, I was going to say that the installed studs are taller than stock. Will see if there is any interference anywhere but hopefully all good. This is going to be a cheap frankenstein build using what parts are available to me here in the UK. Havent really done any research as to whether it will all work together but if it fails, I still have stock!
I know some time ago you posted a dyno thread....want to run the numbers for me? What info would you need?
09-08-2011, 04:29 PM
#6
Le Mans Master
I don't think you'll hit any interference...but you will need some non-standard length pushrods for sure and will need to very, very carefully check valvetrain geometry. When you get a chance, take a straightedge and lay it across the tops of the studs just to see how consistent they are. If they're close enough...then close enough
Shoot me all the specs via PM - most importantly a link to the cam card - and I'll take a swing
Shoot me all the specs via PM - most importantly a link to the cam card - and I'll take a swing
09-08-2011, 04:44 PM
#7
Melting Slicks
Thread Starter
I don't think you'll hit any interference...but you will need some non-standard length pushrods for sure and will need to very, very carefully check valvetrain geometry. When you get a chance, take a straightedge and lay it across the tops of the studs just to see how consistent they are. If they're close enough...then close enough
Shoot me all the specs via PM - most importantly a link to the cam card - and I'll take a swing
Shoot me all the specs via PM - most importantly a link to the cam card - and I'll take a swing
I was under the impression that my stock pushrods would be OK with this build but I will check.
Just ran a straight edeg across the tops of the studs and they are all pretty damn close to being the same, very very minor difference in them.
Sent a PM, hope all the info you need is there if not, let me know what else you need! Appreciate you taking the time to look for me.
09-08-2011, 04:47 PM
#8
Le Mans Master
Normally stock 7.800 pushrods would be fine, but you've raised the fulcrum point quite a bit...so it's going to take longer, potentially custom longer...pushrods :/
09-08-2011, 05:01 PM
#9
Melting Slicks
Thread Starter
Yes, self aligning. Think the Gm part was about $57.
n00b question. You say I have raised the fulcrum point quite a bit....how?
Thinking as a complete novice here so help me out....I simply have replaced a push in stud with a screw in stud, all other factors remain constant. Are you saying that a vortec head design/geometry is totally different to a stock head design with regards pushrods?
09-08-2011, 05:38 PM
#10
Le Mans Master
Nope, hang on a sec
Think about the relationship between the front and back of the rocker arm. The front rides on the valve, the back on the pushrod. When you installed the shouldered studs, they're taller, right? Actually, probably a fair bit taller. So the ball will be up a fair bit taller on the stud. The valve can't move...so the pushrod must become longer to maintain the geometry.
You'll find out when you go to mock it up
09-08-2011, 05:45 PM
#11
Melting Slicks
Thread Starter
Nope, hang on a sec
Think about the relationship between the front and back of the rocker arm. The front rides on the valve, the back on the pushrod. When you installed the shouldered studs, they're taller, right? Actually, probably a fair bit taller. So the ball will be up a fair bit taller on the stud. The valve can't move...so the pushrod must become longer to maintain the geometry.
You'll find out when you go to mock it up
Think about the relationship between the front and back of the rocker arm. The front rides on the valve, the back on the pushrod. When you installed the shouldered studs, they're taller, right? Actually, probably a fair bit taller. So the ball will be up a fair bit taller on the stud. The valve can't move...so the pushrod must become longer to maintain the geometry.
You'll find out when you go to mock it up
If the valve hasnt moved ( front of the rocker ) and the back of the rocker is still on the same pushrod, the fulcrum point will still be in the same place on the stud all be it a different stud? Surely the stud height wont matter? ( dont shoot me down in flames, I did say I was a novice and Im just trying to get it straight in my pea brain! lol )
Good job I have a pushrod checker! Thanks for the heads up, will certainly check it out.
09-08-2011, 05:56 PM
#12
Le Mans Master
If the valve hasnt moved ( front of the rocker ) and the back of the rocker is still on the same pushrod, the fulcrum point will still be in the same place on the stud all be it a different stud? Surely the stud height wont matter? ( dont shoot me down in flames, I did say I was a novice and Im just trying to get it straight in my pea brain! lol )
Good job I have a pushrod checker! Thanks for the heads up, will certainly check it out.
Good job I have a pushrod checker! Thanks for the heads up, will certainly check it out.
Post more great pics as you check it!
 09-08-2011, 06:33 PM
#14
Le Mans Master
Will do when I get home tonight.
Hey...note on that cam - it will *not* work with stock Vortec springs; .450 lift max...and even with that it's pretty darn tight.
Hey...note on that cam - it will *not* work with stock Vortec springs; .450 lift max...and even with that it's pretty darn tight.
09-08-2011, 08:05 PM
#15
Melting Slicks
Thread Starter
Yeah I hear you on the springs. I checked on the springs in the cam kit and will check all measurements on mock up but from the measurements I have already taken I will have clearance and no coil bind. When I get to my pc in the morning I will post up what I have.
Just enjoying tinkering at the mo. Lol.
Just enjoying tinkering at the mo. Lol.
09-08-2011, 08:11 PM
#16
Le Mans Master
Cool - but the issue with high lift on the Vortecs isn't coil bind...it's that the retainer hits the valve seal...so make sure you check all the clearances
09-08-2011, 09:09 PM
#17


fulcrum point doesnt change.
if the stud sticks up farther then that means the nut will have to be screwed down farther to adjust valve lash. question would be if they stick up to far you might run out of threads or have a clearance problem between the bottom of the rocker and the new stud shoulder.

if the stud sticks up farther then that means the nut will have to be screwed down farther to adjust valve lash. question would be if they stick up to far you might run out of threads or have a clearance problem between the bottom of the rocker and the new stud shoulder.
Last edited by project C4; 09-08-2011 at 09:20 PM.
09-08-2011, 09:54 PM
#18
Drifting


Project c4 is correct. The valve stem is no longer if you increase the push rod so you have enough adjustment you'll change the geometry of your valve train. What may happen with the shouldered stud is run out of adjustment room. To keep the geometry correct if the valve increases in length then you'd have to increase the push rod length to keep the rocker running in the center of the valve stem tip. I'd take them to the shop and have them mill the stem boss lower and flat and then reinstall the shouldered stud or go to the straight stud. Personally I think the studs you have are a bit stronger than the straight stud.My opinion
09-09-2011, 03:32 AM
#19
Melting Slicks
Thread Starter
Bill, again when I checked a new spring and retainer on a valve I did have clearance. I know vortecs are lift limited, I think it is in part due to the OE retainer used with quite a large bulge on its underside.
From my notes, I see the measurement from the bottom of the new retainer to the top of the installed valve stem seal is .520 so with a lift of .480 I should be in the clear.
project C4 and Indiancreek, that was my thinking ref geometry.
If the bosses need machining down, I will do it, Summit has a tool for that also! lol.
Last edited by jotto; 09-09-2011 at 06:21 AM.
09-09-2011, 07:39 AM
#20
Drifting
Take them to a shop and have them put your heads on their guide and seat machine or mill and get them taken down to the same height. Or at least get a bid from them. You've done the hard work by having all the studs removed.