
LS3 into my 72
 09-24-2011, 04:34 PM
#21
Race Director

Thread Starter
OK Photobucket back up and working.
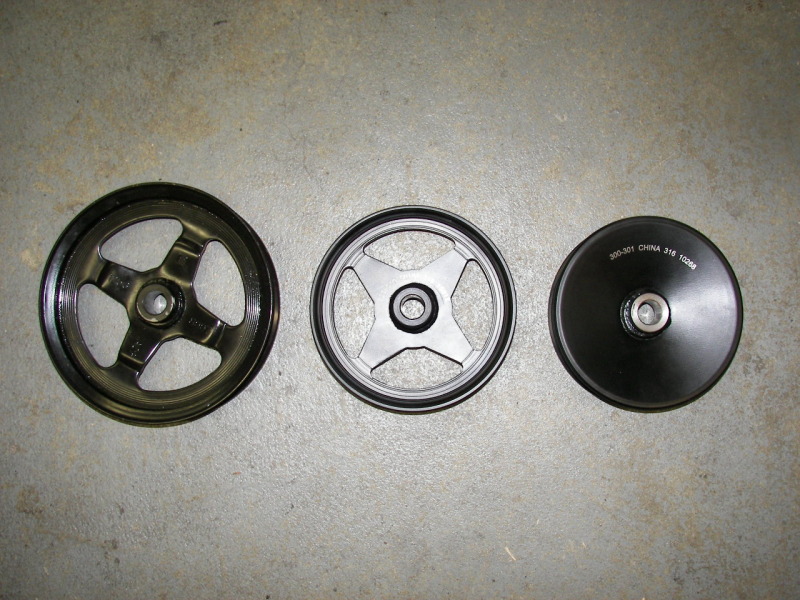
Here are the three pulleys I have. The left one is the Vette pulley at 6 5/8 diameter and a .660 hole. Next one is the Dorman 300-310 at 5 5/8 with a .620 hole. Next up is the Dorman 300-301 at 5 5/16 with a .660 hole. Either of the two Dorman ones will work I just have to see which one lines up better with the belt when it is fully on the shaft. It does look like the offset is a little different between the two Dorman pulleys.
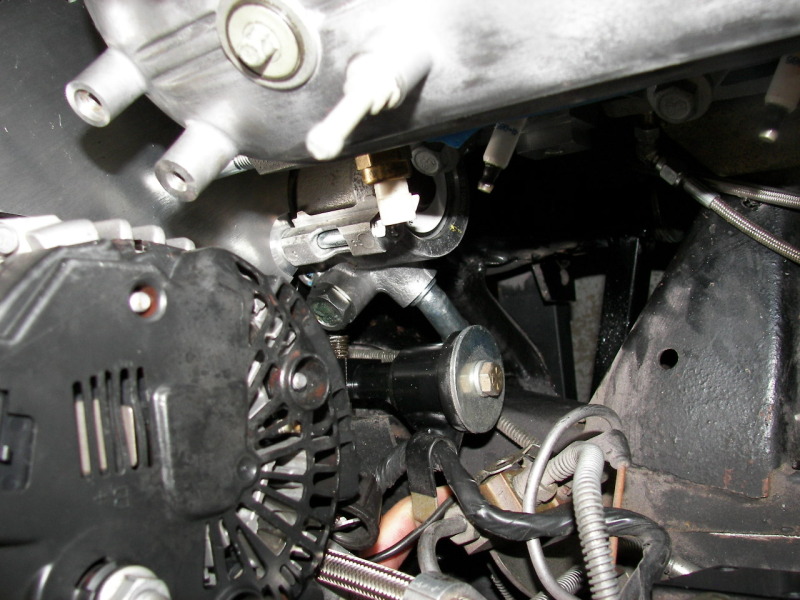
Next picture is of the Kwik bracket for Vette Acc. It is pretty much the way it would be bolted onto the motor. The nipple for the remote reservoir is pointing slightly down and away. This points just below the rear of the upper control arm. Plenty of room for the tube to go on. Also you will see the pressure port is pointing straight up which is a good thing. Seeing I run a hydroboost I can run a 90 fitting and it will be pointing directly at the HB unit. I may remove the inlet tube and tap it for a different fitting so I can locate the reservoir where I want it.
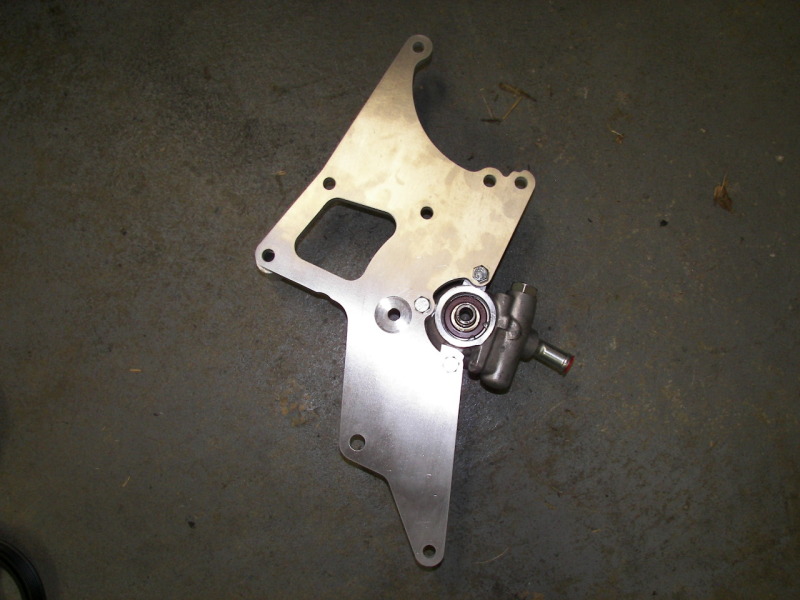
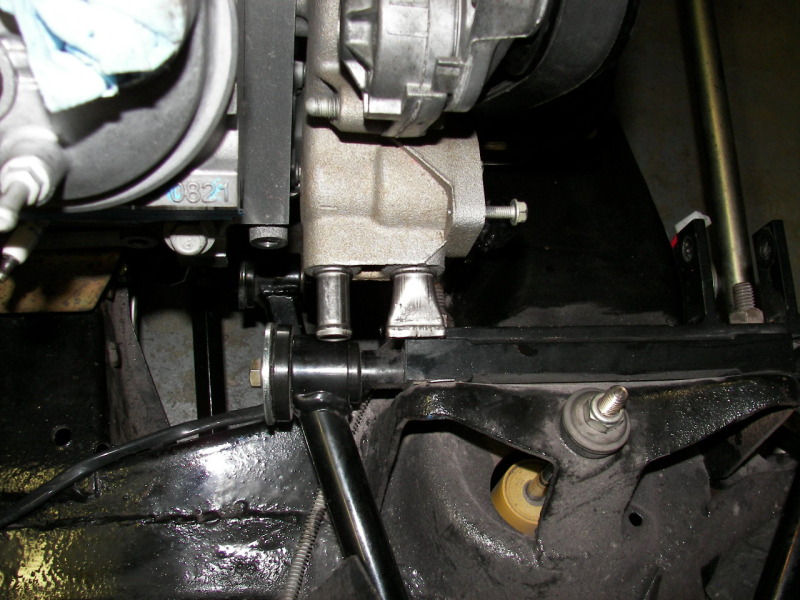
Looking at the last picture I have the stock Vette bracket in its normal position on the motor and next to it the pump the way it would be in the stock bracket. The Kwik bracket actually rotates the pump 180 degrees (approx). The inlet tube is pointing to the left but the stock reservoir is in perfect location obviously doing it this way. The outlet is pointing down this way which is OK for the Stock Vette setup and could be done for my setup but the plumbing is a little more difficult for my setup.

The Fbody pump is a totally different pump and the mounting points are differerent. It uses a reservoir attached type pump so it would not work with the Vette Kwik bracket. If you bought the Kwik bracket for the Fbody I am sure it would fit fine. The bracket looks quite well made and beefy enough. I may use their AC bracket also for the Vintage Air system I am putting in.
Here are the three pulleys I have. The left one is the Vette pulley at 6 5/8 diameter and a .660 hole. Next one is the Dorman 300-310 at 5 5/8 with a .620 hole. Next up is the Dorman 300-301 at 5 5/16 with a .660 hole. Either of the two Dorman ones will work I just have to see which one lines up better with the belt when it is fully on the shaft. It does look like the offset is a little different between the two Dorman pulleys.
Next picture is of the Kwik bracket for Vette Acc. It is pretty much the way it would be bolted onto the motor. The nipple for the remote reservoir is pointing slightly down and away. This points just below the rear of the upper control arm. Plenty of room for the tube to go on. Also you will see the pressure port is pointing straight up which is a good thing. Seeing I run a hydroboost I can run a 90 fitting and it will be pointing directly at the HB unit. I may remove the inlet tube and tap it for a different fitting so I can locate the reservoir where I want it.
Looking at the last picture I have the stock Vette bracket in its normal position on the motor and next to it the pump the way it would be in the stock bracket. The Kwik bracket actually rotates the pump 180 degrees (approx). The inlet tube is pointing to the left but the stock reservoir is in perfect location obviously doing it this way. The outlet is pointing down this way which is OK for the Stock Vette setup and could be done for my setup but the plumbing is a little more difficult for my setup.
The Fbody pump is a totally different pump and the mounting points are differerent. It uses a reservoir attached type pump so it would not work with the Vette Kwik bracket. If you bought the Kwik bracket for the Fbody I am sure it would fit fine. The bracket looks quite well made and beefy enough. I may use their AC bracket also for the Vintage Air system I am putting in.
 09-24-2011, 08:13 PM
#22
Drifting


Since I wont be working on mine any time soon I will have to be happy with watching your build come together.
Looking great so far, it makes me a little antsy to drop everything I have going on right now and dive into my setup.
Keep up the great work.
Riggs
09-24-2011, 08:17 PM
#23
Melting Slicks


The CTS V pulley (12578552) has the same diameter shaft as the Corvette and is on the same belt line. The pulley is just over 6" (6 1/8).
I have both the Corvette and CTS V pulleys in front of me on my computer desk if you need any specific measurements.
I have both the Corvette and CTS V pulleys in front of me on my computer desk if you need any specific measurements.


 09-25-2011, 10:44 AM
#25

I've got the Kwik AC bracket, it's a nice piece too. Just be sure to get the suggested brand of tensioner for correct spacing. I think they also came out with a smooth pulley with shoulders on it for better belt holding.
09-25-2011, 10:55 AM
#26
Race Director
Thread Starter
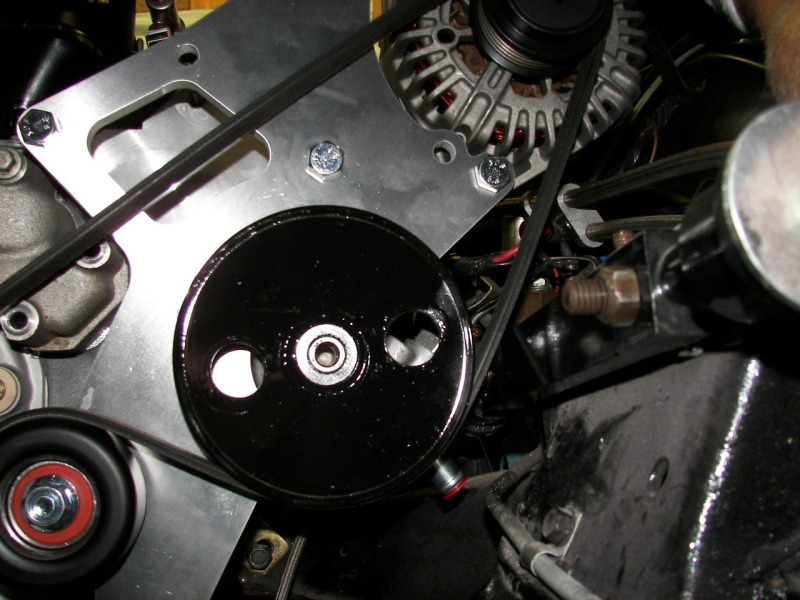
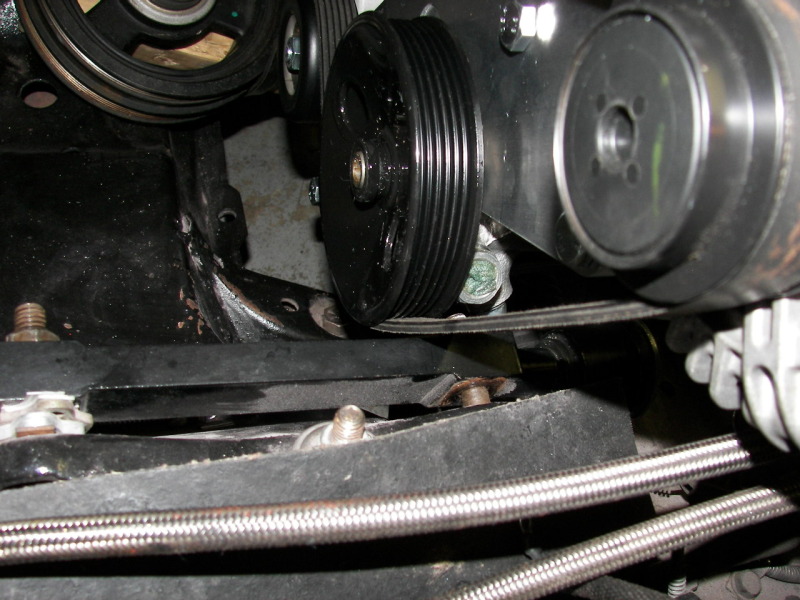
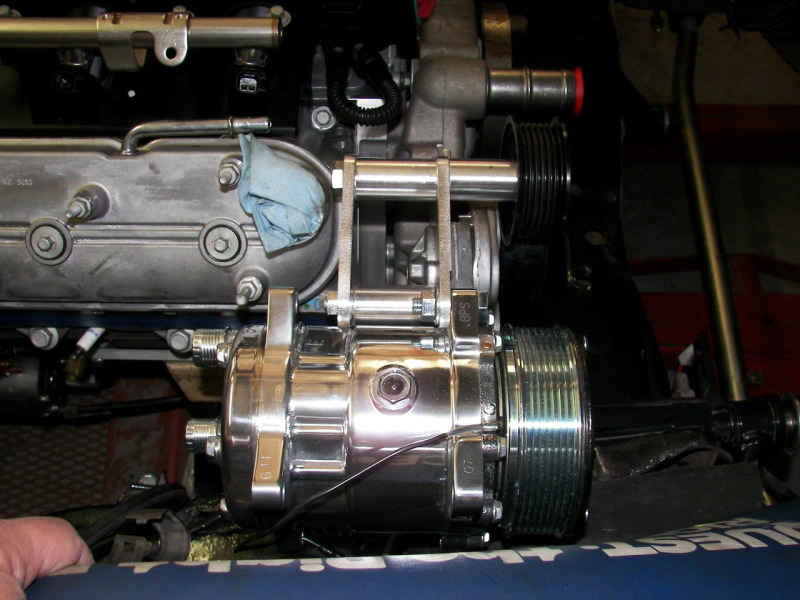
Here it is pretty much in the final mock up stage. Looks like it will work pretty well. Gives good clearance with the belt on to the upper control arm. The belt is definitly not tight here, just wanted to check the alignment of the pulleys. It is dead on. I drilled 2 holes in the pulley so there is access to the mounting bolts for the PS pump. This will make installation much easier.
You can also see in one of the pictures the inlet tube for the remote reservoir. Obviously this will not do for me so I will pull the nipple and make up my own remote can.
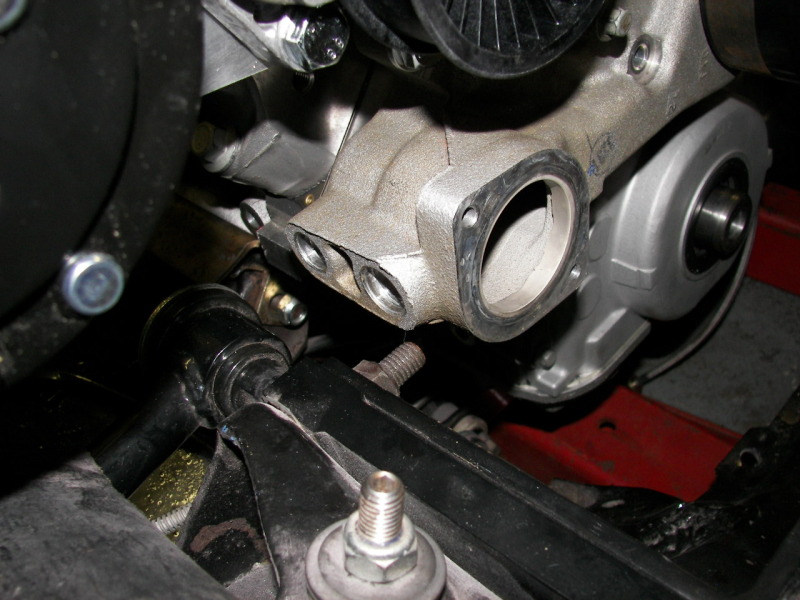
I knew the WP outlets were going to have to be replaced with something and this confirms it. I have seen many options for this and will do one of them.
You can also see in one of the pictures the inlet tube for the remote reservoir. Obviously this will not do for me so I will pull the nipple and make up my own remote can.
I knew the WP outlets were going to have to be replaced with something and this confirms it. I have seen many options for this and will do one of them.

 09-25-2011, 12:57 PM
#28
Safety Car


Just saw this thread. Love this stuff and will have to keep watching. Id love to do a chrome bumper LS project someday. The trick is to try to stay married while I do it! 
My 82 LS1-4L60E car is alive and well and living in Finland with Hannu. 1/4 mile times are 13.1s with the hard-old Dunlop 255-60 tires and that's with the stock cam.
Always loved your car Gordon.
B.
My 82 LS1-4L60E car is alive and well and living in Finland with Hannu. 1/4 mile times are 13.1s with the hard-old Dunlop 255-60 tires and that's with the stock cam.
Always loved your car Gordon.
B.
09-25-2011, 02:21 PM
#29
Race Director
Thread Starter
Thanks everyone for showing an interest. I am doing this to just show what goes into one of these and hopefully help someone in the future. I am neck deep into this now. I have the interior out of the car now as I am putting in a Vintage Air system also. So the car is still getting dismantled right now. Replacing t he front carpet also after 15 years. I will keep updating as I make any progress or any changes that I see are needed to post.
09-25-2011, 06:22 PM
#30
Le Mans Master

I will have to achrive this if I ever go over to the dark side Gordon. I will admit the weight saving along with the improved head flow technology sure is enticing. Just not ready to give up on my current motor, having just too much fun still  10-08-2011, 05:07 PM
#31
Race Director
Thread Starter
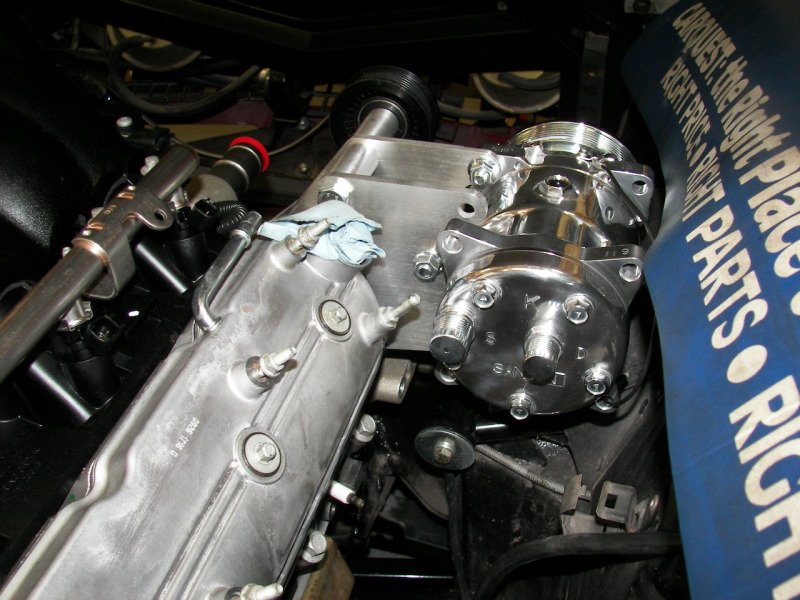
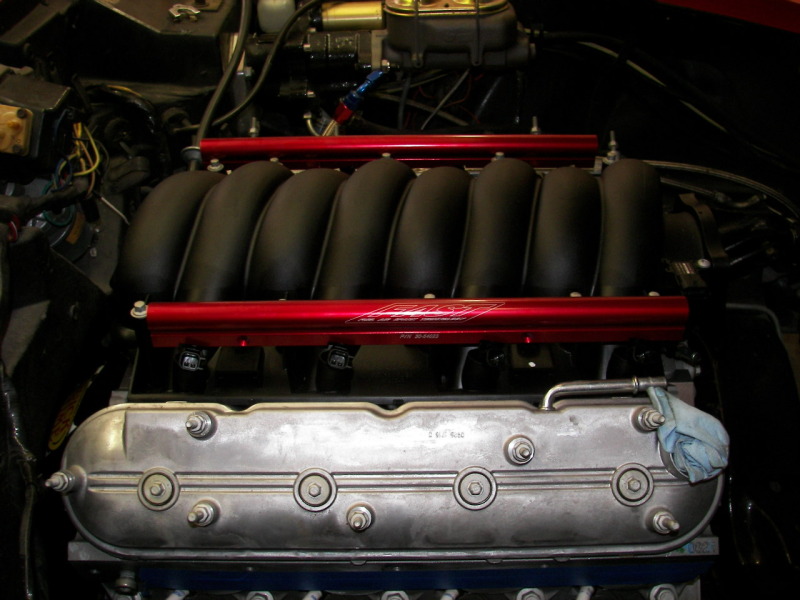
I was gone all week but my Vintage AC system was on the door step when I came home. I just wanted to make sure the compressor and new brackets all fit in. I got a rear discharge compressor to keep the lines clean. I also wanted to see what I was going to do about the heater hoses. Looks like a 90 degree fitting coming out of the WP and I will put an AN fitting on it. Not a ton of room but there will be clearance. Also put on some Fast fuel rails to do away with the stock style. The attaching brackets need some massaging to make it all work but so far that has been the norm on this.
10-08-2011, 06:24 PM
#32
Le Mans Master

Thank you so much for taking the time to post your findings. When you are finished there should be a sticky as with more ls based cars out there (Camaros, C5/6's, GTO) the prices will continue to come down for good used engines and trannies to use. You're a good man Gordon, if we ever happen to meet the first few rounds are on me. 
10-08-2011, 06:37 PM
#33
Safety Car
Great thread!!!
Sure is refreshing to see some discussion on unique fabrication and the skills nessasary to put something like this together.
Another "How do I bleed my brakes" thread or..."My car is running hot" thread may make me start drinkin' again!!!
Very good work...I look forward to the next post.
Sure is refreshing to see some discussion on unique fabrication and the skills nessasary to put something like this together.
Another "How do I bleed my brakes" thread or..."My car is running hot" thread may make me start drinkin' again!!!
Very good work...I look forward to the next post.
10-08-2011, 07:18 PM
#34
Safety Car
Member Since: Aug 2001
Location: North Easton Mass
Posts: 4,883
Likes: 0
Received 8 Likes
on
8 Posts

Thank you so much for taking the time to post your findings. When you are finished there should be a sticky as with more ls based cars out there (Camaros, C5/6's, GTO) the prices will continue to come down for good used engines and trannies to use. You're a good man Gordon, if we ever happen to meet the first few rounds are on me.
http://forums.corvetteforum.com/c3-t...-their-c3.html
Some of us have done this type of swap a few years ago and there are a number of variations on the common theme.
Rick B.
10-08-2011, 08:25 PM
#35
Drifting
Gordonm, It's looking good, I like the fast fuel rails, it really makes the appearance of the intake look better. Are you thinking about installing the 90 degree fittings at the original outlet location? It looks like there is a little more room than on some of the other swaps I have seen. I was thinking about using 45 degree fittings, so when you screw them in they should clear each other and point them up wards away from the control arm.
Riggs.
Riggs.
10-08-2011, 08:42 PM
#36
Race Director
Thread Starter
Gordonm, It's looking good, I like the fast fuel rails, it really makes the appearance of the intake look better. Are you thinking about installing the 90 degree fittings at the original outlet location? It looks like there is a little more room than on some of the other swaps I have seen. I was thinking about using 45 degree fittings, so when you screw them in they should clear each other and point them up wards away from the control arm.
Riggs.
Riggs.
As long as people are still interested in this I will keep posting pictures. Mine is not going to be like any others as most of them are all custom. I have gotten ideas from the post 72ls1vette has talked about. Just doing some things a little different.
The motor will probably come back out next weekend. Still deciding on a cam. Engine bay cleanup and the Vintage AC install is easier with everything out of the way.
10-08-2011, 08:44 PM
#37
Race Director


I like the Fast Fuel Rails. Those look too nice to cover up. Are you planning on running fuel rail covers?
 10-08-2011, 09:12 PM
#40
Drifting
[QUOTE=Gordonm;1578909397]As long as people are still interested in this I will keep posting pictures. Mine is not going to be like any others as most of them are all custom. I have gotten ideas from the post 72ls1vette has talked about. Just doing some things a little different.
QUOTE]
Are you serious, hell yea we want to see your progress, the work you do is top notch and your projects rate right there with the best of them. Your build is already headed into the custom direction and will be Bad Azz when finished.
Riggs.
QUOTE]
Are you serious, hell yea we want to see your progress, the work you do is top notch and your projects rate right there with the best of them. Your build is already headed into the custom direction and will be Bad Azz when finished.
Riggs.