


Ignition Key Problems, calling on Jim Shea
Thread Starter
Safety Car


Joined: Nov 2005
Posts: 3,961
Likes: 573
From: Lompoc, CA. Santa Barbara County
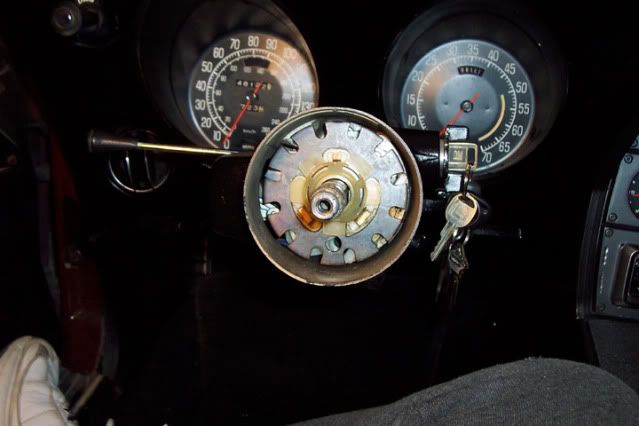
I should have known better, but my 30+ year old key failed me last night, in the run position. I couln't start the car and now the ignition is stuck in the run position. I can't turn it back to off position or forward to start the car. I could remove the old key while in the run position. I used my battery cut off to disconnect the battery and I left the car at work overnight. I now have a newer fresher key, but I can't get it into the ignition to turn it either to start or off. I can get the old key in, but it wont turn the ignition any longer.
I have tilt telescopic btw. I'm about to call the locksmith so I don't have to leave my car again. HELP!
Bee Jay
I have tilt telescopic btw. I'm about to call the locksmith so I don't have to leave my car again. HELP!
Bee Jay
Instructor

Joined: Jul 2011
Posts: 142
Likes: 1
From: Fort White Florida
I went through that about 6 months ago. I got lucky it was in my driveway when it happened. I doubt a locksmith can help you it is probably the key lock cylinder that is the problem. You hook the battery back up and jump the solenoid on the starter to get it running and drive it home or to a mechanic that can replace the cylinder. Jim has some diagrams that show how to do it.

Le Mans Master


Joined: Jul 2000
Posts: 6,001
Likes: 113
From: Saginaw Michigan
I assume your car with the problem is the 1979 in your avatar. Therefore, you do not have that pesky transmission interlock system. You have the small lever near the ignition key that you have to trip to rotate your lock cylinder to the OFF-LOCK position. However, you will have one other problem. You will need to determine exactly what type of ignition lock cylinder your T&T steering column will require. Read further to find out about the newer design lock cylinder that was introduced during the 1979 model year.
It sounds as if you just have a worn out ignition key and/or lock cylinder. If you want to purchase a new lock cylinder and key it is not that bad of a job to remove and replace the original.
REPLACING THE IGNITION LOCK CYLINDER
The procedures that describe replacing the lock cylinder on 1969 through 1982 Corvette steering columns are very similar between a standard (non-adjustable) columns and the Tilt & Telescoping types. The lock cylinder is the same between the two types of columns.
You will need two special tools: A steering wheel hub puller and a locking plate compressor tool. You can usually beg, borrow, or purchase both tools from most automotive stores. One other important point: Disconnect your battery whenever you work on your steering column.
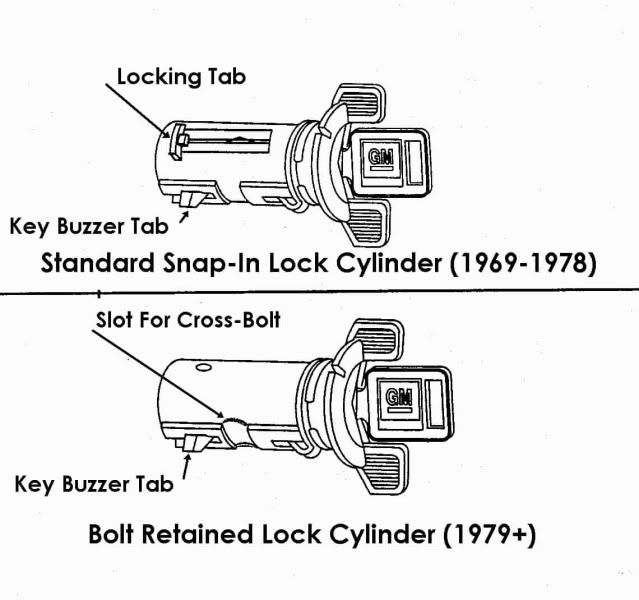
There is a change in the way that the lock cylinder was retained in the turn signal switch housing that occurred during the 1979 model year. Previous to 1979 the lock cylinder had a spring loaded locking tab that engaged a slot in the turn signal switch housing. During the 1979 model year, steering column security was improved with a housing that utilized a cross-bolt that engaged a notch in the lock cylinder. So if you have a 1979 Vette you will have to disassembly the column in order to determine exactly what type of lock cylinder you require.
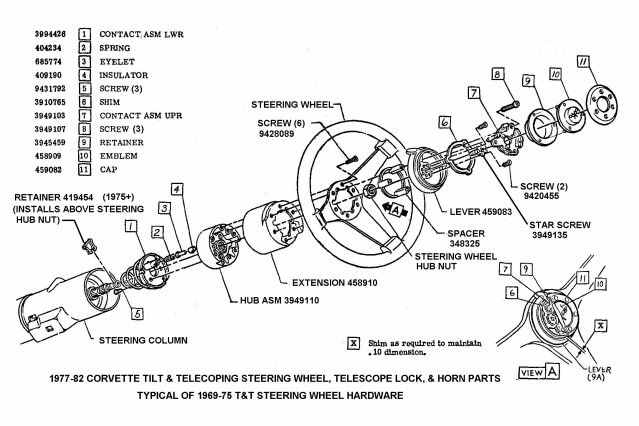
You do NOT need a key to remove the lock cylinder from the steering column. You do have to remove the horn cap, horn parts, telescope lock (T&T), the hazard warning ****, and the steering wheel and hub. You then need to remove a plastic retainer (T&T).
If you have a T&T column that has not been disassembled through the many years of its existence, you might just as well purchase a new plastic retainer before you start the tear down process. If the retainer is original it will break into several pieces as you try to remove it. This part is required to be in place to prevent your horn from blowing continuously. It is GM #7808385 and is no longer available through GM dealers also it is still available through numerous other automotive part sources. It is that tan part right in the middle of the following picture.
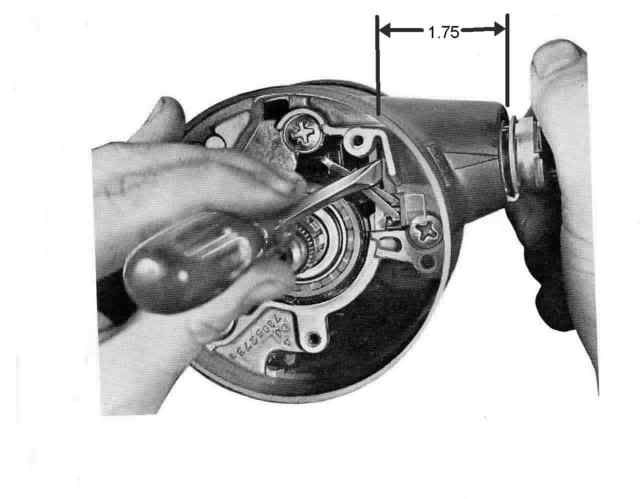
Compress the locking plate so that you can remove a c-clip retainer (T&T) or a small round wire ring . Remove the locking plate and turn signal cancelling cam.
Remove the turn signal switch lever (1969 through 1976) or remove the crossover arm between the turn signal switch and the dimmer pivot (1977 through 1982). Remove the three turn signal switch screws and pull the switch partially out of the column so that you can reach the floor of the turn signal switch housing. (You may need to disconnect the plastic "harmonica" electrical connector down under the dash from the vehicle wiring harness so that you will have enough slack in the turn signal switch wires to allow the switch to just "hang out" of the column head.)
The lock cylinder is held in place by a metal tab that sticks out of the lock cylinder and fits into a rectangular slot in the housing (1969 through early 1979). You need to reach into the slot with a small screwdriver to push the tab back into the lock cylinder. You should then be able to pull the cylinder right out of the column.
As mentioned previously, during the 1979 model year security was improved with the introduction of a allen head screw that assembled into the turn signal housing and passed through a notch on the lock cylinder. This design more securely held the lock cylinder in place and eliminated the metal spring tab. The screw is located at about the 2 o'clock position in the housing. It is right above the torks head housing screw that is at the 3 o'clock position. You will need reach into the housing and unscrew it from the floor of the turn signal switch housing. You should then be able to pull the lock cylinder right out.
Lock Cylinder Installation
Insert the ignition key into the new lock cylinder. Now, hold the case of the lock cylinder and rotate the ignition key all the way clockwise against the stop. (This would normally be the Start position.) You should be able to retract the plastic key buzzer tab and the metal spring tab should retract easily with slight pressure as well.
There is a keyway in the housing. Align the key on the lock cylinder (not the ignition key but the raised section on the lock cylinder case) with the keyway in the housing and push the cylinder into the housing until it hits the sector. Now rotate the ignition key counterclockwise maintaining a light push on the lock cylinder until the drive section of the cylinder mates with the sector. Push in until the locking tab snaps into the housing and the lock cylinder is secure (1969- early 1979). Reinstall the crossbolt on later columns.
Reassemble the column and you are ready to go.
Very complete instructions (for either the T&T or the standard, non-adjustable columns) are available at:
www.corvettefaq.com
Click on Jim Shea's Steering Papers
Click on Corvette Steering Papers
Scroll down to either the standard column or the T&T column section
Download Disassembly & Repair Paper #1 and the Disassembly & Repair Pic #1 for the appropriate steering column.
Jim
It sounds as if you just have a worn out ignition key and/or lock cylinder. If you want to purchase a new lock cylinder and key it is not that bad of a job to remove and replace the original.
REPLACING THE IGNITION LOCK CYLINDER
The procedures that describe replacing the lock cylinder on 1969 through 1982 Corvette steering columns are very similar between a standard (non-adjustable) columns and the Tilt & Telescoping types. The lock cylinder is the same between the two types of columns.
You will need two special tools: A steering wheel hub puller and a locking plate compressor tool. You can usually beg, borrow, or purchase both tools from most automotive stores. One other important point: Disconnect your battery whenever you work on your steering column.
There is a change in the way that the lock cylinder was retained in the turn signal switch housing that occurred during the 1979 model year. Previous to 1979 the lock cylinder had a spring loaded locking tab that engaged a slot in the turn signal switch housing. During the 1979 model year, steering column security was improved with a housing that utilized a cross-bolt that engaged a notch in the lock cylinder. So if you have a 1979 Vette you will have to disassembly the column in order to determine exactly what type of lock cylinder you require.
You do NOT need a key to remove the lock cylinder from the steering column. You do have to remove the horn cap, horn parts, telescope lock (T&T), the hazard warning ****, and the steering wheel and hub. You then need to remove a plastic retainer (T&T).
If you have a T&T column that has not been disassembled through the many years of its existence, you might just as well purchase a new plastic retainer before you start the tear down process. If the retainer is original it will break into several pieces as you try to remove it. This part is required to be in place to prevent your horn from blowing continuously. It is GM #7808385 and is no longer available through GM dealers also it is still available through numerous other automotive part sources. It is that tan part right in the middle of the following picture.
Compress the locking plate so that you can remove a c-clip retainer (T&T) or a small round wire ring . Remove the locking plate and turn signal cancelling cam.
Remove the turn signal switch lever (1969 through 1976) or remove the crossover arm between the turn signal switch and the dimmer pivot (1977 through 1982). Remove the three turn signal switch screws and pull the switch partially out of the column so that you can reach the floor of the turn signal switch housing. (You may need to disconnect the plastic "harmonica" electrical connector down under the dash from the vehicle wiring harness so that you will have enough slack in the turn signal switch wires to allow the switch to just "hang out" of the column head.)
The lock cylinder is held in place by a metal tab that sticks out of the lock cylinder and fits into a rectangular slot in the housing (1969 through early 1979). You need to reach into the slot with a small screwdriver to push the tab back into the lock cylinder. You should then be able to pull the cylinder right out of the column.
As mentioned previously, during the 1979 model year security was improved with the introduction of a allen head screw that assembled into the turn signal housing and passed through a notch on the lock cylinder. This design more securely held the lock cylinder in place and eliminated the metal spring tab. The screw is located at about the 2 o'clock position in the housing. It is right above the torks head housing screw that is at the 3 o'clock position. You will need reach into the housing and unscrew it from the floor of the turn signal switch housing. You should then be able to pull the lock cylinder right out.
Lock Cylinder Installation
Insert the ignition key into the new lock cylinder. Now, hold the case of the lock cylinder and rotate the ignition key all the way clockwise against the stop. (This would normally be the Start position.) You should be able to retract the plastic key buzzer tab and the metal spring tab should retract easily with slight pressure as well.
There is a keyway in the housing. Align the key on the lock cylinder (not the ignition key but the raised section on the lock cylinder case) with the keyway in the housing and push the cylinder into the housing until it hits the sector. Now rotate the ignition key counterclockwise maintaining a light push on the lock cylinder until the drive section of the cylinder mates with the sector. Push in until the locking tab snaps into the housing and the lock cylinder is secure (1969- early 1979). Reinstall the crossbolt on later columns.
Reassemble the column and you are ready to go.
Very complete instructions (for either the T&T or the standard, non-adjustable columns) are available at:
www.corvettefaq.com
Click on Jim Shea's Steering Papers
Click on Corvette Steering Papers
Scroll down to either the standard column or the T&T column section
Download Disassembly & Repair Paper #1 and the Disassembly & Repair Pic #1 for the appropriate steering column.
Jim
Last edited by Jim Shea; Dec 8, 2011 at 10:43 PM.
Thread Starter
Safety Car
Joined: Nov 2005
Posts: 3,961
Likes: 573
From: Lompoc, CA. Santa Barbara County
I guess what you are saying is that there is no way to get this ignition unstuck where I am. The locksmith can't come until noon tomorow. I guess I can come back up here with a jack and jumper the starter so that I can start the car and get it home. Then start disassembling the column in my garage. Dang it. If it was a stick, I could just ask for a push start.
I've got the new, fresh key here with me. What would happen if I forced it in?
Bee Jay
I've got the new, fresh key here with me. What would happen if I forced it in?
Bee Jay
Last edited by Bee Jay; Dec 8, 2011 at 05:31 PM.
Burning Brakes

Joined: May 2009
Posts: 1,232
Likes: 6
From: Tucson AZ
St. Jude Donor '12
This happened to me once in my 77. I had to work the release tab thing under the column while moving the key back and forth away from and towards start and off. It only moved a tiny bit at first, then with a little time and working both things it rotated back to off.
Race Director

Joined: Mar 2006
Posts: 14,112
Likes: 28
From: Florida
I guess what you are saying is that there is no way to get this ignition unstuck where I am. The locksmith can't come until noon tomorow. I guess I can come back up here with a jack and jumper the starter so that I can start the car and get it home. Then start disassembling the column in my garage. Dang it. If it was a stick, I could just ask for a push start.
I've got the new, fresh key here with me. What would happen if I forced it in?
Bee Jay
I've got the new, fresh key here with me. What would happen if I forced it in?
Bee Jay
Autozone has a new lock cylinder with 2 keys for around 10 bucks. Should be in stock, they fit many GMs.
Good luck

Thread Starter
Safety Car
Joined: Nov 2005
Posts: 3,961
Likes: 573
From: Lompoc, CA. Santa Barbara County
I got it started and I got the car home. I borowed a pair of plyers from the lab and forced the ignition back to the off position with the old key in. Then I inserted the new key and started the car. Two minor problems, the key doesn't spring back to run, I almost burned up the starter, and I don't need a key to start it anymore. Oh well, it's safely at home. Frustration level is really high right now. I wish I could afford a C6 Z06. I think I can afford a C5 Z06 whenever I get my 914 insurance settled. Now I need a new lock and cylinder.
Damn.
Bee Jay
Damn.
Bee Jay
Corvette Stories
The Best of Corvette for Corvette Enthusiasts

Top 10 Most Expensive Corvettes Ever Sold on Bring A Trailer
Brett Foote
10 Things Every Corvette Owner Needs (2026 Edition)
Michael S. Palmer
8 Most "Only Corvette Owners Understand" Quirks and Problems
Pouria Savadkouei
10 Reasons the C6 Z06 is Still A Performance Benchmark After 20 Years
Joe Kucinski
How Much Horsepower Every Corvette Engine "LOST" in 1972
Joe Kucinski
Top 10 DOs and DON'Ts for Protecting Your Convertible Top!
Michael S. Palmer
Top 10 Most Explosive Corvettes Ever Made: Power-to-Weight Ratio Ranked!
Joe Kucinski
150 hp to 1,250 hp: Every Corvette Generation Compared by the Specs That Matter
Joe Kucinski
8 Coolest Corvette Pace Cars (and Replicas) of All Time
Verdad GallardoRace Director


Joined: Jan 2000
Posts: 12,399
Likes: 247
From: San Jose CA
I got it started and I got the car home. I borowed a pair of plyers from the lab and forced the ignition back to the off position with the old key in. Then I inserted the new key and started the car. Two minor problems, the key doesn't spring back to run, I almost burned up the starter, and I don't need a key to start it anymore. Oh well, it's safely at home. Frustration level is really high right now. I wish I could afford a C6 Z06. I think I can afford a C5 Z06 whenever I get my 914 insurance settled. Now I need a new lock and cylinder.
Damn.
Bee Jay
Damn.
Bee Jay
Thread Starter
Safety Car
Joined: Nov 2005
Posts: 3,961
Likes: 573
From: Lompoc, CA. Santa Barbara County
If the key is really in the "on" position with juice to the hei AND the steering wheel is unlocked , so you can turn it to drive, then reconnect your battery and use a mid length screwdriver to jump the solenoid and battery terminal on the starter to get it home. then just use the battery disconnect again to shut down.
Autozone has a new lock cylinder with 2 keys for around 10 bucks. Should be in stock, they fit many GMs.
Good luck
Autozone has a new lock cylinder with 2 keys for around 10 bucks. Should be in stock, they fit many GMs.
Good luck
Thread Starter
Safety Car
Joined: Nov 2005
Posts: 3,961
Likes: 573
From: Lompoc, CA. Santa Barbara County
Bee Jay
Le Mans Master
Joined: Jul 2000
Posts: 6,001
Likes: 113
From: Saginaw Michigan
Here is the Zip Products address for the plastic retainer. It is also available from many other Corvette suppliers. Just copy and paste this huge address to get to the Zip website.
http://www.zip-corvette.com/ProductDetails/ProductDetails.aspx?pid={13d3365f-7ae7-4b27-87cb-9ab8dc7f3922}&gid={22c9b1f5-2f38-4f92-956b-acbcde9be3f9}&GroupName=Turn+Signal+Comp onents&pname=69-89+Turn+Signal+Cancelling+Cam+Plastic+Re tainer&Referer=&Alias=&ptct=SGR-SR&CTitle=&
Jim
http://www.zip-corvette.com/ProductDetails/ProductDetails.aspx?pid={13d3365f-7ae7-4b27-87cb-9ab8dc7f3922}&gid={22c9b1f5-2f38-4f92-956b-acbcde9be3f9}&GroupName=Turn+Signal+Comp onents&pname=69-89+Turn+Signal+Cancelling+Cam+Plastic+Re tainer&Referer=&Alias=&ptct=SGR-SR&CTitle=&
Jim
Race Director
Joined: Mar 2008
Posts: 15,161
Likes: 17
From: coffee
I'm in nearly the same spot with my '81, but thankfully, it will at least spring back to run from start. I'll have to go through this to get the key out. I went with a battery quick disconnect while I sorted out some other problems. This will be up soon on my to do list.
So thanks to Bee Jay for running the traps and thanks to Jim Shea for the write-up.
So thanks to Bee Jay for running the traps and thanks to Jim Shea for the write-up.
Thread Starter
Safety Car
Joined: Nov 2005
Posts: 3,961
Likes: 573
From: Lompoc, CA. Santa Barbara County
Here is the Zip Products address for the plastic retainer. It is also available from many other Corvette suppliers. Just copy and paste this huge address to get to the Zip website.
http://www.zip-corvette.com/ProductDetails/ProductDetails.aspx?pid={13d3365f-7ae7-4b27-87cb-9ab8dc7f3922}&gid={22c9b1f5-2f38-4f92-956b-acbcde9be3f9}&GroupName=Turn+Signal+Comp onents&pname=69-89+Turn+Signal+Cancelling+Cam+Plastic+Re tainer&Referer=&Alias=&ptct=SGR-SR&CTitle=&
Jim
http://www.zip-corvette.com/ProductDetails/ProductDetails.aspx?pid={13d3365f-7ae7-4b27-87cb-9ab8dc7f3922}&gid={22c9b1f5-2f38-4f92-956b-acbcde9be3f9}&GroupName=Turn+Signal+Comp onents&pname=69-89+Turn+Signal+Cancelling+Cam+Plastic+Re tainer&Referer=&Alias=&ptct=SGR-SR&CTitle=&
Jim
Now, help me, the Cancelling cam first, then the locking ring, then the C-clip, then the Cancelling Cam Plastic Retainer. Is that the right order of reinstall?
Bee Jay
Le Mans Master
Joined: Jul 2000
Posts: 6,001
Likes: 113
From: Saginaw Michigan
First the bearing preload spring, then the horn contact carrier (cancelling cam), then the toothed locking plate, then the c-clip, then the plastic retainer:
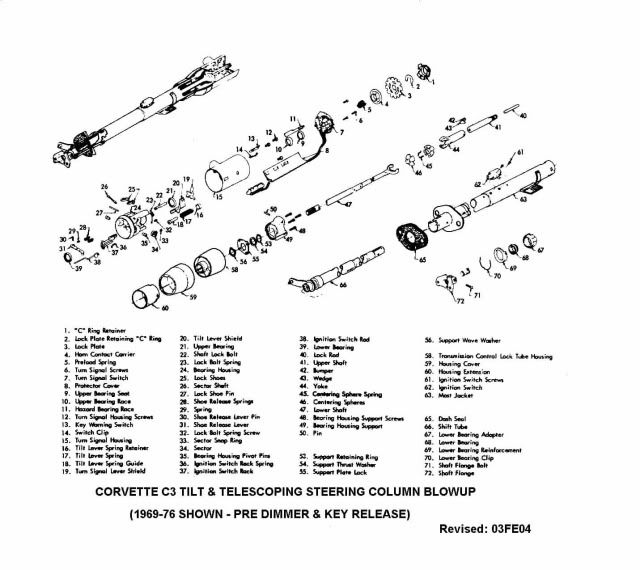
Then the lower horn contact with the big spring (this should also include the spring, eyelet, and insulator bushing, then three screws to retain the lower horn contact to the hub, then the hub, and steering wheel nut, the sheet metal extension, then the six screws to hold the steering wheel in place, then the spacer, telescope locking ring, shim(s), star screw, upper horn contact with three screws to retain it, finally the horn cap assembly.
Jim

Racer
Joined: Nov 2004
Posts: 358
Likes: 2
From: Suburban Washington DC
If you're replacing the ignition lock, I would get the one with the universal keyway. Then you can make it work with the door key and only need one key for the whole car. Did that to a few of my GM cars.
Racer

Joined: Sep 2010
Posts: 302
Likes: 14
From: Northern Ca.
Jim,
Please take a look at this. My housing is missing the slot that accesses the release button on the cylinder. It is a 70 std column. There is also no bolt to remove similar to the 79. How is it possible to get the cylinder out if neither option is available? Thanks.


Please take a look at this. My housing is missing the slot that accesses the release button on the cylinder. It is a 70 std column. There is also no bolt to remove similar to the 79. How is it possible to get the cylinder out if neither option is available? Thanks.
Le Mans Master
Joined: Jul 2000
Posts: 6,001
Likes: 113
From: Saginaw Michigan
There is a thin die casting skin over the slot. Take the tip of a small, sharp, knife and punch through the skin. You will find the locking tab from the lock cylinder. Press in along the right side of the slot.
I believe that some trucks may have had steering columns that did not lock the steering wheel. They were built without the locking bolt. Otherwise, Bubba has been into your steering column and removed it.
Jim
I believe that some trucks may have had steering columns that did not lock the steering wheel. They were built without the locking bolt. Otherwise, Bubba has been into your steering column and removed it.
Jim