


Oil Pan Removal
Thread Starter
Intermediate

Joined: Jun 2011
Posts: 47
Likes: 0
From: Hamilton Ontario
Hi again,
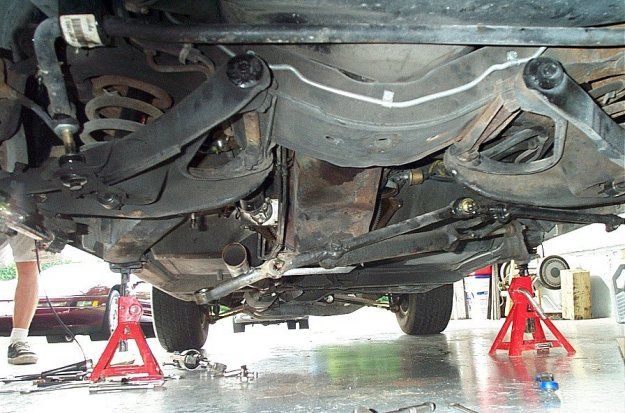
need some more tips before I tackle this next job. I have spoken to my mechanic and searched "how to" from the internet on how to remove the oil pan from my 79 vette. It has the usual stock 350 small block in it. I want to do the job myself, but I get conflicting info about how best to do it due to clearances etc. I am looking for a tried and true way (if there is one) on doing this job with the front end up on ramps or jack stands.
Help
...and thanks.
Melting Slicks


Joined: Jan 2003
Posts: 2,877
Likes: 13
From: Doha
St. Jude Donor '08
I did it twice in my big block 'vette, so yours should be much easier, first thing to do is to disconnect the idler arm from the frame and lower the steering link down a bit, then if you have the stock GM starter (the large one) you have to remove it to gain access to the bolts, then rotate the engine so you are 180* down from the TDC (in other words you put your #1 piston to TDC, it doesnt matter if its the firing or the exhaust stroke, and then rotate the crank more one half turn), then just unbolt the oil pan and slide it out. I wrote that off my head so I may forgot a step or two, but pretty much thats about it. Not hard at all, just time consuming, so take your time.

Team Owner


Joined: Aug 1999
Posts: 30,995
Likes: 99
From: Ontario
I did it twice in my big block 'vette, so yours should be much easier, first thing to do is to disconnect the idler arm from the frame and lower the steering link down a bit, then if you have the stock GM starter (the large one) you have to remove it to gain access to the bolts, then rotate the engine so you are 180* down from the TDC (in other words you put your #1 piston to TDC, it doesnt matter if its the firing or the exhaust stroke, and then rotate the crank more one half turn), then just unbolt the oil pan and slide it out. I wrote that off my head so I may forgot a step or two, but pretty much thats about it. Not hard at all, just time consuming, so take your time.

Last edited by Paul L; Jan 4, 2012 at 01:05 PM.
Team Owner

Joined: Mar 2002
Posts: 24,160
Likes: 78
I did it twice in my big block 'vette, so yours should be much easier, first thing to do is to disconnect the idler arm from the frame and lower the steering link down a bit, then if you have the stock GM starter (the large one) you have to remove it to gain access to the bolts, then rotate the engine so you are 180* down from the TDC (in other words you put your #1 piston to TDC, it doesnt matter if its the firing or the exhaust stroke, and then rotate the crank more one half turn), then just unbolt the oil pan and slide it out. I wrote that off my head so I may forgot a step or two, but pretty much thats about it. Not hard at all, just time consuming, so take your time.

Burning Brakes

Joined: Dec 2005
Posts: 992
Likes: 56
From: Baldwinsville, NY
Disconnect the battery,
Drain the oil and remove oil filter,
Drop the starter,
Remove the transmission cover plate,
Drop the steering cylinder,
Drop the idler arm,
Remove the oil pan bolts,
Clean the engine were the new seal will go,
Use a one piece seal for 79 corvette 350,
Check oil pump inlet for popper depth to new oil pan,
Install new seal with sealant in the corners only,
Install pan,
Install steering cylinder,
Install idler arm,
Install transmission access cover,
Install starter,
Fill with new oil and new oil filter,
Connect battery,
Did I mention to Disconnect the Battery, the Starter is very Hot!
Advanced
Joined: Mar 2011
Posts: 74
Likes: 0
From: Fairfield California
I did this on my 72 350 recently. As stated above all that was required was to remove the idler arm from the frame to make room to remove the pan. I did not have to remove anthing else.
Clean the gasket surface and be careful torquing those small pan bolts. I forget the exact torque specs but they seem like they would strip pretty easy if you put the 'guns' on them. Might not be a bad time to check the rear main seal while you are at it.
Clean the gasket surface and be careful torquing those small pan bolts. I forget the exact torque specs but they seem like they would strip pretty easy if you put the 'guns' on them. Might not be a bad time to check the rear main seal while you are at it.
Corvette Stories
The Best of Corvette for Corvette Enthusiasts

Top 10 Most Expensive Corvettes Ever Sold on Bring A Trailer
Brett Foote
10 Things Every Corvette Owner Needs (2026 Edition)
Michael S. Palmer
8 Most "Only Corvette Owners Understand" Quirks and Problems
Pouria Savadkouei
10 Reasons the C6 Z06 is Still A Performance Benchmark After 20 Years
Joe Kucinski
How Much Horsepower Every Corvette Engine "LOST" in 1972
Joe Kucinski
Top 10 DOs and DON'Ts for Protecting Your Convertible Top!
Michael S. Palmer
Top 10 Most Explosive Corvettes Ever Made: Power-to-Weight Ratio Ranked!
Joe Kucinski
150 hp to 1,250 hp: Every Corvette Generation Compared by the Specs That Matter
Joe Kucinski
8 Coolest Corvette Pace Cars (and Replicas) of All Time
Verdad Gallardo
Pro

Joined: May 2011
Posts: 581
Likes: 5
From: BC
To ensure a nice sweat free seal remove any traces of oil from the sealing surfaces with aerosol brake cleaner. Glue the side rail pieces to the block with a very thin bead of 3M weatherstripping cement. A dob of RTV sealant at the corners where the end and side pieces meet. Keep greasy hands off the pan when installing. If this is all new to you use a torque wrench to tighten the bolts to spec. Too loose, the result is obvious. Too tight and you will split the gasket. Corner bolts (5/16" bolt size)are tighter than side bolts (1/4").
Steve g
Steve g