





Putting the steering column back on...

Thread Starter
Heel & Toe

Joined: Mar 2012
Posts: 16
Likes: 0
 Putting the steering column back on...
Hi,
I have posted to this forum a few days ago and you guys were absolutely wonderful. And, you helped solve my problem.
Now, I am wanting to make sure everything is going back on correctly.
I had to order a horn contact and spring kit because I lost the spring trying to tap the steering column (the thing that the steering wheel screws into) back on.
The main question is, how do you get the steering column back on to the threads since the steering is telescoping and just pushes in and there is no way that I can see to hold it whilst pushing the steering column on. I took it off to make sure I wasn't stripping the thread. I thought I could use the big nut to push it back on but I am not sure what the best approach is to putting it back on is. I'm afraid of tightening the nut and pushing it down but since it turns on the center rod, I don't want it to turn and sit on top of the threads as it goes down.
I hope I explained it well. If you need any more explanation please let me know but anyone that has taken off and put back on a turn signal assembly probably understands the dilemma I face.
BTW, is there a full illustrated diagram of how the whole steering assembly goes on and off. Something other than the low resolution extremely hard to see diagrams that don't show everything. I need all the help I can get. I am curious as to how the spring that's attached to the steering column contacts the plastic piece that pokes through the disc that locks the steering. It appears the spring is part of the circuit that is used for the horn. I need to know if that's how it actually works.
Thanks for everything!
I have posted to this forum a few days ago and you guys were absolutely wonderful. And, you helped solve my problem.
Now, I am wanting to make sure everything is going back on correctly.
I had to order a horn contact and spring kit because I lost the spring trying to tap the steering column (the thing that the steering wheel screws into) back on.
The main question is, how do you get the steering column back on to the threads since the steering is telescoping and just pushes in and there is no way that I can see to hold it whilst pushing the steering column on. I took it off to make sure I wasn't stripping the thread. I thought I could use the big nut to push it back on but I am not sure what the best approach is to putting it back on is. I'm afraid of tightening the nut and pushing it down but since it turns on the center rod, I don't want it to turn and sit on top of the threads as it goes down.
I hope I explained it well. If you need any more explanation please let me know but anyone that has taken off and put back on a turn signal assembly probably understands the dilemma I face.
BTW, is there a full illustrated diagram of how the whole steering assembly goes on and off. Something other than the low resolution extremely hard to see diagrams that don't show everything. I need all the help I can get. I am curious as to how the spring that's attached to the steering column contacts the plastic piece that pokes through the disc that locks the steering. It appears the spring is part of the circuit that is used for the horn. I need to know if that's how it actually works.
Thanks for everything!

Le Mans Master


Joined: Jul 2000
Posts: 6,001
Likes: 112
From: Saginaw Michigan
I assume that you have a T&T steering column and you are trying to compress the locking plate so that you can install the c-clip.
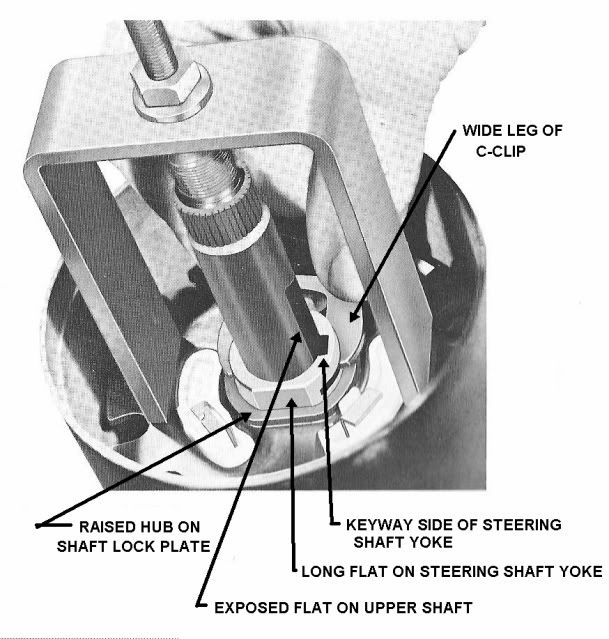
Normally the "star" screw can be tightened so as to prevent the upper shaft from telescoping. Since you cannot use the star screw with your tool, what you need is a 5/16-18 UNC set screw. This screw can be threaded into the upper shaft and tightened. This will prevent the shaft from telescoping.
Most likely you found that when you tried to remove the plastic retainer that covered the c-clip, the part broke into several pieces. You are going to have to replace that retainer because it not only secures the c-clip in place but it also acts as an insulator and isolates the big telescope spring from touching the locking plate and causing the horn to blow continuously. This part is available from various Corvette suppliers.
The plastic lower horn contact has a tower that extends up through the steering wheel hub. First you install the spring, then the eyelet with the upset head inserted first against the spring. Then install the plastic insulator (bushing) to lock the parts in place.
Jim
Normally the "star" screw can be tightened so as to prevent the upper shaft from telescoping. Since you cannot use the star screw with your tool, what you need is a 5/16-18 UNC set screw. This screw can be threaded into the upper shaft and tightened. This will prevent the shaft from telescoping.
Most likely you found that when you tried to remove the plastic retainer that covered the c-clip, the part broke into several pieces. You are going to have to replace that retainer because it not only secures the c-clip in place but it also acts as an insulator and isolates the big telescope spring from touching the locking plate and causing the horn to blow continuously. This part is available from various Corvette suppliers.
The plastic lower horn contact has a tower that extends up through the steering wheel hub. First you install the spring, then the eyelet with the upset head inserted first against the spring. Then install the plastic insulator (bushing) to lock the parts in place.
Jim
Last edited by Jim Shea; Apr 15, 2012 at 01:58 PM.
Le Mans Master
Joined: Jul 2000
Posts: 6,001
Likes: 112
From: Saginaw Michigan
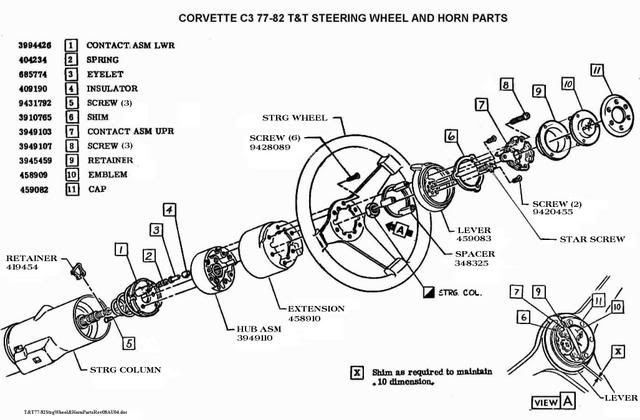
You didn't mention what year or type of steering column (T&T or standard, non-adjustable.) Also you didn't mention what year. This exploded picture shows a 1977-82 steering wheel and horn parts. All these parts are very similar to the 1969-75 versions.
Jim
Jim
Thread Starter
Heel & Toe
Joined: Mar 2012
Posts: 16
Likes: 0
It's the piece you have to use the steering wheel puller on. The question is, how do I put that back on ensuring that I don't strip the threads by beating it back on top of the threads and if I have to use the nut to push it back onto the threads, what's the best way to ensure I don't turn it on top of the threads as it goes down over them? If I have to beat it back on, how do I keep the telescoping part out without pushing it down to the plastic retainer and breaking it (in which I had to buy since the other did fall apart as you mentioned).
Thanks Jim!
Last edited by freshpowder01; Apr 15, 2012 at 02:17 PM.
Le Mans Master
Joined: Jul 2000
Posts: 6,001
Likes: 112
From: Saginaw Michigan
You should never havet to "beat parts back on." If you are trying to compress the locking plate you will need a small 5/16-18 UNC set screw to replace the "star" screw to lock the upper shaft from telescoping. With the upper shaft locked in place, the compressor tool will work.
Use the steering wheel nut to press the hub onto the upper steering shaft. Be sure to remove the set screw and install the star screw in its place.
Jim
Use the steering wheel nut to press the hub onto the upper steering shaft. Be sure to remove the set screw and install the star screw in its place.
Jim
Thread Starter
Heel & Toe
Joined: Mar 2012
Posts: 16
Likes: 0
You should never havet to "beat parts back on." If you are trying to compress the locking plate you will need a small 5/16-18 UNC set screw to replace the "star" screw to lock the upper shaft from telescoping. With the upper shaft locked in place, the compressor tool will work.
Use the steering wheel nut to press the hub onto the upper steering shaft. Be sure to remove the set screw and install the star screw in its place.
Jim
Use the steering wheel nut to press the hub onto the upper steering shaft. Be sure to remove the set screw and install the star screw in its place.
Jim
Just trying to make sure...
It sounds like the "set screw" is what I need to stop the shaft from telescoping. But, like I said, when I push down the HUB ASM (3949110) I don't want to push down on top of the threads on the shaft or the HUB ASM itself which also has threads that fit over the shaft.
Where do I get this set screw at? Would a regular auto parts store have it?
Thanks!
Le Mans Master
Joined: Jul 2000
Posts: 6,001
Likes: 112
From: Saginaw Michigan
You should be able to find a set screw at a hardware store, or Home Depot, Lowes, and possibly a automotive store.
The hub assembly has splines machined into the center. Those splines should match the splines that are machined into the steering shaft. You should not have any problems with stripping "threads".
On the end of the steering shaft there should be a chizel mark. Also on the hub there should also be a chizel mark. Align the two marks when you assemble the hub to the steering shaft.
Jim
The hub assembly has splines machined into the center. Those splines should match the splines that are machined into the steering shaft. You should not have any problems with stripping "threads".
On the end of the steering shaft there should be a chizel mark. Also on the hub there should also be a chizel mark. Align the two marks when you assemble the hub to the steering shaft.
Jim

Melting Slicks


Joined: Mar 2008
Posts: 2,023
Likes: 6
From: Austin Tx
Are you wondering how to actually get the hub back onto the shaft?
If that is the case, if you put the hub on correctly, then you should be able to see enough of the threads to put the nut on. You then tighten the nut, and it pushes the hub on.
ALWAYS make sure to listen to everything Jim has to say - make sure the hub is properly aligned with the shaft. On the top of the shaft you should see a vertical line, look on the hub and you will find an identical one. Make sure to line them up when you put the hub on the shaft.
If for some reason you are not able to put the hub on the shaft far enough that you can start the nut, then something is not correct - you should never need to force anything. Post some pictures, and I'm sure Jim will be able to tell you where you might have gone wrong.
If that is the case, if you put the hub on correctly, then you should be able to see enough of the threads to put the nut on. You then tighten the nut, and it pushes the hub on.
ALWAYS make sure to listen to everything Jim has to say - make sure the hub is properly aligned with the shaft. On the top of the shaft you should see a vertical line, look on the hub and you will find an identical one. Make sure to line them up when you put the hub on the shaft.
If for some reason you are not able to put the hub on the shaft far enough that you can start the nut, then something is not correct - you should never need to force anything. Post some pictures, and I'm sure Jim will be able to tell you where you might have gone wrong.
Corvette Stories
The Best of Corvette for Corvette Enthusiasts

10 Reasons the C6 Z06 is Still A Performance Benchmark After 20 Years
Joe Kucinski
How Much Horsepower Every Corvette Engine "LOST" in 1972
Joe Kucinski
Top 10 DOs and DON'Ts for Protecting Your Convertible Top!
Michael S. Palmer
Top 10 Most Explosive Corvettes Ever Made: Power-to-Weight Ratio Ranked!
Joe Kucinski
150 hp to 1,250 hp: Every Corvette Generation Compared by the Specs That Matter
Joe Kucinski
8 Coolest Corvette Pace Cars (and Replicas) of All Time
Verdad Gallardo
Top 10 Corvette Engines RANKED by Peak Torque (70+ Years of Muscle!)
Joe Kucinski
Corvette ZR1X Will Be Pacing the Indy 500, And Could Probably Race, Too!
Verdad Gallardo
Top 10 Corvettes Coming to Mecum Indy 2026!
Brett Foote
Thread Starter
Heel & Toe
Joined: Mar 2012
Posts: 16
Likes: 0
Are you wondering how to actually get the hub back onto the shaft?
If that is the case, if you put the hub on correctly, then you should be able to see enough of the threads to put the nut on. You then tighten the nut, and it pushes the hub on.
ALWAYS make sure to listen to everything Jim has to say - make sure the hub is properly aligned with the shaft. On the top of the shaft you should see a vertical line, look on the hub and you will find an identical one. Make sure to line them up when you put the hub on the shaft.
If for some reason you are not able to put the hub on the shaft far enough that you can start the nut, then something is not correct - you should never need to force anything. Post some pictures, and I'm sure Jim will be able to tell you where you might have gone wrong.
If that is the case, if you put the hub on correctly, then you should be able to see enough of the threads to put the nut on. You then tighten the nut, and it pushes the hub on.
ALWAYS make sure to listen to everything Jim has to say - make sure the hub is properly aligned with the shaft. On the top of the shaft you should see a vertical line, look on the hub and you will find an identical one. Make sure to line them up when you put the hub on the shaft.
If for some reason you are not able to put the hub on the shaft far enough that you can start the nut, then something is not correct - you should never need to force anything. Post some pictures, and I'm sure Jim will be able to tell you where you might have gone wrong.
I have tightened the nut to push the hub down and it's getting really tight. But as long as it's safe to use the nut to push it down then I'm "down" with that. I just didn't want to strip the threads on the shaft and have to take the whole thing apart just to replace the threads.
Jim is the man! I'm glad he pointed out the chiseled marks or I would have missed that altogether.
I'm going to use the nut to push down the hub. I'm assuming when I get the nut down as far as it can go the hub assembly is down as far as it needs to go???
Thanks to all that have helped and especially Jim who has take quite a bit of time to explain a lot of things.
