






LT-1 Valve/head problem, need your help

Thread Starter
Drifting


Joined: Oct 2010
Posts: 1,873
Likes: 134
From: Bushkill Twp. PA
St. Jude Donor '17

Yup, Using Amsoil 10W-40 with high zinc. Either change it when I put it away for the winter, or when it goes on the road in the spring. Never gets more than a 1000 miles on it before a change.
Thread Starter
Drifting
Joined: Oct 2010
Posts: 1,873
Likes: 134
From: Bushkill Twp. PA
St. Jude Donor '17
Car up on ramps, starter and boomerangs off. Next step, empty coolant out of the block. I have to go pick up a breaker bar, couldn't get these to budge with my 3/8" drive.
Thread Starter
Drifting
Joined: Oct 2010
Posts: 1,873
Likes: 134
From: Bushkill Twp. PA
St. Jude Donor '17
Finally got to spend a couple hours in the garage. Block drain plugs came out easy with a 1/2" breaker bar. Block is drained. Took a bunch of pictures of the carb and distributor. Have the passenger side manifold off. Started removing all the rubber lines to the carb, but thought to myself, why does the carb have to come off? I can remove the carb and intake as one piece.
My father mentioned to me to mark where the distributor is as it relates to the timing mark on the harmonic balancer. That way when putting it back together, I can make sure my timing is close.......
Next steps
Remove manifold and carb
Remove distributor
Remove driver side exhaust manifold
Loosen/remove all rockers
Remove heads
My father mentioned to me to mark where the distributor is as it relates to the timing mark on the harmonic balancer. That way when putting it back together, I can make sure my timing is close.......
Next steps
Remove manifold and carb
Remove distributor
Remove driver side exhaust manifold
Loosen/remove all rockers
Remove heads

Le Mans Master


Joined: Oct 2006
Posts: 7,123
Likes: 433
From: Gladstone MO
C3 of Year Finalist (appearance mods) 2019
Marking the distributor position is not a bad idea. Problem is, are you going to remember EXACTLY where it was in relation to all the marks when you go back together? Easier (IMHO) to bump the starter over with your finger stuck in the #1 spark plug hole- when it blows your finger off the hole, then turn the engine with a breaker bar to align the timing marks if needed. Set the rotor pointing at the left front and drop the distributor. Hold it down and bump the starter until it drops the rest of the way in.
And the carb and manifold can come off as one- it's easier to clean the gasket surfaces on the manifold without it. (and the carb has to come off for paint/polish anyway)
And the carb and manifold can come off as one- it's easier to clean the gasket surfaces on the manifold without it. (and the carb has to come off for paint/polish anyway)
Thread Starter
Drifting
Joined: Oct 2010
Posts: 1,873
Likes: 134
From: Bushkill Twp. PA
St. Jude Donor '17
Made some good progress today. I was able to get the carb, intake, and dist out without any hangups. I have all the parts bagged or layed out on paper towels with notes. I got the pass side head off. Working on it a couple nights this week, I should be able to get the driver side off too.
Heres some pics of the progress.


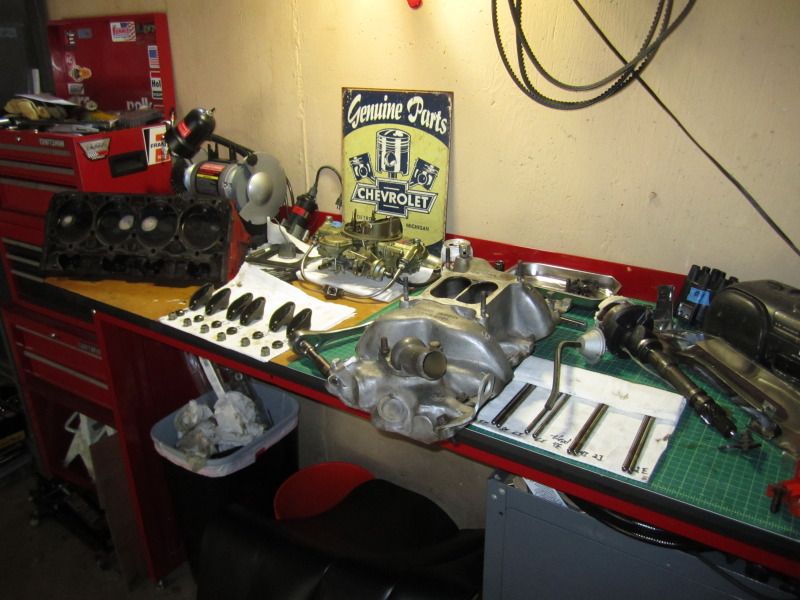
Heres some pics of the progress.
Burning Brakes

Joined: Feb 2005
Posts: 894
Likes: 91
Check Cam/Lifters
Hi Dan, now that you're this deep in, pull the lifters one at a time, and check the bottoms where they ride on the lobes!!
Lay any type straight-edge across the lifter bottoms and make sure they ALL have slight "crown" to them. If any are flat or "convexed", change the cam and all the lifters! (Any decent drill bit shank makes a good straightedge for checking lifters)
If your long term plan is top keep the car for a while I would recommend doing the heads 100% and go for some add'l longevity!
Bronze guides, all new valves, double springs (this extends spring life two-fold), some decent retainers, "Viton" seals, and possibly exhaust seat inserts. With this setup you "toss" the spring "hats", they aren't really needed anyway!
For some years now, 40+ to be exact, we've avoided using "single" springs when possible, if one breaks it will take out the unit, chances are much better for survival with double springs if one happens to fail.
Thanks, Gary in N.Y.
P.S. Just an add'l tip, I'll assume for the moment you removed a "tin" head gasket (.022" nominal) and will most likely be replacing with some Fel-Pro Permatorques. Remember the difference in thickness will lower the already low compression! Between the flat-top forged pistons (L2417F) in your photo's and the 76 cc heads the C.R. is really low. Presently you're around 9.0:1.
Lay any type straight-edge across the lifter bottoms and make sure they ALL have slight "crown" to them. If any are flat or "convexed", change the cam and all the lifters! (Any decent drill bit shank makes a good straightedge for checking lifters)
If your long term plan is top keep the car for a while I would recommend doing the heads 100% and go for some add'l longevity!
Bronze guides, all new valves, double springs (this extends spring life two-fold), some decent retainers, "Viton" seals, and possibly exhaust seat inserts. With this setup you "toss" the spring "hats", they aren't really needed anyway!
For some years now, 40+ to be exact, we've avoided using "single" springs when possible, if one breaks it will take out the unit, chances are much better for survival with double springs if one happens to fail.
Thanks, Gary in N.Y.
P.S. Just an add'l tip, I'll assume for the moment you removed a "tin" head gasket (.022" nominal) and will most likely be replacing with some Fel-Pro Permatorques. Remember the difference in thickness will lower the already low compression! Between the flat-top forged pistons (L2417F) in your photo's and the 76 cc heads the C.R. is really low. Presently you're around 9.0:1.
Last edited by GOSFAST; Aug 20, 2012 at 08:05 AM. Reason: Add info
Corvette Stories
The Best of Corvette for Corvette Enthusiasts

Top 10 Most Explosive Corvettes Ever Made: Power-to-Weight Ratio Ranked!
Joe Kucinski
150 hp to 1,250 hp: Every Corvette Generation Compared by the Specs That Matter
Joe Kucinski
8 Coolest Corvette Pace Cars (and Replicas) of All Time
Verdad Gallardo
Top 10 Corvette Engines RANKED by Peak Torque (70+ Years of Muscle!)
Joe Kucinski
Corvette ZR1X Will Be Pacing the Indy 500, And Could Probably Race, Too!
Verdad Gallardo
Top 10 Corvettes Coming to Mecum Indy 2026!
Brett Foote
Top 10 C9 Corvette MUST-HAVES to Fix These C8 Generation Flaws!
Michael S. Palmer
10 Revolutionary 'Corvette Firsts' Most People Don't Know
Joe Kucinski
5 Reasons to Upgrade to an LS6-Powered Corvette; 5 Reasons to Stay LT2
Michael S. Palmer
Race Director


Joined: May 2005
Posts: 10,674
Likes: 122
From: Millington Illinois
St. Jude Donor '08-'09
Head gasket Felpro 1094 and when the heads are at the machine shop mill them .025. Will get you about an extra .5 compression and won't cause any alignment problems or issues. I see you have been having issues on #2 in your photos.
Thread Starter
Drifting
Joined: Oct 2010
Posts: 1,873
Likes: 134
From: Bushkill Twp. PA
St. Jude Donor '17
If I use that thinner Felpro gasket and have the head milled, do I need to account for any of the dimensional changes at the intake manifold/head connection?
#2 spark plug


Race Director
Joined: May 2005
Posts: 10,674
Likes: 122
From: Millington Illinois
St. Jude Donor '08-'09
No. You will be fine. Don't angle mill, flat mill. It will just close the gap up a little between the intake and the front and rear china wall. That gap is usually huge. There are different thickness intake gaskets and you can test fit it and measure with a feeler guage but I have done dozens and the stock gasket has always worked fine.

Le Mans Master

Joined: Jun 2004
Posts: 6,231
Likes: 65
From: Seattle WA
St. Jude Donor '14
Personally, I'd check the alignment - with the thinner gasket and the head deck cut, you're changing the position of the intake ports in the ballpark of .060...certainly enough to be worth a check.
Better a quick check while the engine is accessible than an intake leak at the bottom of the ports.
Just one guy's opinion.
Better a quick check while the engine is accessible than an intake leak at the bottom of the ports.
Just one guy's opinion.
Race Director
Joined: May 2005
Posts: 10,674
Likes: 122
From: Millington Illinois
St. Jude Donor '08-'09
.032 difference plus the 45 degree angle. your talking .016. You can check it but I never had any issues using regular intake gaskets and have done this a lot. Standard gasket is .060 thick. There are .045 thick gaskets if needed but doubt you need them. Just check it first.
Race Director
Joined: May 2005
Posts: 10,674
Likes: 122
From: Millington Illinois
St. Jude Donor '08-'09
Example: My last build I zero decked the block. That is a .025 cut. Then milled the heads .032. Stock head gasket. That puts the heads .057 lower than stock. Checked and double checked. .060 intake gasket was it. Lined up and sealed perfect.
Le Mans Master
Joined: Jun 2004
Posts: 6,231
Likes: 65
From: Seattle WA
St. Jude Donor '14
My math comes out differently.
I have seen intake leaks with as little as an .020 total cut on the head/block deck, before gasket thickness was factored in, with an out-of-the-box intake. My shop recommends checking if more than .010 is machined off the block/head deck. I think the standard formula is something like .010 off the intake or head intake surface for every .010 change in assembled port height - it isn't about the valley ends; the heads are closer together - not just lower.
Again, just one guy's opinion/experience - OP can make their own decision and talk to their shop for guidance as well.
I have seen intake leaks with as little as an .020 total cut on the head/block deck, before gasket thickness was factored in, with an out-of-the-box intake. My shop recommends checking if more than .010 is machined off the block/head deck. I think the standard formula is something like .010 off the intake or head intake surface for every .010 change in assembled port height - it isn't about the valley ends; the heads are closer together - not just lower.
Again, just one guy's opinion/experience - OP can make their own decision and talk to their shop for guidance as well.
Le Mans Master
Joined: Jun 2004
Posts: 6,231
Likes: 65
From: Seattle WA
St. Jude Donor '14
And...as an aside, you will most likely need new pushrods...but again, make sure you check the valvetrain geometry and all valvetrain clearances.
When doing engine work, check everything twice
Personally, I wouldn't cut such a rare engine more than absolutely required...
When doing engine work, check everything twice
Personally, I wouldn't cut such a rare engine more than absolutely required...
Last edited by billla; Aug 21, 2012 at 08:48 AM.
Thread Starter
Drifting
Joined: Oct 2010
Posts: 1,873
Likes: 134
From: Bushkill Twp. PA
St. Jude Donor '17
billla/63mako,
I appreciate your help and insight on my project. In asking around, I have found three machine shops in my area to look into to take care of these heads. I will bring up both of your points as they all are valid.
My overall approach is that stock appearance stays in tact. I'm not too concerned on price. I don't want to make a race motor, I want to repair this properly so I don't have to do it again for several years. Its a low mile, stock motor.
I feel like this is a place that scope creep happens. By that I mean, "I started out wanting to replace valve guides" and instead "end up spending the same amount of $$$ a new set of heads would cost".
When we talk about milling the base of the head, I try to think about everywhere else it has dimensional effects. I didn't think about pushrods, which makes me think "what else am I not thinking about?" Also, being a newb, I'm not sure how/where to check everything. Hoping my machine shop can help with that.
Again, thank you guys. I would be lost without all your advice. I am certainly learning a lot in this process which is half the fun!
I appreciate your help and insight on my project. In asking around, I have found three machine shops in my area to look into to take care of these heads. I will bring up both of your points as they all are valid.
My overall approach is that stock appearance stays in tact. I'm not too concerned on price. I don't want to make a race motor, I want to repair this properly so I don't have to do it again for several years. Its a low mile, stock motor.
I feel like this is a place that scope creep happens. By that I mean, "I started out wanting to replace valve guides" and instead "end up spending the same amount of $$$ a new set of heads would cost".
When we talk about milling the base of the head, I try to think about everywhere else it has dimensional effects. I didn't think about pushrods, which makes me think "what else am I not thinking about?" Also, being a newb, I'm not sure how/where to check everything. Hoping my machine shop can help with that.
Again, thank you guys. I would be lost without all your advice. I am certainly learning a lot in this process which is half the fun!
Le Mans Master
Joined: Jun 2004
Posts: 6,231
Likes: 65
From: Seattle WA
St. Jude Donor '14
Scope creep is exactly what bites these projects - specifically, the cascade of additional items that need to be addressed from a simple change, or the changes required in the rest of the car based on increases in power. Reading back, I would also expect that polylocks might not fit under the stock covers...
Given the rarity and originality of the car, it can be preserved while still being a pretty rowdy beast As noted, I would tend to treat this as a repair with a few upgrade opportunities vs. a "build" to make more power. Get the heads done with a few minor upgrades (back-cut on the valves, minor clean up of the throats, installation of the springs, etc.), re-install with a new steel shim gasket and call it good.
Learning is always fun and there are a lot of good options on the thread. Many ways to skin this cat - just one guy's take. I'm coming to the thread late, so I don't mean to take it off-track
Finally...make sure you get good references - not referrals - on the machine shop. This type of work isn't difficult, but there's opportunity for making scrap...so be SURE you have a good shop!
Given the rarity and originality of the car, it can be preserved while still being a pretty rowdy beast
As noted, I would tend to treat this as a repair with a few upgrade opportunities vs. a "build" to make more power. Get the heads done with a few minor upgrades (back-cut on the valves, minor clean up of the throats, installation of the springs, etc.), re-install with a new steel shim gasket and call it good. Learning is always fun and there are a lot of good options on the thread. Many ways to skin this cat - just one guy's take. I'm coming to the thread late, so I don't mean to take it off-track
Finally...make sure you get good references - not referrals - on the machine shop. This type of work isn't difficult, but there's opportunity for making scrap...so be SURE you have a good shop!
Last edited by billla; Aug 21, 2012 at 01:38 PM.
Thread Starter
Drifting
Joined: Oct 2010
Posts: 1,873
Likes: 134
From: Bushkill Twp. PA
St. Jude Donor '17
Got the other head off last night. Time to do some machine shop shopping/interviews! (After Carlisle of coarse.........)
Cheers to everyone there tomorrow, or wants to be there and can't
Cheers to everyone there tomorrow, or wants to be there and can't