


Suspension Rebuild
Thread Starter
Racer


Joined: Oct 2011
Posts: 318
Likes: 3
From: NP Nebraska
I am starting to rebuild the front and rear suspension for my body-off 1980 4-speed project. The plan is to have a car designed for comfort and cruising that will be capable of the occasional open road race in the future.
I am staying with slightly modified front suspension. I have the Deluxe Front Suspension Rebuild kit with poly bushings. To replace the ball joints I have to remove the factory riveted joints. Any suggestions on how to make this process easier? I need a method to get the ball joints out of the spindles without just hammering like an idiot until something breaks.
I am wondering how important you think it is to replace the front springs? Moog replacements are fairly cheap and I could lower the height a bit. My springs look fine and I could modify them for a lower ride without spending a thing.
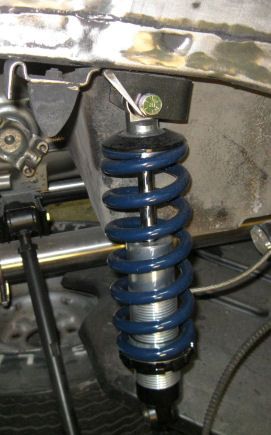
The rear suspension is going coil-over. I am looking at the Van Steel setup b/c I need new trailing arms and there is a kit that includes offset trailing arms. The arms are $500 alone. The double adj. kit only adds shocks, springs, and brackets at $1640 http://www.ecklerscorvette.com/1980+...1963-1982.html any of which can be had for much cheaper. I have done quite a bit of research but haven't found any opinions on this kit nor any options for fabricating my own setup.
BTW here is the blue car in my avitar... . Needless to say, I'll be asking a LOT of questions.
Thanks for your help in advance,
Mike
I am staying with slightly modified front suspension. I have the Deluxe Front Suspension Rebuild kit with poly bushings. To replace the ball joints I have to remove the factory riveted joints. Any suggestions on how to make this process easier? I need a method to get the ball joints out of the spindles without just hammering like an idiot until something breaks.
I am wondering how important you think it is to replace the front springs? Moog replacements are fairly cheap and I could lower the height a bit. My springs look fine and I could modify them for a lower ride without spending a thing.
The rear suspension is going coil-over. I am looking at the Van Steel setup b/c I need new trailing arms and there is a kit that includes offset trailing arms. The arms are $500 alone. The double adj. kit only adds shocks, springs, and brackets at $1640 http://www.ecklerscorvette.com/1980+...1963-1982.html any of which can be had for much cheaper. I have done quite a bit of research but haven't found any opinions on this kit nor any options for fabricating my own setup.
BTW here is the blue car in my avitar...
. Needless to say, I'll be asking a LOT of questions.Thanks for your help in advance,
Mike
Last edited by myko; Nov 13, 2012 at 09:40 PM.
Burning Brakes


Joined: Oct 2001
Posts: 1,241
Likes: 4
From: Okinawa Okinawa
Just drill them out . You can read the link below.
http://forums.corvetteforum.com/c3-t...t-removal.html
http://forums.corvetteforum.com/c3-t...t-removal.html
Thread Starter
Racer
Joined: Oct 2011
Posts: 318
Likes: 3
From: NP Nebraska
Just drill them out . You can read the link below.
http://forums.corvetteforum.com/c3-t...t-removal.html
http://forums.corvetteforum.com/c3-t...t-removal.html
Drifting


Joined: Jun 2008
Posts: 1,495
Likes: 134
From: Blanco County, TX
Same price, $1640. Mine are sitting in the box, but getting close to install. Went through the instructions today and a trial layout. You should know that you will have to shorten a bolt (probably) and there is welding and drilling involved. Welding is "optional" but if you are getting coilovers you are probably going to want to use them...
And if you are getting the rear sway bar, there is frame drilling involved with that and it is not compatible with a spare tire. Ask them about that.
http://www.vansteel.com/index.cfm?fu...p=1971&ID=3174
And if you are getting the rear sway bar, there is frame drilling involved with that and it is not compatible with a spare tire. Ask them about that.
http://www.vansteel.com/index.cfm?fu...p=1971&ID=3174
Pro


Joined: Jan 2010
Posts: 533
Likes: 18
From: Boca Raton Florida
Offset trailing arms ($440), composite spring ($330) and QA-1 single adjustable shocks ($370) upgrades your rear suspension for $1,150.
I just bought the Van Steel coilover conversion for my '72 big block last month with the single adjustable QA-1 shocks, which drops the price to $1,202.30 (with the 10% forum member discount).
Either setup with double-adjustable shocks is another $300. With the discount, the $1,640 Van Steel double-adjustable setup is really $1,476.
All of these prices are without shipping or tax (if you live in the wrong state).
I'm doing the job myself in the garage and am documenting the work involved in converting to rear coilovers and front semi-coilovers. If there's any interest I can start a thread. Be forewarned -- I am old and slow -- with DIY disease.
Last edited by Bob Heine; Nov 10, 2012 at 09:28 PM.

Le Mans Master

Joined: Apr 1999
Posts: 6,134
Likes: 46
From: Raleigh North Carolina
Thread Starter
Racer
Joined: Oct 2011
Posts: 318
Likes: 3
From: NP Nebraska
Same price, $1640. Mine are sitting in the box, but getting close to install. Went through the instructions today and a trial layout. You should know that you will have to shorten a bolt (probably) and there is welding and drilling involved. Welding is "optional" but if you are getting coilovers you are probably going to want to use them...
And if you are getting the rear sway bar, there is frame drilling involved with that and it is not compatible with a spare tire. Ask them about that.
And if you are getting the rear sway bar, there is frame drilling involved with that and it is not compatible with a spare tire. Ask them about that.
I had the rear sway on the car so it is drilled. Thinking about adding one to my other C3 as I don't have the spare under it anyway.
Offset trailing arms ($440), composite spring ($330) and QA-1 single adjustable shocks ($370) upgrades your rear suspension for $1,150.
I just bought the Van Steel coilover conversion for my '72 big block last month with the single adjustable QA-1 shocks, which drops the price to $1,202.30 (with the 10% forum member discount).
Either setup with double-adjustable shocks is another $300. With the discount, the $1,640 Van Steel double-adjustable setup is really $1,476.
I'm doing the job myself in the garage and am documenting the work involved in converting to rear coilovers and front semi-coilovers. If there's any interest I can start a thread. Be forewarned -- I am old and slow -- with DIY disease.
 . I will probably go with double-adjustable shocks, not because I need them but more because I would always wonder how much better it could have been. I just don't want to get the kit an find that I spent $700 more than I needed to get a neat set of brackets and installation instructions.
Corvette Stories
The Best of Corvette for Corvette Enthusiasts

Top 10 Most Expensive Corvettes Ever Sold on Bring A Trailer
Brett Foote
10 Things Every Corvette Owner Needs (2026 Edition)
Michael S. Palmer
8 Most "Only Corvette Owners Understand" Quirks and Problems
Pouria Savadkouei
10 Reasons the C6 Z06 is Still A Performance Benchmark After 20 Years
Joe Kucinski
How Much Horsepower Every Corvette Engine "LOST" in 1972
Joe Kucinski
Top 10 DOs and DON'Ts for Protecting Your Convertible Top!
Michael S. Palmer
Top 10 Most Explosive Corvettes Ever Made: Power-to-Weight Ratio Ranked!
Joe Kucinski
150 hp to 1,250 hp: Every Corvette Generation Compared by the Specs That Matter
Joe Kucinski
8 Coolest Corvette Pace Cars (and Replicas) of All Time
Verdad GallardoDrifting
Joined: Jun 2008
Posts: 1,495
Likes: 134
From: Blanco County, TX
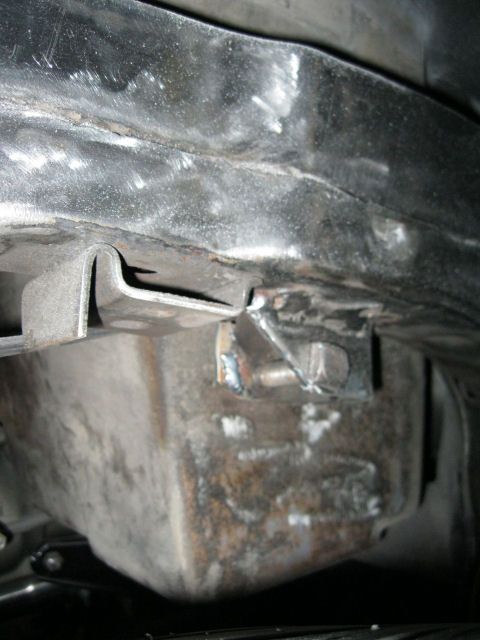
The stock sway bar on stock trailing arms clear the carrrier, but the offset arms require a shortened sway bar that mounts to the permanent rear cross member. The cross memeber has to be drilled (they conveniently provide a long drill bit for this) and the sway bar passes through the carrier, which would need to be cut, if you had it. The mounting bracket for the sway bar has holes drilled all the way through the x-member. It's a totally different mount than stock.
Pro
Joined: Jan 2010
Posts: 533
Likes: 18
From: Boca Raton Florida
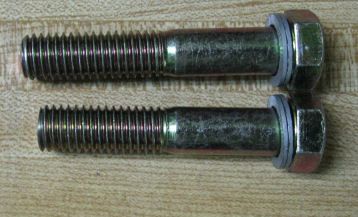
The brackets that need to be drilled out are on the frame and that's the bolt that may need to be shortened:
The black piece is the reinforcement and it wraps around the stock shock mount. You can see the storage box behind the mount and that's where the supplied bolt may be too long. Here's the bracket and full-length bolt.
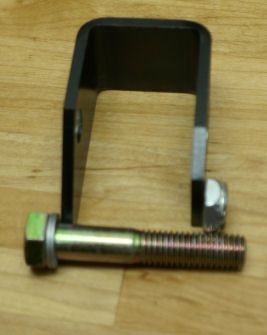
The bolt needs to thread through the Nyloc nut so you can see there's a small amount that needs to be cut off. Here''s the supplied bolt and the shortened one.
The problem is the stock bar will hit those wider tires that the offset arms otherwise allow. Van Steel sells a shorter sway bar and it mounts in a different spot on the cross-member. The spare tire carrier has to be notched to fit around the new sway bar. Ray Y's thread shows the solution.
I worry about that kind of rip-off as well. No such problem with the Van Steel coilover conversion. Their offset trailing arms are solid pieces and at $90 more than a pair of stock trailing arms, they are a bargain. The coilover mount itself is beefy but in addition to the bolt that attaches the bottom of the coilover there is a bolt that ties the coilover mount to the strut rod mount. My strut rod end is a spherical joint instead of a bushing end but you get the idea -- this is not some cheap stamped steel bracket.
Keviin68 -- I didn't mean to duplicate your post. I started writing mine this morning but didn't post it until we returned from a multi-hour Costco shopping expedition.
The black piece is the reinforcement and it wraps around the stock shock mount. You can see the storage box behind the mount and that's where the supplied bolt may be too long. Here's the bracket and full-length bolt.
The bolt needs to thread through the Nyloc nut so you can see there's a small amount that needs to be cut off. Here''s the supplied bolt and the shortened one.
I had the rear sway on the car so it is drilled. Thinking about adding one to my other C3 as I don't have the spare under it anyway.
I am definitely interested in a thread. I suffer from the same DIY disease . I will probably go with double-adjustable shocks, not because I need them but more because I would always wonder how much better it could have been. I just don't want to get the kit an find that I spent $700 more than I needed to get a neat set of brackets and installation instructions.
. I will probably go with double-adjustable shocks, not because I need them but more because I would always wonder how much better it could have been. I just don't want to get the kit an find that I spent $700 more than I needed to get a neat set of brackets and installation instructions.
Keviin68 -- I didn't mean to duplicate your post. I started writing mine this morning but didn't post it until we returned from a multi-hour Costco shopping expedition.
Last edited by Bob Heine; Nov 13, 2012 at 04:55 PM. Reason: Looong delay between start and end of post.
Drifting
Joined: Jun 2008
Posts: 1,495
Likes: 134
From: Blanco County, TX
Did you weld your reinforcing bracket?
Thread Starter
Racer
Joined: Oct 2011
Posts: 318
Likes: 3
From: NP Nebraska
They provide an upper shock reinforcing bracket. You have to drill your existing upper shock mount hole to 1/2", and slide the reinforcing bracket they provide over the existing bracket. The 1/2 bolt they give you for the upper coilover mount is probably too long and will interfere with the battery/jack tubs, depending on how your body sits on the frame. On my car, I'll definitely have to cut one, maybe both. The reinforcing bracket should be welded. They recommend assembling everything, then pulling the coilover to weld.

The stock sway bar on stock trailing arms clear the carrrier, but the offset arms require a shortened sway bar that mounts to the permanent rear cross member. The cross memeber has to be drilled (they conveniently provide a long drill bit for this) and the sway bar passes through the carrier, which would need to be cut, if you had it. The mounting bracket for the sway bar has holes drilled all the way through the x-member. It's a totally different mount than stock.
Bob, very helpful post with those pics! Can you post pics of the lower bracket to attach the coil-over, please?
Last edited by myko; Nov 13, 2012 at 09:48 PM.
Pro
Joined: Jan 2010
Posts: 533
Likes: 18
From: Boca Raton Florida
Kevin,
It isn't the best job but yes, I did weld the first side on.
I envy Mike having the room to separate the body from the frame. I keep 3 cars in my 3-car garage so I can't take the body completely off the frame and do it the easy way. Instead I am lifting the body as much as I need to get the job done. Two 7/16" all-thread rods in the rear body mounts and two 1/2" rods in the front body mounts make a relatively safe lift. I decided to paint the frame before I put everything back together.
Pro
Joined: Jan 2010
Posts: 533
Likes: 18
From: Boca Raton Florida
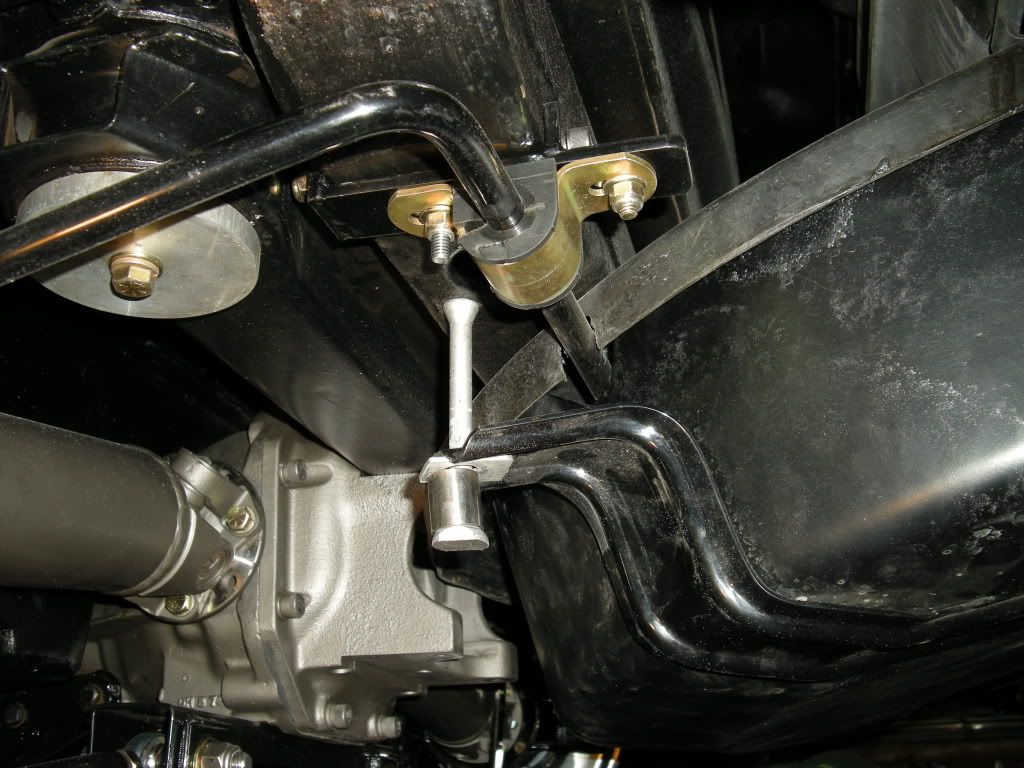
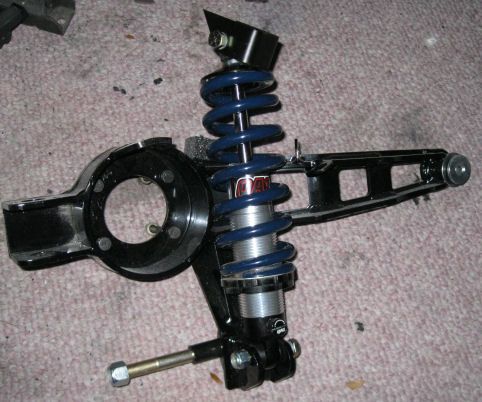
Here's a picture of the other trailing arm with the coilover attached. In the earlier picture, the axle stub and hub with the strut attachment was bolted on with the coilover missing. This is the opposite, with just the coilover attached but the long bolt is installed in the coilover bracket. Hope this helps.
Thread Starter
Racer
Joined: Oct 2011
Posts: 318
Likes: 3
From: NP Nebraska
Mike,
Here's a picture of the other trailing arm with the coilover attached. In the earlier picture, the axle stub and hub with the strut attachment was bolted on with the coilover missing. This is the opposite, with just the coilover attached but the long bolt is installed in the coilover bracket. Hope this helps.
Here's a picture of the other trailing arm with the coilover attached. In the earlier picture, the axle stub and hub with the strut attachment was bolted on with the coilover missing. This is the opposite, with just the coilover attached but the long bolt is installed in the coilover bracket. Hope this helps.


Thread Starter
Racer
Joined: Oct 2011
Posts: 318
Likes: 3
From: NP Nebraska
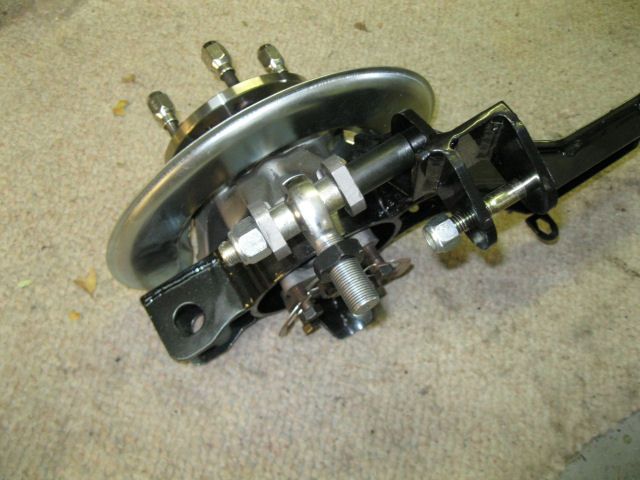
Okay, after the holiday weekend I found some time to tear down the driver's side rear axle. As you can see, the half shaft has some damage. It is not very deep but does go all the way around the shaft. The trailing arm was in poor shape and dust shield was ruined so I removed the spindle, etc. Any guesses on how much torque an undamaged 80 MT halfshaft can take so I can decide to replace it or upgrade both?
What do you guys recommend replacing even if it appears to be good? I am planning to replace the inner bearing seal as I'm sure it isn't expensive. What about the bearings and the U-joints? Anything else to check closely - ie micrometer instead of the eyeball test?
What do you guys recommend replacing even if it appears to be good? I am planning to replace the inner bearing seal as I'm sure it isn't expensive. What about the bearings and the U-joints? Anything else to check closely - ie micrometer instead of the eyeball test?
Drifting
Joined: Jun 2008
Posts: 1,495
Likes: 134
From: Blanco County, TX
I would replace every piece of rubber and all U-joints with the highest quality part you can find. If you have any differential leaks you might replace side yoke and pinion seals, and the cover gasket. I would check for side yoke end play (with a feeler gauge), which requires pulling the diffy cover. Not sure about the halfshaft without seeing it.
VanSteel rebuilds your bearing assembly for something like $200 per side with a lifetime warranty. Money well spend IMO.
VanSteel rebuilds your bearing assembly for something like $200 per side with a lifetime warranty. Money well spend IMO.
Pro
Joined: Jan 2010
Posts: 533
Likes: 18
From: Boca Raton Florida
While I had the cover off my differential, I replaced the axle seals and bearings (also called yoke bearings). I wasn't having problems but 40-year old rubber and bearings that hadn't seen use for 25 seemed like cheap insurance. When you pull the axles out of the differential, the needle bearings I'm talking about are behind the seals and lightly presssed into the case.
These bearings run between $16 and $30 each so you might want to shop around.
Thread Starter
Racer
Joined: Oct 2011
Posts: 318
Likes: 3
From: NP Nebraska
I would replace every piece of rubber and all U-joints with the highest quality part you can find. If you have any differential leaks you might replace side yoke and pinion seals, and the cover gasket. I would check for side yoke end play (with a feeler gauge), which requires pulling the diffy cover. Not sure about the halfshaft without seeing it.
VanSteel rebuilds your bearing assembly for something like $200 per side with a lifetime warranty. Money well spend IMO.
VanSteel rebuilds your bearing assembly for something like $200 per side with a lifetime warranty. Money well spend IMO.
I am planning on the VanSteel coil-overs to get rid of the monospring. I was looking at their package with offset trailing arms as I need a new right side TA anyway. Now, given the fact I need rotors, dust sheilds, and TAs I am thinking about going to the complete rear option http://www.vansteel.com/index.cfm?fu...p=1971&ID=3185 to avoid having to do the bearings myself. Hard to spend half what I paid for the car to get coil-overs and a bearing job
 .
.
Last edited by myko; Nov 29, 2012 at 06:04 AM.
Drifting
Joined: Jun 2008
Posts: 1,495
Likes: 134
From: Blanco County, TX
You might consider part number CO-R-78SB. It is just the coilovers and the offset TAs. Then send in your bearing assembly and let them rebuild them for $205 per side, assuming your spindles are OK. Rotors are comparatively cheap. Should save you over $700. Enough to upgrade to double adjustable with $400 change, Part No. CO-R-78SB-D.