


Auto meter speeds & tach install
Safety Car


Joined: Jun 2000
Posts: 4,711
Likes: 552
From: St. Louis MO
2020 Corvette of the Year (appearance mods)
C2 of Year Winner (appearance mods) 2019
CI 4-5-7-9-10-11 Car Show Winner
CI 2-3-4-5-6-7-9-10-11 Vet
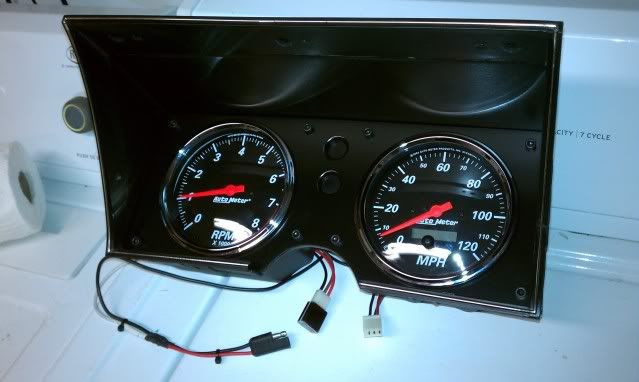
Not the best pic but that all I have now.
Autometer SportComp
George


Autometer SportComp
George
Last edited by Black_Magic; Dec 20, 2013 at 03:26 PM.
Drifting


Joined: Nov 2004
Posts: 1,631
Likes: 293
2020 C3 of the Year Finalist - Modified
I used some lexan plexiglass as a back plate. Used factory location and lens for brights and blinkers. Hope this helps you.


Last edited by bluegtp; Dec 30, 2013 at 12:35 AM.
Burning Brakes


Joined: Oct 2011
Posts: 956
Likes: 86
From: McDonough Georgia
Drifting
Joined: Nov 2004
Posts: 1,631
Likes: 293
2020 C3 of the Year Finalist - Modified
I tore everything off housing and tapped into stock wiring harness for blinkers/brights/tach and for power to the gauges. The little 194 lights fit in the factory housing just like a replacement light would but the lights have pigtails on them. I used LEDS in place. Nothing from the gauges to the wiring harness is hardwired. I used male/female connectors for simple plug and play. Easy to remove if I need to in future too. Same goes for my center gauge cluster. I left factory connectors for me to convert back easily if I wanted, I doubt I ever will though.

Corvette Stories
The Best of Corvette for Corvette Enthusiasts

Every 2027 Corvette Engine Explained
Joe Kucinski
Designer Imagines A Corvette That Looks More Like a Corvette Than the Corvette
Verdad Gallardo
10 Ugly Corvettes That We Still Kinda Love
Joe Kucinski
Top 10 Most Expensive Corvettes Ever Sold on Bring A Trailer
Brett Foote
10 Things Every Corvette Owner Needs (2026 Edition)
Michael S. Palmer
8 Most "Only Corvette Owners Understand" Quirks and Problems
Pouria Savadkouei
10 Reasons the C6 Z06 is Still A Performance Benchmark After 20 Years
Joe Kucinski
How Much Horsepower Every Corvette Engine "LOST" in 1972
Joe Kucinski
Top 10 DOs and DON'Ts for Protecting Your Convertible Top!
Michael S. PalmerBurning Brakes
Joined: Oct 2011
Posts: 956
Likes: 86
From: McDonough Georgia
Yes I sanded the top down and painted with light coats out of a rattle can. (satin black I believe)
I tore everything off housing and tapped into stock wiring harness for blinkers/brights/tach and for power to the gauges. The little 194 lights fit in the factory housing just like a replacement light would but the lights have pigtails on them. I used LEDS in place. Nothing from the gauges to the wiring harness is hardwired. I used male/female connectors for simple plug and play. Easy to remove if I need to in future too. Same goes for my center gauge cluster. I left factory connectors for me to convert back easily if I wanted, I doubt I ever will though.
I tore everything off housing and tapped into stock wiring harness for blinkers/brights/tach and for power to the gauges. The little 194 lights fit in the factory housing just like a replacement light would but the lights have pigtails on them. I used LEDS in place. Nothing from the gauges to the wiring harness is hardwired. I used male/female connectors for simple plug and play. Easy to remove if I need to in future too. Same goes for my center gauge cluster. I left factory connectors for me to convert back easily if I wanted, I doubt I ever will though.
I am saving this picture for the future.
thanks for the post

Melting Slicks

Joined: Aug 2004
Posts: 2,920
Likes: 229
From: Oakbank Manitoba
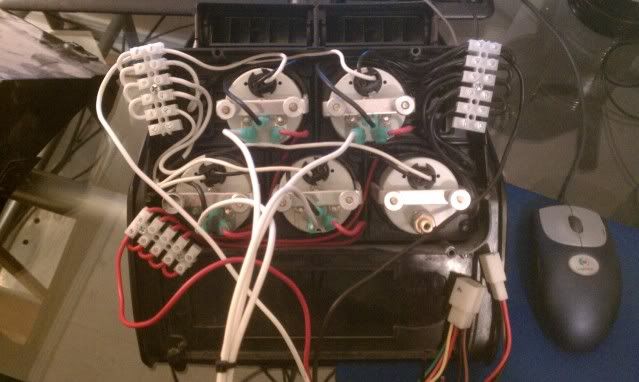
Here is a picture of the back side. You carefully gut the plastic housing until you have enough room. Aluminum plates were made to hold the gauges in the correct position. The center mounted lights can be retained by filing the openings so that plastic bulb holders can be installed.
The eleven wires will be spliced/crimped in a single 12 pin male/female molex type of connector.
I used a die grinder with sanding drums to slowly open up the housing to suit my needs.
New thin aluminum face plates were fabricated and then painted satin black. They were then glued over the original face plate.
PIN ASSIGNMENT
1-Right turn sig
2-Left turn signal
3-Hi Beam
4-Brake light
5-Speedo signal
6-Tach signal
7-Ignition voltage
8-Ground #1 (for center mounted lights)
9-Ground #2 (for speedo and tach)
10- Trip Reset button
11-Gauge lights
12-empty


Last edited by KENS80V; Jan 2, 2014 at 07:43 PM.


Burning Brakes
Joined: Nov 2013
Posts: 889
Likes: 13
From: Jax/St. Augustine FL
Melting Slicks

Joined: Feb 2009
Posts: 2,797
Likes: 608
From: Dallas Georgia
2020 Corvette of the Year Finalist (track prepared)
C3 of Year Winner (track prepared) 2019
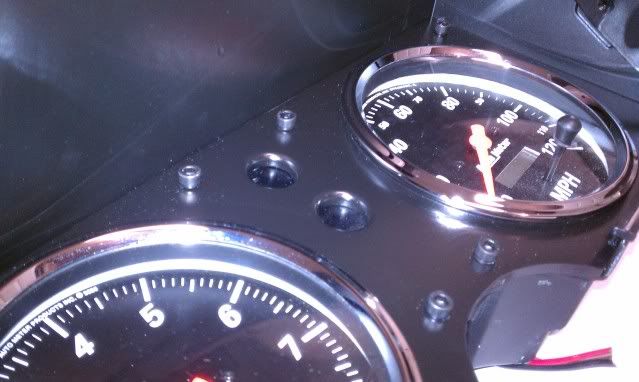
Haven't reached the point of driving yet. I'll try to get some install photos but I think the angled gauges will make visibility just that much easier from the driver seat.

Racer

Joined: Nov 2008
Posts: 366
Likes: 7
From: Mobile Al
I put the 5" monster speedo and tach along with a set of 2 5\8 gauges in the center. Made some plates that went where the stock ones hooked to the dash pad and did the same for the others in the center.