


Steering TT Rack and Selector Replacement
Thread Starter
Instructor

Joined: Aug 2013
Posts: 234
Likes: 3
From: Johnston Rhode Island
Hi Guys,
Pulled my column hoping my ignition switch replacement would save the day. Not quite. I noticed some missing teeth on my selector. Rack looks ok so far. I have never taken the column apart to get in there and replace them. My cyclinder also now spins freely with or without key.
So how do I get the upper part of the column off to replace at least the selector and probably the rack and cylinder while I am at it?
I have been thru Jim's papers and I believe it is there and it just isn't clicking for me. No idea where my manual went so if anyone can has so pics and hints that would be much appreciated.
It's actually sector I believe, but auto correct won.
Thank you
Last edited by Hpozzuoli; Jun 8, 2014 at 10:49 AM.
Thread Starter
Instructor
Joined: Aug 2013
Posts: 234
Likes: 3
From: Johnston Rhode Island
I have never had to touch a column other than pull them out and swap them. I actually need to get inside to replace the sector. This is where I am now for reference. I don't have a shop manual, not sure if that would help getting this granular. TT in a 1971. Column was out yesterday. I put it back in last night. Hoping I can do the rest with it in the car.
Thread Starter
Instructor
Joined: Aug 2013
Posts: 234
Likes: 3
From: Johnston Rhode Island
Getting a little further. Feel free to jump in at any point to guide and advise. Hopefully we can all gain from this.
I used my steering wheel puller to get the asm hub off.
I used my steering wheel puller to get the asm hub off.
Le Mans Master


Joined: Dec 2007
Posts: 6,422
Likes: 591
From: McHenry Illinois
You're headed in the right direction, I just posted this link an another thread, might help you also.
http://jimshea.corvettefaq.com/?cat=5
http://jimshea.corvettefaq.com/?cat=5
Thread Starter
Instructor
Joined: Aug 2013
Posts: 234
Likes: 3
From: Johnston Rhode Island
You're headed in the right direction, I just posted this link an another thread, might help you also.
http://jimshea.corvettefaq.com/?cat=5
http://jimshea.corvettefaq.com/?cat=5
Thread Starter
Instructor
Joined: Aug 2013
Posts: 234
Likes: 3
From: Johnston Rhode Island
I decided to just take the column out again. The switch and cylinder need to be synchro'd anyways. Can't locate a lock tab on the cylinder. The hole is open but no tab. Stuck a puller on it and instead of the cylinder I got decorative ears. Cylinder still inside. I will be fighting the cylinder and the column cover as long as the family allows today. I will also get some more parts ordered. I hope I don't get mad halfway thru and just buy a new column. I decided this route cause I thought it would be quicker. Silly thoughts.
Funny thing. I had to not only take my column out yesterday, but did a friends as well.
Funny thing. I had to not only take my column out yesterday, but did a friends as well.
Corvette Stories
The Best of Corvette for Corvette Enthusiasts

Top 10 Most Expensive Corvettes Ever Sold on Bring A Trailer
Brett Foote
10 Things Every Corvette Owner Needs (2026 Edition)
Michael S. Palmer
8 Most "Only Corvette Owners Understand" Quirks and Problems
Pouria Savadkouei
10 Reasons the C6 Z06 is Still A Performance Benchmark After 20 Years
Joe Kucinski
How Much Horsepower Every Corvette Engine "LOST" in 1972
Joe Kucinski
Top 10 DOs and DON'Ts for Protecting Your Convertible Top!
Michael S. Palmer
Top 10 Most Explosive Corvettes Ever Made: Power-to-Weight Ratio Ranked!
Joe Kucinski
150 hp to 1,250 hp: Every Corvette Generation Compared by the Specs That Matter
Joe Kucinski
8 Coolest Corvette Pace Cars (and Replicas) of All Time
Verdad Gallardo
Thread Starter
Instructor
Joined: Aug 2013
Posts: 234
Likes: 3
From: Johnston Rhode Island
I compare this to a transmission. Easy to take in and out, but forget about going inside. After really thinking this over I have decided to send it to Larry Smith in Southlake TX to rebuild. Takes approx a week of work. Add some shipping time and I will be down 2.5 weeks. It stinks, but there's way to much going on in there for my schedule. Cost will be about $400. The good thing about this is he is going to replace everything inside that column. I was only going to do the broken stuff. He will do need signal, bearings, soup to nuts.
Mr Jim Shea- your papers and knowledge are first class. For me to go thru all this effort and still have a 40yr old made the decision for me. I will have all new components and thanks to you I have a much better understanding of something I never knew would be so complicated.
Mr Jim Shea- your papers and knowledge are first class. For me to go thru all this effort and still have a 40yr old made the decision for me. I will have all new components and thanks to you I have a much better understanding of something I never knew would be so complicated.

Le Mans Master

Joined: Jul 2000
Posts: 6,001
Likes: 113
From: Saginaw Michigan
Sorry I didn't get back sooner. Sorry that you ruined your lock cylinder with a puller. You must have been pressing on a blind slot. Here is the correct slot. Use a very thin screwdriver blade to depress the wedge.
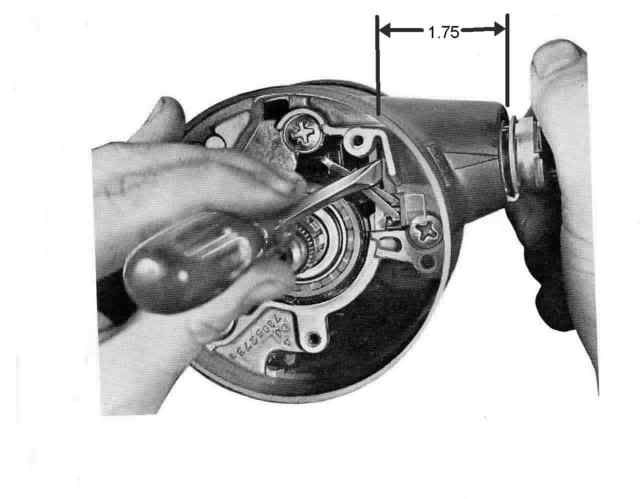
Press to the right side of the slot in ths housing. Try to press in the center of the wedge it could tip and one edge of the wedge would be hanging up in the slot. The lock cylinder should come right out.
I would suggest that you remove the plastic "harmonica" connector from your turn signal switch wires. Then you can easily pull the wires back up through the column and get the switch out of the way. The procedure to release the wiring contacts is described in my T&T D&R paper #2, pages 5 and 6. The wiring will be much easier to reinstall without the harmonica as well.
Now you can remove the three screws that hold your housing in place. Sometimes the housing can have some slight corrosion holding it in place. It could require a little penatrating oil to help it.
With the housing removed, you will have the plastic sector and the die cast rack in plain sight. Check to make sure that the rack is not broken where it sorrounds the pivot pin. Check for damaged teeth on the sector and/or rack. First remove the complicated "grasshopper spring" then you have to remove the big tilt spring. T&T D&R paper #3, page 3. Then the pivot pin T&T D&R paper page 4.
The sector is either a press if to the driveshaft pin or there may be a small c-clip on the end of the driveshaft pin that holds the sector in place.
After you reassemble your steering column, you should use the procedure describe in T&T D&R paper #2, page 5 to synchronize the ignition switch to the steering column.
Good luck,
Jim
Le Mans Master
Joined: Jul 2000
Posts: 6,001
Likes: 113
From: Saginaw Michigan
Sorry I didn't get back sooner. Sorry that you ruined your lock cylinder with a puller. You must have been pressing on a blind slot. Here is the correct slot. Use a very thin screwdriver blade to depress the wedge.
Press to the right side of the slot in ths housing. Try to press in the center of the wedge it could tip and one edge of the wedge would be hanging up in the slot. The lock cylinder should come right out.
I would suggest that you remove the plastic "harmonica" connector from your turn signal switch wires. Then you can easily pull the wires back up through the column and get the switch out of the way. The procedure to release the wiring contacts is described in my T&T D&R paper #2, pages 5 and 6. The wiring will be much easier to reinstall without the harmonica as well.
Now you can remove the three screws that hold your housing in place. Sometimes the housing can have some slight corrosion holding it in place. It could require a little penatrating oil to help it.
With the housing removed, you will have the plastic sector and the die cast rack in plain sight. Check to make sure that the rack is not broken where it sorrounds the pivot pin. Check for damaged teeth on the sector and/or rack. First remove the complicated "grasshopper spring" then you have to remove the big tilt spring. T&T D&R paper #3, page 3. Then the pivot pin T&T D&R paper page 4.
The sector is either a press if to the driveshaft pin or there may be a small c-clip on the end of the driveshaft pin that holds the sector in place.
After you reassemble your steering column, you should use the procedure describe in T&T D&R paper #2, page 5 to synchronize the ignition switch to the steering column.
Good luck,
Jim
Thread Starter
Instructor
Joined: Aug 2013
Posts: 234
Likes: 3
From: Johnston Rhode Island
Jim-I have a pic on my phone. I forgot to take it with the ipad. At some point my cylinder was changed. Whatever they put in doesn't have a pin. The hole is open, but only reveals the side of the cylinder. I sent the pic to the guy doing the rebuild and he was stumped. If it was going to be hit with the puller I wanted first shot at destruction.
The fellow I found rebuilds these columns and also sells rebuilds, parts, and other related stuff. For me to spend another few hours and only replace a couple of things isn't as good as what he will do. For $400 I get basically a brand new column. All brand new parts inside with a fresh paint job and bearings.
The fellow I found rebuilds these columns and also sells rebuilds, parts, and other related stuff. For me to spend another few hours and only replace a couple of things isn't as good as what he will do. For $400 I get basically a brand new column. All brand new parts inside with a fresh paint job and bearings.
Thread Starter
Instructor
Joined: Aug 2013
Posts: 234
Likes: 3
From: Johnston Rhode Island
I shipped my column out this morning. It cost $35 from RI to TX. Larry will have it on Thurs and turn it around ASAP and send it back. I guess it is a smart move to rebuild it instead of fix a couple of broken items. Can't wait to get it back
Thread Starter
Instructor
Joined: Aug 2013
Posts: 234
Likes: 3
From: Johnston Rhode Island
Just a little update. Column is still being finished. I have spoken to Larry a few times. He is a perfectionist. He wants this column to be NCRS ready. I can't blame him wanting to deliver the best work possible. I just wanted the guts all replaced along with the bearings etc.
I am getting a fully sandblasted, painted, new indicator levers all around, new bearings, all new wiring to match my new harness I just put in, and the missing bell cover. Hopefully it will ship back here early next week. He was able to tell me the column was not original to the car.
I shipped it out on 6/9. It's driving me crazy not being able to drive the car, but I am happy I will have a new column.
Thread Starter
Instructor
Joined: Aug 2013
Posts: 234
Likes: 3
From: Johnston Rhode Island
Well rebuilt column is in, but she won't turn over or crank. Larry had questioned the connector in the car while doing the rebuild. I do have this jumper in there (courtesy of bubba). I am fairly certain the cars wires are not matching up to the factory wires coming off the column for the lights etc and the ignition switch itself. Hopefully after dinner I can spend sometime chasing wires and re wire the harmonica if need be....ugh
He said the ignition switch was synchro'd to the key so I won't look there yet. Anything I might have missed?
He said the ignition switch was synchro'd to the key so I won't look there yet. Anything I might have missed?
Last edited by Hpozzuoli; Jun 27, 2014 at 01:51 PM.
Thread Starter
Instructor
Joined: Aug 2013
Posts: 234
Likes: 3
From: Johnston Rhode Island
New column is in and car is running. I got rid of that jumper posted above. I put in approx 20 feet of new wire and cleared out all the half *** work that was done. I have the minimum amount of wire to make everything work. Got rid of all the splices etc at the ignition switch. I also pushed the ignition switch closer to the fire wall on the column to make sure I was hitting the contacts. A lot of the wire that came out was soldered and corroded....no heat shrink. I had enough of all the colors to make everything consistent. Not sure if it was the corroded wires or just moving the switch a little, but she is running again after a 3 week rest. Larry did a great job on the rebuild and I am very happy with his work. If anyone needs his info i believe I posted it above, but shoot me a pm and I will give it to you. Time for a wash and a cruise now!
Wish I remembered to send the horn cap so it could be painted too.
Wish I remembered to send the horn cap so it could be painted too.
Last edited by Hpozzuoli; Jun 27, 2014 at 01:52 PM.