When you click on links to various merchants on this site and make a purchase, this can result in this site earning a commission. Affiliate programs and affiliations include, but are not limited to, the eBay Partner Network.
My problem is a constant Key-in-Ignition Buzzer going off, even with the key removed, and only with the LH door open.
1973 Chevrolet Service Manual has an excellent Troubleshoot section on those specific conditions that can cause it, but not too detailed on the pictures of the switch close-up.
Pretty much shot it down to the switch, but never to have seen a new switch, I need your help with this.
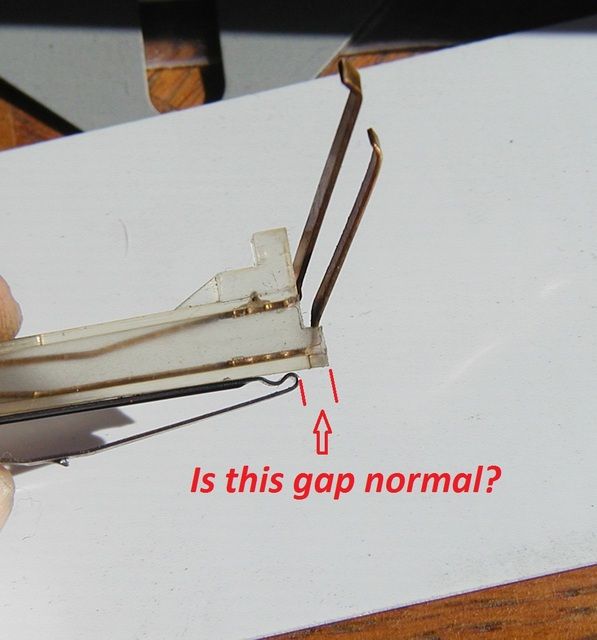
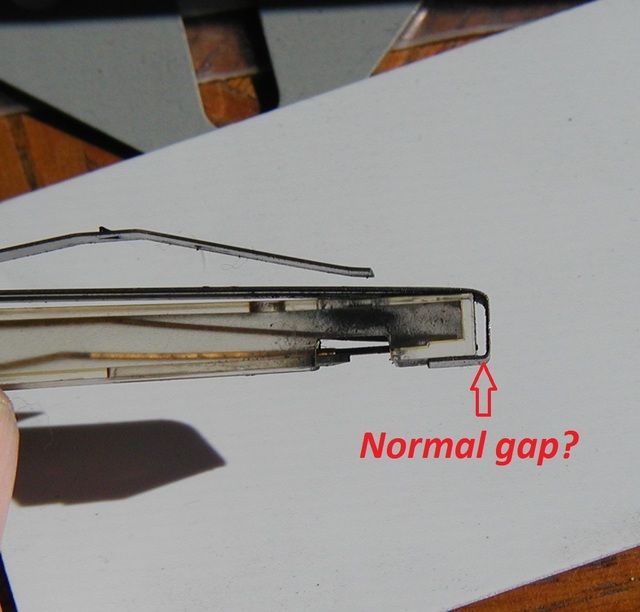
As far as the gaps: If the switch's Clip doesn't sit fully onto the switch, I can see the switch not seating fully down into position in it's receptacle.
And the last photo: Is that the normal appearance of the switch where the Lock Cylinder's protruding buzzer activator tab makes contact?
Steve,
Have you tried placing continuity probes on the long switch contacts and trying to depress the internal contacts to see if they open and close correctly?
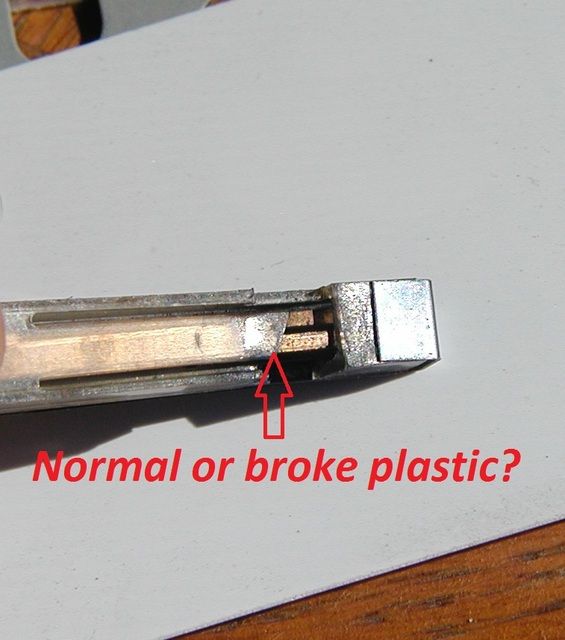
I am not sure what that silvery part is in the third picture. I wouldn't think that it should be there.
As to the fitment of the clip on the switch, I don't have any parts to compare if that is normal or not.
Are you sure that your problem isn't the plastic lock cylinder tab that might be stuck in the extended position.
Steve,
Have you tried placing continuity probes on the long switch contacts and trying to depress the internal contacts to see if they open and close correctly? Thanks Jim. If you mean the "window" where the Lock Cylinder Key Tab contacts, NO. I take it that it's normally open unless the key is in the lock and not in the RUN position, correct?
I am not sure what that silvery part is in the third picture. I wouldn't think that it should be there. That's just a reflection from light in the photo. Clear plastic.
As to the fitment of the clip on the switch, I don't have any parts to compare if that is normal or not.
Are you sure that your problem isn't the plastic lock cylinder tab that might be stuck in the extended position. It could be, but it, and another cylinder lock I've tried appear to operate normal on the bench.
I replaced the switch and clip on my 69 T&T some time back. I also installed a new ignition lock cylinder at the same time. I currently have the same problem (buzzer sounds continuously - so much for aftermarket parts). As Jim suggested, I'm guessing the tab on the lock cylinder is the culprit; but, I've yet to tear into it. Pic 2: regarding the switch/clip that I removed, mine has no gap. Perfect fit between the spring and the plastic switch housing. I'm guessing that it's OEM. You could install the switch without the spring to see if it's home position is the same as with the spring. The "silvery" part that Jim refers to is part of the hinged finger that is part of the plastic housing. The very tip of it has broken off. The lock cylinder tab pushes against the finger which, in turn, pushes the metal contacts together. Let me know if you'd like pictures.
I replaced the switch and clip on my 69 T&T some time back. I also installed a new ignition lock cylinder at the same time. I currently have the same problem (buzzer sounds continuously - so much for aftermarket parts). As Jim suggested, I'm guessing the tab on the lock cylinder is the culprit; but, I've yet to tear into it. Pic 2: regarding the switch/clip that I removed, mine has no gap. Perfect fit between the spring and the plastic switch housing. I'm guessing that it's OEM. You could install the switch without the spring to see if it's home position is the same as with the spring. The "silvery" part that Jim refers to is part of the hinged finger that is part of the plastic housing. The very tip of it has broken off. The lock cylinder tab pushes against the finger which, in turn, pushes the metal contacts together. Let me know if you'd like pictures.
Thanks 69!
I really like pictures to help jump start my feeble mind.
And i appreciate your insight too.
Bad switch.
Cost for one of these: just South of a C-note.
Therefore, I had better, at least, make an attempt to possibly repair it.
The end of the switch where the contact strips merge had to be shorting, and I noted the lower strip bent up an RCH so as to perhaps cause this erroneous function.
I ever-so-carefully used a jeweler's flat screwdriver to pry the two strips apart, with a little success.
Brushing and spraying electrical contact cleaner into the merging contact area was also done, and at the end of all this, the upper arm contacts of the switch now have an ohm reading of infinite at rest, and lightly pushing on the contacts through the switches opening yields continuity. The only question as I see it now, is will the Key Lock Cylinder's actuating tab work with the switch's broken cover tab? It did before I tore the column apart. At least I can test it by just installing the turn signal switch & hook up the negative Battery Cable to see.
My fingers are crossed.
Steve
And Thanks to Jim Shea for pointing me in this direction.
Got a couple of pic's of the tip of the finger that's missing on yours. My guess is that you'll need a new switch.
69vette,
Hey, that's what I was lookin for! THANKS!
Yeah, I see now that missing plastic end on mine. The fact that the buzzer worked correctly before the column rebuild gives me hope that the switch might still work like before. I can see the purpose of it, but not the necessity of it, as long as the actuating tab (non-conductive) in the cylinder lock reaches long enough to push the contacts together. It had to have, since it worked before.
Please! Not another 90 bucks!
Hope you can make your old one work. I bought an aftermarket T&T switch from Willcox in '11 when they first started carrying them ($38). I had to bend both contact leads coming out the top of the switch to mate with the two contacts on the underside of the turn signal switch. Nothing like OEM parts.
Hope you can make your old one work. I bought an aftermarket T&T switch from Willcox in '11 when they first started carrying them ($38). I had to bend both contact leads coming out the top of the switch to mate with the two contacts on the underside of the turn signal switch. Nothing like OEM parts.
Thanks 69vette.
Looks like that broke-off end of plastic tab is critical, and looks like another 90 bucks for me.
Just installed a new Lock Cylinder, with the Buzzer Switch already in place. Unfortunately there is continuity between the contacts in all Ignition Key positions as well as the desired "Key removed" position. Perhaps the Lock Cylinder's square casting "key" caught the Buzzer Switch's exposed contact strips on insertion, causing the closed circuit. They sat up awfully close to the edge of the "hole" where the Cylinder fits into.
The only other thing I can do right now is remove and re-insert the Buzzer Switch, so as to check the contact's condition AND subject the contacts to the different direction of contact with the Lock Cylinder.
And maybe place a tiny section of electrical tape over the exposed contacts to serve the function of that broken tab end.
Just shootin' in the dark here folks.
Steve
Addition: Buzzer Switch/Clip doesn't wanna come out with the Lock Cylinder in place, and I'm not gonna force ANYTHING at this point. (Yes, with the Ignition key out or the Ignition Switch in "RUN".)
All this might prove is the importance of that broken Buzzer Switch tab end.
Steve
You may have already figured this out, but I took a look at a spare ignition lock cylinder and found that the button that actuates the buzzer switch does not have a spring to return the button to it's retracted position when the key is removed. I'm guessing that the plastic finger (yours with the missing tip) provides this function. The pic shows what I'm referring to as the button.


 THANKS!


