When you click on links to various merchants on this site and make a purchase, this can result in this site earning a commission. Affiliate programs and affiliations include, but are not limited to, the eBay Partner Network.
Hello everyone, I’m currently tackling my latest project; the AC system. The motor blows hard, and the system does go hot and cold when I flick the switch. The heater core looks really good and there are no mouse nests or obstructions. However; the doors that direct the air are NOT opening on their own. And the vacuum hoses that were connected to the AC switch are completely chewed and destroyed by the mouse.
My main problems are these; finding the rubber fittings that go onto the end of the vacuum hose like the factory originals (I’m assuming it’s original and I can always buy regular vacuum line and color code if necessary.)
Finding the red vacuum line (I can’t find it anywhere in the dash; is it even supposed to be there?)
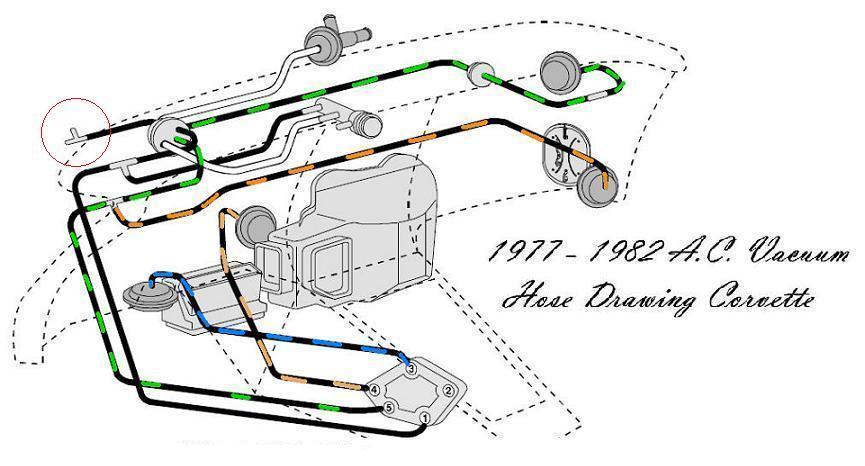
I will attach photos and the diagram I am using for reference, any guidance would be very appreciated. This is the end of the line that connects to the vacuum diaphragm on the drivers side. Note the rubber fitting on the right line that I am referring to; where can I find these rubber pieces? This is the other rubber piece that attaches to the AC switch, again the mouse chewed this up completely. Do new switches come with this or do I even need it? These are the ends that were supposed to be connected to the AC switch, but the darn mouse chewed them up. These are all the vacuum lines that I could find in the dash that were not connected to the AC switch. But no red vacuum line. (Side note, the wiring is a mess but I did clean it up some.) This is the diagram I am using as reference to the vacuum line location; I cannot find the red vacuum line anywhere. Do I even need it?
I looked for those connectors too but never could find any. Your other option might be to either find a Corvette salvage yard that would have the entire vacuum harness or use one of the replacement kits. It will not have those connectors that got chewed up though.
I appreciate the information and new diagram it’s very helpful and much better. I was originally going to tear out most of the AC to replace it but it all looks to be in very good shape minus the obvious damage by the switch. I’d rather not have to replace all the vacuum hoses but if I had to do that at least on the interior about how long would that take? (The hoses aren’t brittle but I don’t want to break anything unnecessarily.) I don’t have a vacuum pump or anything to test the switch so I won’t know if it’s good or not until I hookup those vacuum hoses; in the event that nothing happens I will go ahead and replace it and check the vacuum on the diaphragms tomorrow to make sure those still operate correctly using the finger over the port technique.
Yes, just get the complete hose kit. It will give you the correct Tees and colored hoses along with the spring clamps.
The hardest part will be feeding the new hose ends through the firewall grommets.
The new rubber hose is a larger ID size then original so the grommet holes will need some reaming to get them through.
I also noticed on your diagram the port numbering of the vacuum switch is labeled a little different than a Corvette, your diagram shows #2 as OFF, there is no off.
This switch was used on both A/C and Non A/C cars so follow the porting on the left.
If you still have the Delco or a ACdelco dealer replacement switch the ports should be numbered.
Updated Vacuum Switch Port Circuits
Last edited by bmotojoe; May 17, 2022 at 09:26 AM.
Thank you for your response, I will take a look shortly to see if it is numbered. If it is indeed numbered, how will I know which vacuum lines will go to each port? Ex: How can I tell which line is the "vacuum in (green, orange, etc)?" If it isn't numbered I'm obviously assuming I can just place the hoses in the same place as the diagram you posted, but may go ahead and buy a new switch anyways just so I have everything I need at one time.
Update, the switch is not labeled; no big deal. I also followed the vacuum lines that go into the firewall and out into the engine area; the small vacuum hose in the middle is completely snapped off and has been for a long time, lots of crud built up in and around the line itself. There are two more bigger lines that also come from the same spot, one goes into a tee on the driver side and the other I can't quite follow.
If you found the Tee in the engine compartment and one line is going into that grommet, that will be your vacuum source from the engine, labeled #1 Vacuum
See where it is circled in red on the drawing above?
#1 also tees off to the vacuum switch that operates the hot water shutoff valve on top of your heater box inside the cabin.
The others,
One will go to the plenum actuator (green hose)
The other will go to the Hot Water shutoff valve in the one heater hose (white hose).
Last edited by bmotojoe; Apr 27, 2022 at 07:06 PM.
Thank you for clarifying the diagram and what I am seeing, I just ordered the hose kit and some additional parts so I will post an update in the next week or so on how its coming along.
Update, after getting rid of all the electrical tape, zip ties, and duct tape holding the ac ducts together (oh brother) I finally have it mostly bare to see. I've started re attaching the new hoses and new vacuum switch. The 1981 that I have has 2 tees that connect the black 9 inch hose to the vacuum valve to the switch ontop of the heater box. The kit only came with one tee for the interior and another tee for the exterior which is way too big for the interior lines. And one question, a few months ago I ripped out the old vacuum headlights and replaced them with the electric light kit from Richard Hayes. I left the old AC lines that would've gone to that in the engine bay, should I block them off with some caps or tear most of those lines out and keep one line open/capped off? I can take pictures if that will aid in any assistance.
Last edited by RonnieJamesDio; May 8, 2022 at 08:50 PM.
Reason: Added information
Since you have upgraded to the electric system there is no need for the check valve, that can be removed.
If it were me I would run a dedicated line from the manifold fitting through the filter and up next on the firewall your HVAC line now tees in.
You will need to purchase the correct reducer to make the connection.
For the reducer, a short length of 1/8" ID vacuum hose will fit nice and sung over the existing vacuum line entering the cabin.
I believe the vacuum line from the manifold/filter is 1/4"...
You can cap things off if you like but loose ends sometimes turn into problems down the road.
Easy peasy ...
This is helpful for sure, thanks a lot. As stated in previous posts, some owner in the early 2000s (I'm guessing) did so much bubba work and did pretty much nothing correctly. I will do my best to do as you suggest; I would much rather have it correct and working properly unlike before. I will work on it the next few days and see what happens.
Since you have upgraded to the electric system there is no need for the check valve, that can be removed.
If it were me I would run a dedicated line from the manifold fitting through the filter and up next on the firewall your HVAC line now tees in.
You will need to purchase the correct reducer to make the connection.
For the reducer, a short length of 1/8" ID vacuum hose will fit nice and sung over the existing vacuum line entering the cabin.
I believe the vacuum line from the manifold/filter is 1/4"...
You can cap things off if you like but loose ends sometimes turn into problems down the road.
Easy peasy ...
UPDATE
After hooking up all the vacuum hoses I believe I got it working properly again for the most part. The main blend door on the passenger side towards the fire wall opens and closes; blows nice and cold, the defrost flap opens perfect. The foot door on the passenger side is stuck shut; no big deal I guess. The only thing I’ve noticed is when I turn the AC on the two ports on the switch they I did not use makes a loud hissing. Should I cap it? Or should it sound like that. Thanks for all the help.
The foot door on the passenger side has a spring load pin that allows you to remove and install that door. What happens is the bottom pin gets rusty/cruddy and freezes the door up. You can spray some lubricant on the top and bottom pins and use your hand to get the door freed up again. Mine was like that on my 81 and I have it working as it should now.
What about the door out in the cowl area, tucked down inside the fender well area? You can see it if you look down in there by the end of the blower swirl cage area.
Last edited by MattoonVette; May 12, 2022 at 05:15 PM.
UPDATE
After hooking up all the vacuum hoses I believe I got it working properly again for the most part. The main blend door on the passenger side towards the fire wall opens and closes; blows nice and cold, the defrost flap opens perfect. The foot door on the passenger side is stuck shut; no big deal I guess. The only thing I’ve noticed is when I turn the AC on the two ports on the switch they I did not use makes a loud hissing. Should I cap it? Or should it sound like that. Thanks for all the help.
Post #5 shows the vacuum switch and the ports.
The only unused port would be #2 exhaust port, and its only porpoises is to exhaust otherwise trapped energy from a none venting actuator.
Once an actuator(s) have exhausted there should be no more sound unless the switch itself is faulty.
The foot door (or air re-circulation door) is held shut with that heavy spring, so it is possible it may be frozen shut or your just not pushing hard enough against the spring resistance.
That circuit is also connected to the plenum actuator in the engine compartment. Follow the green hose in the wiper gutter.
If you remove the plastic trash screen you will see the plenum door and the actuator is on the inside, you have to remove the door held in by screws.
If the hose nibblers did what they did on the inside of the car,,, well you might want to check that hose too. If so there will not be enough or no vacuum to open either door...
See, mine was crushed during cars assembly and never worked, I think another forum member found the same thing...
Plenum actuator Short Hose...
Last edited by bmotojoe; May 12, 2022 at 08:00 PM.
Reason: Added Air re-circulation door
UPDATE
After hooking up all the vacuum hoses I believe I got it working properly again for the most part. The main blend door on the passenger side towards the fire wall opens and closes; blows nice and cold, the defrost flap opens perfect. The foot door on the passenger side is stuck shut; no big deal I guess. The only thing I’ve noticed is when I turn the AC on the two ports on the switch they I did not use makes a loud hissing. Should I cap it? Or should it sound like that. Thanks for all the help.
where did you get the hose kit,I'm thinking about replacing mine,although I think everything works on mine,I o ly drove it twice,but lights,ac,wipers all worked,not sure about the heat.but replacing,heads,intake and carburetor with headers,and still using vacuum for lights.
I will definitely check on the door tomorrow; I just reassembled everything most of the A/C works good. I have pressed on the door but didn't want to push too hard to avoid breaking it. Its possible I may have ran one of the hoses to the vacuum switch incorrectly, because when I put my finger over the port (I forgot which one it is) the hissing clearly stops. I will take a look tomorrow after work and see if I may have missed something. As for you @Golferdad there is a link near the top of this post, I bought them from Zip Corvette and they arrived fairly quick. Good quality, the instructions it comes with are not nearly as good as the instructions provided by everyone in this post and forum.








 1981 Corvette AC Vacuum Hoses (Interior)