


Leaking Freeze plug
Thread Starter
Bonehead


Joined: Feb 2006
Posts: 121
Likes: 9
From: Onnabeachin, Hawaii 94 6spd
So on Thursday, I noticed this just after I parked the Vette in the garage:

Yep, antifreeze. I looked at all the usual suspects--weep hole from the waterpump-dry, all hoses-dry, radiator-dry. After about 20 minutes of searching and burning myself on everything still hot, I finally discovered this:
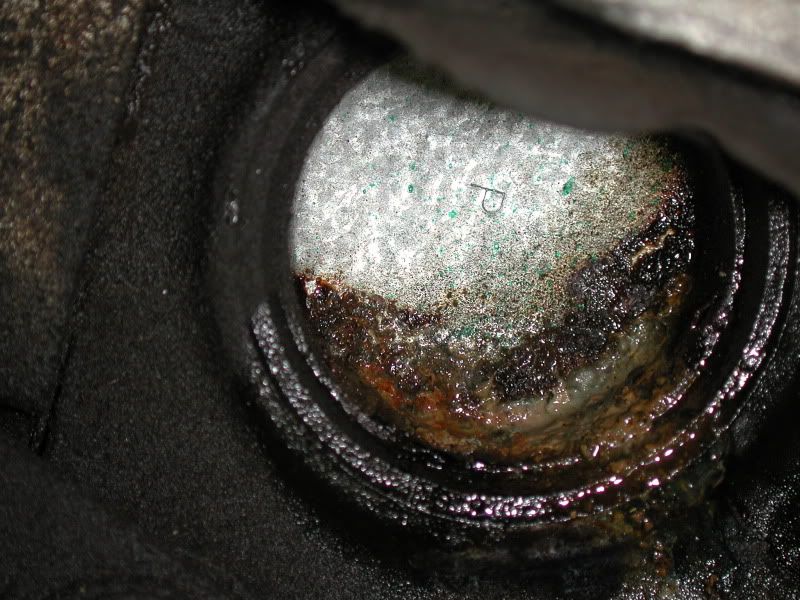
Leaking Freeze plug on the right front of the engine, just to right of Optispark. I looked at the other ones I was able to see and they all look pristine. After I scraped off the goo, I got a small geiser you can see, and I hope at this point you can feel my pain.
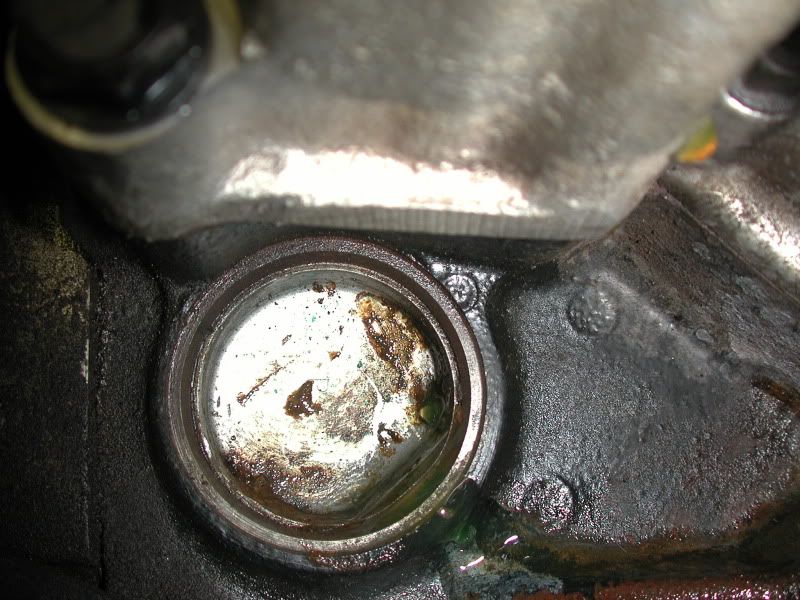
I suppose I should be somewhat thankful, and of course I am, that this is likely the only freeze plug of 8 that is sorta semi accessible to at least see, kinda/sorta. I started by removing about everything I could once I had disconnected the neg at the battery, shielding the Optispark with rags, plastic, draining the coolant system. At this point I should add that I run a minimum of 50/50 antifreeze all the time even though I live in Hawaii and it never gets cold I even checked it with a floaty checky thingey (name escapes me at the moment, but it looks like a turkey baster and you suck up your antifreeze in it to check spec gravity to see your freeze point) and confirmed I was good down to -10*. The antifreeze of course also has anticorrosive components that are supposed to protect against this sorta thing, but it kinda looked as if the freeze plug had rusted from outside-in. I read up all I could online about removing/installing freeze plugs and all the photos were of engine blocks conveniently on engine stands with no obstructions to anything. Such was not the case with my situation. I learned you can drive in one edge of the plug and it will "rotate" in the hole so you can grab it with pliers and yank it out. Um, no such luck. Not even close. I even permanently lost somewhere in the front of the vehicle my favorite pin-punch, it went into never never land. I was able to get a small drill with an ultra short drill bit in it and drill a hole, then thread in a coarse thread bolt as below:
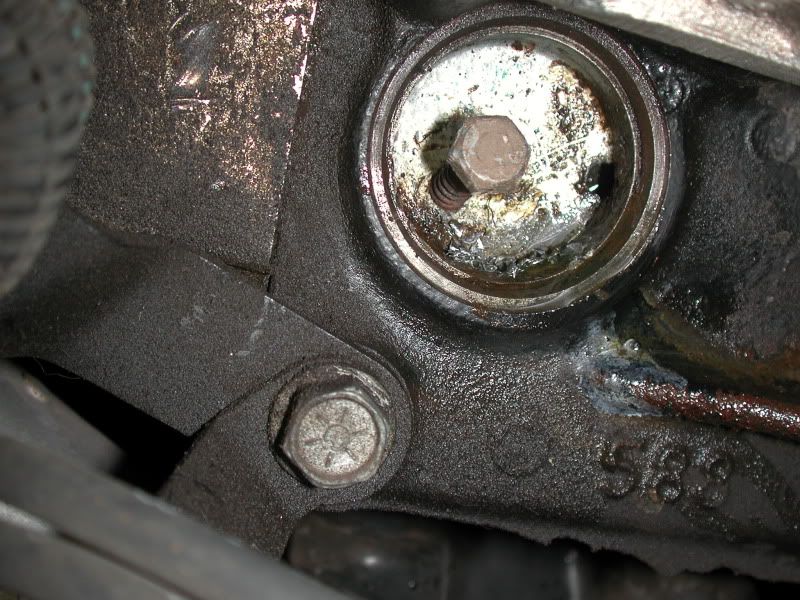
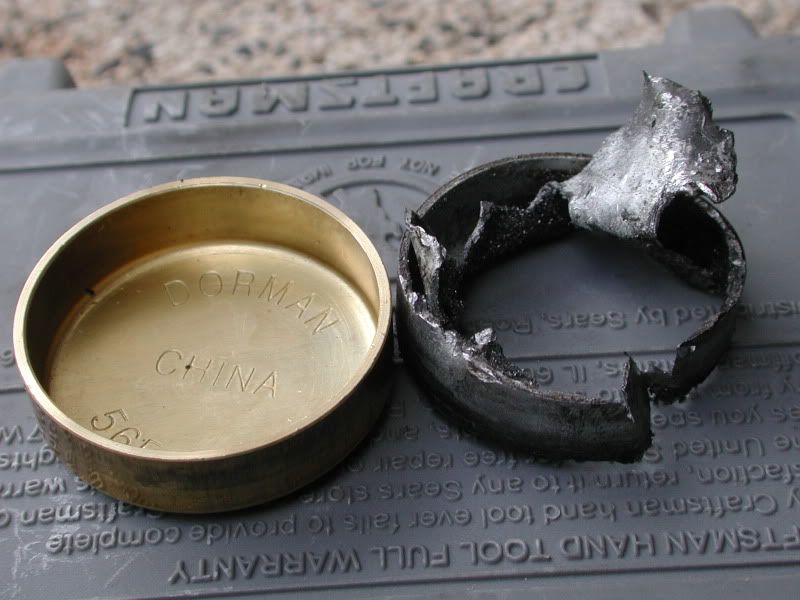
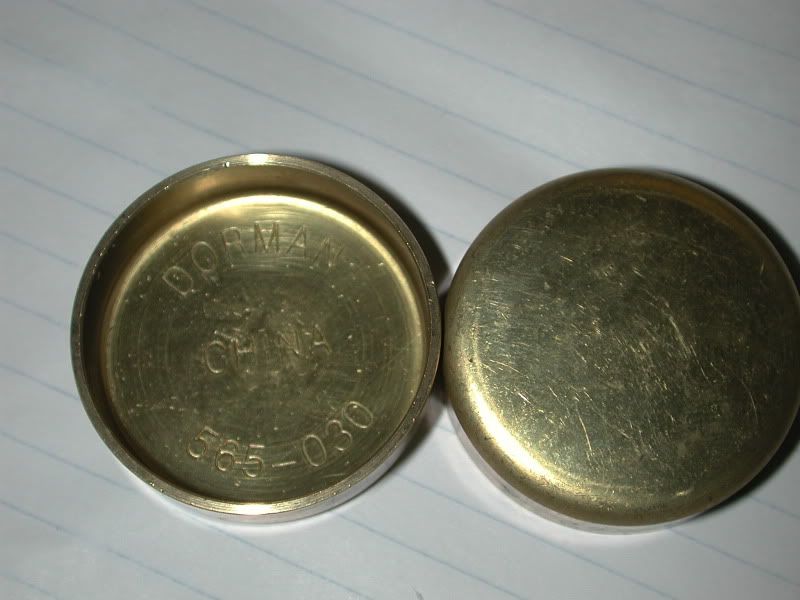
The idea was to get some variety of prybar, plier, slide puller on it and yank it out. No such luck. The threads pulled thru before anything budged. Same thing with 2 subsequent drill holes. I used every tool usually reserved for destructive carpentry and managed to mangle the thing to an unrecognizable twisted chunk of metal, but still no luck, and it was hardly coughing up blood. Lost skin off every knuckle, etc. Stopped taking photos at this point, about 3 hours into the struggle. Essentially all that remained was the rim of the thing and I used a carbide burr in a die grinder to carefully thin out the rim until it was like tin foil across an arc of about 30* and then that crumpled and it came free with some special swear words reserved for such trying occasions. I had to be very very careful not to grind thru the rim and damage the bore or it would never seal. Took a lot of tedious, meticulous time, sorta like Endodontic root canal work. At least the drill/grinder sounded the same. The old galvanized steel plug here finally out in all its mangled glory, next to the new brass plug. If you can't tell which is which, stop reading here.
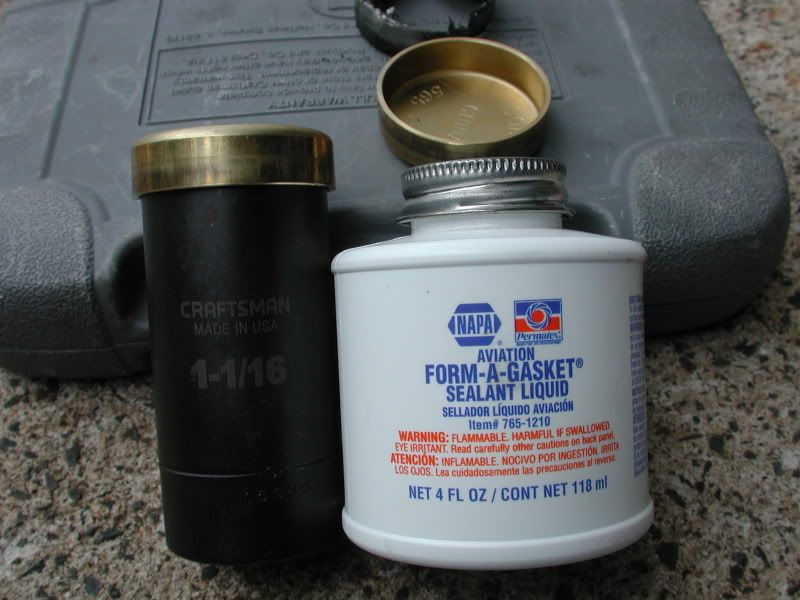
From all my reading, generally it was recommended to use a sealer. It seemed all the genuine serious racers recommended ThreadLocker Red, most others recommended Permatex Aviation Sealer. You can see what I used, and the "driver" I utilized to seat the new plug. I was very lucky to find this, as the parts places I usually utilize had no clue about what this was, even though I took a photo of the bottle from an online writeup.
I cleaned up the bore where the new plug was to go, it seems the antirust stuff had protected the engine block inside the water jacket pretty well.

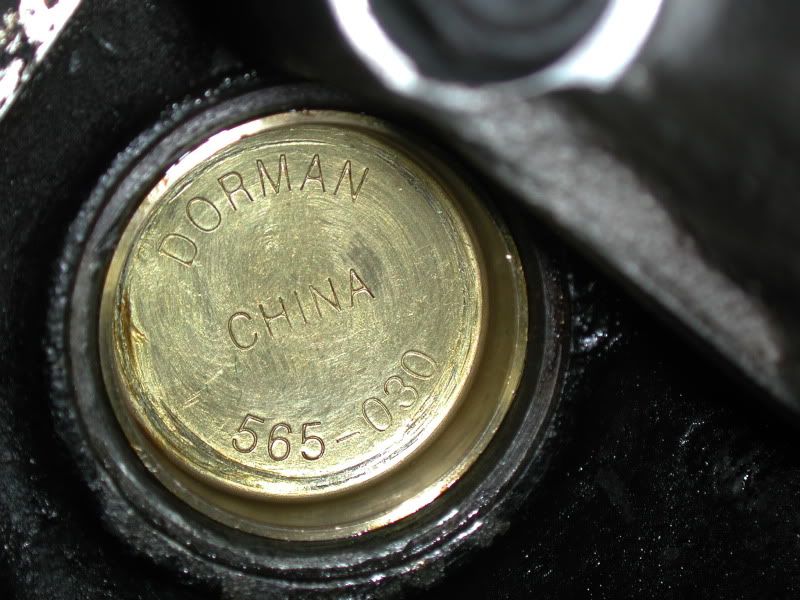
Centered the new plug in the bore, carefully drove it in. Not much room at all to get any sorta purposeful swing, so it was a lot of tapping and various swearing noises associated with finger impacts, etc.
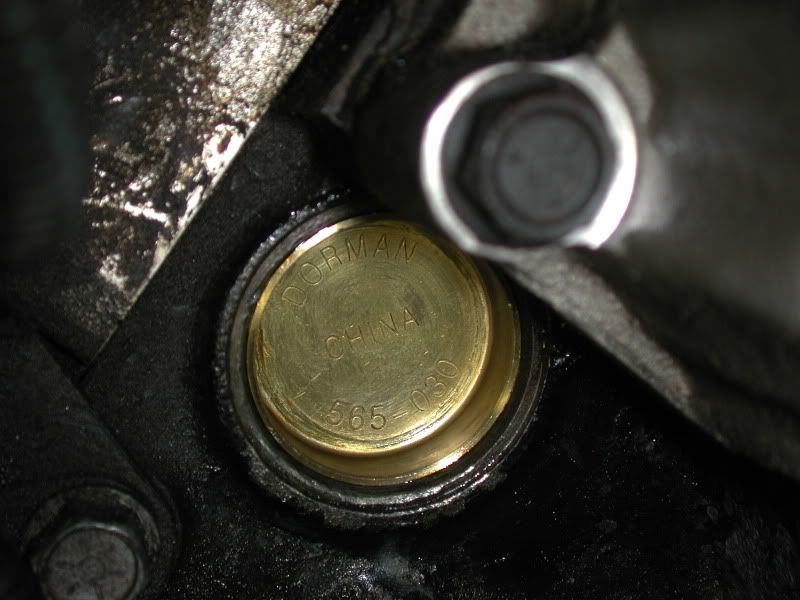
Flushed, filled with new Antifreeze, ran it up to operating temperatures and no leaks. Of course I am thankful for several things, one being that I noticed it when it was a mere trickle, it didn't leave me dead on the roadside, or overheated and seized, and the location was in a relatively "accessible" location and not one on the rear of the block, or on the sides behind the motor mounts etc which would have required pulling the engine.
Of course now I am suspicious of the other 7, but will keep a close watch under the Vette for any fluid leaks.
Anyone else have this much fun today? 9 hours of joy here.
Yep, antifreeze. I looked at all the usual suspects--weep hole from the waterpump-dry, all hoses-dry, radiator-dry. After about 20 minutes of searching and burning myself on everything still hot, I finally discovered this:
Leaking Freeze plug on the right front of the engine, just to right of Optispark. I looked at the other ones I was able to see and they all look pristine. After I scraped off the goo, I got a small geiser you can see, and I hope at this point you can feel my pain.
I suppose I should be somewhat thankful, and of course I am, that this is likely the only freeze plug of 8 that is sorta semi accessible to at least see, kinda/sorta. I started by removing about everything I could once I had disconnected the neg at the battery, shielding the Optispark with rags, plastic, draining the coolant system. At this point I should add that I run a minimum of 50/50 antifreeze all the time even though I live in Hawaii and it never gets cold
I even checked it with a floaty checky thingey (name escapes me at the moment, but it looks like a turkey baster and you suck up your antifreeze in it to check spec gravity to see your freeze point) and confirmed I was good down to -10*. The antifreeze of course also has anticorrosive components that are supposed to protect against this sorta thing, but it kinda looked as if the freeze plug had rusted from outside-in. I read up all I could online about removing/installing freeze plugs and all the photos were of engine blocks conveniently on engine stands with no obstructions to anything. Such was not the case with my situation. I learned you can drive in one edge of the plug and it will "rotate" in the hole so you can grab it with pliers and yank it out. Um, no such luck. Not even close. I even permanently lost somewhere in the front of the vehicle my favorite pin-punch, it went into never never land. I was able to get a small drill with an ultra short drill bit in it and drill a hole, then thread in a coarse thread bolt as below:The idea was to get some variety of prybar, plier, slide puller on it and yank it out. No such luck. The threads pulled thru before anything budged. Same thing with 2 subsequent drill holes. I used every tool usually reserved for destructive carpentry and managed to mangle the thing to an unrecognizable twisted chunk of metal, but still no luck, and it was hardly coughing up blood. Lost skin off every knuckle, etc. Stopped taking photos at this point, about 3 hours into the struggle. Essentially all that remained was the rim of the thing and I used a carbide burr in a die grinder to carefully thin out the rim until it was like tin foil across an arc of about 30* and then that crumpled and it came free with some special swear words reserved for such trying occasions. I had to be very very careful not to grind thru the rim and damage the bore or it would never seal. Took a lot of tedious, meticulous time, sorta like Endodontic root canal work. At least the drill/grinder sounded the same. The old galvanized steel plug here finally out in all its mangled glory, next to the new brass plug. If you can't tell which is which, stop reading here.
From all my reading, generally it was recommended to use a sealer. It seemed all the genuine serious racers recommended ThreadLocker Red, most others recommended Permatex Aviation Sealer. You can see what I used, and the "driver" I utilized to seat the new plug. I was very lucky to find this, as the parts places I usually utilize had no clue about what this was, even though I took a photo of the bottle from an online writeup.
I cleaned up the bore where the new plug was to go, it seems the antirust stuff had protected the engine block inside the water jacket pretty well.
Centered the new plug in the bore, carefully drove it in. Not much room at all to get any sorta purposeful swing, so it was a lot of tapping and various swearing noises associated with finger impacts, etc.
Flushed, filled with new Antifreeze, ran it up to operating temperatures and no leaks. Of course I am thankful for several things, one being that I noticed it when it was a mere trickle, it didn't leave me dead on the roadside, or overheated and seized, and the location was in a relatively "accessible" location and not one on the rear of the block, or on the sides behind the motor mounts etc which would have required pulling the engine.
Of course now I am suspicious of the other 7, but will keep a close watch under the Vette for any fluid leaks.
Anyone else have this much fun today? 9 hours of joy here.
Last edited by Opihi59; Jun 19, 2015 at 12:45 PM.
Drifting


Joined: Jan 2007
Posts: 1,908
Likes: 3
From: Supreme Soviet Peace-Loving Pipple's Kollektive of Seattle Wa
What a great posting with just as great pix!! You did everything right and explained it all very well. You earned your vette stripes on this one!
Don't you just LOVE those illustration pix of a "proffessional" doing the job in a clean environment, engine on stand, and the "mechanic" is posing there with a 'banger-thingy' on the whatchamacallit and it looks SO easy? First clue is he's clean, no dirty hands, no ripped fingernails, no grease debris jammed under an eyelid, no torn coveralls, no blood smears on clothing and his eyes look.... calm. THIS IS POSED! THIS WILL NOT BE YOUR EXPERIENCE! HE"S AN ACTOR! HE HAS NO CLUE!
Glad it all worked out! It's always a good idea to build and save a cussword supply to cover any job! The last plugs I replaced were many years ago when I was younger. I am amazed you found access enuff to do the work without a cutting torch to clear a path.... Congratulations!
Last edited by SQUIRMIN VERMIN 84; Sep 5, 2010 at 03:41 AM.
Burning Brakes

Joined: Jul 2008
Posts: 776
Likes: 3
From: Ottawa IL
Nice write up and photos explaining your "journey" 
This should be a new sticky for future reference. These are the topics that I enjoy as you never know if something like will happen to the Vette or even the family car.
Thanks for sharing your experience - and sorry for the painful knuckles
edit:
Just noticed this, "...even though I live in Hawaii "... and was wondering if the salty air could of caused this possibly as the inside seems normal. Could the trace amounts of salt on the road and air affect this? I don't know how it is there, but I do know here in Illinois in the winters they POUR salt on the road, and the under carriages of vehicles are full of rust and corrosion. Anyway, just a thought..
Last edited by ottawabarber; Sep 5, 2010 at 09:14 AM.

Race Director


Joined: Jun 1999
Posts: 14,924
Likes: 9
From: Merritt Ils Fl
Thank you for an informative and entertaining post. It would have been better if you had provided the vocabulary of the magic words you used during the process. Oh yes, what brand of Band Aid do you use? 
Corvette Stories
The Best of Corvette for Corvette Enthusiasts

Top 10 Most Explosive Corvettes Ever Made: Power-to-Weight Ratio Ranked!
Joe Kucinski
150 hp to 1,250 hp: Every Corvette Generation Compared by the Specs That Matter
Joe Kucinski
8 Coolest Corvette Pace Cars (and Replicas) of All Time
Verdad Gallardo
Top 10 Corvette Engines RANKED by Peak Torque (70+ Years of Muscle!)
Joe Kucinski
Corvette ZR1X Will Be Pacing the Indy 500, And Could Probably Race, Too!
Verdad Gallardo
Top 10 Corvettes Coming to Mecum Indy 2026!
Brett Foote
Top 10 C9 Corvette MUST-HAVES to Fix These C8 Generation Flaws!
Michael S. Palmer
10 Revolutionary 'Corvette Firsts' Most People Don't Know
Joe Kucinski
5 Reasons to Upgrade to an LS6-Powered Corvette; 5 Reasons to Stay LT2
Michael S. Palmer
Thread Starter
Bonehead
Joined: Feb 2006
Posts: 121
Likes: 9
From: Onnabeachin, Hawaii 94 6spd
Not sure about the salt out here, none on our roads but it is pretty much ubiquitous. Sure it could be a contributing factor as things do seem to rust in this Area Code. You should see my poor trusty old truck.
Heel & Toe

Joined: Aug 2010
Posts: 23
Likes: 0
I am currently going through a similar nightmare. The freeze plug on the driver's side near the knock sensor is rusted on solid. I tried for 7 hours yesterday to tap, drill, and pry the thing out, and it's still stuck in there. I soaked it with PB blaster overnight, and I'm about to get started today. I may have to remove the cat converter to get more room. This SUCKS....
Melting Slicks

Joined: Sep 2008
Posts: 2,376
Likes: 111
From: Cherokee National Forest TN
I am currently going through a similar nightmare. The freeze plug on the driver's side near the knock sensor is rusted on solid. I tried for 7 hours yesterday to tap, drill, and pry the thing out, and it's still stuck in there. I soaked it with PB blaster overnight, and I'm about to get started today. I may have to remove the cat converter to get more room. This SUCKS....
What removal method worked best? Drive the plug into the water jacket, lock a vise grip plier on the lip of the plug & use some sort of crows foot rocker bar, pry bar etc. Hook the plier with the bar & lever it against the block. There are times when a wood block will be required between the lever & the block.
Luck with your project.
Thread Starter
Bonehead
Joined: Feb 2006
Posts: 121
Likes: 9
From: Onnabeachin, Hawaii 94 6spd
I am currently going through a similar nightmare. The freeze plug on the driver's side near the knock sensor is rusted on solid. I tried for 7 hours yesterday to tap, drill, and pry the thing out, and it's still stuck in there. I soaked it with PB blaster overnight, and I'm about to get started today. I may have to remove the cat converter to get more room. This SUCKS....
I had to come up with all sorts of things to use as a fulcrum, it got rather entertaining trying to hold them in place. As my accumulated number of freeze plug activities is extremely low, one of my biggest fears was to lose the thing inside the block. It may have been alright, but I am too much of a neophyte to have felt comfy doing that trick. Maybe when I grow up a bit. Thanks for the tip though, I am certain it will be another tidbit of knowledge I gain from the real engine builders out there.
Last edited by Opihi59; Sep 6, 2010 at 02:04 PM.
Heel & Toe
Joined: Aug 2010
Posts: 23
Likes: 0
I am currently going through a similar nightmare. The freeze plug on the driver's side near the knock sensor is rusted on solid. I tried for 7 hours yesterday to tap, drill, and pry the thing out, and it's still stuck in there. I soaked it with PB blaster overnight, and I'm about to get started today. I may have to remove the cat converter to get more room. This SUCKS....
Then I moved to the passenger side. To get to the other leaking plug, I had to remove the starter and the cat converter. Lucky for me (sarcasm), it's impossible to get any tool on one of the mounting bolts, which means I would also have to remove the passenger side exhaust manifold. I expected to have the cat just drop right out of there, but guess what? There's a nice mounting bracket holding the cat converter in place, with two bolts ON TOP that can't be reached with any tool of any sort on planet Earth. So, I pulled back the carpet on the passenger side, and drilled two access holes through the fiberglass floor. Finally, the cat converter came out. The freeze plug was so bad that when I barely tapped on it, coolant spewed right out. I was able to get the center of the plug out, but the rim is still rusted to the block. Time to go buy some grinding tools you guys were talking about.
Thread Starter
Bonehead
Joined: Feb 2006
Posts: 121
Likes: 9
From: Onnabeachin, Hawaii 94 6spd
I got out the driver's side freeze plug. To get to it, I had no other choice but to remove the cat converter. Murphy's Law says that I MUST break a mounting bolt in the exhaust manifold side during removal. So I was given the joy of removing the driver's side exhaust manifold, as well, and spent an extra hour drilling out the broken mounting bolt.
Then I moved to the passenger side. To get to the other leaking plug, I had to remove the starter and the cat converter. Lucky for me (sarcasm), it's impossible to get any tool on one of the mounting bolts, which means I would also have to remove the passenger side exhaust manifold. I expected to have the cat just drop right out of there, but guess what? There's a nice mounting bracket holding the cat converter in place, with two bolts ON TOP that can't be reached with any tool of any sort on planet Earth. So, I pulled back the carpet on the passenger side, and drilled two access holes through the fiberglass floor. Finally, the cat converter came out. The freeze plug was so bad that when I barely tapped on it, coolant spewed right out. I was able to get the center of the plug out, but the rim is still rusted to the block. Time to go buy some grinding tools you guys were talking about.
Then I moved to the passenger side. To get to the other leaking plug, I had to remove the starter and the cat converter. Lucky for me (sarcasm), it's impossible to get any tool on one of the mounting bolts, which means I would also have to remove the passenger side exhaust manifold. I expected to have the cat just drop right out of there, but guess what? There's a nice mounting bracket holding the cat converter in place, with two bolts ON TOP that can't be reached with any tool of any sort on planet Earth. So, I pulled back the carpet on the passenger side, and drilled two access holes through the fiberglass floor. Finally, the cat converter came out. The freeze plug was so bad that when I barely tapped on it, coolant spewed right out. I was able to get the center of the plug out, but the rim is still rusted to the block. Time to go buy some grinding tools you guys were talking about.
The grinder that works best is a small one of course, like a dremel with a 1/8 inch straight carbide burr on it. Grind carefully and patiently, you don't need, or want to grind completely thru the rim of the plug. Grind it down enough so it is thin and weak and can be folded up with a pick or small tip screwdriver. You can do that in 2 places within about 30* of eachother over a length of about 5-8mm and that piece will fold out. That really breaks the back of whatever forces are holding the thing in place. Once that is done you can get it out.
Heel & Toe
Joined: Aug 2010
Posts: 23
Likes: 0
Crackersauce, I certainly feel your pain. I have often wondered "how in the....did they get that part installed, etc. At least the forum is accumulating information on which freeze plugs can be replaced with the engine in, and what it takes to do it. Keep up the good work and let us know how it comes out.
The grinder that works best is a small one of course, like a dremel with a 1/8 inch straight carbide burr on it. Grind carefully and patiently, you don't need, or want to grind completely thru the rim of the plug. Grind it down enough so it is thin and weak and can be folded up with a pick or small tip screwdriver. You can do that in 2 places within about 30* of eachother over a length of about 5-8mm and that piece will fold out. That really breaks the back of whatever forces are holding the thing in place. Once that is done you can get it out.
The grinder that works best is a small one of course, like a dremel with a 1/8 inch straight carbide burr on it. Grind carefully and patiently, you don't need, or want to grind completely thru the rim of the plug. Grind it down enough so it is thin and weak and can be folded up with a pick or small tip screwdriver. You can do that in 2 places within about 30* of eachother over a length of about 5-8mm and that piece will fold out. That really breaks the back of whatever forces are holding the thing in place. Once that is done you can get it out.

Intermediate
Joined: Feb 2007
Posts: 31
Likes: 0
From: Dallas TX
Isn't it nice when you can actually see the plug instead of feeling up behind the passengerside lower A arm to find the plug just sitting there - . Havent figured out yet wether I need to pull the engine to get to it or not.... my luck - probably. The engine has 183k on it - might as well rebuild it - in for a penny - in for a pound. (I still dont know what that means but it seems to fit here)
Team Owner

Joined: Aug 2005
Posts: 34,988
Likes: 515
From: Riverside County Southern California
Co-winner 2020 C4 of the Year - Modified
2018 Corvette of Year Finalist
2017 C4 of Year
2016 C7 of Year Finalist
St. Jude Donor '09 thru '20
The chinese are claiming more and more. Notice how big those letters are. They used to be at the end and small, now they are centered and BIG.
I wonder how many "made in USA" tools sell in China...
