


Superram installation: studs with kep nuts
Thread Starter
Melting Slicks

Joined: Aug 2003
Posts: 3,403
Likes: 397
From: Lakeville MI
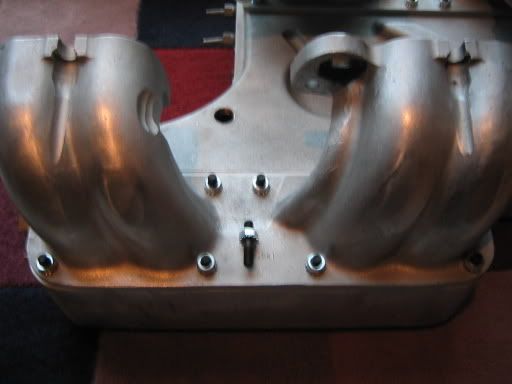
My studs showed up today Au-ve-co part number 9668 1/4-28 x 1/4-20 x 1 1/4" long. I'm also using 1/4-20 k-locks or kep nuts (nuts with integrated star lock washer). I included a pic of the stud/nut in one pic for reference.
It seems that it will be easier to spin a nut onto the stud with 1 finger, rather than try and thread up the 12 point bolts. I guess I will find out soon enough. Still waiting on a block off plates, etc.
Here's a few pics:

If anybody sees a reason this won't work, please share.
It seems that it will be easier to spin a nut onto the stud with 1 finger, rather than try and thread up the 12 point bolts. I guess I will find out soon enough. Still waiting on a block off plates, etc.
Here's a few pics:
If anybody sees a reason this won't work, please share.
Race Director


Joined: Feb 1999
Posts: 12,772
Likes: 17
From: Indianapolis IN
Could be OK,
What I did was drill a hole thru the side of the bolts that went thru the plenum toward the underside of the plenum, put a nut onto the bolt and then put a Hitch Pin into the hole I drilled thru the bolt which stuck out the the bottom of the plenum. The one on the bottom of the pic

What I did was drill a hole thru the side of the bolts that went thru the plenum toward the underside of the plenum, put a nut onto the bolt and then put a Hitch Pin into the hole I drilled thru the bolt which stuck out the the bottom of the plenum. The one on the bottom of the pic
Pro


Joined: Jan 2004
Posts: 503
Likes: 0
From: Forney Texas
I am assuming you are going to put a nut on the inside of the plenum. If you are, have you checked that all of the nuts will clear the side of the plenum? On my setup, some of the holes in the plenum are drilled very close to the side of the plenum and if I drilled them out to accept a 1/4" stud, the nut would not clear the side.
Your plenum may not have been drilled like mine so this may not be an issue. If it is however, and you have figured out a solution, I would appreciate your sharing it with us.
90Indy
Your plenum may not have been drilled like mine so this may not be an issue. If it is however, and you have figured out a solution, I would appreciate your sharing it with us.
90Indy
Thread Starter
Melting Slicks
Joined: Aug 2003
Posts: 3,403
Likes: 397
From: Lakeville MI
To answer a few questions:
I understand that the runners must be attached to the base first, since the fuel rails prevent simply sliding the assembly onto the base.
My photos were the first test fitting to determine if the non-threaded portion of the stud would interfere with snugging everything up. So far it looks good without a gasket, the extra thickness with the gasket should help in this regard.
Also there is no plan to put nuts inside the plenum, and stud the runners as others have done.
The studs are intended to simplify plenum to runner alignment during installation and also it should be easier to spin nuts on to the studs from below as compared to threading in the bolts from below. Other benefits of studs as in other applications are improved strength, harder to strip etc.
I got the idea from another thread on this topic. Thank you to the original poster.
The k-nuts spin freely, but also have a locking function. This makes them more attractive then nylocks due to the ease of spinning them on.
I got a box of 100 for $5.
Down the road, this may make removal a little more difficult once corrosion sets in on the stud threads, which is something to consider.
Maybe stainless would be a better choice if I can find some.

Le Mans Master


Joined: Jan 2002
Posts: 9,036
Likes: 13
From: Edmonton AB
Was that '2manyfuncars' suggestion about using Stat-O-Seals and
floating nuts in "Question on superram install..."?
If so, his solution is a bit different in that it seals and allows the nuts
to shift so that fasteners, runners and plenum can all settle into place
together.
It seems to me that the integral star washers on the k-nuts will gall the
aluminum. Perhaps this may not be considered an issue if the intake is
not going to be removed very often. But with each subsequent
reassembly, the nut will be running up against an increasingly chewed
up face.
Also, IMO - the star locks don't have the same locking qualities as a nylock.
I feel that if the 'bolt stretch' or tension lessens due to any reason
such as seating at the bolt/nut faces, gasket compression or whatever,
then the nut can loosen and with fewer degrees of rotation become free
to spin off through vibration. The nylock needs to rotate however many
turns are required to disengage the nylon from the threads before it
is in the same situation.
.
Corvette Stories
The Best of Corvette for Corvette Enthusiasts

Top 10 Most Expensive Corvettes Ever Sold on Bring A Trailer
Brett Foote
10 Things Every Corvette Owner Needs (2026 Edition)
Michael S. Palmer
8 Most "Only Corvette Owners Understand" Quirks and Problems
Pouria Savadkouei
10 Reasons the C6 Z06 is Still A Performance Benchmark After 20 Years
Joe Kucinski
How Much Horsepower Every Corvette Engine "LOST" in 1972
Joe Kucinski
Top 10 DOs and DON'Ts for Protecting Your Convertible Top!
Michael S. Palmer
Top 10 Most Explosive Corvettes Ever Made: Power-to-Weight Ratio Ranked!
Joe Kucinski
150 hp to 1,250 hp: Every Corvette Generation Compared by the Specs That Matter
Joe Kucinski
8 Coolest Corvette Pace Cars (and Replicas) of All Time
Verdad Gallardo
Le Mans Master
Joined: Jan 2002
Posts: 9,036
Likes: 13
From: Edmonton AB
From Pegasus Racing
"MS21059 Floating Nut Plate
These nut plates allow for some misalignment in assembly.
Rivet holes are spaced 0.688" center-to-center on all sizes
except the 1/4-28 size, which has them spaced 1.000"
center-to-center."
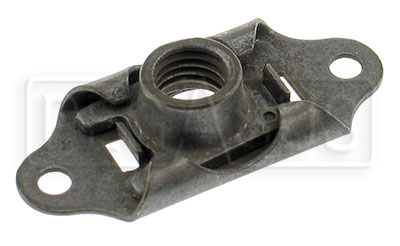
(No, I don't know how '2manyfuncars' managed to fit this item
on the outboard plenum fasteners.)
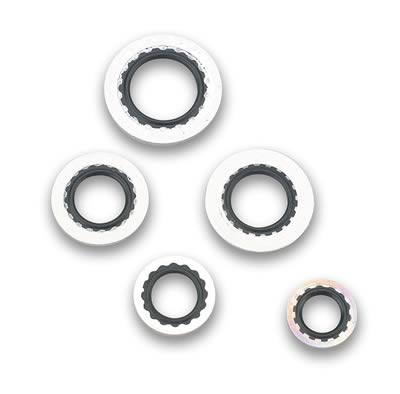
From Summit
Earl's 1/4" Stat-O-Seal. Search for other sizes as required.
.
"MS21059 Floating Nut Plate
These nut plates allow for some misalignment in assembly.
Rivet holes are spaced 0.688" center-to-center on all sizes
except the 1/4-28 size, which has them spaced 1.000"
center-to-center."
(No, I don't know how '2manyfuncars' managed to fit this item
on the outboard plenum fasteners.)
From Summit
Earl's 1/4" Stat-O-Seal. Search for other sizes as required.
.
Instructor

Joined: Dec 2004
Posts: 135
Likes: 0
From: Pickering Ontario
Boy have you got the right idea. After some problems with my installation of the superram . I have had to remove mine ,and I did the same thing as you. I put in S/S thread inserts in all the holes ,as I found the aluminium was starting to strip. I used grade 8 studs and S/S nylock nuts and flat washers. Be sure to do the lid as well, you will find the bolt holes are not in the center of the sealing surface. I think this was a cause of some vacume leaks,  on mine, and don't forget the RTV you just want a skim no extra
Roocars
on mine, and don't forget the RTV you just want a skim no extra Roocars
Last edited by Roocars; Mar 15, 2006 at 10:09 AM.
Thread Starter
Melting Slicks
Joined: Aug 2003
Posts: 3,403
Likes: 397
From: Lakeville MI
I got the kep nuts locally at a fastener store, a box of 100 for about $5.
The studs were from nutsandbolts.com
http://store.nutsandbolts.com/cylind...ds-auveco.html
The studs were from nutsandbolts.com
http://store.nutsandbolts.com/cylind...ds-auveco.html


Safety Car

Joined: Apr 2001
Posts: 3,525
Likes: 2
From: Houston TX
Wow, these are some different approaches.
I welded up the inside holes on the runners. I then drilled out the threaded part in the plenum section. Chamferred the holes to 38° (I think this is the right angle, from memory), then installed alled head countersunk screws. I even went so far as to place silicon over the top so there would be no issue with the bolts backing out. This method served for many years.
And the bolts were so much easier to install.
Aaron
Le Mans Master
Joined: Mar 2004
Posts: 5,107
Likes: 171
From: Dublin CA
I used the 1/4 studs when I installed my SR. I had talked to a Accel tech and he said to throw the screws away and use the studs. Even with the studs it was difficult. I don't know how you guys that used the supplied allan heads ever did this.
A heads up. I had to remove two rocker arms on each bank to tighten the bolts (runners to base). I also removed the distributor cap to get to the stud in the back corner. I pre-fit the runners to the plenum and took an air grinder to the runners to get more clearance for the nuts on a couple of the runners.
I also used plenty of silicone on the runner to plenum gaskets, so much that it squeezed into the runners. Let it sit overnight and cut the excess out of the runner with an small knife or razorblade. I wanted to be sure that this sealed after reading other threads about leaks.
I also had an issue with a 52MM BBK TB. The SR moves the TB about 1" forward. The TB cover plate and bolts rubbed against the hood when closed. Also be sure that your screw band on the coupler is off to the side and not centered.....it will hit the hood. I made a custom cover plate from stainless and used counter sunk SS screws. Polished the plate so it looks like chrome. This plate reduced the height of the original plate by .125".
A heads up. I had to remove two rocker arms on each bank to tighten the bolts (runners to base). I also removed the distributor cap to get to the stud in the back corner. I pre-fit the runners to the plenum and took an air grinder to the runners to get more clearance for the nuts on a couple of the runners.
I also used plenty of silicone on the runner to plenum gaskets, so much that it squeezed into the runners. Let it sit overnight and cut the excess out of the runner with an small knife or razorblade. I wanted to be sure that this sealed after reading other threads about leaks.
I also had an issue with a 52MM BBK TB. The SR moves the TB about 1" forward. The TB cover plate and bolts rubbed against the hood when closed. Also be sure that your screw band on the coupler is off to the side
and not centered.....it will hit the hood. I made a custom cover plate from stainless and used counter sunk SS screws. Polished the plate so it looks like chrome. This plate reduced the height of the original plate by .125".
Instructor
Joined: May 2005
Posts: 182
Likes: 0
From: Glendale AZ
Additional follow up....
When you guys converted to the SR did you have a problem with the snorkel hose not fitting the new 52mm TB? I cannot get it to slide over it to save my life. Is there another one that i am supposed to buy?
When you guys converted to the SR did you have a problem with the snorkel hose not fitting the new 52mm TB? I cannot get it to slide over it to save my life. Is there another one that i am supposed to buy?
Melting Slicks


Joined: Oct 2000
Posts: 3,426
Likes: 4
From: Heidelberg PA
Cruise-In V Veteran
Originally Posted by sremenap
Additional follow up....
When you guys converted to the SR did you have a problem with the snorkel hose not fitting the new 52mm TB? I cannot get it to slide over it to save my life. Is there another one that i am supposed to buy?
When you guys converted to the SR did you have a problem with the snorkel hose not fitting the new 52mm TB? I cannot get it to slide over it to save my life. Is there another one that i am supposed to buy?

Drifting


Joined: Jan 2001
Posts: 1,408
Likes: 13
From: Dayton, Ohio
for what it's worth, these may be of some help.
they're from "Carr-Lane".
Try googling, "carr-lane threaded inserts". I hope this helps you guys out.
[IMG]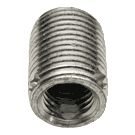 [/IMG]
they're from "Carr-Lane".
Try googling, "carr-lane threaded inserts". I hope this helps you guys out.
[IMG]
[/IMG]
Last edited by Yguy; Jun 20, 2006 at 01:24 AM.