
Radiator Screen


Le Mans Master


Joined: May 2005
Posts: 7,354
Likes: 2,278
From: Central Maryland
Originally Posted by rick lambert
I think MidAmerica or Ecklers sells one,it's just a fibre mesh, but I'd make my own.
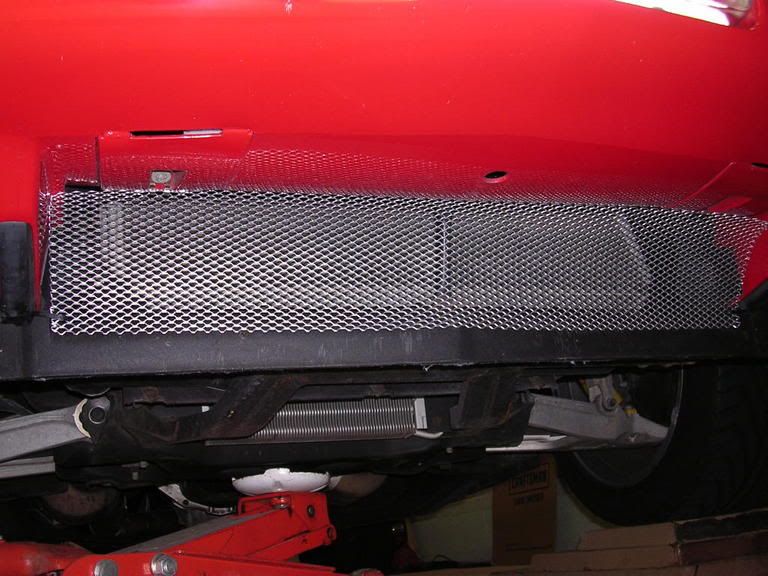
The following images will give you some idea of how I did this, and what it looks like, although these shots were of the first prototype I made. The one that's on the car now fits better, etc, but the concept didn't change -- only the execution improved. My car's a '94 -- yours would probably need to be a bit different, as you have the early-C4 nose on yours.
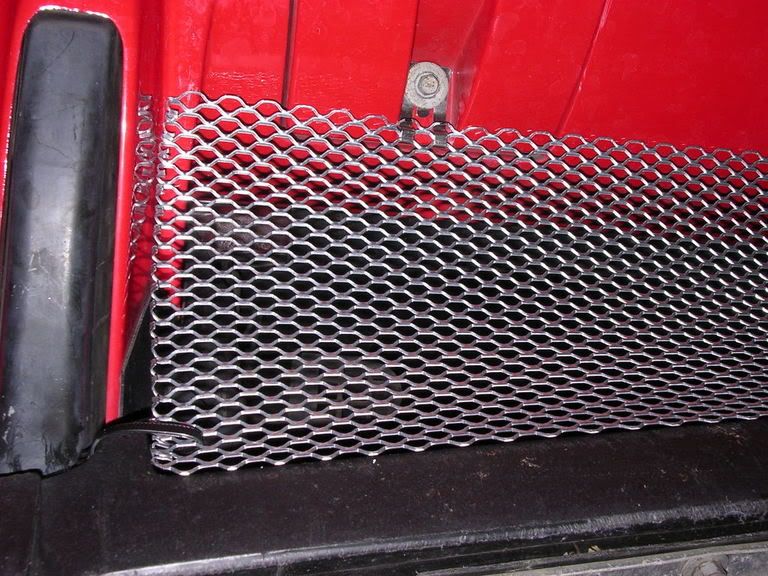
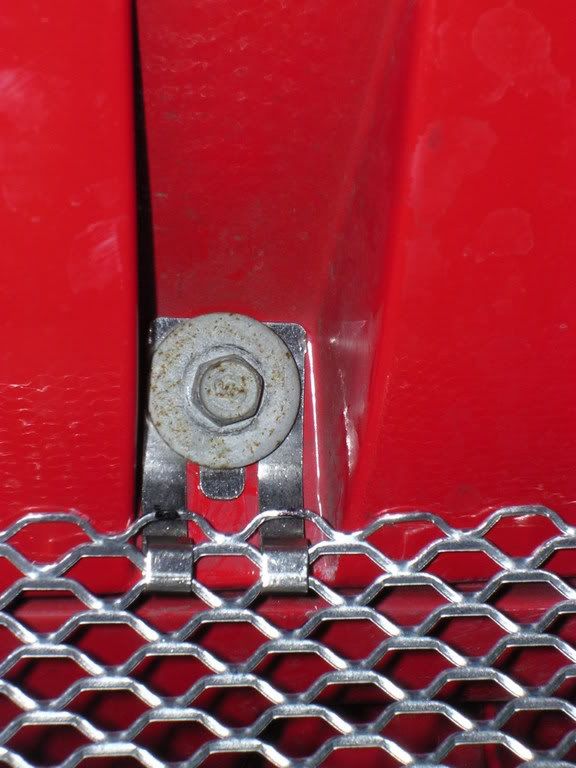
To attach the screen to the car, I "re-engineered" two of the stainless steel hinge clips that were furnished with the screen material. These clips were intended to secure one edge of the screen sections to a residential rain gutter. I took most of the bends out of these clips (flattened them out, basically) and drilled a hole in them, then reattached them to the screen material as shown in the photos. These two clips are then anchored to the car using the two screws that secure the fog lamp access panels on the underside of the bumper. That takes care of attaching the upper edge of the screen. To secure the lower edge, I drilled a small hole in the inner face of the air dam (inside of the mouth, as shown -- it really can't even be seen unless you have the bumper at eye level), and ran a black zip tie around that corner of the air dam to secure the screen in place.
I will eventually re-engineer this thing one last time, but it's working so well now that there isn't much urgency to it. The final cut at it will include coating the entire finished screen in black Plasti-Dip for additional corrosion resistance and to make it less visible.
Be well,
SJW
.
.
Last edited by SJW; May 12, 2006 at 10:05 PM.
Safety Car

Joined: Aug 1999
Posts: 4,931
Likes: 3
From: Fort Lauderdale FL
Originally Posted by SJW
I made my own using galvanized gutter screen material from Lowe's or Home Depot. Cost less than $10 for the materials.
The following images will give you some idea of how I did this, and what it looks like, although these shots were of the first prototype I made. The one that's on the car now fits better, etc, but the concept didn't change -- only the execution improved. My car's a '94 -- yours would probably need to be a bit different, as you have the early-C4 nose on yours.
To attach the screen to the car, I "re-engineered" two of the stainless steel hinge clips that were furnished with the screen material. These clips were intended to secure one edge of the screen sections to a residential rain gutter. I took most of the bends out of these clips (flattened them out, basically) and drilled a hole in them, then reattached them to the screen material as shown in the photos. These two clips are then anchored to the car using the two screws that secure the fog lamp access panels on the underside of the bumper. That takes care of attaching the upper edge of the screen. To secure the lower edge, I drilled a small hole in the inner face of the air dam (inside of the mouth, as shown -- it really can't even be seen unless you have the bumper at eye level), and ran a black zip tie around that corner of the air dam to secure the screen in place.
I will eventually re-engineer this thing one last time, but it's working so well now that there isn't much urgency to it. The final cut at it will include coating the entire finished screen in black Plasti-Dip for additional corrosion resistance and to make it less visible.
Be well,
SJW

Melting Slicks


Joined: Dec 2004
Posts: 3,284
Likes: 51
From: Jacksonville, FL
St. Jude Donor '08 thru '26
There is a how to write up on making a screen over at the ZR1NetRegistry site. It's in the maintanance section under the "how to" tab.
I just did it for my 90 ZR-1. I removed the spoiler sections and the air splitter that is in the middle of the opening and used the stock mounting screws as anchor points, I just ran the screws thru the screen material back into their holes. It was a bit time consuming and tedious as you have to mess with it alot to use the stock holes and screws...but the results are well worth not getting junk up in the rad!
I used the "how to" write up as a guide to give me an idea of what was gonna work...I used the plastic wide mesh screen that you get with a house A/C unit for use in a wall sleeve, it's about 2 feet square of material and then over that I put regular fiberglass screen material. All this stuff was black in color so it hides nicely against my black Z. The splitter and center spoiler hold the bottom of my screen and I used enought material so I just tuck the top up into the area above the bumper & because it's longer and wider the screen archs and holds itself in place at the top & sides. The plastic wide mesh stuff has a memory so it wants to flatten out & that's what keeps it in place at the sides & top.
Go check out the site & between what was presented here and over ther you should be able to come up with something that works for your vette.
Tom
Last edited by tomtom72; May 13, 2006 at 08:17 AM.

Thread Starter
Advanced

Joined: Oct 2005
Posts: 74
Likes: 0
From: Halifax Va
Cruise-In VII Veteran
Originally Posted by SJW
I made my own using galvanized gutter screen material from Lowe's or Home Depot. Cost less than $10 for the materials.
The following images will give you some idea of how I did this, and what it looks like, although these shots were of the first prototype I made. The one that's on the car now fits better, etc, but the concept didn't change -- only the execution improved. My car's a '94 -- yours would probably need to be a bit different, as you have the early-C4 nose on yours.
To attach the screen to the car, I "re-engineered" two of the stainless steel hinge clips that were furnished with the screen material. These clips were intended to secure one edge of the screen sections to a residential rain gutter. I took most of the bends out of these clips (flattened them out, basically) and drilled a hole in them, then reattached them to the screen material as shown in the photos. These two clips are then anchored to the car using the two screws that secure the fog lamp access panels on the underside of the bumper. That takes care of attaching the upper edge of the screen. To secure the lower edge, I drilled a small hole in the inner face of the air dam (inside of the mouth, as shown -- it really can't even be seen unless you have the bumper at eye level), and ran a black zip tie around that corner of the air dam to secure the screen in place.
I will eventually re-engineer this thing one last time, but it's working so well now that there isn't much urgency to it. The final cut at it will include coating the entire finished screen in black Plasti-Dip for additional corrosion resistance and to make it less visible.
Be well,
SJW
.
.
Thanks,
David
Le Mans Master
Joined: May 2005
Posts: 7,354
Likes: 2,278
From: Central Maryland
Originally Posted by 1990 c4
Thanks for the tip, SJW. I made one like yours and installed it this afternoon. Very easy, and clean-looking, and cost me about 8 bucks and about 30 minutes work.
Thanks,
David
Thanks,
David
Be well,
SJW


