



Replacing injectors on a 91

Thread Starter
Drifting

Joined: Feb 2007
Posts: 1,807
Likes: 0
From: Somewherein Pa
 Replacing injectors on a 91
I was hoping for some opinions on replacing the fuel injectors. I have an FSM on the way. I am ok with a wrench but have never done this before. Is this a job I can do without really screwing things up?
What are some of the problems to look for when doing this job? I want to start learning more about the car and how to do some of the work myself, is this something I should not attempt?
Thanks!

What are some of the problems to look for when doing this job? I want to start learning more about the car and how to do some of the work myself, is this something I should not attempt?
Thanks!
Le Mans Master


Joined: Jun 2001
Posts: 6,694
Likes: 3
From: Less Talk, More WOT | Houston TX
Its a pretty easy job.
Just pull the runners and plenum, disconnect the fuel lines and you should be able to get to the fuel rail bolts and get the injectors out. DON'T get the Accel replacement injectors though.
Just pull the runners and plenum, disconnect the fuel lines and you should be able to get to the fuel rail bolts and get the injectors out. DON'T get the Accel replacement injectors though.

Team Owner

Joined: Dec 2000
Posts: 90,675
Likes: 304
From: SE NY
Cruise-In II Veteran
Pull the FP Fuse and run the engine till it empties the fuel lines & dies.
I like to bag & label the bolts as I remove them. Little extra time comming apart but less head scratching going back together.
Handle the hard plastic vac lines carefully as they get brittle with time.
Use a long narrow 3/8" drive Torx socket to remove the runner bolts. A ball driver aids in starting them back in on assembly. Don't forget the two inner lower runner bolts, one LR and one RF.
Drain a little coolant before removing the TB coolant hoses. Plan on doing the TB coolant bypass mod so that messing with coolant will not be necessary again.
After removing the upper runner bolts & TB from the plenum it may be necessary to smack the plenum with a rubber mallet to loosen it from the gaskets.
You may need to loop a length of rubber hose over the ends of the fuel lines to prevent constant fuel seepage??
When removing the clips that retain the injectors into the fuel rail use care to not break the clips as they are a bit fragile.
A little motor oil on the injector O-rings aids in installation and lessens the chance of chipping an O-ring.
When installing the plenum, well hand start ALL the bolts to avoid cross-threading them.
Have a magnetic wand handy to aid in starting the lower runner bolts.
Have fun, it's not a hard job if you take your time and think it through.
I like to bag & label the bolts as I remove them. Little extra time comming apart but less head scratching going back together.
Handle the hard plastic vac lines carefully as they get brittle with time.
Use a long narrow 3/8" drive Torx socket to remove the runner bolts. A ball driver aids in starting them back in on assembly. Don't forget the two inner lower runner bolts, one LR and one RF.
Drain a little coolant before removing the TB coolant hoses. Plan on doing the TB coolant bypass mod so that messing with coolant will not be necessary again.
After removing the upper runner bolts & TB from the plenum it may be necessary to smack the plenum with a rubber mallet to loosen it from the gaskets.
You may need to loop a length of rubber hose over the ends of the fuel lines to prevent constant fuel seepage??
When removing the clips that retain the injectors into the fuel rail use care to not break the clips as they are a bit fragile.
A little motor oil on the injector O-rings aids in installation and lessens the chance of chipping an O-ring.
When installing the plenum, well hand start ALL the bolts to avoid cross-threading them.
Have a magnetic wand handy to aid in starting the lower runner bolts.
Have fun, it's not a hard job if you take your time and think it through.
Thread Starter
Drifting
Joined: Feb 2007
Posts: 1,807
Likes: 0
From: Somewherein Pa
Pull the FP Fuse and run the engine till it empties the fuel lines & dies.
I like to bag & label the bolts as I remove them. Little extra time comming apart but less head scratching going back together.
Handle the hard plastic vac lines carefully as they get brittle with time.
Use a long narrow 3/8" drive Torx socket to remove the runner bolts. A ball driver aids in starting them back in on assembly. Don't forget the two inner lower runner bolts, one LR and one RF.
Drain a little coolant before removing the TB coolant hoses. Plan on doing the TB coolant bypass mod so that messing with coolant will not be necessary again.
After removing the upper runner bolts & TB from the plenum it may be necessary to smack the plenum with a rubber mallet to loosen it from the gaskets.
You may need to loop a length of rubber hose over the ends of the fuel lines to prevent constant fuel seepage??
When removing the clips that retain the injectors into the fuel rail use care to not break the clips as they are a bit fragile.
A little motor oil on the injector O-rings aids in installation and lessens the chance of chipping an O-ring.
When installing the plenum, well hand start ALL the bolts to avoid cross-threading them.
Have a magnetic wand handy to aid in starting the lower runner bolts.
Have fun, it's not a hard job if you take your time and think it through.
I like to bag & label the bolts as I remove them. Little extra time comming apart but less head scratching going back together.
Handle the hard plastic vac lines carefully as they get brittle with time.
Use a long narrow 3/8" drive Torx socket to remove the runner bolts. A ball driver aids in starting them back in on assembly. Don't forget the two inner lower runner bolts, one LR and one RF.
Drain a little coolant before removing the TB coolant hoses. Plan on doing the TB coolant bypass mod so that messing with coolant will not be necessary again.
After removing the upper runner bolts & TB from the plenum it may be necessary to smack the plenum with a rubber mallet to loosen it from the gaskets.
You may need to loop a length of rubber hose over the ends of the fuel lines to prevent constant fuel seepage??
When removing the clips that retain the injectors into the fuel rail use care to not break the clips as they are a bit fragile.
A little motor oil on the injector O-rings aids in installation and lessens the chance of chipping an O-ring.
When installing the plenum, well hand start ALL the bolts to avoid cross-threading them.
Have a magnetic wand handy to aid in starting the lower runner bolts.
Have fun, it's not a hard job if you take your time and think it through.
Is this gasket you mention re-usable or should I replace?
Thanks
Team Owner
Joined: Dec 2000
Posts: 90,675
Likes: 304
From: SE NY
Cruise-In II Veteran
Is this gasket you mention re-usable or should I replace?
The first time the top end comes apart I like to use a new FelPro gasket set for the upper & lower runner gaskets and the TB to plenum gasket. Thereafter I reuse them.
You could pick up a Fel Pro top end gasket set at Auto Zone for around $35 that will contain all the gaskets mentioned and more. Later if you have the intake base off you will have those gaskets and can reuse the runner & TB gaskets.
Corvette Stories
The Best of Corvette for Corvette Enthusiasts

Top 10 Most Explosive Corvettes Ever Made: Power-to-Weight Ratio Ranked!
Joe Kucinski
150 hp to 1,250 hp: Every Corvette Generation Compared by the Specs That Matter
Joe Kucinski
8 Coolest Corvette Pace Cars (and Replicas) of All Time
Verdad Gallardo
Top 10 Corvette Engines RANKED by Peak Torque (70+ Years of Muscle!)
Joe Kucinski
Corvette ZR1X Will Be Pacing the Indy 500, And Could Probably Race, Too!
Verdad Gallardo
Top 10 Corvettes Coming to Mecum Indy 2026!
Brett Foote
Top 10 C9 Corvette MUST-HAVES to Fix These C8 Generation Flaws!
Michael S. Palmer
10 Revolutionary 'Corvette Firsts' Most People Don't Know
Joe Kucinski
5 Reasons to Upgrade to an LS6-Powered Corvette; 5 Reasons to Stay LT2
Michael S. Palmer
Le Mans Master

Joined: Jul 2001
Posts: 5,297
Likes: 0
From: Stamford VT
Yes, you just have to pull the runners and plenum, but in order to get the runners on the passenger side off, you've got to remove the valve cover. To remove the valve cover, you need to remove the heater diverter valve, and all associated hoses, the egr crossover tube, and the a/c compressor. Of course, to remove the a/c compressor, you need to remove the inner wheel well insert above the upper control arm. All in all, plan on at least an hour before you can even get to the runner bolts.
For the passenger side, you again need to take the valve cover off. This looks easy, but the backside of the bolt holding the smog pump in sticks out about 1/4" too far to just lift the valve cover off. You either need to fight with the cover (and scratch it in the process) or remove the smog pump bolt, which means the smog pump pulley has to come off, which is a pain if you already removed the serpentine belt due to pulling the compressor off. Ask me how I know this.

It took me almost 3 hours to get the fuel rail off my Corvette last week. On my camaro, which has none of this unnecessary garbage on top of the car, it takes me about 20 minutes.
Absolutely none of the process is difficult, it's just time consuming, and if you're doing it without knowing what's in store, it's frustrating. Since my 1 night project turned into a 2 week "when I've got time to work on it for 5 minutes" affair, I decided that while everything was apart, it was getting cleaned, detailed, painted, or whatever else it needed.
I had a picture I was going to post, but apparently this forum no longer allows attachments.

Last edited by Jim85IROC; May 11, 2007 at 10:28 AM.

Drifting
Joined: May 1999
Posts: 1,478
Likes: 3
From: Sacramento, CA Money can't buy happiness - but it's more comfortable to cry in a Corvette than a Yugo.
Yes, you just have to pull the runners and plenum, but in order to get the runners on the passenger side off, you've got to remove the valve cover. To remove the valve cover, you need to remove the heater diverter valve, and all associated hoses, the egr crossover tube, and the a/c compressor. Of course, to remove the a/c compressor, you need to remove the inner wheel well insert above the upper control arm. All in all, plan on at least an hour before you can even get to the runner bolts.
For the passenger side, you again need to take the valve cover off.
For the passenger side, you again need to take the valve cover off.
Absolutely none of the process is difficult, it's just time consuming, and if you're doing it without knowing what's in store, it's frustrating. Since my 1 night project turned into a 2 week "when I've got time to work on it for 5 minutes" affair, I decided that while everything was apart, it was getting cleaned, detailed, painted, or whatever else it needed.
I suggest also a decent set of flare wrenches for the fuel line connections to the fuel rail. I bought a set of 3 wrenches with the six most widely used sizes from NAPA for pretty cheap. You will use one every time you change the fuel filter, so this isn't a one-time use purchase. I suggest that you don't try to skimp and use a crescent wrench where a flare wrench is really needed. The fuel rail connections use 2 special fuel resistant o-rings. Buy 3 and replace the old ones you take out. The 3rd is for backup incase you drop or mung up one of the first two.
Remember that the openings at the base of the runners lead into the engine. Use rags or a paper towel to fill each opening as soon as you get the rails off. DO NOT DROP STUFF IN THERE!
Most guys bag the bolts and mark the bags. I prefer to get some extra heavy duty cardborad or cut out the sides of a cardboard shipping box and use it. First I use a Sharpie marker and draw a crude outline of the part and bolt locations on the cardboard. Label the front or driver side on the cardboard. Then punch small starter holes in the cardboard that match the locations of the bolts. As you remove the bolts, push them into the cardboard holes. This keeps track of each bolt and ensures that the 3/4" long T-40 torx bolt goes back into the correct hole and not in the one for the the 1" long T-40 torx bolt. It also ensures that any bolts with bad threads don't go back into a different hole in the part that uses the same size bolt throughout.
As I recall, the 89 FSM lists a torque value of 22 ft.lb for the plenum bolts in one place and 18 ftlb in another. Use the lessor of the 2 values. The bolts are steel and the plenum is aluminum and it's threads strip pretty easily if over torqued.
Double check your work as you tighten everything back up and be sure to have the hood up and a fire extinguisher close at hand when you fire it up. (Just in case)
You can do it yourself and have the satisfaction of knowing you did it all. Take your time and enjoy the learnig experience.

Melting Slicks

Joined: Apr 2002
Posts: 2,118
Likes: 0
From: St. Charles, MO Route 66 Corvette Club
bd2626: I have removed the injectors on my 89 a few times and used the FSM on the first removal. Removing the valve covers is a pain in the ****! Here is a document that I produced after some experimenting in repacing the Multec injectors in my car. You do not have to remove the runners to repace the injectors on a 89 L98 engine.
http://webpages.charter.net/buddiel/...al)%201-04.doc
Hope this is helpful to you! Any additions or corrections to this document would be appreciated
http://webpages.charter.net/buddiel/...al)%201-04.doc
Hope this is helpful to you! Any additions or corrections to this document would be appreciated
Last edited by Sam Lam; May 13, 2007 at 09:40 AM.

Team Owner

Joined: Oct 2004
Posts: 81,241
Likes: 3,063
From: altered state
St. Jude Donor '05
Another vote on not having to remove the valve covers.
Replace the Orings in the fuel rail, they come apart pretty easy. Running around with 17 year old Orings under pressure made me a little uneasy.
Replace the Orings in the fuel rail, they come apart pretty easy. Running around with 17 year old Orings under pressure made me a little uneasy.
Drifting
Joined: May 1999
Posts: 1,478
Likes: 3
From: Sacramento, CA Money can't buy happiness - but it's more comfortable to cry in a Corvette than a Yugo.
bd2626: I have removed the injectors on my 89 a few times and used the FSM on the first removal. Removing the valve covers is a pain in the ****! Here is a document that I produced after some experimenting in repacing the Multec injectors in my car. You do not have to remove the runners to repace the injectors on a 89 L98 engine.
http://webpages.charter.net/buddiel/...al)%201-04.doc
Hope this is helpful to you! Any additions or corrections to this document would be appreciated
http://webpages.charter.net/buddiel/...al)%201-04.doc
Hope this is helpful to you! Any additions or corrections to this document would be appreciated
"I followed the Helm manual procedure on my first injector removal and found it difficult to remove the lower Torx runner bolts. These bolts are not easily removed because the valve covers do not allow "straight access" to the pesky Torx bolts. Therefore, you must remove the valve covers..... "
I agree that it isn't a perfectly straight shot at the lower bolts, but if you have a 6" T-40 torx bit for a 1/4" drive socket wrench then the lower bolts are easily removed without having to remove the valve covers. You can also do it with the shorter T-40 torx bit that you recommend in the write-up, if you have a flex-joint and a 6" drive extention. I recommend using a 1/4" drive socket and 6" bit combo rather than a 3/8" bit combo, as the smaller diameter tools have more wiggle room when accessing the lower runner bolts. I ordered Whia tools and Torx bits on-line for this. Whia tools are quality German made tools at reasonable prices. You can get the 6" Long Torx Bit socket Part # 77164 at http://www.wihatools.com/771Sockets.htm for $7.26. T-40 torx bolts are used all over the C4, so this tool has other uses.
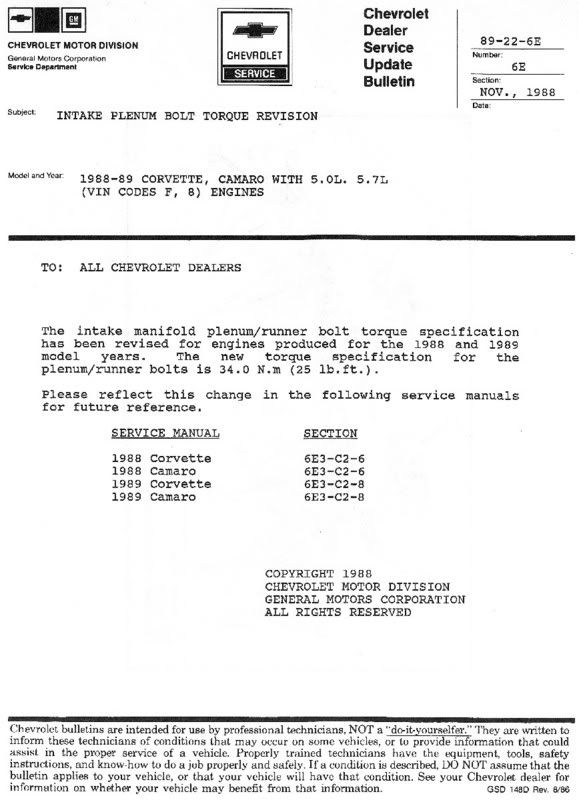
c. The Runner Torx bolts should be torqued to 25 ft lbs of torque. This is per GM Service Bulletin 89-22-6E dated 11/88. Be very careful not to strip out these bolts, as the plenum material is soft aluminum.
I would like to see that Service Bulletin. The 88 FSM specifies 25 Nm or 19 Lb ft torque values in Figure C2-6 on page 6E3-C2-6. I believe that the 89 FSM shows the same. I know from experience with my brother's 89 that 25 Lb ft stripped the aluminum threads for one of his plenum bolts. Given that spark plugs which have a larger thread size, use a smaller torque value for threads in aluminum heads, I suspect someone has confused 25 Newton-meters with 25 Pound-foot of torque.
Melting Slicks
Joined: Apr 2002
Posts: 2,118
Likes: 0
From: St. Charles, MO Route 66 Corvette Club
Mike_88Z51:
I asked for comments and thanks for giving them to me
The comments on the tools is some good info for anyone who is trying to get to the difficult bolts on the bottom of the runners.
You asked to see the GM Bulletin that is mentioned in the write up and it consists of info on the front of the page and a diagram on the reverse side of the page. Here is the GM Service Bulletin (89-22-6E), front page:
Here is the reverse side of the above:
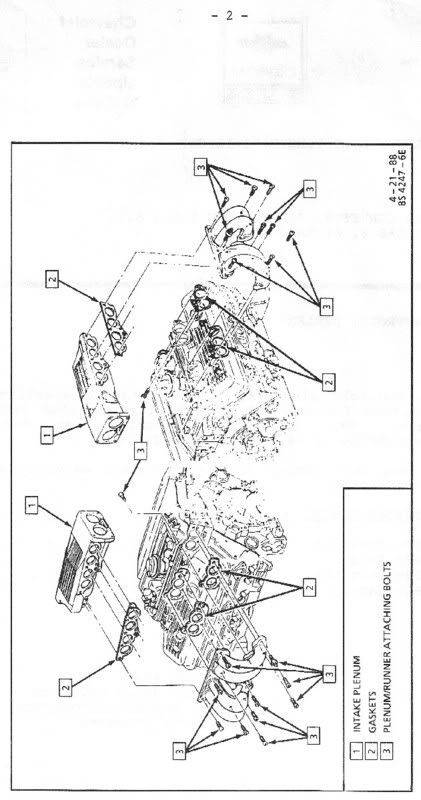
Your comments on the GM Helms Factor Service Manual for a 89 car caused me to look up the info in the 89 FSM that I own. Section 6E3-C2 page 17 lists the following torques:
Manifold to Runner Bolts = 34 N-m or 25 lb. ft.
Runner to Manifold Bolts = 34 N-m or 25 lb. ft.
I think the second line is a typo and should read Runner to "Plenum" Bolts. This typo probably created the Service Bulletin.....my opinion only.
This is a wonderful place to share Corvette information
I asked for comments and thanks for giving them to me
The comments on the tools is some good info for anyone who is trying to get to the difficult bolts on the bottom of the runners.
You asked to see the GM Bulletin that is mentioned in the write up and it consists of info on the front of the page and a diagram on the reverse side of the page. Here is the GM Service Bulletin (89-22-6E), front page:
Here is the reverse side of the above:
Your comments on the GM Helms Factor Service Manual for a 89 car caused me to look up the info in the 89 FSM that I own. Section 6E3-C2 page 17 lists the following torques:
Manifold to Runner Bolts = 34 N-m or 25 lb. ft.
Runner to Manifold Bolts = 34 N-m or 25 lb. ft.
I think the second line is a typo and should read Runner to "Plenum" Bolts. This typo probably created the Service Bulletin.....my opinion only.
This is a wonderful place to share Corvette information
Last edited by Sam Lam; May 14, 2007 at 12:01 AM.
Thread Starter
Drifting
Joined: Feb 2007
Posts: 1,807
Likes: 0
From: Somewherein Pa
Thanks for all the help and great info....I have an 89 but I also have a 91 and that is the one that I want to replace the injectors on. I am not in a rush and hope to have a full weekend to do the job, remove, clean, paint, replace anything that needs it but I didn't like the sound of all that was involved with removing the valve covers, so one last time, a 91 L98, replace the injectors, yes or no, do I need to remove the valve covers? Thansk everyone for the great info!
BD2626
BD2626
Last edited by bd2626; May 14, 2007 at 08:54 AM.

Le Mans Master
Joined: Jun 2006
Posts: 5,642
Likes: 5
From: One day you're a Comet...the next day you're dust... Arkansas
Thanks for all the help and great info....I have an 89 but I also have a 91 and that is the one that I want to replace the injectors on. I am not in a rush and hope to have a full weekend to do the job, remove, clean, panit replace anything that needs it but I didn't like the sound of all that was involved with removing the valve covers, so one last time, a 91 L98, replace the injectors, yes or no, do I need to remove the valve covers? Thansk everyone for the great info!
BD2626
BD2626
 with the "NO" answer too!
Drifting
Joined: May 1999
Posts: 1,478
Likes: 3
From: Sacramento, CA Money can't buy happiness - but it's more comfortable to cry in a Corvette than a Yugo.
Sam Lam, you are the man! I stand corrected. Thanks for posting the Service Bulletin.
Interesting that it covers 88 and 89 Vettes. Since it was distributed in Nov. 88, it certainly superceeds my 88 FSM. I don't have my brother's 89 FSM, and he has since sold his Vette along with the 89 FSM, but I do believe you that the 89 FSM says 34Nm or 25 Lb.ft., because as I recall there was a discerepency between the 88 & 89 manual's torque listings that my brother and I discussed quite a bit before he started final torquing of his runner to plenum bolts. It may have been my manual's 19Lbft. versus his manual's 25Lb.ft. I do remember quite clearly the stream of adult-only words he expressed when either the first or second runner to plenum bolt stripped out at a setting of 25Lbft. We blamed it on an erroneous torque value in the 89 manual and used the lower 88 FSM setting on the rest of his bolts. However, the problem may just have been a weak set of threads from work done by the previous owner.
Since GM updated the specs from to 25Lb.ft. for both the 88 and 89 plenum to runner bolts I may even try retorquing mine a bit tighter. From the current 19Lb.ft, closer to 25Lb.ft. When/if I do, it will be very carefully.
Interesting that it covers 88 and 89 Vettes. Since it was distributed in Nov. 88, it certainly superceeds my 88 FSM. I don't have my brother's 89 FSM, and he has since sold his Vette along with the 89 FSM, but I do believe you that the 89 FSM says 34Nm or 25 Lb.ft., because as I recall there was a discerepency between the 88 & 89 manual's torque listings that my brother and I discussed quite a bit before he started final torquing of his runner to plenum bolts. It may have been my manual's 19Lbft. versus his manual's 25Lb.ft. I do remember quite clearly the stream of adult-only words he expressed when either the first or second runner to plenum bolt stripped out at a setting of 25Lbft. We blamed it on an erroneous torque value in the 89 manual and used the lower 88 FSM setting on the rest of his bolts. However, the problem may just have been a weak set of threads from work done by the previous owner.
Since GM updated the specs from to 25Lb.ft. for both the 88 and 89 plenum to runner bolts I may even try retorquing mine a bit tighter. From the current 19Lb.ft, closer to 25Lb.ft. When/if I do, it will be very carefully.