


Sway bar install options?
Thread Starter
Race Director


Joined: Jun 2004
Posts: 13,966
Likes: 709
From: WI
I've got some new aftermarket large sway bars to install and want to set them up correctly. I've done some searching and found some old posts about this. I thought I'd consolidate them here for easy reference. Does anyone know if these tricks work on all years?
Vetracr - Add shims under sway bar mounts to adjust how fast bars respond.
Put a 1" spacer block between your frame and the bushings on the front of your car? If not, you may want to look into putting one on since you are working on making your sway bars more effective. I can't explain the benefit to the block, but Guldstrand sells them with their poly bushing kits and there is an apparent benefit to changing this geometry. If they say it works I don't doubt it.
Jackdaroofer - Here's another, maybe more important consideration if you are moving up to a bigger bar, particularly the 30mm in the front.
The end link bushings on the bigger bar will be further back than on your existing bar.
The vertical links will have to be forced rearward to link up with the bar. This puts them out of the vertical plane and can cause a bind on the lower control arm.
After much searching, I decided to cut the top two "tabs" (ears where the bolt goes through) off the vertical link and move them rearward on the square tube of the vertical link and reweld them. If you move them back so that the rear edge of the tabs lines up with the rear edge of the square tube (approx 1/4") you will have proper alignment.
NavyVet - the sway bar should move relatively freely up & down. A "trick" is to use alignment shim(s) to space the outer sway bar bushing shell away from the frame when you bolt it down. The bushing for the bigger (i.e., 30mm) bar tends to "crush" a bit in the factory shell making the bar very resistent to movement. Space as necessary so it moves up & down freely (not sloppy loose, but moves with only very moderate force). I learned this from a SCCA Nat'l Champion Vette AX'er who learned it from a multi-time champ in Vettes. Since their cars handle like they do, and they've studied this science more than I have, I tend to follow their lead and take advantage of their experience.
As Vetracer said, the factory end links are fixed, so they are only going to be at one height relationship with the lower a-arm, therefore it shouldn't matter where it's sitting when you tighten them - just so they move. Being so tight that they resist movement is partially defeating the function of the shocks and limiting the reactiveness of the suspension as it tries to keep the wheels on the ground. The one inch blocks tend to make the moving end more horizontally in line with the a-arm versus the factory position where the end is a bit more raised. Horizontal is one goal. No preload on either side is the other (unless doing serious corner weighting exercises that go beyond most people's capabilities and/or needs). The only way to achieve zero pre-load at normal weighted ride height is with adjustable end links.
Vetracr - If you look at the bend in a smaller, say 28mm front bar like the one that came on my '86 that I relpaced wit a 32mm there is a noticeable lack of bend in the larger bar. That means the sway bar is tilted down toward the end link, and is much more resistant to "bending" as it should which limits the travel of the lower "A" arm and of course everything attached to it like the wheel and tire. Sorta like the folding legs on a table, it hinges and jams.
The blocks prevent this from happening by lowering the front of the sway bar.
The Bus - Shim the front sway bar 3/16" from the frame mounting using washers. This improves turn in.
Solofast - Get the Koni Sport shocks for your 89. I am assuming that you have the Z51 suspension and the Koni's were developed specifically for the 89/90 Z51 springs and sway bars, I know, I did the development driving and selected the valving with Dean Dodge (who was then with KONI) and we tested them on my 89. Set the rears to full soft, or close to it, and expect the fronts to be about in the middle of the adjustment range. That way you can tune the car between runs quickly since you are just spinning the **** a quarter of a turn either way to fine tune the car....If you don't have the Z51 bars, springs and control arms you will likely need to get them to be competitive in A/S on a national level.
One last tip that was often an "Unfair Advantage".....The sway bar on the front of the C4 is huge, and a lot of the compliance in the swaybar system is in the bar mount bushings. You can make a HUGE HUGE difference in how stiff or soft the bar is by preloading of softening the preload on those bushings.....If the car is loose, you can stiffen the front bar by putting a large (1.5-2 inch) diameter washer on top of the rubber and clamping it in tightly. The extra preload will make a huge difference in front roll stiffness. If the car is pushing you can put an alignment shim or (in extreme conditions 2 shims) in between the two halves of the front bar bracket to soften the front bar. If you put a cable tie on the washer and on the shims, you can pull them out or put them in in less than two minutes....that is easily done between runs if you need to. It can turn a local event into a test and tune....If you doubt it, try it and you will be truly amazed....
Thread Starter
Race Director
Joined: Jun 2004
Posts: 13,966
Likes: 709
From: WI
An update to this..
I was working on the front spring and wanted to jack up the suspension to ride height, so I could tighten the control arm and spring perch fasteners without trying to get under the low car. I found that the car wouldn't get anywhere near ride height before coming off the jack stands. I was lifting under each arm so as not to twist the sway bar. Something was so bound up the suspension couldn't move.
I unhooked the sway bar and used all my strength, it wouldn't rotate at all. I've been noticing a change in suspension harshness as the grease would go away. And I had taken the bar down to add new grease. This time it had no grease left at all, it had been to long. I added zerks this time to put new grease in. I also stopped using that thick suspension grease. I found it would turn to clay with dirt and couldn't be cleaned well. The Redline synthetic grease is working nice.
I added one washer between the bushing clamps to reduce load on the bushing. It moves with moderate force now and once everything was reinstalled, the suspension would nicely jack up to ride height. I could tell by jacking to the dirt line on the shock. After driving the car I could tell the suspension was working well again, before it also felt like a solid suspension!
I decided to remove the rear sway bar and add zerks there too. The rear sway bar was fine, it could rotate, and the grease was still there. I cut a shallow groove around the center of the bushing for grease to move through. It's an easy project.
Thread Starter
Race Director
Joined: Jun 2004
Posts: 13,966
Likes: 709
From: WI
Another update and some clarification. The above tips talking about changing load on the bar mount bushings are for stock style rubber bushings only. They work by twisting and need to be clamped tight. Poly does not twist and the bar should rotate freely (some grease stiction). Depending on your bushing you may have to add shim between the mount half bolts to reduce load or shim on top of the bushing to squish it tighter.
Pic of zerk added:
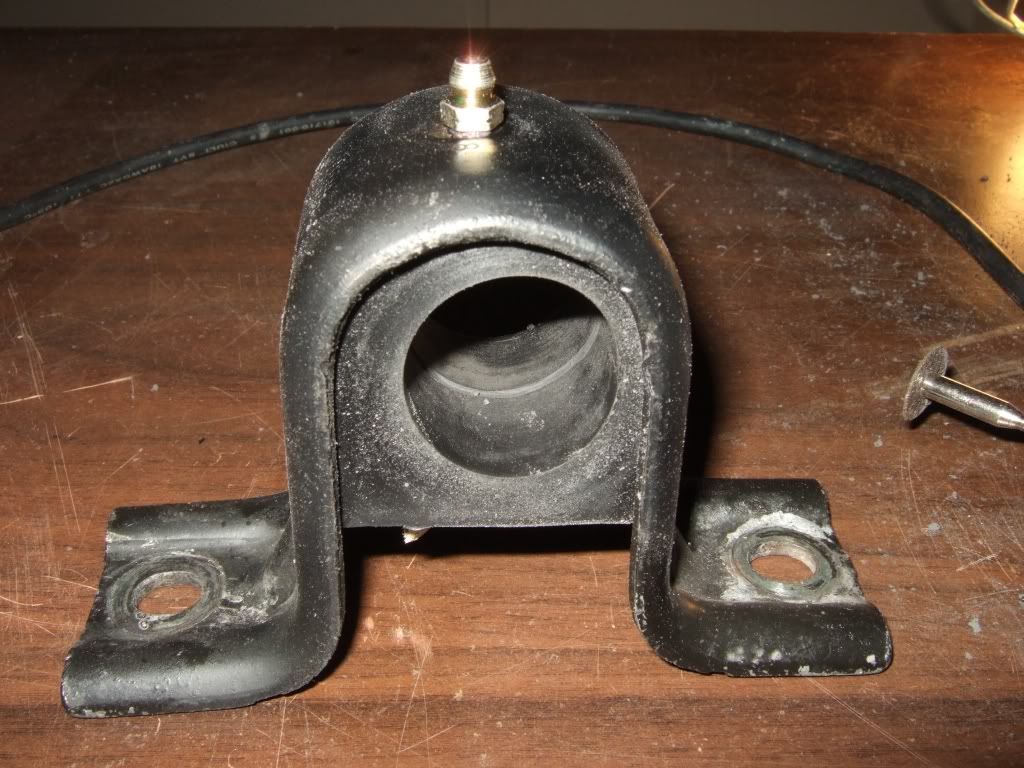
For the rear I used 90� zerks that I saved from front ball joints that were changed out.
Also if you switch to poly, bar collars should be added. I found that my sway bars slide side to side. The rear slides enough to bump the inner wheel well frame. Install a bar collar inboard of each mount. I used aluminum units from McMaster, link:
http://www.mcmaster.com/#catalog/116/1154/=9cemg0
(pic shown with offset mount bushing, used to keep bar end links straight)
Pic of zerk added:
For the rear I used 90� zerks that I saved from front ball joints that were changed out.
Also if you switch to poly, bar collars should be added. I found that my sway bars slide side to side. The rear slides enough to bump the inner wheel well frame. Install a bar collar inboard of each mount. I used aluminum units from McMaster, link:
http://www.mcmaster.com/#catalog/116/1154/=9cemg0
(pic shown with offset mount bushing, used to keep bar end links straight)
Thread Starter
Race Director
Joined: Jun 2004
Posts: 13,966
Likes: 709
From: WI
Welcome!
Another tip, with the rear mounts I couldn't keep a wrench up above the mufflers because the mount studs were super long. Trim down the length of the thread so it's easier to install the bushing mounts. With them trimmed I can use a socket there's so much room now. The studs are much longer than they need to be.
Another tip, with the rear mounts I couldn't keep a wrench up above the mufflers because the mount studs were super long. Trim down the length of the thread so it's easier to install the bushing mounts. With them trimmed I can use a socket there's so much room now. The studs are much longer than they need to be.
Melting Slicks


Joined: Mar 2005
Posts: 2,352
Likes: 230
From: Northeast FL
Thoughts on using Heim joints to eliminate the preload? I'm thinking of doing it and am a little unclear on the complete benefit for the price. I've already got poly bushings, coilovers, 32MM bar, etc. and want to finish of the suspension. I'll be replacing the solid bar with a hollow one this winter.
Thread Starter
Race Director
Joined: Jun 2004
Posts: 13,966
Likes: 709
From: WI
I sit in the car and then have a helper put the bolt through the end link and tighten it, so weight (preload force) isn't jacked in. You can split a kit with someone else and just use one adjustable end link to do this. I hated messing with the end link bushings and just installed heim links on them all.
Good idea about the tubular bar to save weight. I have the VBP 1.25" and 1" tubular bars on mine.
I called Addco for info on the rates. Lots of these bars are made by Addco (which VBP sells?), in their chart there is a 1/8" difference in dia. between the tubular and solid. The tubular being larger.
http://02bbfb5.netsolhost.com/Buick-....htm#Chevrolet
http://www.addco.net/
800-621-8916 main
800-338-7012 tech
A 1 1/4" tubular bar will be the same rate as a 1 1/8" solid bar. So for the front if you buy the 1 1/8" bar you're just adding extra weight.
Some figures, 1 1/8 solid = 1464 lb/in deflection (34" mid section, 6" arm), 1 1/4 tubular = 1464, 1 1/8 tubular = 914. 1 1/4 solid bar = 2231!
A tubular bar will be the same rate as the next size down solid bar.
Melting Slicks
Joined: Mar 2005
Posts: 2,352
Likes: 230
From: Northeast FL
I'll probably just do all four links and the hollow bars at both ends. I get my suspension stuff from Van Steel. I've had a few bad encounters with VBP and I'll never buy from them again.
Corvette Stories
The Best of Corvette for Corvette Enthusiasts

Every 2027 Corvette Engine Explained
Joe Kucinski
Designer Imagines A Corvette That Looks More Like a Corvette Than the Corvette
Verdad Gallardo
10 Ugly Corvettes That We Still Kinda Love
Joe Kucinski
Top 10 Most Expensive Corvettes Ever Sold on Bring A Trailer
Brett Foote
10 Things Every Corvette Owner Needs (2026 Edition)
Michael S. Palmer
8 Most "Only Corvette Owners Understand" Quirks and Problems
Pouria Savadkouei
10 Reasons the C6 Z06 is Still A Performance Benchmark After 20 Years
Joe Kucinski
How Much Horsepower Every Corvette Engine "LOST" in 1972
Joe Kucinski
Top 10 DOs and DON'Ts for Protecting Your Convertible Top!
Michael S. Palmer
Thread Starter
Race Director
Joined: Jun 2004
Posts: 13,966
Likes: 709
From: WI
My rear bar was really sliding around. The front not so much. Added bar collars. I'm surprised I haven't heard of the issue from others. I did notice some sway bar kits include bar collars, not C4 kits though.
