




Roller Rocker Install

Thread Starter
Burning Brakes


Joined: Mar 2002
Posts: 1,035
Likes: 0
From: Atlanta Ga
 Roller Rocker Install
OK, I think these questions are generic for any aluminum roller rocker, I'm using PRW recommended by my machine shop, but would thik this hold true for a Summit, Jegs, or other builder/shop brand.
1) When putting the rocker on the stud is there a top and bottom to the trunnion shaft?
2) Is is normal that some will not go onto the studs far enough to catch the nut until you rotate the motor and get closer to TDC for that cylinder? Maybe 1.6 like these are bit tougher due to the ratio?
3) Also it is normal the the rocker will not bottom out on the stud... I don't think it can and still operate properly.
I have just got them on but not yet adjusted, I wanted to make sure before going to the next step! Here is what we've got so far.
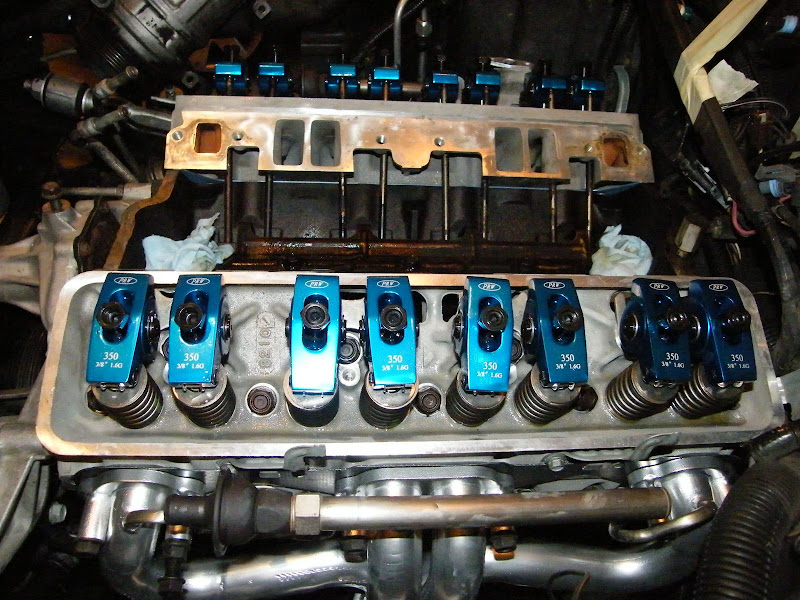
Sorry if these are dumb questions but it's been about 20 years since my last job like this and first with the roller rockers!
1) When putting the rocker on the stud is there a top and bottom to the trunnion shaft?
2) Is is normal that some will not go onto the studs far enough to catch the nut until you rotate the motor and get closer to TDC for that cylinder? Maybe 1.6 like these are bit tougher due to the ratio?
3) Also it is normal the the rocker will not bottom out on the stud... I don't think it can and still operate properly.
I have just got them on but not yet adjusted, I wanted to make sure before going to the next step! Here is what we've got so far.
Sorry if these are dumb questions but it's been about 20 years since my last job like this and first with the roller rockers!

Le Mans Master

Joined: Mar 2004
Posts: 5,107
Likes: 171
From: Dublin CA
If you look at the RR where the stud goes thru, you will find one side is flat...this side up!! You need the flat surface for you lock nut to snug down to.
Adjusting valves on the 1985 Corvette: also if you follow this sequence you can remove the rockers and install the RR as you adjust the valves. If you remove a rocker that is under tension because the valve is open, you may not be able to get any threads of the nut on the stud. The valve needs to be CLOSED.
1) Remove the spark plugs. This makes it much easier to turn the engine by hand.
2) I believe that the nut in the center of the bottom pulley on the balancer is 5/8”. Use a six point 5/8” socket to turn the engine over by hand to line up the timing marks. Place a finger in the spark plug hole for plug #1 as you turn the engine over. You are trying to determine if the engine is on compression as you line up the marks. If you feel the air pushing against your finger as you line up the marks, you have compression in cylinder #1. Align the timing marks.
3) Now adjust the valves as follows:
Intake #1, 2, 5 and 7 then adjust Exhaust 1, 3, 4 and 8.
4) Turn the engine 360 degrees and line up the timing marks again. Now adjust the following:
Intake 3, 4, 6 and 8 then adjust Exhaust 2, 5, 6 and 7.
You are now finished with your adjustment. I usually tighten the lock nut ½ turn after adjusting to zero lash.
The rocker should NOT bottom out on the stud, but be held off the base of the head (rocker stud).
Try this method for adjusting using the above sequence per Forum member Joe C:
BTW, I tried something a little unconventional on adjusting hydraulic lifters. one thing that always bothered me is the statement "spin the pushrod until resistance is felt" that seems a little too subjective to me. so I tried this: I set "zero" lash with a .0015" feeler gauge while slowly turning the adjusting nut. when I felt the feeler gauge grab, I was fairly confident I was about .001 from zero lash. at that point, I turned the adjusting nut 3/4 turn. I recently read that one turn is equivalent to .040" because of the thread pitch on the threaded rocker arm stud, so 3/4 turn should give you about .030" adjustment. I also read that within a hydraulic lifter there is .060 total plunger movement, and ideally you want to be just about in the middle of that range, or .030 inch. I don't know if I’m out in left field on what I did, but I feel I got a really consistent valve adjustment across the board. if you think you might have a tight cylinder, maybe give this a try - it seemed to work for me...
I have used it several times and it seems to work for me better than twisting the rods....and I have been doing this for 35+ years..
John
Adjusting valves on the 1985 Corvette: also if you follow this sequence you can remove the rockers and install the RR as you adjust the valves. If you remove a rocker that is under tension because the valve is open, you may not be able to get any threads of the nut on the stud. The valve needs to be CLOSED.
1) Remove the spark plugs. This makes it much easier to turn the engine by hand.
2) I believe that the nut in the center of the bottom pulley on the balancer is 5/8”. Use a six point 5/8” socket to turn the engine over by hand to line up the timing marks. Place a finger in the spark plug hole for plug #1 as you turn the engine over. You are trying to determine if the engine is on compression as you line up the marks. If you feel the air pushing against your finger as you line up the marks, you have compression in cylinder #1. Align the timing marks.
3) Now adjust the valves as follows:
Intake #1, 2, 5 and 7 then adjust Exhaust 1, 3, 4 and 8.
4) Turn the engine 360 degrees and line up the timing marks again. Now adjust the following:
Intake 3, 4, 6 and 8 then adjust Exhaust 2, 5, 6 and 7.
You are now finished with your adjustment. I usually tighten the lock nut ½ turn after adjusting to zero lash.
The rocker should NOT bottom out on the stud, but be held off the base of the head (rocker stud).
Try this method for adjusting using the above sequence per Forum member Joe C:
BTW, I tried something a little unconventional on adjusting hydraulic lifters. one thing that always bothered me is the statement "spin the pushrod until resistance is felt" that seems a little too subjective to me. so I tried this: I set "zero" lash with a .0015" feeler gauge while slowly turning the adjusting nut. when I felt the feeler gauge grab, I was fairly confident I was about .001 from zero lash. at that point, I turned the adjusting nut 3/4 turn. I recently read that one turn is equivalent to .040" because of the thread pitch on the threaded rocker arm stud, so 3/4 turn should give you about .030" adjustment. I also read that within a hydraulic lifter there is .060 total plunger movement, and ideally you want to be just about in the middle of that range, or .030 inch. I don't know if I’m out in left field on what I did, but I feel I got a really consistent valve adjustment across the board. if you think you might have a tight cylinder, maybe give this a try - it seemed to work for me...
I have used it several times and it seems to work for me better than twisting the rods....and I have been doing this for 35+ years..
John
Last edited by John A. Marker; May 27, 2009 at 09:17 PM.
Thread Starter
Burning Brakes
Joined: Mar 2002
Posts: 1,035
Likes: 0
From: Atlanta Ga
If you look at the RR where the stud goes thru, you will find one side is flat...this side up!! You need the flat surface for you lock nut to snug down to.
Adjusting valves on the 1985 Corvette: also if you follow this sequence you can remove the rockers and install the RR as you adjust the valves. If you remove a rocker that is under tension because the valve is open, you may not be able to get any threads of the nut on the stud. The valve needs to be CLOSED.
1) Remove the spark plugs. This makes it much easier to turn the engine by hand.
2) I believe that the nut in the center of the bottom pulley on the balancer is 5/8”. Use a six point 5/8” socket to turn the engine over by hand to line up the timing marks. Place a finger in the spark plug hole for plug #1 as you turn the engine over. You are trying to determine if the engine is on compression as you line up the marks. If you feel the air pushing against your finger as you line up the marks, you have compression in cylinder #1. Align the timing marks.
3) Now adjust the valves as follows:
Intake #1, 2, 5 and 7 then adjust Exhaust 1, 3, 4 and 8.
4) Turn the engine 360 degrees and line up the timing marks again. Now adjust the following:
Intake 3, 4, 6 and 8 then adjust Exhaust 2, 5, 6 and 7.
You are now finished with your adjustment. I usually tighten the lock nut ½ turn after adjusting to zero lash.
The rocker should NOT bottom out on the stud, but be held off the base of the head (rocker stud).
Try this method for adjusting using the above sequence per Forum member Joe C:
BTW, I tried something a little unconventional on adjusting hydraulic lifters. one thing that always bothered me is the statement "spin the pushrod until resistance is felt" that seems a little too subjective to me. so I tried this: I set "zero" lash with a .0015" feeler gauge while slowly turning the adjusting nut. when I felt the feeler gauge grab, I was fairly confident I was about .001 from zero lash. at that point, I turned the adjusting nut 3/4 turn. I recently read that one turn is equivalent to .040" because of the thread pitch on the threaded rocker arm stud, so 3/4 turn should give you about .030" adjustment. I also read that within a hydraulic lifter there is .060 total plunger movement, and ideally you want to be just about in the middle of that range, or .030 inch. I don't know if I’m out in left field on what I did, but I feel I got a really consistent valve adjustment across the board. if you think you might have a tight cylinder, maybe give this a try - it seemed to work for me...
I have used it several times and it seems to work for me better than twisting the rods....and I have been doing this for 35+ years..
John
Adjusting valves on the 1985 Corvette: also if you follow this sequence you can remove the rockers and install the RR as you adjust the valves. If you remove a rocker that is under tension because the valve is open, you may not be able to get any threads of the nut on the stud. The valve needs to be CLOSED.
1) Remove the spark plugs. This makes it much easier to turn the engine by hand.
2) I believe that the nut in the center of the bottom pulley on the balancer is 5/8”. Use a six point 5/8” socket to turn the engine over by hand to line up the timing marks. Place a finger in the spark plug hole for plug #1 as you turn the engine over. You are trying to determine if the engine is on compression as you line up the marks. If you feel the air pushing against your finger as you line up the marks, you have compression in cylinder #1. Align the timing marks.
3) Now adjust the valves as follows:
Intake #1, 2, 5 and 7 then adjust Exhaust 1, 3, 4 and 8.
4) Turn the engine 360 degrees and line up the timing marks again. Now adjust the following:
Intake 3, 4, 6 and 8 then adjust Exhaust 2, 5, 6 and 7.
You are now finished with your adjustment. I usually tighten the lock nut ½ turn after adjusting to zero lash.
The rocker should NOT bottom out on the stud, but be held off the base of the head (rocker stud).
Try this method for adjusting using the above sequence per Forum member Joe C:
BTW, I tried something a little unconventional on adjusting hydraulic lifters. one thing that always bothered me is the statement "spin the pushrod until resistance is felt" that seems a little too subjective to me. so I tried this: I set "zero" lash with a .0015" feeler gauge while slowly turning the adjusting nut. when I felt the feeler gauge grab, I was fairly confident I was about .001 from zero lash. at that point, I turned the adjusting nut 3/4 turn. I recently read that one turn is equivalent to .040" because of the thread pitch on the threaded rocker arm stud, so 3/4 turn should give you about .030" adjustment. I also read that within a hydraulic lifter there is .060 total plunger movement, and ideally you want to be just about in the middle of that range, or .030 inch. I don't know if I’m out in left field on what I did, but I feel I got a really consistent valve adjustment across the board. if you think you might have a tight cylinder, maybe give this a try - it seemed to work for me...
I have used it several times and it seems to work for me better than twisting the rods....and I have been doing this for 35+ years..
John
I've already got the balancer marked so I can rotate to the 4 locations and get each cylinder at TDC for adjustments, and plugs are not installed yet. I did notice that you can't get a nut onto a valve that is open, so rotating the assembly takes care of that.
Le Mans Master
Joined: Mar 2004
Posts: 5,107
Likes: 171
From: Dublin CA
I believe the 85 and 89 can be adjusted the same. Takes only one full rotation to get all the valves. You can check it by turning the balancer and lining up the timing mark and see which valves are closed and compare to the above sequence.
I just replaced all my rocker studs with ARP studs last weekend and used the sequence that I listed above and Joe C's method of using the feeler gauge. Did them all in about 45 minutes. That means taking off the RR, taking out the stud, replacing with new ARP, put on RR, tighten nut to get to zero lash, 1/2 turn and lock the lock screw....repeat 15 more times.
John
I just replaced all my rocker studs with ARP studs last weekend and used the sequence that I listed above and Joe C's method of using the feeler gauge. Did them all in about 45 minutes. That means taking off the RR, taking out the stud, replacing with new ARP, put on RR, tighten nut to get to zero lash, 1/2 turn and lock the lock screw....repeat 15 more times.
John
Thread Starter
Burning Brakes
Joined: Mar 2002
Posts: 1,035
Likes: 0
From: Atlanta Ga
I don't get the process with the feeler gauge, where are you putting the gauge? The rocker arm is concave for the tip of the push rod so it can't be there. and the rockers are self aligning so I don't think you could measure in there?????
Don't get this part of your process. I agree though the "spin the push rod until resistance" is a very subjective method.
Don't get this part of your process. I agree though the "spin the push rod until resistance" is a very subjective method.
Last edited by Dolfan; May 27, 2009 at 10:11 PM.
Le Mans Master
Joined: Mar 2004
Posts: 5,107
Likes: 171
From: Dublin CA
Put feel gauge between roller tip and the top of the valve. On your picture, the end where the spring is. Turn the nut as you pull on the gauge (at a right angle to the roller so you are pulling to the front or rear on the engine). When you feel resistance you have reached zero lash plus .0015". The .0015 is nothing.....tighten the nut 1/2 turn and then lock down the allen screw inside the nut.
Thread Starter
Burning Brakes
Joined: Mar 2002
Posts: 1,035
Likes: 0
From: Atlanta Ga
The issue with the feeler gauge is space on the roller tip to fit it. Like I said these are self aligning so there isn't a flat area under the rocker to fit the feeler gauge. Maybe you have a gauge that was a narrow end, my gauges are about 1/2" wide metal strips.
Corvette Stories
The Best of Corvette for Corvette Enthusiasts

5 Best & 5 Worst Corvette Daily Drivers
Joe Kucinski
The Headlights of Every Corvette Generation Explained
Joe Kucinski
5 Best & 5 Most Overrated Corvette Track Packages of All Time!
Joe Kucinski
Every 2027 Corvette Engine Explained
Joe Kucinski
Designer Imagines A Corvette That Looks More Like a Corvette Than the Corvette
Verdad Gallardo
10 Ugly Corvettes That We Still Kinda Love
Joe Kucinski
Top 10 Most Expensive Corvettes Ever Sold on Bring A Trailer
Brett Foote
10 Things Every Corvette Owner Needs (2026 Edition)
Michael S. Palmer
8 Most "Only Corvette Owners Understand" Quirks and Problems
Pouria Savadkouei
Thread Starter
Burning Brakes
Joined: Mar 2002
Posts: 1,035
Likes: 0
From: Atlanta Ga


Melting Slicks

Joined: Nov 2005
Posts: 2,736
Likes: 0
From: WAY UPSTATE NY
If you are only using a feeler of a few thousands just cut it with a good pair of sharp scissors.
BTW I have used the method John Marker described for over 30 years. It only requires one revolution of the engine. It is also the method that is in your FSM
BTW I have used the method John Marker described for over 30 years. It only requires one revolution of the engine. It is also the method that is in your FSM
Last edited by nutz4c4; May 28, 2009 at 03:02 PM.
Thread Starter
Burning Brakes
Joined: Mar 2002
Posts: 1,035
Likes: 0
From: Atlanta Ga
Thread Starter
Burning Brakes
Joined: Mar 2002
Posts: 1,035
Likes: 0
From: Atlanta Ga
I'm glad I asked about the flat side of the rocker axle as upon review about 10 were wrong, even with a 50/50 shot.  Thanks for getting me quick info on that. Well, just adjusted the valves and used the feeler gauge method and rotating the engine just once.
I was wondering if now doing a compression check was a good way to check my work? I'd like to know know if something is wrong instead of waiting until all is back together.
Thanks for getting me quick info on that. Well, just adjusted the valves and used the feeler gauge method and rotating the engine just once. I was wondering if now doing a compression check was a good way to check my work? I'd like to know know if something is wrong instead of waiting until all is back together.
Le Mans Master
Joined: Mar 2004
Posts: 5,107
Likes: 171
From: Dublin CA
You should not have to cut down your feeler gauge. I don't think that the self aligning RR are an issue. They should still have the roller riding on the flat surface of the valve stem. You should have two flat surfaces at this point, although the roller is round...it is flat against the valve stem. This should not distort the gauge at all.
Give it a try on a valve and see what you think.
John
Give it a try on a valve and see what you think.
John
Thread Starter
Burning Brakes
Joined: Mar 2002
Posts: 1,035
Likes: 0
From: Atlanta Ga
You should not have to cut down your feeler gauge. I don't think that the self aligning RR are an issue. They should still have the roller riding on the flat surface of the valve stem. You should have two flat surfaces at this point, although the roller is round...it is flat against the valve stem. This should not distort the gauge at all.
Give it a try on a valve and see what you think.
John
Give it a try on a valve and see what you think.
John
I just snipped the end more narrow and that worked.
