


How to fix burned-through floorpan?

Thread Starter
Le Mans Master

Joined: Aug 2005
Posts: 7,392
Likes: 218
From: Merritt Island, FL
Background: 91 ZR-1, headers, no cats, straight pipes from headers back to mufflers - no resonator.
As I was gutting the interior from my 91, I found that the passenger side corner, where the floorpan meets the trans tunnel as it widens for the bellhousing, was burned by the exhaust, in approximately a 1" diameter circle. It was not burned entirely through, but all that remained was fiber strands, no hard substance at all. The carpet padding overlying it was completely disintegrated. I never smelled anything burning, so this may have happened when the previous owner had the exhaust done, I have no way of knowing.
So, what to do? Obviously I need to patch the hole, but more importantly, I suppose I need to fabricate a heat shield? Or do I just have a muffler shop bend the pipe a little?
What should I use to patch the floor pan?


Thanks!
Andrew
As I was gutting the interior from my 91, I found that the passenger side corner, where the floorpan meets the trans tunnel as it widens for the bellhousing, was burned by the exhaust, in approximately a 1" diameter circle. It was not burned entirely through, but all that remained was fiber strands, no hard substance at all. The carpet padding overlying it was completely disintegrated. I never smelled anything burning, so this may have happened when the previous owner had the exhaust done, I have no way of knowing.
So, what to do? Obviously I need to patch the hole, but more importantly, I suppose I need to fabricate a heat shield? Or do I just have a muffler shop bend the pipe a little?
What should I use to patch the floor pan?
Thanks!
Andrew
Last edited by VetteMed; Jul 29, 2009 at 08:56 PM.
Le Mans Master


Joined: Aug 2007
Posts: 8,735
Likes: 413
From: WV
First thing is get a repair shop to get the pipe away from the floorboard, get yourself a fiberglass repair kit, it has the resin and fabric to repair this and read the instructions carefully.....WW
Last edited by WW7; Jul 30, 2009 at 08:02 AM.

Safety Car

Joined: Jan 2004
Posts: 3,759
Likes: 8
Use either Epoxy resin or SMC resin. Fiberglass may lay down and harden, but it isn't the best choice and won't last from what all I've read. You'd only want to do the repair once.
Team Owner


Joined: Mar 2001
Posts: 30,858
Likes: 293
From: Boston, Dallas, Detroit, SoCal, back to Boston MA
 I've used expoxy and it's seems to have stayed nice and bonded.
Ditto on getting the pipe moved and some heat shielding in there.
Safety Car
Joined: Jan 2004
Posts: 3,759
Likes: 8
Inside front left corner passenger side:

Outside:


Instructor


Joined: Sep 2004
Posts: 216
Likes: 4
From: Linton Indiana
I've used fiberglass resin and cloth on my 85 and it seems to be holding just fine...it's been about 4 years ago or so. Just get the pipe out of the way or put a heat shield over it. I guess you could use header wrap on the pipe. Some people like that stuff, others don't.
Burning Brakes

Joined: Apr 2005
Posts: 1,109
Likes: 2
I have fixed succesfully like this:
I clean and degrease the floor pan on the outside and inside. Usually use carburator cleaner in spray or thinner. I let it dry perfectly.
I then apply some masking tape / duct tape or any tape you have at hand , to the outside of the broken plastic part. I try to apply small pieces to give the approximate shape of the floor pan.
Then from the inside. ( By now the carpet has been removed ). I apply cyanoacrilate glue ( this brand has worked great for me: http://www.zapglue.com/)
I let the SMC fibers soak for a little, also the tape.
THen apply another coat, soaking wet. I apply sodium bicarbonate ( baking soda ) and this will get wet with the cyanoacrilate glue making a reaction, you will see some fumes and vapor coming out.
I then blow off the bicarbonate that has not impregnated. Apply more glue and then more bicarbonate, blow it again. You get the idea. This will build a rock like material that can latter be shaped by sanding.
After you cover perfectly the hole and give it the shape you like. Then apply fiberglass and wet it with epoxy resin. You can use carbon fiber if you like.
Apply several coats of this combination until you give the part an adequate shape and thickness . The epoxy resin + fiberglass should extend beyond the hole.
This repair will seal perfectly and hold on very well giving structural rigidity to the part specially if you use carbon fiber.
If you have doubt send me a message to give you further instructions.
Good luck
Corvette Stories
The Best of Corvette for Corvette Enthusiasts

Every 2027 Corvette Engine Explained
Joe Kucinski
Designer Imagines A Corvette That Looks More Like a Corvette Than the Corvette
Verdad Gallardo
10 Ugly Corvettes That We Still Kinda Love
Joe Kucinski
Top 10 Most Expensive Corvettes Ever Sold on Bring A Trailer
Brett Foote
10 Things Every Corvette Owner Needs (2026 Edition)
Michael S. Palmer
8 Most "Only Corvette Owners Understand" Quirks and Problems
Pouria Savadkouei
10 Reasons the C6 Z06 is Still A Performance Benchmark After 20 Years
Joe Kucinski
How Much Horsepower Every Corvette Engine "LOST" in 1972
Joe Kucinski
Top 10 DOs and DON'Ts for Protecting Your Convertible Top!
Michael S. PalmerTeam Owner
Joined: Mar 2001
Posts: 30,858
Likes: 293
From: Boston, Dallas, Detroit, SoCal, back to Boston MA
How hard is that? I've got a hole/crack in the same place. And from looking underneath, there is a small crack on the other side of the passenger front corner of the floorpan by the Fender gill. I can't see it from the inside as there is plastic in the way.
Inside front left corner passenger side:
Inside front left corner passenger side:
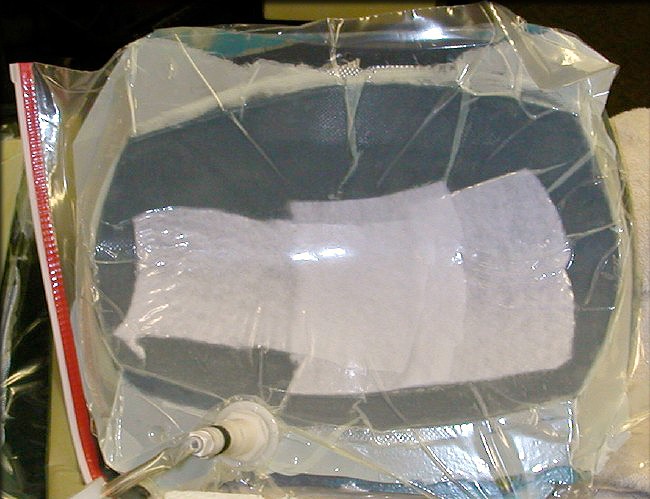
Vacuum bag it if you can for the bottom, you can get away w/o bagging it on the inside, wet the glass in resin before you put it in place. Then tap all the air out of it.
Safety Car
Joined: Jan 2004
Posts: 3,759
Likes: 8
Is this something that is usually covered by insurance? I had bumped the car a while back and planned on getting it painted. But figured I might just see about making a claim so I'm only out my deductible to get it painted instead of thousands. So, I might could just add this on to that claim.
Team Owner
Joined: Mar 2001
Posts: 30,858
Likes: 293
From: Boston, Dallas, Detroit, SoCal, back to Boston MA
http://www.nextcraft.com/vacuum_bagging_01.html
http://composite.about.com/od/aboutc...l/aa000109.htm
http://www.bertram31.com/proj/tips/vaccuum.htm
You can get by w/o it, it's a lot easier with it.
Here's the boat that I'm working on


http://composite.about.com/od/aboutc...l/aa000109.htm
http://www.bertram31.com/proj/tips/vaccuum.htm
You can get by w/o it, it's a lot easier with it.
Here's the boat that I'm working on
Advanced
Joined: Aug 2007
Posts: 70
Likes: 0
I had the same problem with my '84, the floor boards were cracked bad.
I used fiberglass and it has held up well since the year or 2 since i did it.
The most important thing i learned and would pass on to you is: USE the 50/50 mix style fiberglass, not the big tub of goop you mix with an ounce of activator!!
its a million times easier and you wont have half the clean up! Good luck!
Safety Car
Joined: Jan 2004
Posts: 3,759
Likes: 8
I had the same problem with my '84, the floor boards were cracked bad.
I used fiberglass and it has held up well since the year or 2 since i did it.
The most important thing i learned and would pass on to you is: USE the 50/50 mix style fiberglass, not the big tub of goop you mix with an ounce of activator!!
its a million times easier and you wont have half the clean up! Good luck!
I used fiberglass and it has held up well since the year or 2 since i did it.
The most important thing i learned and would pass on to you is: USE the 50/50 mix style fiberglass, not the big tub of goop you mix with an ounce of activator!!
its a million times easier and you wont have half the clean up! Good luck!
And when you did yours, did you do it on the inside, outside, or both?

Advanced
Joined: Nov 2006
Posts: 52
Likes: 0
From: Reston Virginia
Here is the link to my post when I repaired my floor. It was very easy to repair with the SMC resin and fiberglass mat.
http://forums.corvetteforum.com/c4-t...or-repair.html
http://forums.corvetteforum.com/c4-t...or-repair.html
Safety Car
Joined: Jan 2004
Posts: 3,759
Likes: 8
Here is the link to my post when I repaired my floor. It was very easy to repair with the SMC resin and fiberglass mat.
http://forums.corvetteforum.com/c4-t...or-repair.html
http://forums.corvetteforum.com/c4-t...or-repair.html
Got any idea how much a shop normally charges to do this if the carpet is out of the way?
Advanced
Joined: Nov 2006
Posts: 52
Likes: 0
From: Reston Virginia
I bought a quart of the SMC compatible resin at a parts store that also sells body shop and paint products. The quart can of resin was $35.00 which is enough to do 10 repairs. I bought the cloth at Lowes for $5.00. One can of rattle can primer and some sandpaper are the only other materials you need. I did pull the carpet back and covered the hole from the inside with foil duct tape. It provided a backer for the fiberglass and kept the fumes from getting into the interior. To sand and apply two layers of glass and resin took about 1 hour all total. There is no sense in paying a shop to do this. Make sure you mix the resin and hardener in a small throw away aluminium cake pan. The resin will melt plastic cups.
Safety Car
Joined: Jan 2004
Posts: 3,759
Likes: 8
http://www.nextcraft.com/vacuum_bagging_01.html
http://composite.about.com/od/aboutc...l/aa000109.htm
http://www.bertram31.com/proj/tips/vaccuum.htm
You can get by w/o it, it's a lot easier with it.
Here's the boat that I'm working on
http://composite.about.com/od/aboutc...l/aa000109.htm
http://www.bertram31.com/proj/tips/vaccuum.htm
You can get by w/o it, it's a lot easier with it.
Here's the boat that I'm working on
So, what else can one do? Just tape up the hole from the bottom?
Safety Car
Joined: Jan 2004
Posts: 3,759
Likes: 8
I bought a quart of the SMC compatible resin at a parts store that also sells body shop and paint products. The quart can of resin was $35.00 which is enough to do 10 repairs. I bought the cloth at Lowes for $5.00. One can of rattle can primer and some sandpaper are the only other materials you need. I did pull the carpet back and covered the hole from the inside with foil duct tape. It provided a backer for the fiberglass and kept the fumes from getting into the interior. To sand and apply two layers of glass and resin took about 1 hour all total. There is no sense in paying a shop to do this. Make sure you mix the resin and hardener in a small throw away aluminium cake pan. The resin will melt plastic cups.
I was thinking of fixing it on the inside as it would be easier to do unlike trying to do it under the car with no room. And I'd be able to make sure the inside was sealed off from the outside.
And did you drill out any loose pieces? On the hole in mine, I pushed on it and could feel loose pieces. I have heard of people saying to leave the loose pieces there and I've heard you need to remove all the loose pieces.
Team Owner
Joined: Mar 2001
Posts: 30,858
Likes: 293
From: Boston, Dallas, Detroit, SoCal, back to Boston MA
What your really after is keep the material all pressed together while the resin cures.