Official LT1/4l60E to LS2/4L60E Swap (Instruction + Pix)
 02-27-2010, 05:42 PM
#1
Melting Slicks


Thread Starter
I havent found a thread that did a LS2 with a 4l60E in a late C4. So Ill be Making one for the future LSx Swappers!!!
Grab some
Ok my bottom went out on my LT1 so I decided spend $5500.00 on a forged shortblock 396 or do a LSx swap. I figured I sell off my performance mods and I would net $3000-$4000. So this gives me a budget of $9000.00. So Ill start with my part list so far that I bought.
LS2 (2005 Corvette w/ 37000 miles- pull out motor full accessories) Bought from LS1tech forum member.
$3300
Fuel plumbing (PM for complete list)
$200
Motor mount
$100
Flexplate LS1 converted
$100
Flexplate Spacer (12563532 need to still try and see if this works)
$50
Wiring harness (Im going to the pros for it Im not doing a hack job)
$1500 (includes flyby wire, performance tune- plug and play-3 weeks)
Headers (melrose headers)
$1000 uncoated, rewelded, than coated.
Oil adapter
$200
TrailBlazer gas pedal
$100
Dana 44 3.45
$1500
Total Cost $8070 Parts/ $700 Misc. Call it $9000.00 projected.
1996 C4 LS2 450hp/450tq w/ headers,intake,and tune. Weight 3000 pounds I hope.
Ill post more pics in later tonight of cleared out engine bay.
Important Notes
Corvette accessories are a must, it allows for a better fit without cutting cross member.
Use the pedistal from your c5/c6 motor for motor mounts. Buy a solid bar of aluminium and cut to fit.
If you run AC you need modify your melrose headers. You also need a LS1 style AC cause the LS2 style doesnt work.
Dana 44 will solve your 1 inch difference in the drivetrain and allow you to bolt right up.
Steering pump lines- buy a braided line
Need to make a custom bracket for gas pedal. POST 92
Remove bolt that is in the engine bay passenger side frame rail.... your header will hit it when installed.... I removed and welded the seams.
Helpful links
Torque specs
http://ls1tech.com/forums/generation...que-specs.html
Wire Harness
http://www.currentperformance.com/
Headers
http://www.melroseheaders.com/produc...ers/C4_LSx.php
Last edited by fc_soldier; 12-28-2013 at 05:45 PM.
 02-27-2010, 06:05 PM
#2
Melting Slicks
Thread Starter
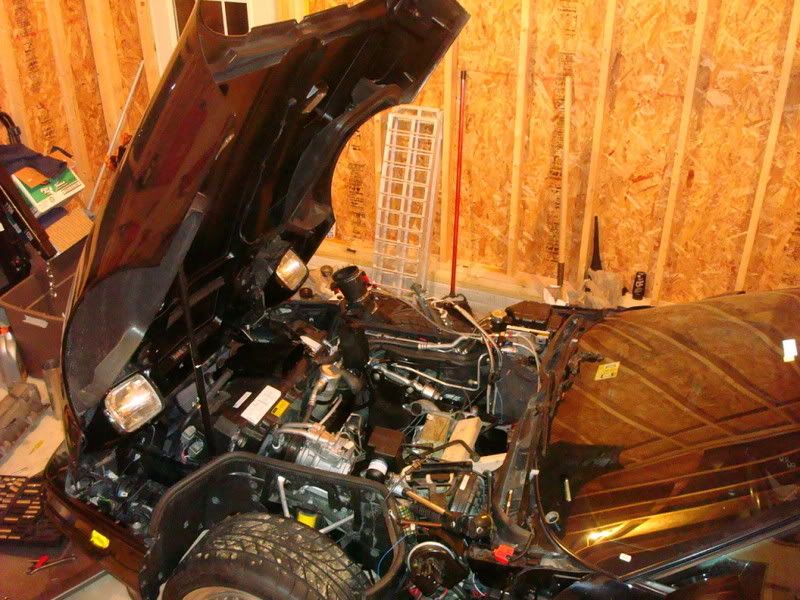
Step 1: Once engine is out time to remove harness. Important start at ECM and work your way to the passenger side. The wireharness then goes into the firewall. You have to go into the interior remove the lower passenger dash.
-Pop vent off with fingers or plastic wedge. There are two star bit screws.
-Unscrew three bolts holding fuse cover on. This will expose more bolts.
-Panel comes off
-Disconnect the wires coming thru firewall.
-Unbolt firewall mount wires can be pulled thru wall.
*Side Note- while motor is out you want to drill the head for coolant temp sensor. See post 7
.Next get all the wires around and underneath the coolant tank.
.Now Jack the car up passenger side and get the passenger side transmission connection.
.Either reach over and unplug drivers side connection on tranny. If you cant jack the other side up.
.Now half the harness is out but still attached the the drivers side.
.Remove battery
.Remove main engine harness from firewall, remove shield from connection expose wires on harness, bolt is running thru the middle of connection remove it.POST 7
.Slide the upper connection away from lower
.Disconnect fuse block (one behind where battery was)
.make sure all connections are undone and pull fuse panel thru the top
.Wire harness is removed POST 7
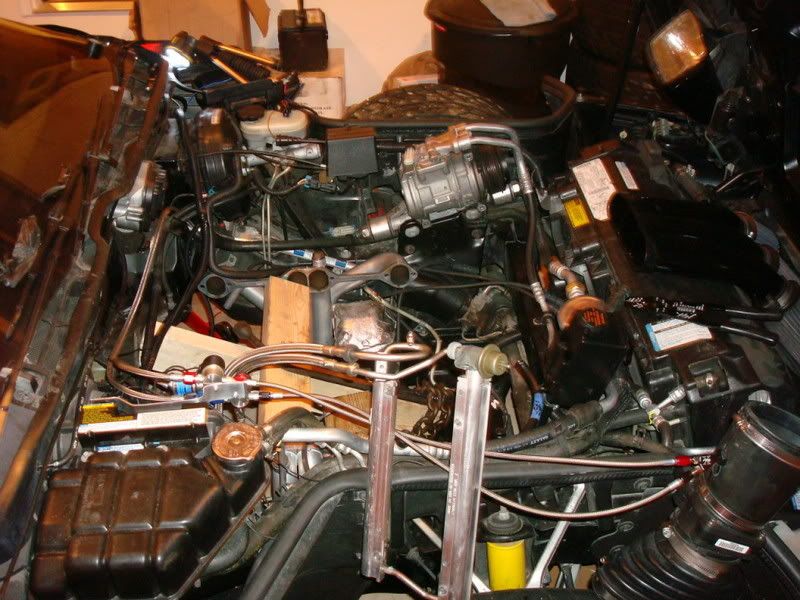
Step 2.Tie back any wires and accessories that may get in the way.
.Make sure that you notched the frame to allow the ac to clear. POST 7
.ASR needs to be unbolted the coils may hit it so I removed it. You dont need it anyway its useless.
. Have a jack underneath supporting tranny weight. Tranny will basically be as high up as it can go.
.Cut out two 2x2 peices of 2x4 and make them into a shape that will fit in motor mount. This will give you the distance of the motor mount. Good for doing a mock up. POST 7
.Lower engine into cradle area make sure to have someone underneath. Cause you can line the tranny up and connect it to the motor. Allow the engine to rest on the wood motor mounts. Your connected. POST 53 -So as you may notice it is pretty far off. About a inch needs to be made up to push the engine forward. The fix for me was buying a Dana 44 that has a 1 inch longer snout on it.
.Install solid motor mounts See POST 23( I went with these after the volve mounts failed)
. The bolts for the cbeam and engine will fall right into place.
- At this point the engine is mounted, tranny is in place, and rear is connected.
STEP 3
. Install headers
-POST 61 Will show you uncoated Melrose Headers
-POST 73 Will show you the modified and coated Header for AC option.
STEP 4. Install intake
STEP 5 Install Wireharness POST 73
-Take your time with this and make sure to secure everything properly. Firewall mount will be difficult to secure.
STEP 6. Install starter
-Make sure to add some locktight to the bolts.
STEP 7
.Install braided fuel line and connectors as seen in POST 42
-Now Im about to redo the fuel system. Im going to run a single connection/line from the fuel rail to the spare tire area. I will be mounting the fuel filter on the spare tire brace. So the filter is in a nice area away from motor. I feel safer lol
A lot of misc parts need to be connected. Explanation Below
.Oil pressure with sender T
.Water Temp
.Custom lower radiator hose to change angle
.Custom upper radiator hose to add sensor
.Power steering hose
As you can see everything after step two is simple and self explanitory. You want to make sure you double check connections and that everything is secured nicely. The solid motor mounts are going to vibrate and loosen up poorly tighten connections.
You need to also install a oil pressure sensor using a oil pressure sender T.
Double check install all your hoses. The lower radiator hose will have to be made, I chopped it and made it work using a coupler.
Add the braided custom hose for the power steering because stock will fail after some time.
-Pop vent off with fingers or plastic wedge. There are two star bit screws.
-Unscrew three bolts holding fuse cover on. This will expose more bolts.
-Panel comes off
-Disconnect the wires coming thru firewall.
-Unbolt firewall mount wires can be pulled thru wall.
*Side Note- while motor is out you want to drill the head for coolant temp sensor. See post 7
.Next get all the wires around and underneath the coolant tank.
.Now Jack the car up passenger side and get the passenger side transmission connection.
.Either reach over and unplug drivers side connection on tranny. If you cant jack the other side up.
.Now half the harness is out but still attached the the drivers side.
.Remove battery
.Remove main engine harness from firewall, remove shield from connection expose wires on harness, bolt is running thru the middle of connection remove it.POST 7
.Slide the upper connection away from lower
.Disconnect fuse block (one behind where battery was)
.make sure all connections are undone and pull fuse panel thru the top
.Wire harness is removed
POST 7Step 2.Tie back any wires and accessories that may get in the way.
.Make sure that you notched the frame to allow the ac to clear. POST 7
.ASR needs to be unbolted the coils may hit it so I removed it. You dont need it anyway its useless.
. Have a jack underneath supporting tranny weight. Tranny will basically be as high up as it can go.
.Cut out two 2x2 peices of 2x4 and make them into a shape that will fit in motor mount. This will give you the distance of the motor mount. Good for doing a mock up. POST 7
.Lower engine into cradle area make sure to have someone underneath. Cause you can line the tranny up and connect it to the motor. Allow the engine to rest on the wood motor mounts. Your connected. POST 53 -So as you may notice it is pretty far off. About a inch needs to be made up to push the engine forward. The fix for me was buying a Dana 44 that has a 1 inch longer snout on it.
.Install solid motor mounts See POST 23( I went with these after the volve mounts failed)
. The bolts for the cbeam and engine will fall right into place.
- At this point the engine is mounted, tranny is in place, and rear is connected.
STEP 3
. Install headers
-POST 61 Will show you uncoated Melrose Headers
-POST 73 Will show you the modified and coated Header for AC option.
STEP 4. Install intake
STEP 5 Install Wireharness POST 73
-Take your time with this and make sure to secure everything properly. Firewall mount will be difficult to secure.
STEP 6. Install starter
-Make sure to add some locktight to the bolts.
STEP 7
.Install braided fuel line and connectors as seen in POST 42
-Now Im about to redo the fuel system. Im going to run a single connection/line from the fuel rail to the spare tire area. I will be mounting the fuel filter on the spare tire brace. So the filter is in a nice area away from motor. I feel safer lol
A lot of misc parts need to be connected. Explanation Below
.Oil pressure with sender T
.Water Temp
.Custom lower radiator hose to change angle
.Custom upper radiator hose to add sensor
.Power steering hose
As you can see everything after step two is simple and self explanitory. You want to make sure you double check connections and that everything is secured nicely. The solid motor mounts are going to vibrate and loosen up poorly tighten connections.
You need to also install a oil pressure sensor using a oil pressure sender T.
Double check install all your hoses. The lower radiator hose will have to be made, I chopped it and made it work using a coupler.
Add the braided custom hose for the power steering because stock will fail after some time.
Last edited by fc_soldier; 12-28-2013 at 05:51 PM.

 02-27-2010, 07:53 PM
#6
Melting Slicks
Thread Starter
I like a challenge and Im going for style points.

This thread is being reserved for LS2 swap questions and comments I dont want it to become a LT1 vs LS2.

Another shot
Last edited by fc_soldier; 02-27-2010 at 09:57 PM.
02-27-2010, 07:57 PM
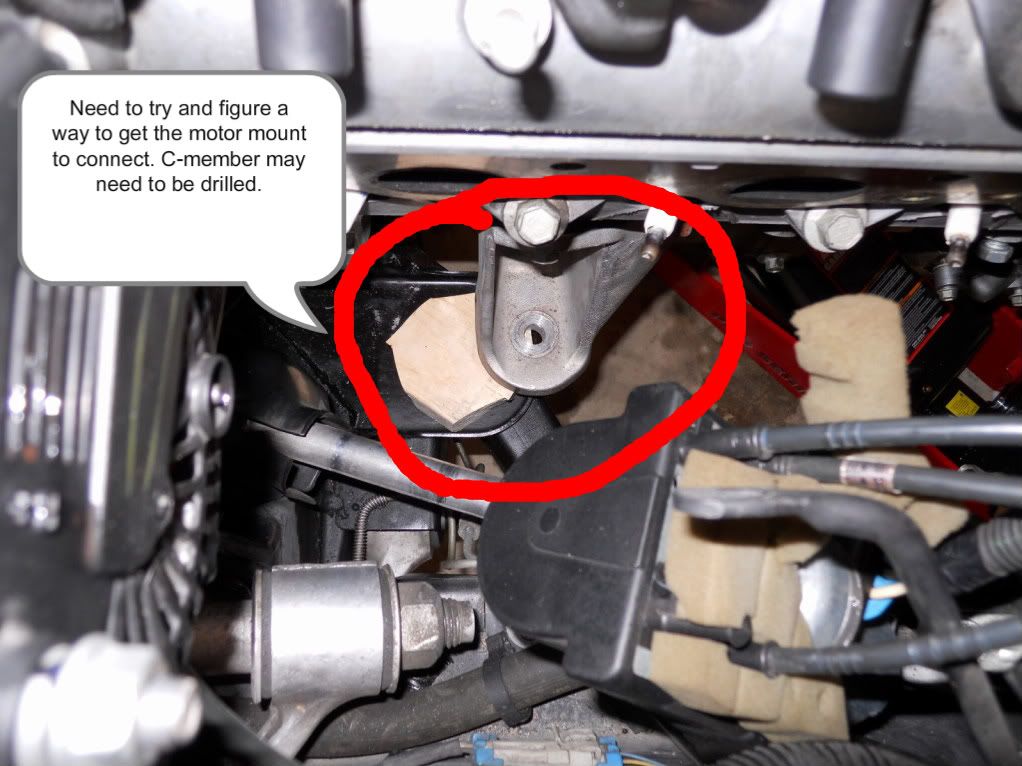
#7
Melting Slicks
Thread Starter
Wire Harness is removed
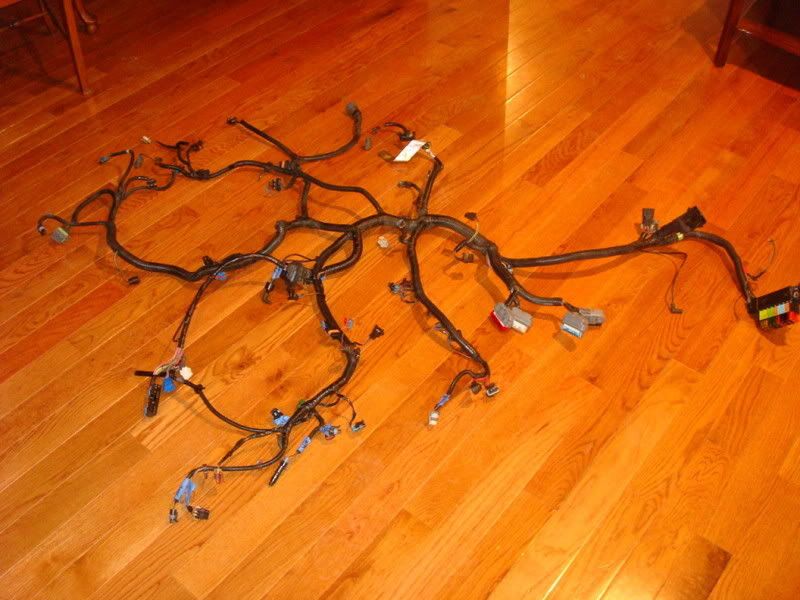
This is a shot of the main wire harness connection on the firewall. The bottom half wire harness that you see is the Lighting and Misc.(not needed by current performance wiring company)

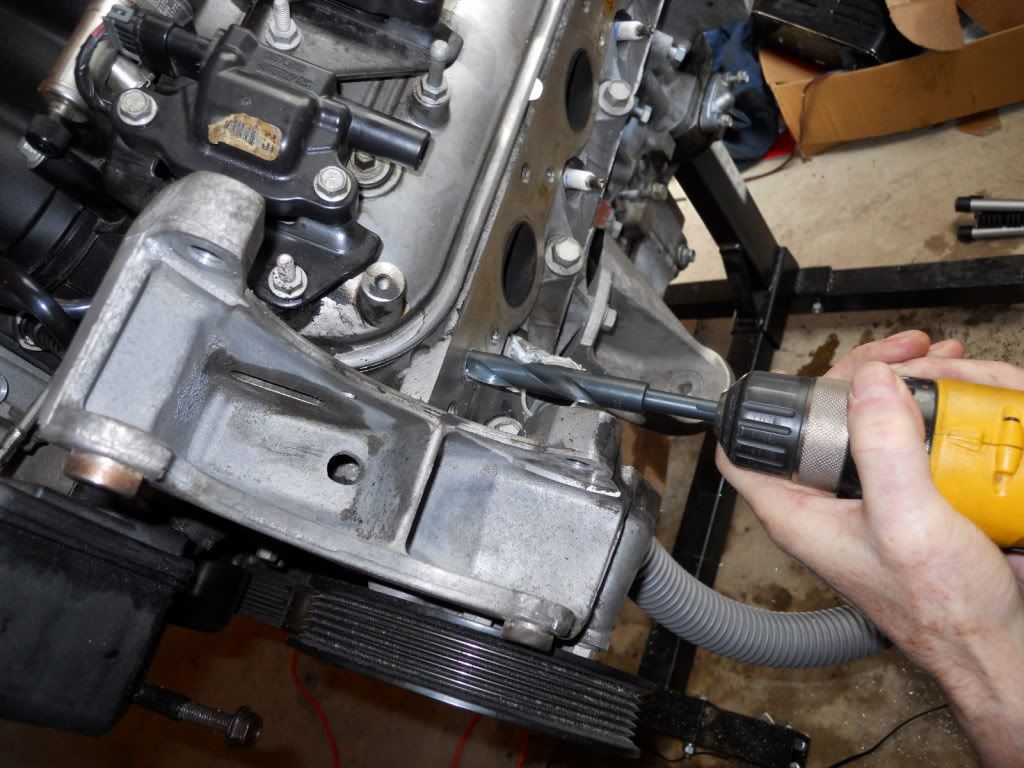
Drilling out for new collant temp. sensor
Cut out room for AC compressor

Motor mount
This is a shot of the main wire harness connection on the firewall. The bottom half wire harness that you see is the Lighting and Misc.(not needed by current performance wiring company)
Drilling out for new collant temp. sensor
Cut out room for AC compressor
Motor mount
Last edited by fc_soldier; 03-07-2010 at 05:43 PM.

 02-27-2010, 08:28 PM
#9
Team Owner


Member Since: Aug 2005
Location: Riverside County Southern California
Posts: 34,988
Received 501 Likes
on
342 Posts
Co-winner 2020 C4 of the Year - Modified
2018 Corvette of Year Finalist
2017 C4 of Year
2016 C7 of Year Finalist
St. Jude Donor '09-'10-'11-'12-'13-'14-'15-'16-'17-'18-'19-'20


Subscribed, This thread got potential.
 02-27-2010, 09:50 PM
#12
Melting Slicks
Thread Starter
The forum has always been there when I need it so I'm giving back alittle.
As I do the steps I will add it to the 2nd post. Underneath will be the pics Ill put ref. numbers in 2nd post.
As I do the steps I will add it to the 2nd post. Underneath will be the pics Ill put ref. numbers in 2nd post.
Last edited by fc_soldier; 02-27-2010 at 10:05 PM.

 02-28-2010, 06:17 PM
#17
Melting Slicks
Thread Starter
Update is that the LS2 is at the shipping carrier. Its getting shipped on monday. It should be here mid next week. Im going to pick it up.
When it gets here I will install a two piece timing cover. So a cam upgrade will be easier next winter.
When it gets here I will install a two piece timing cover. So a cam upgrade will be easier next winter.
02-28-2010, 08:06 PM
#18
Burning Brakes

If you are using the LS engine stands, you can throw the rubber isolaters away. Will be to tall and hood wont close. Good thing is that the engine will sit in the LT1 holes and fit nice.
02-28-2010, 08:12 PM
#19
Racer

if you're keeping the original 4l60e ,this would be the time to get it rebuilt with beefier parts to handle the increased power. i'm just now collecting misc parts to do a ls1 for my 90--m6 to 4l65e.
02-28-2010, 08:30 PM
#20
Melting Slicks
Thread Starter
