L98 valve cover paint
 04-08-2010, 12:53 AM
#1
Instructor

Thread Starter

Member Since: Feb 2010
Location: Schnecksville PA
Posts: 205
Likes: 0
Received 0 Likes
on
0 Posts
... im looking for the paint used on the valve covers... not the grey stuff that mid america, corvette central and others sell..
im looking for the stuff that looks like the slightly goldest tint/ redish tint..
somone on here should know what im talking about... i cant find it for the life of me..
let me know
thx
brian
im looking for the stuff that looks like the slightly goldest tint/ redish tint..
somone on here should know what im talking about... i cant find it for the life of me..
let me know
thx
brian
 04-08-2010, 05:12 AM
#2


... im looking for the paint used on the valve covers... not the grey stuff that mid america, corvette central and others sell..
im looking for the stuff that looks like the slightly goldest tint/ redish tint..
somone on here should know what im talking about... i cant find it for the life of me..
let me know
thx
brian
im looking for the stuff that looks like the slightly goldest tint/ redish tint..
somone on here should know what im talking about... i cant find it for the life of me..
let me know
thx
brian
04-08-2010, 05:52 AM
#3
Instructor
Thread Starter
Member Since: Feb 2010
Location: Schnecksville PA
Posts: 205
Likes: 0
Received 0 Likes
on
0 Posts
u mean to say that the majority of the l98 head valve covers that are NOT grey are wrong? or maybe they are just tarnished? or the coating is changing color ?
04-08-2010, 06:38 AM
#4
this is original correct factory color:

this is what happens because of time and temperature:

these are my 85's covers after (corvette central) paint:
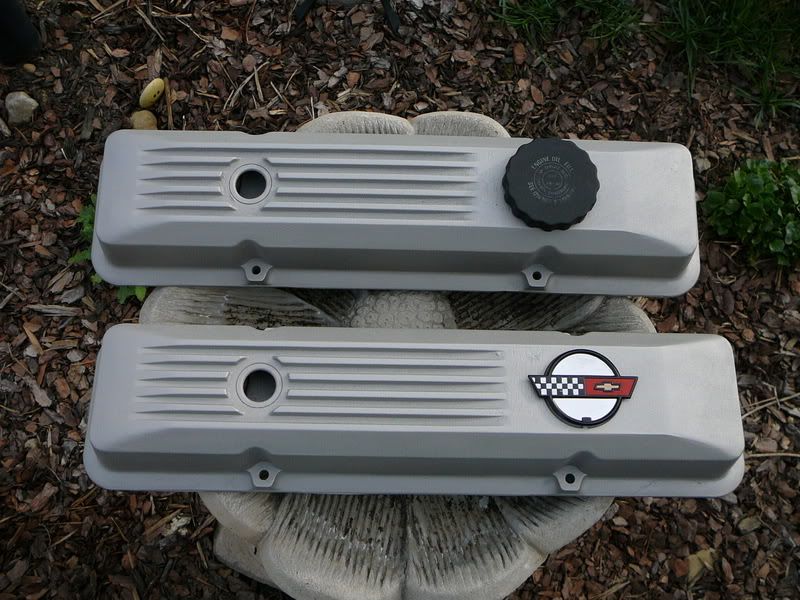

hope this helps...
Last edited by Joe C; 04-08-2010 at 09:28 AM.
04-08-2010, 07:13 AM
#5
I think people just pick up different colors from a local auto parts store fora different color. I did and it works just fine, I drive for about an hour to school and back so it get hot. doesn't peel or anything.
04-08-2010, 01:01 PM
#6
Instructor

That reddish-brown color is the natural color of the rocker cover prior to paint. If that is the color you want, strip the paint off.
That's how I ended up "painting" mine that color. One of these days when I don't have anything else to fix on the car, I'll get the paint the Corvette vendors sell and repaint mine. They'll be reddish-brown for a long time
That's how I ended up "painting" mine that color. One of these days when I don't have anything else to fix on the car, I'll get the paint the Corvette vendors sell and repaint mine. They'll be reddish-brown for a long time

 I used the stuff from MAM and it worked fine for me.

 08-14-2010, 09:28 PM
#11
Safety Car

well, i have noticed that the valve covers turn a reddish-brown color due to time and temperature. the original color is really not gray, but a whitish-silver color with just a very slight tint of gold. i guess its supposed to represent the color of magnesium. the aftermarket paint may not be 100% color correct, but it about as good as you're going to find...
this is original correct factory color:
this is what happens because of time and temperature:
these are my 85's covers after (corvette central) paint:
hope this helps...
this is original correct factory color:
this is what happens because of time and temperature:
these are my 85's covers after (corvette central) paint:
hope this helps...
It is just some "nickle"colored off the shelf spray paint (used to show in catalog as custom blended Performance Choice, but is just now Home Depot stuff- for $20).

Kinda pissed when I had it all apart only to find this crappy color match at the end of the project.
Considering ordering CC paint, sandblasting off the MAM and repainting (starting over).
PITA to remove driver's side cover tho. Removed the WW motor to get acess on mine.
I guess the second time around will be faster, but it took me like 4 hrs the first time.

PS: Also the gaskets MAM sells are crap. Just Mr gasket corkers. Re-used the OEM metal backed rubber lip seal type. Need to buy some new PCV grommets anyhow as I kinda chewed them up removing vs. masking.
Last edited by bub; 08-15-2010 at 10:55 AM.
 08-14-2010, 10:41 PM
#13
Pro


Member Since: Nov 2005
Location: North Bay Ontario
Posts: 602
Likes: 0
Received 0 Likes
on
0 Posts

The silver-grey hi temp Rustoleum paint sold at Home Depot is pretty good stuff. It was recommended a couple of years ago to me on this forum and it was a very close match. I thought the valve covers were supposed to be a goldish colour too, when I first got my 'vette!
08-15-2010, 12:08 AM
#14
Safety Car
The MAM "special blended paint"...

The corkers...

The mismatch...


Passenger side still stock...


Some general undershood shots while I'm posting


The corkers...
The mismatch...
Passenger side still stock...
Some general undershood shots while I'm posting
Last edited by bub; 08-15-2010 at 12:11 AM.
08-15-2010, 10:21 AM
#15
Safety Car
Ad for reference...

Corresponding text:
"Heat discoloration on late model Corvette valve covers occurs due to heat and chemicals on the engine. In the past, we've seen several "attempts" at the correct tint. Now, we're confident that you'll look no further once you've tried our PERFORMANCE CHOICE Valve Cover Paint, our own blend color-matched to new GM valve covers. One 12 oz. can will completely refinish both valve covers, leaving extra for touch-ups at shows. Don't forget new gaskets and the drivers side emblem."
Maybe a bogus return item that got shipped out by mistake?
Calling MAM on Monday an will return stuff at Funfest.
Last edited by bub; 08-15-2010 at 10:59 AM.
08-15-2010, 12:32 PM
#16
Drifting

Member Since: May 2010
Location: Gaithersburg MD A member since 2007 but then the computer crashed and then the car crash loss of memory X 2
Posts: 1,990
Likes: 0
Received 0 Likes
on
0 Posts
Here's another take on the discoloration issue.
I bought a blasting cabinet from Harbor Freight and blasting media, walnut shells, and different grades of aluminum oxide, and blasting sand. Also the good old white cleaned, strained play sand from Toys R Us for really heavy deposits, like on caliper surfaces.
I've blasted calipers, spindles, throttle bodies, intakes, water pumps, valve covers, a/c and alternator brackets and pretty much anything that will fit in the cabinet. Caliper piston bores, spindle bores, throttle bodies, and any critical openings were masked off with Duct Tape PRIOR to blasting. Rusted screws are held in place by jamming them in a piece of heavy cardboard and nuts work well being slipped on to metal shower curtain holders or the $.99 caribieners sold at Home Depot or Lowes.
A more flexible, smaller diameter air hose attached to the blasting gun makes movement of the blasting gun inside the cabinet much easier. Slip the air hose through a hole in a rectangular piece of an old inner tube duct taped to the back of the cabinet for better sealing. Securing or containing the blasting gun pick up hose at the bottom side of the cabinet with a couple 3/4" metal or plastic conduit clamps allows the pick-up hose to move easier with the gun's movement inside the cabinet. The end of the pick-up hose will stay in place better and will provide a constant flow of the blasting media. Changing the media is easy and it can be re-used as needed.
Cleaning the item(s) afterwards with an air blast then soapy warm water, rinse with a hose or put part in a bucket of water and agitate, allow to dry, inspect for any residual media, air blast and clean with more soapy water and rinse again if needed.
Depending on the media used it will either bring the finish back to original or a step above. Some of the media if small enough even lightly polishes the material being blasted like upper and lower control arms. You can even go one step farther using an air grinder with a 4" buffing wheel and approproiate rouge to highly polish those upper and lower control arms. To preserve a shiny, polished finish a few layers of clear coat afterwards makes care, cleaning and long term appearance and finish better and last much longer.
I haven't tried soda blasting yet but that's next.
Last edited by larry93lt1; 08-15-2010 at 01:43 PM.
09-07-2010, 12:30 PM
#18
Race Director


Here is a brand new L98 that Mid America has on display in MY Garage at Effingham, IL.


07-24-2015, 09:21 AM
#19
Heel & Toe

Member Since: Jun 2007
Posts: 22
Likes: 0
Received 0 Likes
on
0 Posts
Corvette Central paint now looks exactly like the can pictured above. It is WAY too bright, and looks about the same as Krylon Dull Aluminum. Wasted my money on this, as I will not use it. Terrible match.
Anyone have any other ideas on what paint comes closed to the NOS covers pictured above?
Anyone have any other ideas on what paint comes closed to the NOS covers pictured above?
09-08-2015, 08:15 PM
#20
Intermediate
Member Since: Sep 2010
Location: LaVale Maryland
Posts: 41
Likes: 0
Received 0 Likes
on
0 Posts
Corvette Central paint now looks exactly like the can pictured above. It is WAY too bright, and looks about the same as Krylon Dull Aluminum. Wasted my money on this, as I will not use it. Terrible match.
Anyone have any other ideas on what paint comes closed to the NOS covers pictured above?
Anyone have any other ideas on what paint comes closed to the NOS covers pictured above?
http://www.corvetteamerica.com/cf/di...ord%3A%20paint