


 Loosen the 15mm head bolt below the alternator at the pivot point on the bracket. This will allow the alternator to rotate toward the center of the motor and your bolt will line up.


tpis air pump eliminator

Thread Starter
Heel & Toe

Joined: Dec 2005
Posts: 23
Likes: 0
From: Mississauga Ontario
 tpis air pump eliminator
I purchased a tpis air pump eliminator for my 85 auto.My problem is the arm hits the top of the alternator.I'm about a half a hole out.Has anybody else run into this?

Le Mans Master


Joined: Aug 2007
Posts: 8,735
Likes: 412
From: WV
I think your having this problem because on your year car the belt has to be changed to a 2" shorter belt..Just bolt the eliminator up solid and then change to a shorter belt.. WW
Thread Starter
Heel & Toe
Joined: Dec 2005
Posts: 23
Likes: 0
From: Mississauga Ontario
I found on a previous post that they had to grind down the alternator housing to get the arm to fit.My question now is, is it better to grind down the housing or the arm? Thanks
Race Director


Joined: Nov 2003
Posts: 12,221
Likes: 446
From: Overland Park Kansas
2020 Corvette of the Year Finalist (appearance mods)
C4 of Year Winner (appearance mods) 2019
Edit:
Actually, you probably put it together wrong. Notice how the alt support has to run in front of the alternator.
It will look like this...

Last edited by GREGGPENN; Jun 2, 2010 at 09:58 PM.
Race Director
Joined: Apr 2003
Posts: 17,700
Likes: 1,667
From: moraga ca

Pro


Joined: Feb 2007
Posts: 740
Likes: 2
From: San Antonio TX
Race Director
Joined: Nov 2003
Posts: 12,221
Likes: 446
From: Overland Park Kansas
2020 Corvette of the Year Finalist (appearance mods)
C4 of Year Winner (appearance mods) 2019
Thanks! Everything was cleaned, some parts bead blasted, painted, and baked for durability. Plus, I decided to reverse colors of the brackets and pulleys. I wanted the brackets to be less distracting.
This was after my test assembly.
(FWIW, I had to shorter all bolts a couple of threads and elongate one hole in the alt braket. That's because AFR's pattern was slightly off from an L98. Also, there accessory holes weren't quite as deep. Guess it shouldn't surprise me after I found their valve cover rim also didn't match stock. I've heard they don't call it making mods for nothing. But, I gotta wonder why these people can't copy some of the stock stuff better. (It's a d@mn good thing these heads are supposed to work well!)
This was after my test assembly.
(FWIW, I had to shorter all bolts a couple of threads and elongate one hole in the alt braket. That's because AFR's pattern was slightly off from an L98. Also, there accessory holes weren't quite as deep. Guess it shouldn't surprise me after I found their valve cover rim also didn't match stock. I've heard they don't call it making mods for nothing. But, I gotta wonder why these people can't copy some of the stock stuff better. (It's a d@mn good thing these heads are supposed to work well!)
Corvette Stories
The Best of Corvette for Corvette Enthusiasts

10 Reasons the C6 Z06 is Still A Performance Benchmark After 20 Years
Joe Kucinski
How Much Horsepower Every Corvette Engine "LOST" in 1972
Joe Kucinski
Top 10 DOs and DON'Ts for Protecting Your Convertible Top!
Michael S. Palmer
Top 10 Most Explosive Corvettes Ever Made: Power-to-Weight Ratio Ranked!
Joe Kucinski
150 hp to 1,250 hp: Every Corvette Generation Compared by the Specs That Matter
Joe Kucinski
8 Coolest Corvette Pace Cars (and Replicas) of All Time
Verdad Gallardo
Top 10 Corvette Engines RANKED by Peak Torque (70+ Years of Muscle!)
Joe Kucinski
Corvette ZR1X Will Be Pacing the Indy 500, And Could Probably Race, Too!
Verdad Gallardo
Top 10 Corvettes Coming to Mecum Indy 2026!
Brett Foote
Le Mans Master
Joined: Aug 2007
Posts: 8,735
Likes: 412
From: WV
Thanks! Everything was cleaned, some parts bead blasted, painted, and baked for durability. Plus, I decided to reverse colors of the brackets and pulleys. I wanted the brackets to be less distracting.
This was after my test assembly.
(FWIW, I had to shorter all bolts a couple of threads and elongate one hole in the alt braket. That's because AFR's pattern was slightly off from an L98. Also, there accessory holes weren't quite as deep. Guess it shouldn't surprise me after I found their valve cover rim also didn't match stock. I've heard they don't call it making mods for nothing. But, I gotta wonder why these people can't copy some of the stock stuff better. (It's a d@mn good thing these heads are supposed to work well!)
This was after my test assembly.
(FWIW, I had to shorter all bolts a couple of threads and elongate one hole in the alt braket. That's because AFR's pattern was slightly off from an L98. Also, there accessory holes weren't quite as deep. Guess it shouldn't surprise me after I found their valve cover rim also didn't match stock. I've heard they don't call it making mods for nothing. But, I gotta wonder why these people can't copy some of the stock stuff better. (It's a d@mn good thing these heads are supposed to work well!)
On my Dart Pro 1 heads, they are missing one of the holes on the head that holds the A/C bracket on...Now, you tell me why they couldn't put the same holes in there heads as the stock heads have so I could use all the bolts needed to hold the bracket.????
 ..WW
..WW PS::Also, to the original poster, you are still going to have to buy a shorter belt after your done..It says so in the instructions I got with my TPIS bracket..... WW
Last edited by WW7; Jun 3, 2010 at 08:51 AM.
Thread Starter
Heel & Toe
Joined: Dec 2005
Posts: 23
Likes: 0
From: Mississauga Ontario
I think I need to start from the beginning.I've been collecting parts for years for an engine change and I'm just about finished the installation.From reading the posts over the years I built a 383 roller, 10.9 cr, comp .525 int and exh cam.Everything has been replaced with aftermarket. I was trying to figure out what to do about the bracket that goes from the alternator to the first and second header bolt and the arm going from the alternator to the third bolt.The only bolt I have in place is the lower alternator bolt and it is loose.From the picture above I have It installed correctly.Still the TPIS arm comes up hard against the alt housing so I can't get the bolt in.My 85 was built in Oct 84.Could it be they changed the design of the alternator after that?
Le Mans Master
Joined: Aug 2007
Posts: 8,735
Likes: 412
From: WV
Its possible that its a different alternator, I just went to the TPIS site and they say it fits the 85 up, nothing about fitting the 84..What you need to do is find out if the alternator you have is the same as all the other 85s and if maybe its been changed before you got the car.As far as the support bracket that goes to the back of the alternator, what I did was cut the bracket in half,then bolt one half to the alternator and the other end to the 3rd bolt on the headers. Next get a piece of bar stock or a long bolt with the head cut off that fits up inside the 2 halfs and weld it in or if you don't have a welder mark them and have them welded somewhere else You may have to bend the ends a little where they bolt up ..If you need pictures of mine let me know and I will shoot some and post them for you....WW
Last edited by WW7; Jun 3, 2010 at 11:07 AM.
Thread Starter
Heel & Toe
Joined: Dec 2005
Posts: 23
Likes: 0
From: Mississauga Ontario
Thanks WW pictures would be great.I've owned my 85 since 1988 and bought it from the original owner. I'm pretty sure the alternator is the original because it only had 30,000 miles. Could anybody else with an 85 take a picture of their alternator.Thanks
Race Director
Joined: Nov 2003
Posts: 12,221
Likes: 446
From: Overland Park Kansas
2020 Corvette of the Year Finalist (appearance mods)
C4 of Year Winner (appearance mods) 2019
AFR put all the holes there. They drilled them a hair shallower plus the patter was off enough that I had to elongate one of the holes in the alt bracket.
Le Mans Master
Joined: Aug 2007
Posts: 8,735
Likes: 412
From: WV
I wasn't asking anything, I was just saying I have ( Dart pro 1 heads) that don't have one of the holes drilled for the A/C bracket..I was just commenting that they should make aftermarket heads with the same holes as the stock heads so everything would bolt up like the original heads...WW
Last edited by WW7; Jun 3, 2010 at 06:00 PM.
Le Mans Master
Joined: Aug 2007
Posts: 8,735
Likes: 412
From: WV
George,
In these pics you can see where I cut the original bracket and put a piece of round bar stock inside both ends then welded the 2 ends to make a new bracket,you can't see the left side because the wires are blocking it. This is one of the easiest ways to fix the problem. With the Hooker headers they give you the little short tubes so you can use your original bolts so they stick out to the stock position.. You just have to use the third hole back instead of the second hole.This actually looks pretty good once you grind the weld smooth and paint them..Hope this helps...WW
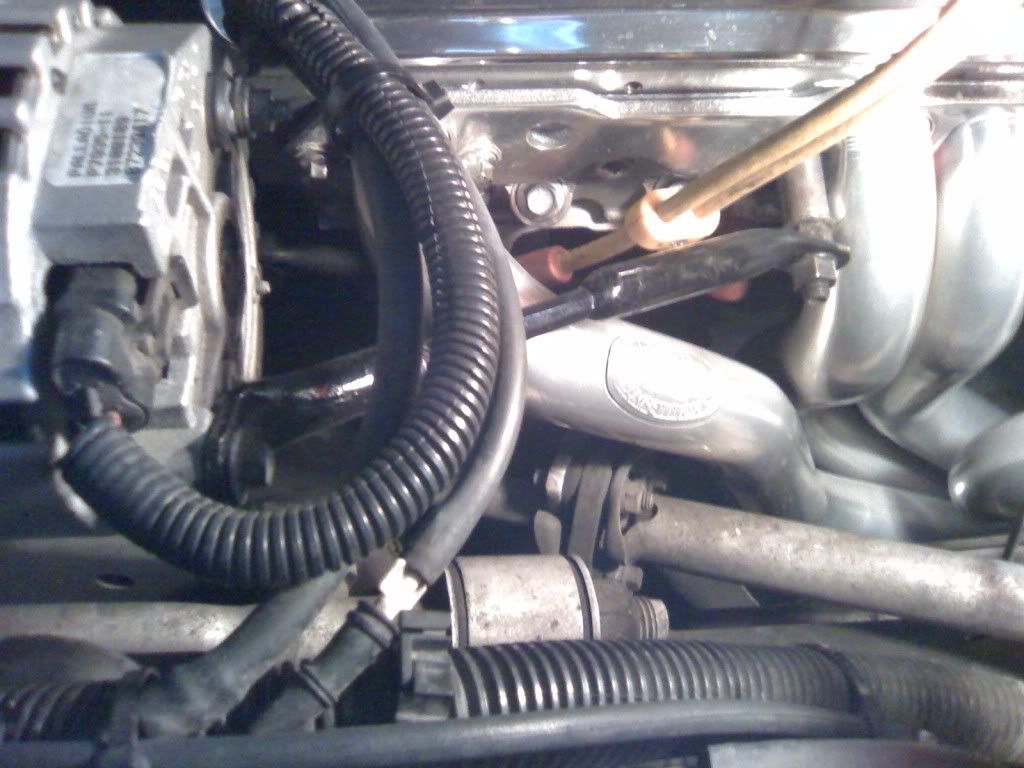

In these pics you can see where I cut the original bracket and put a piece of round bar stock inside both ends then welded the 2 ends to make a new bracket,you can't see the left side because the wires are blocking it. This is one of the easiest ways to fix the problem. With the Hooker headers they give you the little short tubes so you can use your original bolts so they stick out to the stock position.. You just have to use the third hole back instead of the second hole.This actually looks pretty good once you grind the weld smooth and paint them..Hope this helps...WW
Last edited by WW7; Jun 3, 2010 at 10:08 PM.
Safety Car

Joined: Nov 2008
Posts: 4,328
Likes: 15
From: Jacksonville FL
You could check at an auto parts supplier for a different cased alt or slot the elim bracket mounting holes. I always prepare to mod anything non OEM I try to install 'cause it just seems to be my luck.

I ended up using a 1" shorter belt too.
Good Luck!
Race Director
Joined: Nov 2003
Posts: 12,221
Likes: 446
From: Overland Park Kansas
2020 Corvette of the Year Finalist (appearance mods)
C4 of Year Winner (appearance mods) 2019
Race Director
Joined: Nov 2003
Posts: 12,221
Likes: 446
From: Overland Park Kansas
2020 Corvette of the Year Finalist (appearance mods)
C4 of Year Winner (appearance mods) 2019
The A/C was still connected -- in the car. Kinda hard to run a belt like that! When I suggested the kit might have the bar reversed, it's because I did the same thing too.
Good catch with your post though. I had it reversed in the pic already posted. I found another pic on my computer where it's assembled correctly. I should look this this....
