


steps to replace optispark?

Thread Starter
Advanced

Joined: Aug 2008
Posts: 59
Likes: 0
From: odessa MO
 steps to replace optispark?
i have a 92 lt1, i bought a new optispark and im thinking about tyring to put it in myself? what things do i have to remove in order to get to it? any tips to make it easier? anything else i should do while i got it out? what problems should i expect to run into? any help appreciated....

Le Mans Master


Joined: Mar 2010
Posts: 8,172
Likes: 17
From: Eugene Oregon
I believe in the Beer Fairy
St. Jude Donor '15,'19
this guys post helped me out a lot on my job, he is a little vague in some areas especially on the removal of the crank pulley but you can pretty much follow it step by step, after a lot of reading and searching on the forum i decided to remove the pulley by getting under the car with a 5/8 dowel and tapping very lightly on the inside of the pulley, but only at the the center edge, 2 small taps each side then go up and turn the pulley a quarter turn and go back downstairs and repeat these steps. i did this 3 or 4 times and it came right off. this was by far the worst part, i have decided to replace the Optispark, water pump, plugs and wires, belt tensioner, idler pulley, belt, Opti seal, water pump seal,
and cleaned the throttle body while i was at it in hopes i wont have to do this ever again, good luck with yours.
http://forums.corvetteforum.com/c4-t...-pictures.html
and cleaned the throttle body while i was at it in hopes i wont have to do this ever again, good luck with yours.
http://forums.corvetteforum.com/c4-t...-pictures.html
Heel & Toe

Joined: Aug 2010
Posts: 23
Likes: 0
i have a 92 lt1, i bought a new optispark and im thinking about tyring to put it in myself? what things do i have to remove in order to get to it? any tips to make it easier? anything else i should do while i got it out? what problems should i expect to run into? any help appreciated....

When you attach the spark plug wires to the Opti Spark itself, make sure that the wires are snapped on properly (you DO NOT want any misfires on any cylinders!!!!) Best of Luck with your job!


Le Mans Master
Joined: Feb 2000
Posts: 9,715
Likes: 27
From: Kempner Texas
These are the instructions that come with the Accel Opti. I typed up one for my son's use when he changed his Opti, but his car is a 96 and uses a different type Opti so they'll differ from what your engine calls for.
ULTRA OPTI-SPARK II DISTRIBUTOR P/N 59125
ULTRA OPTI-SPARK II CAP & ROTOR KIT P/N 8136
INSTALLATION INSTRUCTIONS
FORM INS-59125 Rev. 6/07
GENERAL
First make sure your vehicle is equipped with an Opti-Spark II type (pin drive – with positive vent system) distributor. It is not necessary to remove the
distributor from the engine to determine if it is an Opti-Spark II or not. Simply look for the intake manifold vacuum hose line and air intake hose line
running to the distributor.
The older Opti-Spark I distributors are not vented and do not have these hose connections. If the distributor is removed from the engine, the Opti-Spark II unit will have anon-splined pin shaft.
REMOVING/INSTALLING NEW OPTI-SPARK II DISTRIBUTOR
NOTE: It is best to have a vehicle service manual for detailed reference on removal and installation of sensor and accessories.
1. Disconnect the negative side of the battery.
2. Drain coolant from cooling system.
3. Disconnect the mass air flow (MAF) and the intake air temperature (IAT) sensors. Next, remove the air intake elbow.
4. Remove upper radiator hose.
5. Remove serpentine belt. Remove the belt tensioner.
6. If necessary remove the cooling fans.
7
. Remove the crankshaft pulley. Note: a balancer removal tool may be required.
8. Position the crankshaft hub as in Figure 4
9. Disconnect and remove the air pump wires and hose’s then remove the air pump.
10. Remove the air pump mounting bracket.
11. Disconnect the coolant temperature sensor (ECT) wire harness from the water pump.
12. Remove the lower radiator and heater hoses from the water pump.
13. Remove the water pump.
14. Be sure to mark the location of the spark plug wires and then remove.
15. Remove vacuum lines and wire harness and coil wire from existing Opt-Spark II.
16. Remove the 3 bolts holding the Opti-Spark II to the engine.
17. Once the old distributor is removed, make sure that both the old pin shaft drive seals are still in place on the pin shaft drive assembly on the back side of the distributor. If not, remove the seals from inside the end of the cam shaft.
18. Important: DO NOT lube Opti-Spark hub or timing cover seal, the seal is Teflon and MUST be installed dry or it will leak oil.
19. When installing the ACCEL Ultra Opti-Spark II, be sure to use the correct index on the pin drive shaft. This index is the only location that the dowel pin on the camshaft properly seats into.
20. Note: You will notice that if the correct index is not used that the distributor will not seat properly and rock against the engine. DO NOT tighten the bolts down.
Remove the ACCEL Ultra Opti-Spark II and reinstall using the correct index.
21. DO NOT force the electrical connector in. If you have difficulties seating the connector remove the connector and check the pins in the Optispark.
If they are bent you can use a long flat blade screwdriver and gently straighten the pins.
22. Reinstall accessories and sensors in reverse order to complete installation.
NOTE: It is best to have a vehicle service manual for detailed reference on removal and installation of sensor and accessories.
Hope this helps.
Jake
ULTRA OPTI-SPARK II DISTRIBUTOR P/N 59125
ULTRA OPTI-SPARK II CAP & ROTOR KIT P/N 8136
INSTALLATION INSTRUCTIONS
FORM INS-59125 Rev. 6/07
GENERAL
First make sure your vehicle is equipped with an Opti-Spark II type (pin drive – with positive vent system) distributor. It is not necessary to remove the
distributor from the engine to determine if it is an Opti-Spark II or not. Simply look for the intake manifold vacuum hose line and air intake hose line
running to the distributor.
The older Opti-Spark I distributors are not vented and do not have these hose connections. If the distributor is removed from the engine, the Opti-Spark II unit will have anon-splined pin shaft.
REMOVING/INSTALLING NEW OPTI-SPARK II DISTRIBUTOR
NOTE: It is best to have a vehicle service manual for detailed reference on removal and installation of sensor and accessories.
1. Disconnect the negative side of the battery.
2. Drain coolant from cooling system.
3. Disconnect the mass air flow (MAF) and the intake air temperature (IAT) sensors. Next, remove the air intake elbow.
4. Remove upper radiator hose.
5. Remove serpentine belt. Remove the belt tensioner.
6. If necessary remove the cooling fans.
7
. Remove the crankshaft pulley. Note: a balancer removal tool may be required.
8. Position the crankshaft hub as in Figure 4
9. Disconnect and remove the air pump wires and hose’s then remove the air pump.
10. Remove the air pump mounting bracket.
11. Disconnect the coolant temperature sensor (ECT) wire harness from the water pump.
12. Remove the lower radiator and heater hoses from the water pump.
13. Remove the water pump.
14. Be sure to mark the location of the spark plug wires and then remove.
15. Remove vacuum lines and wire harness and coil wire from existing Opt-Spark II.
16. Remove the 3 bolts holding the Opti-Spark II to the engine.
17. Once the old distributor is removed, make sure that both the old pin shaft drive seals are still in place on the pin shaft drive assembly on the back side of the distributor. If not, remove the seals from inside the end of the cam shaft.
18. Important: DO NOT lube Opti-Spark hub or timing cover seal, the seal is Teflon and MUST be installed dry or it will leak oil.
19. When installing the ACCEL Ultra Opti-Spark II, be sure to use the correct index on the pin drive shaft. This index is the only location that the dowel pin on the camshaft properly seats into.
20. Note: You will notice that if the correct index is not used that the distributor will not seat properly and rock against the engine. DO NOT tighten the bolts down.
Remove the ACCEL Ultra Opti-Spark II and reinstall using the correct index.
21. DO NOT force the electrical connector in. If you have difficulties seating the connector remove the connector and check the pins in the Optispark.
If they are bent you can use a long flat blade screwdriver and gently straighten the pins.
22. Reinstall accessories and sensors in reverse order to complete installation.
NOTE: It is best to have a vehicle service manual for detailed reference on removal and installation of sensor and accessories.
Hope this helps.
Jake
Le Mans Master
Joined: Feb 2000
Posts: 9,715
Likes: 27
From: Kempner Texas
The one I typed up for my son is 8 pages long and has some 64 bullet points - so it's rather long and detailed.
Since my son is in VA and I'm in TX and since he's a NEWBIE who's just now learning how to work on these engines, I decided to make the directions very detailed - which out of necessity made them long - and email them to him.
In writing it, I recalled those things that caused me pause when I was changing an Opti for the first time. My thinking was that if it caused ME pause it certainly would give HIM pause. So I included directions on how deal with all the "little" things that come up. The "little" things like how to remove the balancer, the water pump, how to install the W/P gaskets, how to access certain bolts, etc.
Jake
Since my son is in VA and I'm in TX and since he's a NEWBIE who's just now learning how to work on these engines, I decided to make the directions very detailed - which out of necessity made them long - and email them to him.
In writing it, I recalled those things that caused me pause when I was changing an Opti for the first time. My thinking was that if it caused ME pause it certainly would give HIM pause. So I included directions on how deal with all the "little" things that come up. The "little" things like how to remove the balancer, the water pump, how to install the W/P gaskets, how to access certain bolts, etc.
Jake
Last edited by JAKE; Sep 21, 2010 at 06:11 PM.
Instructor
Joined: Feb 2009
Posts: 204
Likes: 0
From: Pinellas Park Florida
this guys post helped me out a lot on my job, he is a little vague in some areas especially on the removal of the crank pulley but you can pretty much follow it step by step, after a lot of reading and searching on the forum i decided to remove the pulley by getting under the car with a 5/8 dowel and tapping very lightly on the inside of the pulley, but only at the the center edge, 2 small taps each side then go up and turn the pulley a quarter turn and go back downstairs and repeat these steps. i did this 3 or 4 times and it came right off. this was by far the worst part, i have decided to replace the Optispark, water pump, plugs and wires, belt tensioner, idler pulley, belt, Opti seal, water pump seal,
and cleaned the throttle body while i was at it in hopes i wont have to do this ever again, good luck with yours.
http://forums.corvetteforum.com/c4-t...-pictures.html
and cleaned the throttle body while i was at it in hopes i wont have to do this ever again, good luck with yours.
http://forums.corvetteforum.com/c4-t...-pictures.html

Le Mans Master


Joined: Mar 2001
Posts: 7,999
Likes: 14
From: Life is just one big track event. Everything before and after is prep and warm-up and cool-down laps
Cruise-In III Veteran
Cruise-In IV Veteran
St. Jude Donor '12
Tips on draining the coolant:
Drain Radiator first
Remove the metal shield over the passenger knock sensor
Place a pan under the sensor to catch the water
remove the knock sensor
Repeat on the driver side
If you are not replacing the knock sensors coat the threads on the old ones with the same permatex thread sealer you use on the waterpump bolts.
Don't forget there are 6 (six) waterpump bolts. Don't lose the waterpump drive coupler.
DO NOT FORCE THE NEW OPTI ON! it should "pop" on if you have it aligned properly.
Drain Radiator first
Remove the metal shield over the passenger knock sensor
Place a pan under the sensor to catch the water
remove the knock sensor
Repeat on the driver side
If you are not replacing the knock sensors coat the threads on the old ones with the same permatex thread sealer you use on the waterpump bolts.
Don't forget there are 6 (six) waterpump bolts. Don't lose the waterpump drive coupler.
DO NOT FORCE THE NEW OPTI ON! it should "pop" on if you have it aligned properly.

Pro

Joined: Jun 2008
Posts: 610
Likes: 1
One of the most problematical steps seems to be the crankshaft pulley.
I haven't read any of the guides that have been posted so I don't know what they say about it.
The method I used (on an automatic) was to hold the center bolt with a socket and breaker bar while removing the three outer bolts with another tool. It took a sharp rap with a hammer to break each one loose.
Then you will most likely find that the balance wheel is stuck to the hub with crud.
I soaked mine with penetrating oil, and found the wheel was still stuck to the hub with crud. So you can probably omit that step.
You must go from underneath to knock the wheel off the hub. I could not find a way to get a decent blow on it with anything made of wood, so I used a metal bar (lady slipper) which enabled me to direct the force where I wanted it - at the center very near the hub.
This of course put an unimportant ding or two in my balance wheel which bothers me to no end every time I start the engine. It also removed the balky part with ease.
A little clean up while you have it apart and it slips back together with room to spare.
I haven't read any of the guides that have been posted so I don't know what they say about it.
The method I used (on an automatic) was to hold the center bolt with a socket and breaker bar while removing the three outer bolts with another tool. It took a sharp rap with a hammer to break each one loose.
Then you will most likely find that the balance wheel is stuck to the hub with crud.
I soaked mine with penetrating oil, and found the wheel was still stuck to the hub with crud. So you can probably omit that step.
You must go from underneath to knock the wheel off the hub. I could not find a way to get a decent blow on it with anything made of wood, so I used a metal bar (lady slipper) which enabled me to direct the force where I wanted it - at the center very near the hub.
This of course put an unimportant ding or two in my balance wheel which bothers me to no end every time I start the engine. It also removed the balky part with ease.
A little clean up while you have it apart and it slips back together with room to spare.
Corvette Stories
The Best of Corvette for Corvette Enthusiasts

5 Best & 5 Worst Corvette Daily Drivers
Joe Kucinski
The Headlights of Every Corvette Generation Explained
Joe Kucinski
5 Best & 5 Most Overrated Corvette Track Packages of All Time!
Joe Kucinski
Every 2027 Corvette Engine Explained
Joe Kucinski
Designer Imagines A Corvette That Looks More Like a Corvette Than the Corvette
Verdad Gallardo
10 Ugly Corvettes That We Still Kinda Love
Joe Kucinski
Top 10 Most Expensive Corvettes Ever Sold on Bring A Trailer
Brett Foote
10 Things Every Corvette Owner Needs (2026 Edition)
Michael S. Palmer
8 Most "Only Corvette Owners Understand" Quirks and Problems
Pouria Savadkouei
Le Mans Master

Joined: May 2005
Posts: 7,377
Likes: 2,297
From: Central Maryland
If you have a good set of general mechanic's tools, and decent mechanical skills, you can tackle the Opti swap yourself. No special tools are required. Here are a few tech tips I wrote up some time ago about doing an Opti swap with new plug wires (HIGHLY recommended while you're doing the Opti, as it's a hideous job to replace the wires with everything fully assembled):
--------
Get a Factory Service Manual, and follow the procedure it lays out.
A few tips (I'm going from memory here, so I'll probably forget a few things):
Drain the cooling system.
Disconnect the MAF sensor and IAT sensor and remove the air intake duct with the MAF and IAT as an assembly.
Disconnect the ECT sensor and remove it from the water pump.
Remove the serpentine belt and tensioner.
You may find that you’ll need to unbolt the coil/ICM bracket from the front of the right cylinder head. I can’t recall for sure whether or not I did.
Unbolt (but don't remove) the power steering pump. This will help you to sneak the new plug wires in/out behind the pump, but may also be somewhat helpful when working on the water pump/Opti.
If you want more room to work, you can remove the radiator, but it isn't strictly necessary, and it involves considerably more work to remove it (I left mine in place).
The FSM will tell you that you need a special Kent-Moore puller to remove the crank pulley/damper. You don't. Here's how to get it off:
1. Raise the front of the vehicle enough that you can get under the car (it's also helpful to have it at a more comfortable height while you're working from above).
2. Remove the three bolts that secure the pulley/damper to the hub.
3. Mark the damper and hub so that you can easily see how to realign them to each other later.
4. Slide under the car with a long pry bar or hardwood dowel (I use a jumbo Snap-On screwdriver that's around two feet long) and a mallet.
5. Place the tip of the pry bar against the rear face of the damper, as close to the hub as possible (Ideally rest the tip alongside of the hub).
6 Give the pry bar a few whacks with the mallet, and with any luck the damper will pop off without too much of a fight.
You may find it helpful to apply a few whacks, then rotate the crankshaft in 120* increments, whacking it a few times at each interval (I haven't needed to do this).
It's also helpful to, if possible, shoot a bit of penetrating oil where the damper meets the hub, a day or more in advance of doing the job.
After you get the damper off, clean the damper/hub mating surfaces to remove all corrosion, etc, and apply a very thin coating of anti-seize compound to these surfaces before you reassemble the damper to the hub. This should make it a lot easier to get the damper off next time.
Once the damper is removed, rotate the crankshaft so that one wing of the damper hub is at the six-o'clock position. This will position the other two wings at around the ten- and two-o'clock positions. In this orientation, the Opti will clear the hub as it is being removed/installed.
The Opti basically unbolts and pulls off as you'd expect, once you have the water pump and damper out of the way.
Once the Opti is out of the way, inspect the shaft seals for the Opti, water pump, and crankshaft. If they show any signs of leakage, replace them now.
When you install the new Opti, be sure to align it correctly with the cam gear, and don't force it into place against the timing cover (do NOT use the bolts to draw it into place). At most, give it a gentle bump with the heel of your hand to encourage it to pop into place.
Reassemble everything else.
Follow the cooling system refill procedure in the FSM carefully, and you'll have no problems with this. In particular, be sure to bleed the air out of the system as it's being refilled. I recommend re-bleeding the system after each of the first three temperature cycles. I usually get a bit more air out by doing this. Be sure to pack rags under the bleeder screws before you open them, to catch the small amount of coolant that will leak out. You do NOT want coolant getting onto the brand new Opti!!! A cooling system pressure tester can dramatically speed up the bleeding process, if you own or can borrow one.
Hope this helps. Best of luck with it.
Live well,
SJW
--------
Get a Factory Service Manual, and follow the procedure it lays out.
A few tips (I'm going from memory here, so I'll probably forget a few things):
Drain the cooling system.
Disconnect the MAF sensor and IAT sensor and remove the air intake duct with the MAF and IAT as an assembly.
Disconnect the ECT sensor and remove it from the water pump.
Remove the serpentine belt and tensioner.
You may find that you’ll need to unbolt the coil/ICM bracket from the front of the right cylinder head. I can’t recall for sure whether or not I did.
Unbolt (but don't remove) the power steering pump. This will help you to sneak the new plug wires in/out behind the pump, but may also be somewhat helpful when working on the water pump/Opti.
If you want more room to work, you can remove the radiator, but it isn't strictly necessary, and it involves considerably more work to remove it (I left mine in place).
The FSM will tell you that you need a special Kent-Moore puller to remove the crank pulley/damper. You don't. Here's how to get it off:
1. Raise the front of the vehicle enough that you can get under the car (it's also helpful to have it at a more comfortable height while you're working from above).
2. Remove the three bolts that secure the pulley/damper to the hub.
3. Mark the damper and hub so that you can easily see how to realign them to each other later.
4. Slide under the car with a long pry bar or hardwood dowel (I use a jumbo Snap-On screwdriver that's around two feet long) and a mallet.
5. Place the tip of the pry bar against the rear face of the damper, as close to the hub as possible (Ideally rest the tip alongside of the hub).
6 Give the pry bar a few whacks with the mallet, and with any luck the damper will pop off without too much of a fight.
You may find it helpful to apply a few whacks, then rotate the crankshaft in 120* increments, whacking it a few times at each interval (I haven't needed to do this).
It's also helpful to, if possible, shoot a bit of penetrating oil where the damper meets the hub, a day or more in advance of doing the job.
After you get the damper off, clean the damper/hub mating surfaces to remove all corrosion, etc, and apply a very thin coating of anti-seize compound to these surfaces before you reassemble the damper to the hub. This should make it a lot easier to get the damper off next time.
Once the damper is removed, rotate the crankshaft so that one wing of the damper hub is at the six-o'clock position. This will position the other two wings at around the ten- and two-o'clock positions. In this orientation, the Opti will clear the hub as it is being removed/installed.
The Opti basically unbolts and pulls off as you'd expect, once you have the water pump and damper out of the way.
Once the Opti is out of the way, inspect the shaft seals for the Opti, water pump, and crankshaft. If they show any signs of leakage, replace them now.
When you install the new Opti, be sure to align it correctly with the cam gear, and don't force it into place against the timing cover (do NOT use the bolts to draw it into place). At most, give it a gentle bump with the heel of your hand to encourage it to pop into place.
Reassemble everything else.
Follow the cooling system refill procedure in the FSM carefully, and you'll have no problems with this. In particular, be sure to bleed the air out of the system as it's being refilled. I recommend re-bleeding the system after each of the first three temperature cycles. I usually get a bit more air out by doing this. Be sure to pack rags under the bleeder screws before you open them, to catch the small amount of coolant that will leak out. You do NOT want coolant getting onto the brand new Opti!!! A cooling system pressure tester can dramatically speed up the bleeding process, if you own or can borrow one.
Hope this helps. Best of luck with it.
Live well,
SJW
Thread Starter
Advanced
Joined: Aug 2008
Posts: 59
Likes: 0
From: odessa MO
Alright i got this bad boy out after about an hour and a half. No beer needed. Lol. Ive got the new opti and the new cap and rotor. Im gonna need a set of water pump gaskets and a throttle body gasket, i kinda messed them up during removal. Anything else i need to know or tips to consider before installing the new opti? Im praying everything goes smoothly!!

Racer
Joined: Aug 2009
Posts: 431
Likes: 54
From: Rivesville West Virginia
Lots of good info on Opti in search forums, read up.
Be careful on seating the Opti and see that it is flush to the
front of the motor, do not force.
Most of us replace the water pump on Opti removal.
Be careful on seating the Opti and see that it is flush to the
front of the motor, do not force.
Most of us replace the water pump on Opti removal.
Le Mans Master
Joined: May 2005
Posts: 7,377
Likes: 2,297
From: Central Maryland
You didn't need to remove the throttle body, but it's too late for this advice to help you now.
Be sure you have the keyway aligned properly with the key on the Opti shaft and coupler. Do NOT force the Opti to seat against the engine. If it won't pop on by bumping it with the heel of your hand, something is misaligned. Do NOT use the bolts to draw it into place.
Replace the water pump, hoses, and plug wires while you're this deep into it.
Live well,
SJW
Be sure you have the keyway aligned properly with the key on the Opti shaft and coupler. Do NOT force the Opti to seat against the engine. If it won't pop on by bumping it with the heel of your hand, something is misaligned. Do NOT use the bolts to draw it into place.
Replace the water pump, hoses, and plug wires while you're this deep into it.
Live well,
SJW

Drifting

Joined: Aug 2009
Posts: 1,615
Likes: 3
From: Tampa Fl
replace the opti and w/p seal while your there.
search special tools for w/p seal install.
I would buy a pulley puller for that pulley.I had to make a puller out of a 4" 3 jaw puller.I didn't like banging on the crank pulley
BTW I thought for a minute you lived in Odessa FL,too bad I could of let you use my puller I made
Thread Starter
Advanced
Joined: Aug 2008
Posts: 59
Likes: 0
From: odessa MO
Haha. No im in odessa, missouri. Kinda wish i was in florida, its gonna start gettin cold around here and that doesnt make working on a vette any more enjoyable! The crank pulley actually came right off without any problems. But now im stuck until tomorrow because i need to buy some of those little bits for the tiny bolts that hold the cap on the optispark. They are like a torx bit on the head of the bolts and i need the little sockets for them so i can put the new cap and rotor on the new opti. I ordered them seperately so they didnt come as a complete unit already assembled. And i dont know of any tool places open on a sunday! 
Drifting
Joined: Aug 2009
Posts: 1,615
Likes: 3
From: Tampa Fl
Ok so the hard parts done.
I would put thread pipe compound on the threads and a good gasket sealer on the gaskets
I used this on the threads because some bolt holes go inti the waterjacket
http://www.permatex.com/products/Aut...t_Compound.htm
I used this on the w/p gaskets(this is some great stuff very sticky),no water will get past this
http://www.permatex.com/products/aut...et_Sealant.htm
now would be a good time to do plug wires,you will have to unbolt and pull the power steering pump forward about an inch to get you wires thru on the drivers side,again if you wern't going to change them now is the time they are a pain on the drivers side.
also are you replacing the w/p and opti seals.
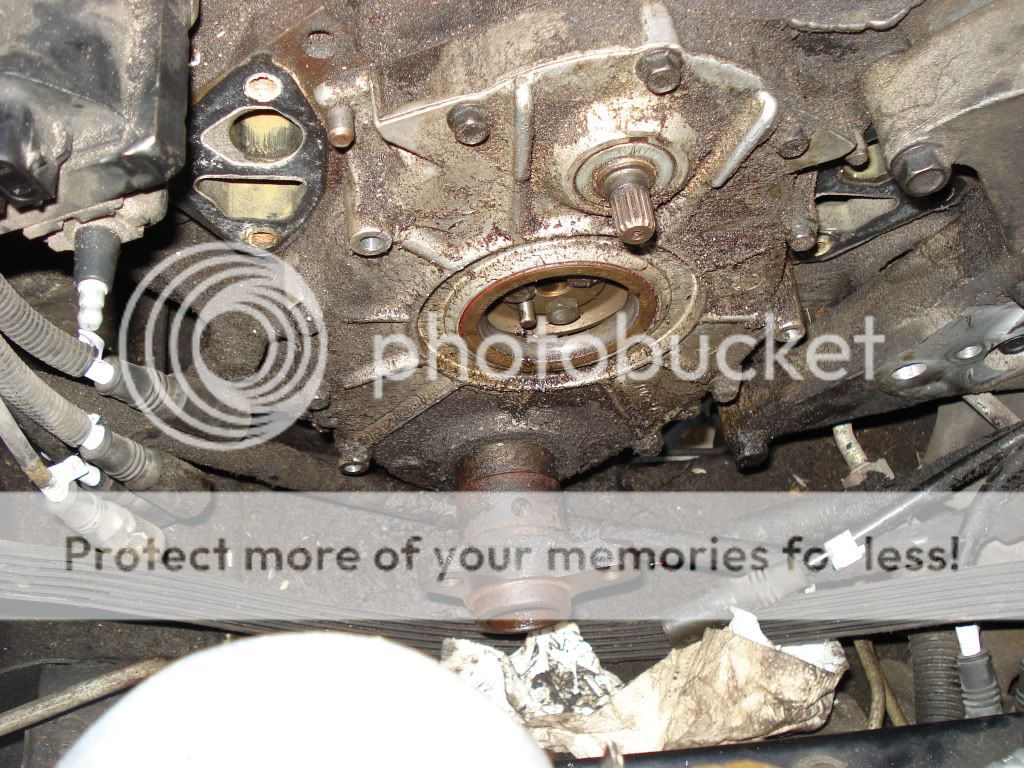
my opti seal was leaking this is what mine looked like,yours will be a smaller opti seal
I would put thread pipe compound on the threads and a good gasket sealer on the gaskets
I used this on the threads because some bolt holes go inti the waterjacket
http://www.permatex.com/products/Aut...t_Compound.htm
I used this on the w/p gaskets(this is some great stuff very sticky),no water will get past this
http://www.permatex.com/products/aut...et_Sealant.htm
now would be a good time to do plug wires,you will have to unbolt and pull the power steering pump forward about an inch to get you wires thru on the drivers side,again if you wern't going to change them now is the time they are a pain on the drivers side.
also are you replacing the w/p and opti seals.
my opti seal was leaking this is what mine looked like,yours will be a smaller opti seal
Last edited by tblt44; Sep 26, 2010 at 03:26 PM.
Thread Starter
Advanced
Joined: Aug 2008
Posts: 59
Likes: 0
From: odessa MO
Ok guys got the opti in and no fire at all!.. jus cranks!... Look at my new thread under tech forums "New opti and No fire" I jus posted it a few minutes ago. Theres a whole decription there. Please help. I dunnno what is goin on.
Thread Starter
Advanced
Joined: Aug 2008
Posts: 59
Likes: 0
From: odessa MO
I got the opti in and last night i had no fire. I went out this morning and right when cranked it to test spark, it started right up! ran a while and died, started back up... idled good. took it for drive and it kept dying on me. And it is still missing and running like crap just like it did before the opti swap? So now im wondering if maybe i have bad injectors? or maybe my plug wires arent on good on one or more plugs. Also when i stopped and parked it, the rpms started surging up and down between 1000 rpm and about 1200rpms? And then it quit? I am beyond irrritated with this? I have no idea what to think at this point?
