


Fuel pump harness issue.
Thread Starter
Instructor

Joined: Jun 2008
Posts: 138
Likes: 0
From: Bridgewater Ma.
In the process of installing a replacement pump kit into my 90' L-98.
Racetronix # FPA-010. Which includes a replacement harness.

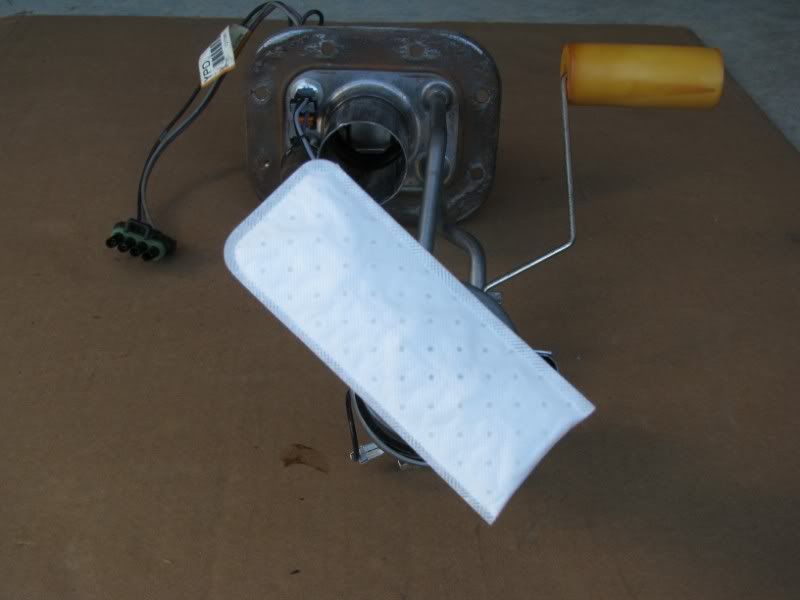
The purple wire connects to the sending unit, however the terminal differs from the existing connection. The existing wire is permanently attached to the sender.

Can this wire be cut and spliced? Or attempt to open up the existing sender terminal and attach that way?
There is also an extra ground wire coming from the pump connector end of the replacement harness. Can this be taped up, out of the way?
I have e-mailed Racetronix but don't expect a reply until Mon. the earliest.
Does this appear to be the OEM sending unit? Is this how the sending wire is attached or does it appear to be a replacement?
Racetronix # FPA-010. Which includes a replacement harness.
The purple wire connects to the sending unit, however the terminal differs from the existing connection. The existing wire is permanently attached to the sender.
Can this wire be cut and spliced? Or attempt to open up the existing sender terminal and attach that way?
There is also an extra ground wire coming from the pump connector end of the replacement harness. Can this be taped up, out of the way?
I have e-mailed Racetronix but don't expect a reply until Mon. the earliest.
Does this appear to be the OEM sending unit? Is this how the sending wire is attached or does it appear to be a replacement?
Last edited by EastCoastHD; Oct 9, 2010 at 01:11 PM.
Pro


Joined: Jan 2003
Posts: 663
Likes: 118
From: Albany OR
I just put a Racetronics fuel pump kit into my 1985 so I can not directly answer your question because the 85 has a different in tank wiring harness. I did have a couple of questions and got quick replies through the Racetronics forum. It's different to have to use a forum like that for tech support instead of just the usual email but that is how they work, and they do respond pretty quickly. I do not think I can attach their PDF instructions to this post, at least I do not know how to. If you pm me I think I could attach it to that. Or I could just attach it to a regular email. The instructions I got were their 89 to 96, it seems that all they offer, everything is the same except for the wiring harness connections are different for the different years.
Brian
Brian
Thread Starter
Instructor
Joined: Jun 2008
Posts: 138
Likes: 0
From: Bridgewater Ma.
I just put a Racetronics fuel pump kit into my 1985 so I can not directly answer your question because the 85 has a different in tank wiring harness. I did have a couple of questions and got quick replies through the Racetronics forum. It's different to have to use a forum like that for tech support instead of just the usual email but that is how they work, and they do respond pretty quickly. I do not think I can attach their PDF instructions to this post, at least I do not know how to. If you pm me I think I could attach it to that. Or I could just attach it to a regular email. The instructions I got were their 89 to 96, it seems that all they offer, everything is the same except for the wiring harness connections are different for the different years.
Brian
Brian
After posting this thread I received a PM from Racetronix support instructing me to register for forum access.
I viewed the PDF instructions.
It appears that both purple wires need to be removed from their respective connectors. Then the OEM float sender wire is inserted into the "new" harness connector which is then plugged into the bulkhead.
Seems like a quality kit and the Walbro pump is "made in the USA".
The lack of instructions and forum based tech support is odd however.
Hopefully it goes in tomorrow.
Last edited by EastCoastHD; Oct 12, 2010 at 12:55 PM.
Drifting


Joined: Dec 2007
Posts: 1,329
Likes: 17
From: woodbury new jersey
just did my 94 with the racetronix pump a week ago. go on blowerworks.net and look on the list to the left of the screen. click on downloads, then a few links down is a guide to replacing, i believe 90-96 pumps. has instructions and pictures and all! on mine, my purple wire wasnt permantly on like that, and the ground wire got plugged in right by the purple wire
Thread Starter
Instructor
Joined: Jun 2008
Posts: 138
Likes: 0
From: Bridgewater Ma.
just did my 94 with the racetronix pump a week ago. go on blowerworks.net and look on the list to the left of the screen. click on downloads, then a few links down is a guide to replacing, i believe 90-96 pumps. has instructions and pictures and all! on mine, my purple wire wasnt permanently on like that, and the ground wire got plugged in right by the purple wire
A few pics / tips on my install.....
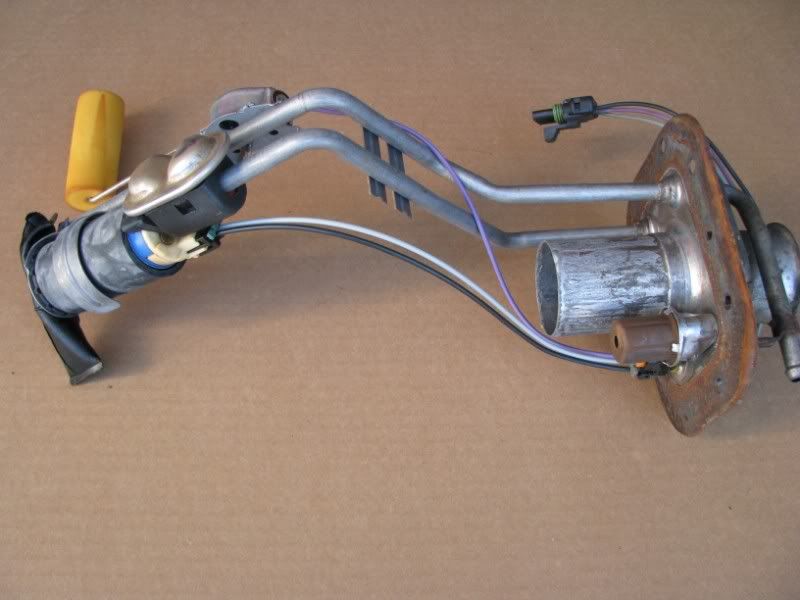
1. After removing the pump assembly from the tank, remove the harness from the pump connection.
2. Remove the pump from fuel tree by pushing the pulsator upward to create clearance from the lower pump retainer, separate the pump from the pulsator and bracket. No bending of the bracket required!
3. Remove the harness from the bulkhead connection. First remove the orange lock pin by prying up.

Then pry the tab to release the connector.

In my application the purple sender wire is permanently attached to the sender, it must be removed from the OE connector and inserted into the new harness included in the kit.
4. To remove the wires, first remove the grey lock pin by holding a screw driver at a 45 deg. angle, press up and in to release. Flip and repeat on the other side.

5. Insert a #1 size paper clip (small) into the groove (red arrow) to release the wire.

A shot of the wire end, note the tab that must be depressed.

6. Swap the OE wire into the correct location, replace grey lock pin.
7. Install the pump, connect the harness. Be sure to install the sock in the same position as the OE.
The kit contains a small tube of silicone grease. This can be applied to both sides of the bulkhead seal, retaining screws / orings and a small amount to the steel lines to ease the installation of rubber hoses.
8. Install into the tank using the new fasteners.
Before
After

A side note. As seen in the above pic you can see that I have attached the ground wire to the clamp spade. Racetronix instructs to place this wire onto the float sender if there is a provision (male spade). If no provision is present, the spade clamp should be attached to the float sender housing / pipe and the ground wire connected. This is a redundant ground.
Link to registration for Racetronix forum
http://www.racetronix.com/supportforum.html
PDF instructions
http://www.blowerworks.net/download/GSS340IG.pdf
Last edited by EastCoastHD; Oct 12, 2010 at 09:36 PM.
Supporting Vendor


Joined: Dec 2001
Posts: 1,571
Likes: 31
From: A dealer near you.

The rubber hose will not provide a ground for this clamp / wire. The grounding clamp is to be located on the body of the sender.
The silicone grease is not used for the in-tank terminals or external connections. Gas will dissolve this grease and in high enough concentrations contaminate the O2 sensor. The grease is to wet the bolt o-rings when installing the gasket.
Corvette Stories
The Best of Corvette for Corvette Enthusiasts

150 hp to 1,250 hp: Every Corvette Generation Compared by the Specs That Matter
Joe Kucinski
8 Coolest Corvette Pace Cars (and Replicas) of All Time
Verdad Gallardo
Top 10 Corvette Engines RANKED by Peak Torque (70+ Years of Muscle!)
Joe Kucinski
Corvette ZR1X Will Be Pacing the Indy 500, And Could Probably Race, Too!
Verdad Gallardo
Top 10 Corvettes Coming to Mecum Indy 2026!
Brett Foote
Top 10 C9 Corvette MUST-HAVES to Fix These C8 Generation Flaws!
Michael S. Palmer
10 Revolutionary 'Corvette Firsts' Most People Don't Know
Joe Kucinski
5 Reasons to Upgrade to an LS6-Powered Corvette; 5 Reasons to Stay LT2
Michael S. Palmer