1996 C4 Engine Removal

Thread Starter
Advanced

Joined: Sep 2011
Posts: 91
Likes: 1
From: Maryland
I searched the forum for a detailed engine removal procedure for a 1996 and didn't find one. I've never pulled an engine before and could use some serious help. Does anyone have a step by step engine removal procedure? (hopefully with pictures)
I do have a procedure taken from a Hanes manual but some of the steps don't make sense, like remove distributor. Could I have commentary on what is and what isn't needed in the following:
Corvette Engine Removal Procedure 1985-1996
1985 ON
1 Disconnect tile battery cables from the battery, then refer to Chapter 4 and detach the throttle and cruise control cables from the engine (see illustration).
2 Refer to Chapter 5 and remove the distributor.
3 Refer to Chapter 12 and remove the wiper motor.
4 Remove the air intake duct and MAF sensor (if equipped).
5 DiSConnect the brake booster vacuum hose and the PCV line-to-canister hose.
6 label and disconnect the vacuum hoses and wires attached to the engine.
7 Disconnect the fuel injector wires and detach the harness from the engine.
8 Refer to Chapter 1 and drain the cooling system, then detach the radiator hoses and heater hoses from the engine fittings. Also, remove the drivebelt from the pulleys.
9 Refer to Chapter 4 and relieve the fuel pressure, then detach the fuel lines at the fuel rail fittings.
10 Disconnect the AIR switching valve at the air conditioning compressor.
11 Remove the catalytic converter AIR pipe.
12 Refer to Chapter 3 and remove the air conditioning compressor. Detach the accumulator at the fan shroud and brace.
13 Disconnect the fuel lines at the engine block fittings.
14 Refer to Chapter 5 and remove the a1temator.
15 Refer to Chapter 10 and remove the power steering pump. Detach the power steering reservoir at the fan shroud and brace.
16 Remove the water pump pulley (If equipped), then refer to Chapter 2A and remove the vibration damper from the end of the crankshaft.
17 Raise the vehicle and support it securely on jackstands, then disconnect the wires from the oxygen sensor, the ESC sensor and the coolant temperature sensor (See illustration).
18 Detach the temperature sensor and ground wires from the engine block.
19 Detach the catalytic converter AIR pipe from the right-hand exhaust manifold (if equipped)
20 Detach the transmission oil cooler lines from the flywheel cover bracket.
21 Refer to Chapter 5 and remove the starter motor.
22 Refer to Chapter 1, drain the engine oil and remove the 0il filter.
23 Detach the exhaust pipes from the exhaust manifolds and the converter hanger (refer to ChaPter 4).
24 Detach the oil cooler adapter from the block and the line from the oil pan.
25 Remove the flywheel/driveplate cover.
26 If your vehicle is equipped with an automatic transmission, remove the torque converter-to-driveplate bolts. The converter will have to be turned to expose the upper bolts.
27 Support the engine with a hoist, then remove the bellhousing bolts.
28 Remove the engine mount through bolts.
29 Remove the engine mount-to-block bolts.
30 Position a jack under the transmission and raise it just enough to support it. A block of wood should be used to prevent the jack head from bearing against the transmission case or oil pan.
31 Move the engine forward to detach it from the transmission, then make one last check to be sure all wires, cables and hoses have been disconnected before carefully lifting it out of the engine compartment (see illustration).
32 Installation can be accomplished by reversing the removal procedure.
Team Owner

Joined: Aug 2005
Posts: 34,988
Likes: 515
From: Riverside County Southern California
Co-winner 2020 C4 of the Year - Modified
2018 Corvette of Year Finalist
2017 C4 of Year
2016 C7 of Year Finalist
St. Jude Donor '09 thru '20
You need the famous Happy Hooker. It will make your project much easier.
hJkQJy2BMm1uY3iTQ~~_35.JPG)
I assume you already got these:

I assume you already got these:
Last edited by PLRX; Sep 6, 2011 at 04:27 PM.
Safety Car


Joined: Jun 2006
Posts: 3,629
Likes: 28
From: FL
Race Director


Joined: Feb 2003
Posts: 11,672
Likes: 20
From: Lake Wylie SC
Another very helpful tool would be a good camera so you can take pictures before you take something apart. That way you can use the pictures to help put everything back together. I'm another FSM guy. It's a must.
Corvette Stories
The Best of Corvette for Corvette Enthusiasts

Top 10 Most Expensive Corvettes Ever Sold on Bring A Trailer
Brett Foote
10 Things Every Corvette Owner Needs (2026 Edition)
Michael S. Palmer
8 Most "Only Corvette Owners Understand" Quirks and Problems
Pouria Savadkouei
10 Reasons the C6 Z06 is Still A Performance Benchmark After 20 Years
Joe Kucinski
How Much Horsepower Every Corvette Engine "LOST" in 1972
Joe Kucinski
Top 10 DOs and DON'Ts for Protecting Your Convertible Top!
Michael S. Palmer
Top 10 Most Explosive Corvettes Ever Made: Power-to-Weight Ratio Ranked!
Joe Kucinski
150 hp to 1,250 hp: Every Corvette Generation Compared by the Specs That Matter
Joe Kucinski
8 Coolest Corvette Pace Cars (and Replicas) of All Time
Verdad Gallardo
Instructor
Joined: Mar 2010
Posts: 163
Likes: 0
From: Birmingham Alabama
The reason Haynes tells you to 'remove the distributor' is because they are covering ALL models from 84-96, just ignore the items not relevant to your year and most of it should be close.
Sara Lou
Sara Lou
Thread Starter
Advanced
Joined: Sep 2011
Posts: 91
Likes: 1
From: Maryland
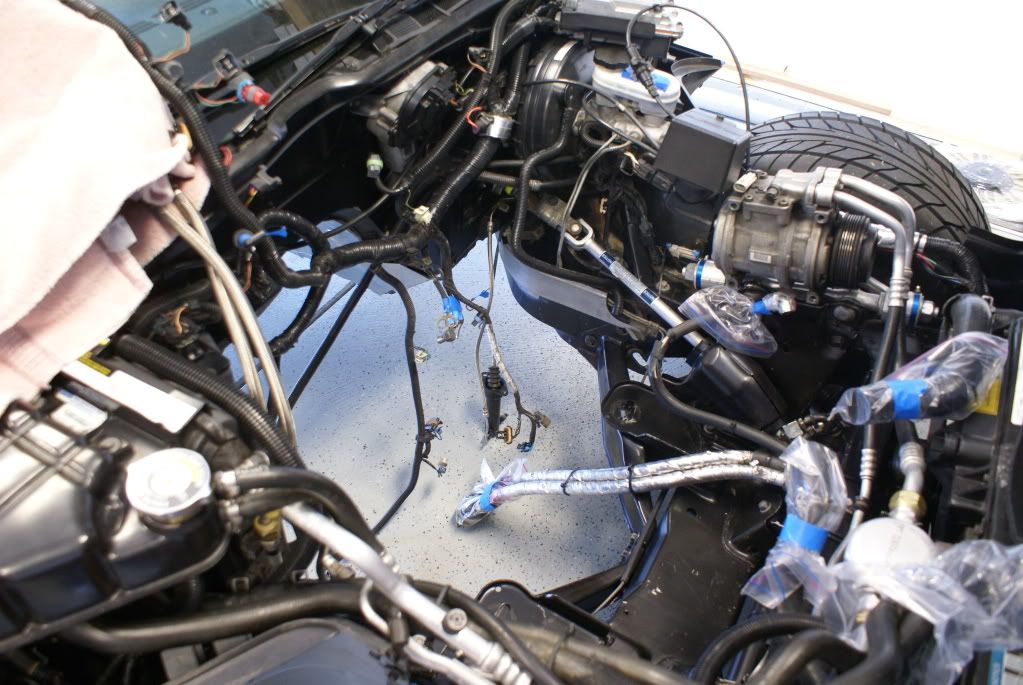
Thanks. I've been taking pictures and bagging and lableling bolts & parts and have ordered the GM manuals but won't receive for a week or two. Meanwhile I'm in the middle of removal and am at the point of doing something with AC compressor. I don't want to break into the lines so my question is can this be laid up out of the way?
Race Director
Joined: Apr 2000
Posts: 15,344
Likes: 4,009
From: Texas
Thanks. I've been taking pictures and bagging and lableling bolts & parts and have ordered the GM manuals but won't receive for a week or two. Meanwhile I'm in the middle of removal and am at the point of doing something with AC compressor. I don't want to break into the lines so my question is can this be laid up out of the way?
Just move it to the side.
You leave most of the engine intact.
- Drain coolant
- Pull the exhaust (cats back, you can leave the manifolds in place).
- Support engine and remove the transmission
- Remove fuel rail
- Remove nuts from motor mount studs
- Pull engine fully dressed.
Pic of the fully dressed engine with the Happy Hooker...
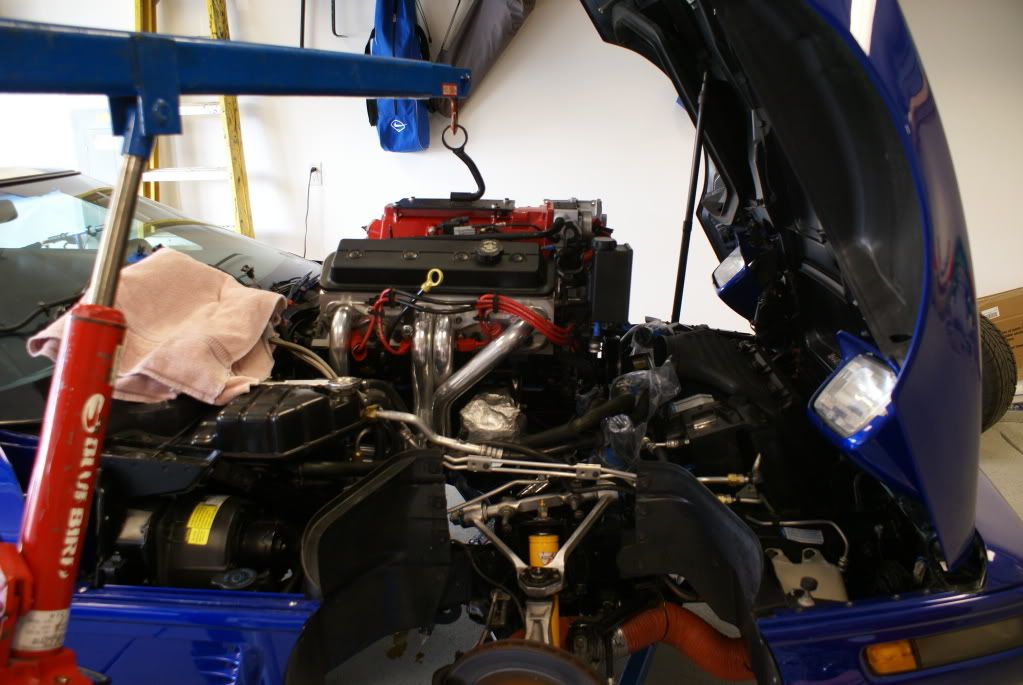
in this pic you can see the compressor to the side...
Team Owner
Joined: Aug 2005
Posts: 34,988
Likes: 515
From: Riverside County Southern California
Co-winner 2020 C4 of the Year - Modified
2018 Corvette of Year Finalist
2017 C4 of Year
2016 C7 of Year Finalist
St. Jude Donor '09 thru '20
Pay attention to Jim's threads and pictures. His experience was vital for my LT4 rebuild and that picture with the Happy Hooker is the reason I bought mine.


Last edited by PLRX; Sep 7, 2011 at 12:13 PM.
Thread Starter
Advanced
Joined: Sep 2011
Posts: 91
Likes: 1
From: Maryland
Very helpful! And very nice work! I can see the advantage of that happy hooker over an engine leveler for the vette application as I was looking around for attachment points on the block or heads. I would never have dreamed of hooking on the intake manifold as those bolts seemed kind of small.
I'm also impressed with those blogs indicating they pulled the engine in 2 hours. I will spend more time than that labeling things
I'm also impressed with those blogs indicating they pulled the engine in 2 hours. I will spend more time than that labeling things
Team Owner
Joined: Aug 2005
Posts: 34,988
Likes: 515
From: Riverside County Southern California
Co-winner 2020 C4 of the Year - Modified
2018 Corvette of Year Finalist
2017 C4 of Year
2016 C7 of Year Finalist
St. Jude Donor '09 thru '20
Thread Starter
Advanced
Joined: Sep 2011
Posts: 91
Likes: 1
From: Maryland
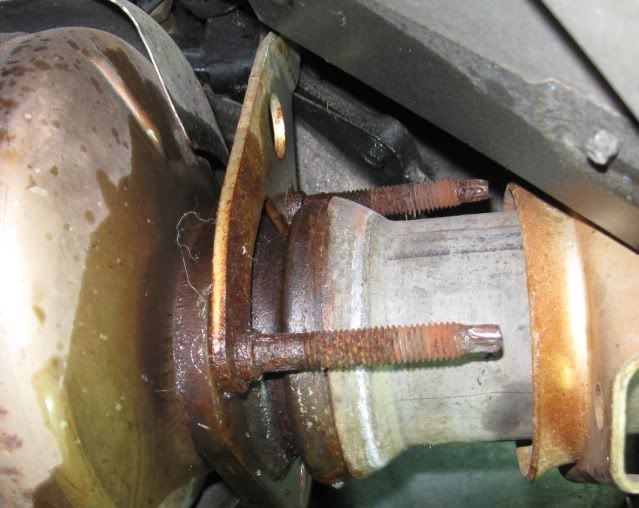
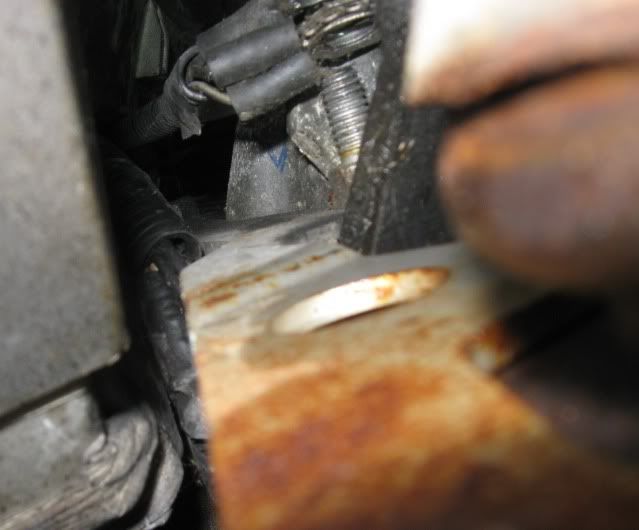
I'm stuck on the catalytic converter removal due to the wonderfully sturdy bracket that holds in place and the studs that are hopelessly frozen. Any tips/tricks for getting that sucker free? Does the bracket stay on or have to come off?
[IMG]C:\Documents and Settings\Hawk73ku\My Documents\My Pictures\iPhone\Iphone 181.jpg[/IMG]
[IMG]C:\Documents and Settings\Hawk73ku\My Documents\My Pictures\iPhone\Iphone 182.jpg[/IMG]
[IMG]C:\Documents and Settings\Hawk73ku\My Documents\My Pictures\iPhone\Iphone 181.jpg[/IMG]
[IMG]C:\Documents and Settings\Hawk73ku\My Documents\My Pictures\iPhone\Iphone 182.jpg[/IMG]
Team Owner
Joined: Aug 2005
Posts: 34,988
Likes: 515
From: Riverside County Southern California
Co-winner 2020 C4 of the Year - Modified
2018 Corvette of Year Finalist
2017 C4 of Year
2016 C7 of Year Finalist
St. Jude Donor '09 thru '20
Yep, I love those two juckers. They are 15mm and 18mm. It works better if you buy a small 15mm wrench.

In 2008 I hyper-extended my forearm muscle thanks to that ****.
In 2008 I hyper-extended my forearm muscle thanks to that ****.
Race Director
Joined: Apr 2000
Posts: 15,344
Likes: 4,009
From: Texas
I'm stuck on the catalytic converter removal due to the wonderfully sturdy bracket that holds in place and the studs that are hopelessly frozen. Any tips/tricks for getting that sucker free? Does the bracket stay on or have to come off?
[IMG]C:\Documents and Settings\Hawk73ku\My Documents\My Pictures\iPhone\Iphone 181.jpg[/IMG]
[IMG]C:\Documents and Settings\Hawk73ku\My Documents\My Pictures\iPhone\Iphone 182.jpg[/IMG]
[IMG]C:\Documents and Settings\Hawk73ku\My Documents\My Pictures\iPhone\Iphone 181.jpg[/IMG]
[IMG]C:\Documents and Settings\Hawk73ku\My Documents\My Pictures\iPhone\Iphone 182.jpg[/IMG]
- Remove the transmission while supporting the engine
- With the transmission out, tilt the engine back and remove the bolts in question.
- Remove the cats from the exhaust manifolds
Team Owner
Joined: Aug 2005
Posts: 34,988
Likes: 515
From: Riverside County Southern California
Co-winner 2020 C4 of the Year - Modified
2018 Corvette of Year Finalist
2017 C4 of Year
2016 C7 of Year Finalist
St. Jude Donor '09 thru '20

Good point, he is removing the engine. That way the bracket will be loose once he removes the bellhousing. I remember in my 95 I was installing the shorties and had to loose the cat. That sucked. My 96 I dont remember if I did it your way or the other way. I already had the tools to make it easy.