


Crank Hub

Thread Starter
Cruising

Joined: Jul 2012
Posts: 13
Likes: 0
From: NC
I am looking to do a HPDE this fall at Carolina Motorsport Park during November. I've been working on my 95 C4 and am getting along well. The one problem that is dealing me a load of crap is the front main seal. It is leaking a bit, not a lot, but more than I would try to go on the track with. The front of the engine is torn down to the crank hub, but the hub is being a bear! Right now the thinking is to go after it with some heat, but carefully. Anyone have thoughts on this? FWIW, I have a good puller and the skills to do this job, but am proceeding with caution. Rather take time and not screw up a crank.
Bill
Bill
Last edited by bstarling; Jul 27, 2012 at 07:16 PM. Reason: spelling

Melting Slicks


Joined: Jan 2009
Posts: 3,482
Likes: 196
From: folsom california
Dear god. Drop the blow torch; back away from the cheater bar; I know from experience where you're headed and the results won't be good.
The LT hub does NOT come off in usual manner, and attempting to pull it in a "normal" manner with a puller will only ruin the hub or worse.
There is no need to use excessive force or heat.
The bad news is that the factory wants you to buy a dedicated puller for a hundred bucks (?). The good news is that a trip to the hardware store and $20, or less, will get you all you need.
Buy three or four 7/16th FINE thread bolts of assorted lengths.
Screw one of the short ones into the front of the crankshaft hub, making sure the head of the bolt does NOT seat against the inner surface of the hub. If the threads in the crank snout are goobered up, chase them with a 7/16th inch fine thread tap.
Attach the three legs of your pullet to the hub in the usual manner.
Screw the large bolt in the center of the puller into the hub so that it seats itself on the head of the 7/16ths bolt. when you screw the puller bolt further into the hub, the hub will now move outward until it contacts the bottom of the head of the 7/16th bolt.
Remove the 7/16th bolt and replace it with a longer bolt. Repeat the above step. In two or three repetitions, using progressively longer bolts, the hub will be free of the crankshaft snout.
Race Director

Joined: Apr 2000
Posts: 15,344
Likes: 4,009
From: Texas
You need to make sure you're talking the same thing. mtwoolford is talking about the hub which the OP mentions (and which needs to be removed to change the front seal).
Kimmer is talking about the balancer that bolts onto the hub.
You can tap the balancer off as Kimmer has outlined. The mt method will work for the hub. If you beat on the hub, you will do nothing other than screw it up. In addition, you may screw up the crank and the bearings.
This is one method to get the hub off, similar to what mt described...

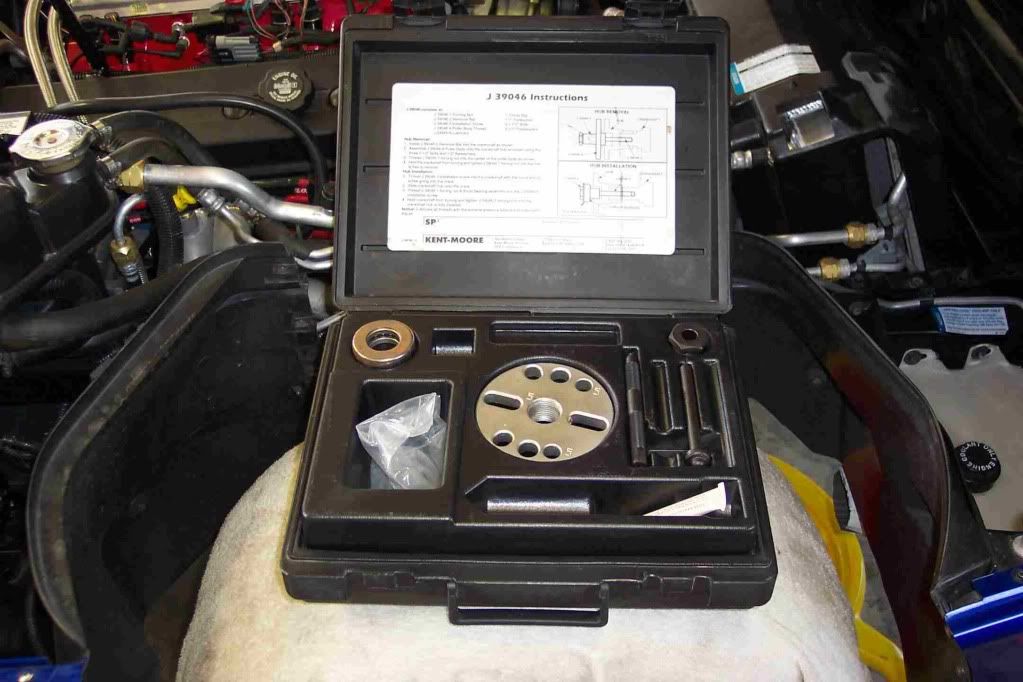
Here is the GM (Kent-Moore) tool that makes this a 60 second task...
GM tool in use...

Kimmer is talking about the balancer that bolts onto the hub.
You can tap the balancer off as Kimmer has outlined. The mt method will work for the hub. If you beat on the hub, you will do nothing other than screw it up. In addition, you may screw up the crank and the bearings.
This is one method to get the hub off, similar to what mt described...
Here is the GM (Kent-Moore) tool that makes this a 60 second task...
GM tool in use...
Thread Starter
Cruising
Joined: Jul 2012
Posts: 13
Likes: 0
From: NC
Thanks for all of replies. This some good info, and I will put it to good use. The hub is the problem, and I believe the issue I was having was the hub shoulder against the bolt. I thought it was out far enough, but evidently not. No damage done, thank the gods. The balancer comes off pretty easily once the back is banged with the big stick. Now it's time to go with the progressive bolt lengths. This is my first experience with wrenching much of anything on a Chevy, so I'm on a learning curve.
I'll post the results soon as I get this bugger off.
Thanks again,
Bill
I'll post the results soon as I get this bugger off.
Thanks again,
Bill
Melting Slicks
Joined: Jan 2009
Posts: 3,482
Likes: 196
From: folsom california
the hub isn't located on a key way, so the best advice at this point is to mark it in relation to the crank snout. If you forget to, not all is lost, there is a way to re-establish the relationship; let's just say its easier to mark the darn things.
Thread Starter
Cruising
Joined: Jul 2012
Posts: 13
Likes: 0
From: NC
Bill
Race Director
Joined: Apr 2000
Posts: 15,344
Likes: 4,009
From: Texas
That is odd! Thanks for the heads up on that one mtwoolford. I noticed that the balancer and the hub have arrows that line up, but sort of expected to find a keyway and key as well. I'll make dang sure it is well marked. I had originally marked the thing, but got out the brake cleaner to get rid of crud and the mark went with it.
Bill
Bill
Corvette Stories
The Best of Corvette for Corvette Enthusiasts

Top 10 Most Explosive Corvettes Ever Made: Power-to-Weight Ratio Ranked!
Joe Kucinski
150 hp to 1,250 hp: Every Corvette Generation Compared by the Specs That Matter
Joe Kucinski
8 Coolest Corvette Pace Cars (and Replicas) of All Time
Verdad Gallardo
Top 10 Corvette Engines RANKED by Peak Torque (70+ Years of Muscle!)
Joe Kucinski
Corvette ZR1X Will Be Pacing the Indy 500, And Could Probably Race, Too!
Verdad Gallardo
Top 10 Corvettes Coming to Mecum Indy 2026!
Brett Foote
Top 10 C9 Corvette MUST-HAVES to Fix These C8 Generation Flaws!
Michael S. Palmer
10 Revolutionary 'Corvette Firsts' Most People Don't Know
Joe Kucinski
5 Reasons to Upgrade to an LS6-Powered Corvette; 5 Reasons to Stay LT2
Michael S. Palmer
Thread Starter
Cruising
Joined: Jul 2012
Posts: 13
Likes: 0
From: NC
FWIW, the balancer only fits on the hub one way and the assembly (hub/balancer) is neutrally balanced. Therefore, although it's nice to line things up, it's not 100% necessary. Nonetheless, I will admit that when I remove the hub, I place the arrow at 12 o'clock or mark where it was pointing and reinstall it in the same position. The neutral balance is why there's no keyway for the hub to slide over.
I'll be under the car tomorrow getting this thing done. Hopefully, it will be back together before it gets too hot down this way. The high today was 100F! That is with a goodly high humidity.
Thanks,
Bill
Thread Starter
Cruising
Joined: Jul 2012
Posts: 13
Likes: 0
From: NC
Got the bugger off. Really quite easy once I stopped pulling against the hub it's self. The rest of this should be simple job.
Thanks to all who gave me the valuable input, maybe I can return the favor sometime.
Bill
Thanks to all who gave me the valuable input, maybe I can return the favor sometime.
Bill