


1996 AC Programmer help needed
Thread Starter
Instructor


Joined: Aug 2004
Posts: 174
Likes: 0
From: NWI IN
Tracked down my AC issue over the last week and it's come down to the programmer.
Question is has there been any documented use of a NON 1996 unit installed in a 96 with success?
If so and programmers of other years can be used which years are compatible?.
If not, are there any sources for 1996 programmers out there? Not e-bay btw.
Thanks in advance for any help you guys can provide.

Racer


Joined: Jan 2007
Posts: 380
Likes: 1
From: Toronto Ontario
Tracked down my AC issue over the last week and it's come down to the programmer.
Question is has there been any documented use of a NON 1996 unit installed in a 96 with success?
If so and programmers of other years can be used which years are compatible?.
If not, are there any sources for 1996 programmers out there? Not e-bay btw.
Thanks in advance for any help you guys can provide.
Question is has there been any documented use of a NON 1996 unit installed in a 96 with success?
If so and programmers of other years can be used which years are compatible?.
If not, are there any sources for 1996 programmers out there? Not e-bay btw.
Thanks in advance for any help you guys can provide.
Thread Starter
Instructor
Joined: Aug 2004
Posts: 174
Likes: 0
From: NWI IN
Thanks for the offer.
I trouble shot this 6 ways from sunday!!!.
heres a cut and past of my threads from another site I frequent. Might make for a good sticky
Still issues with the AC not blowing cold. But now I can describe as with detail. Any and all help is greatly appreciated.
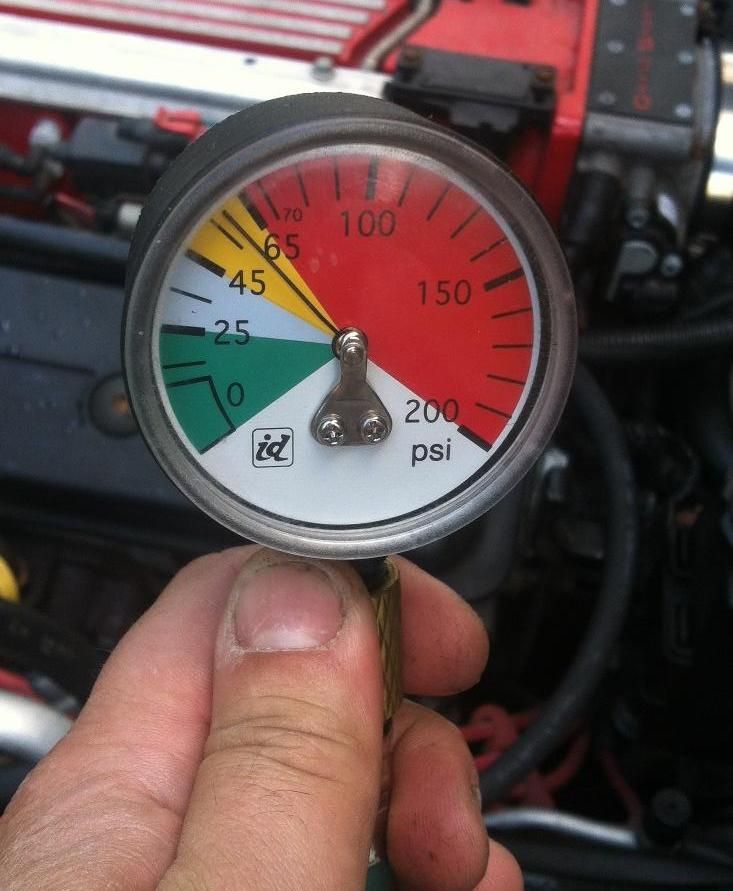
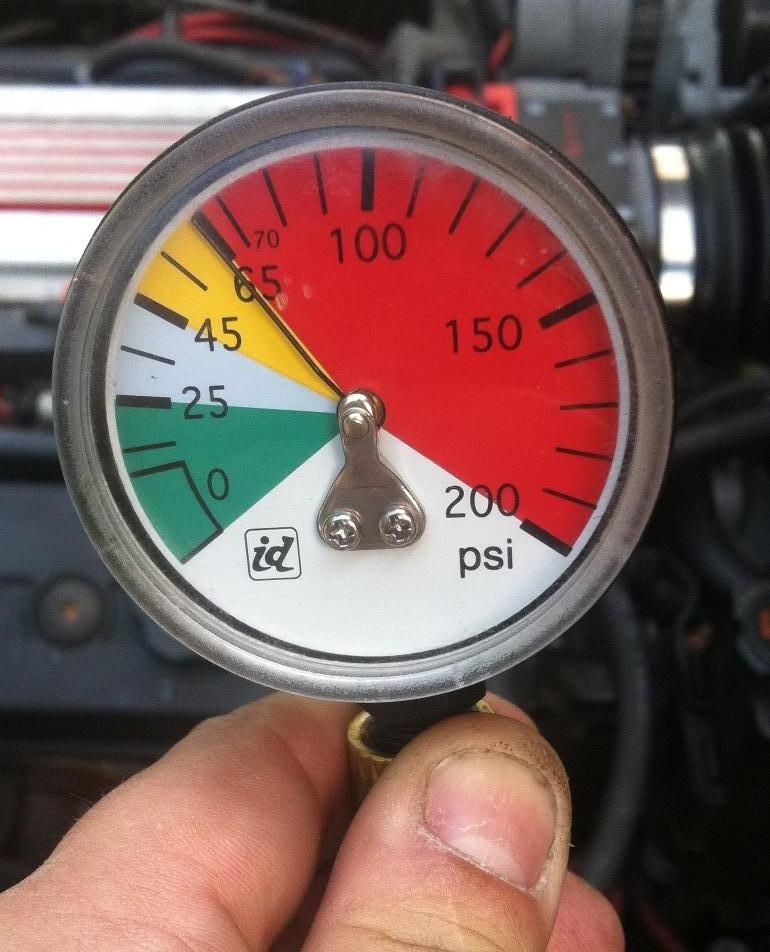
1st I checked the low side with the vehicle off and having sat all night:

I then started the vehicle and set the controller to OFF. As you can see from the video the ac compressor cycles and and gets wet from condensation:
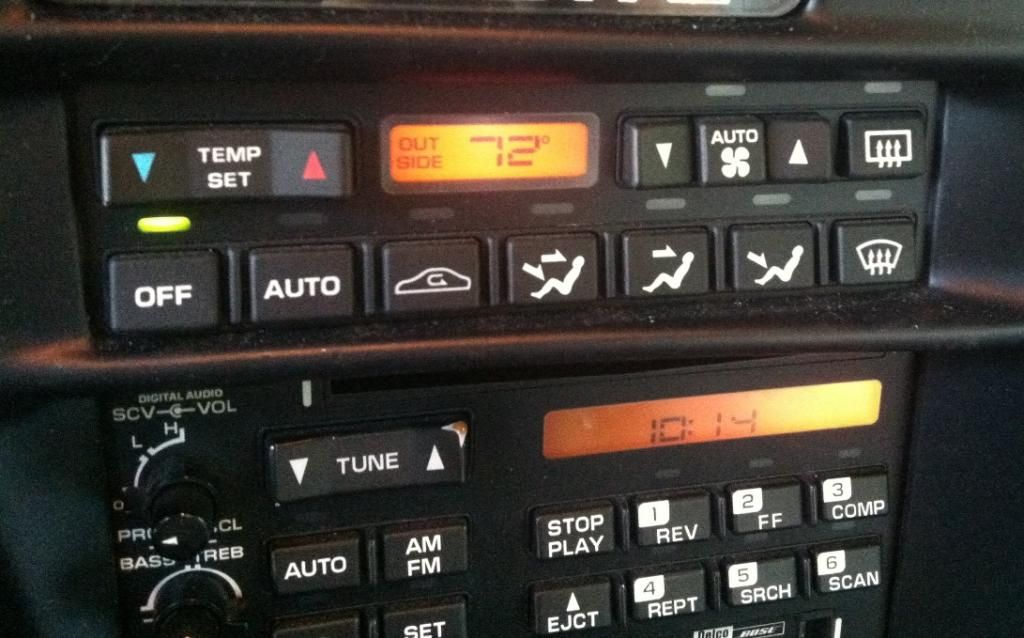
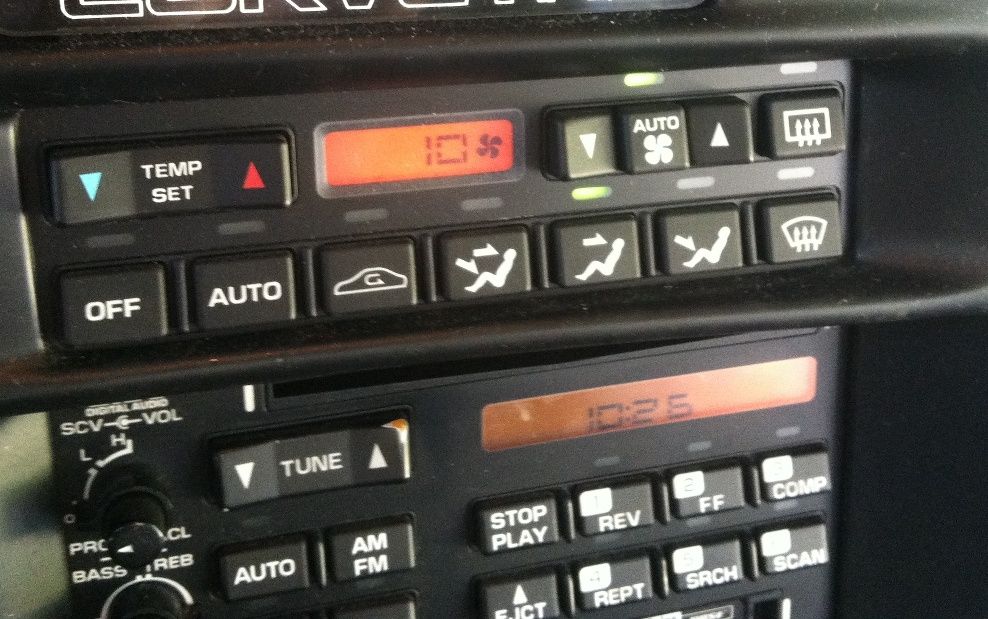
I then moved the controls to recirculate. In this mode the compressor did not cycle on at all. The low side reading remained static:
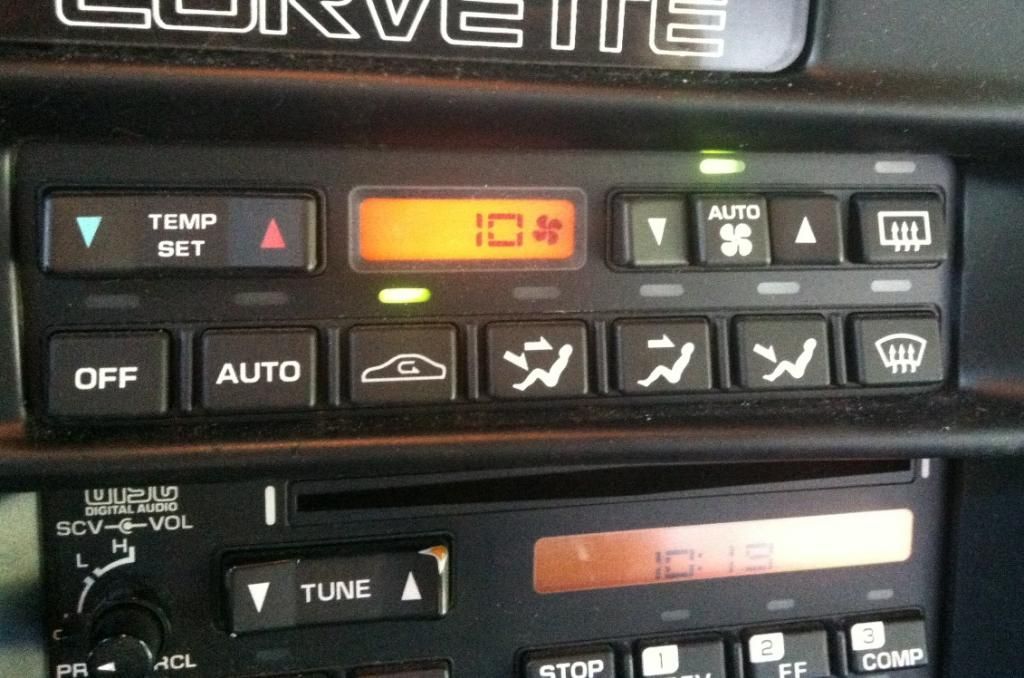
Then moved to the head feet setting. Again, compressor did not cycle on, reading remained static. in addition by this time teh accumulator was dry as a bone from the condesation a few minutes earlier:

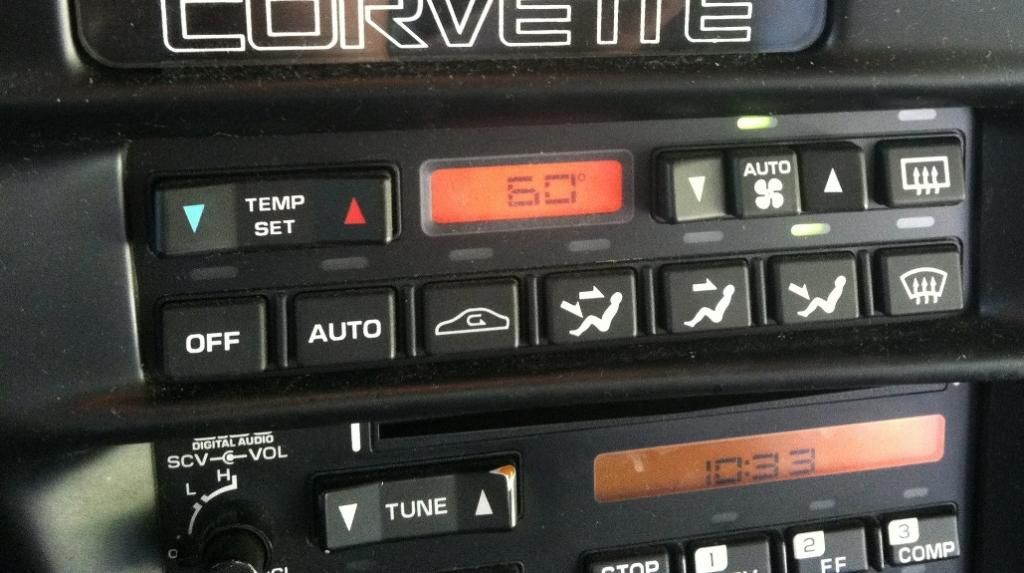
Moved the controller to head only. Compressor began to cycle but NO condensation was present.
Changed setting to feet. Again compressor began to cycle but no condensation was present.
i also ran the AC check on the head. No codes:
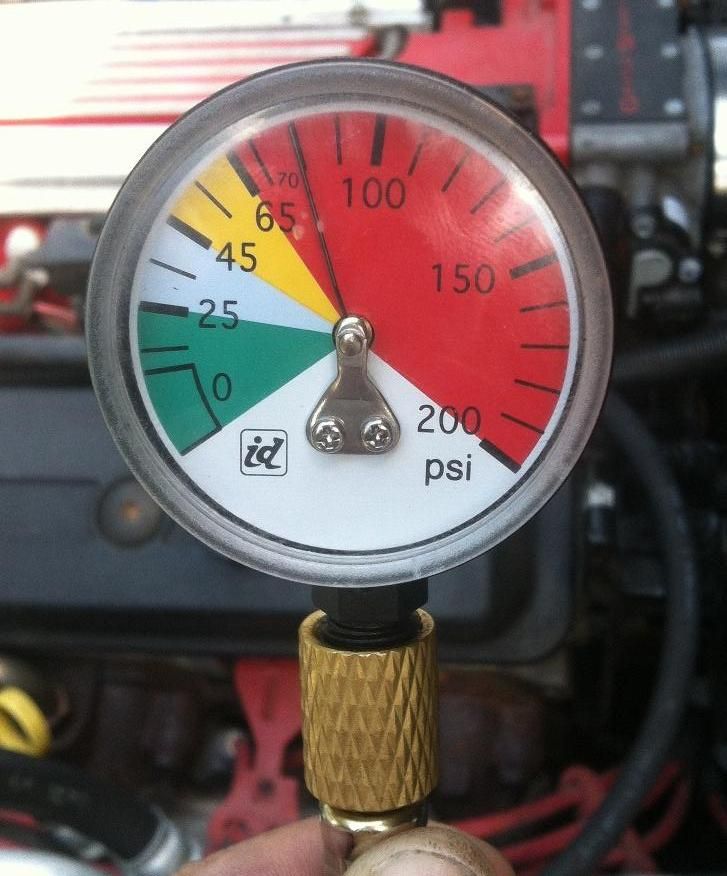
After all my testing I shut the car off and came back about 20 min later to get a static reading with the car off. This is what i got:
Any ideas on what the issue may be? TIA
I trouble shot this 6 ways from sunday!!!.
heres a cut and past of my threads from another site I frequent. Might make for a good sticky
Still issues with the AC not blowing cold. But now I can describe as with detail. Any and all help is greatly appreciated.
1st I checked the low side with the vehicle off and having sat all night:
I then started the vehicle and set the controller to OFF. As you can see from the video the ac compressor cycles and and gets wet from condensation:
I then moved the controls to recirculate. In this mode the compressor did not cycle on at all. The low side reading remained static:
Then moved to the head feet setting. Again, compressor did not cycle on, reading remained static. in addition by this time teh accumulator was dry as a bone from the condesation a few minutes earlier:
Moved the controller to head only. Compressor began to cycle but NO condensation was present.
Changed setting to feet. Again compressor began to cycle but no condensation was present.
i also ran the AC check on the head. No codes:
After all my testing I shut the car off and came back about 20 min later to get a static reading with the car off. This is what i got:
Any ideas on what the issue may be? TIA
Thread Starter
Instructor
Joined: Aug 2004
Posts: 174
Likes: 0
From: NWI IN
That led to my how to on how to do a head clean:
It's not hard, just don't be scared!
first have your head removed, that's another thread but don't worry, it's coming.
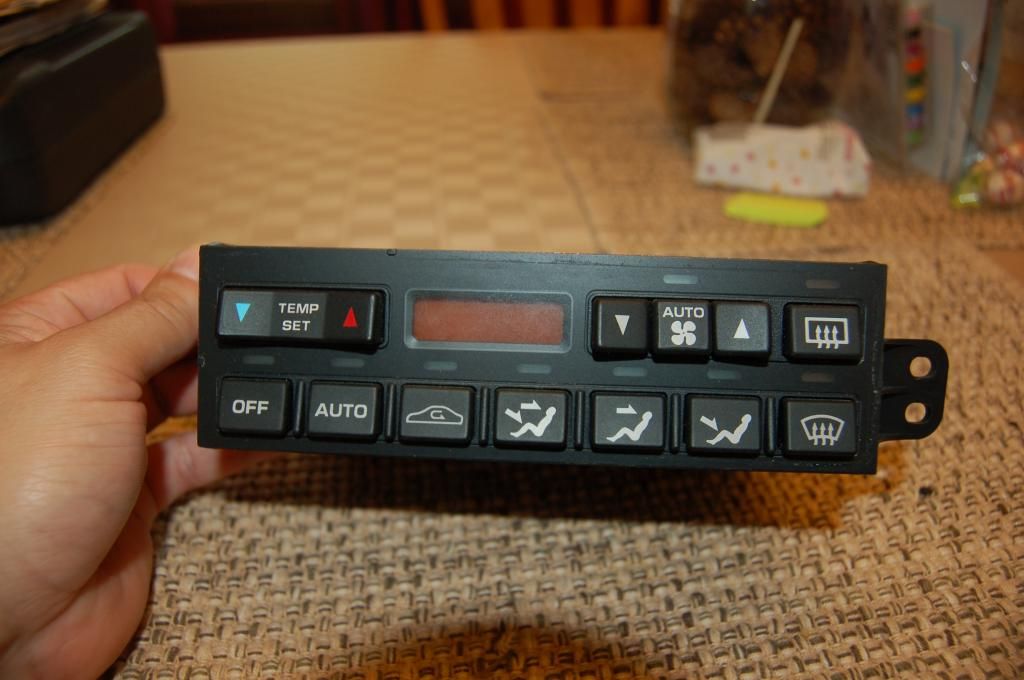
Here's your part #
Now we are going after six 3/16 nuts. 4 in the corners and two on the back. You might have to break out the small guns for this hard to reach one.

Once all the screws are removed slide the guts outta the housing. Here's the top, and the bottom. Give these a once over for any signs of damaged electronics though this is NOT the piece we will be focusing on when we are cleaning.
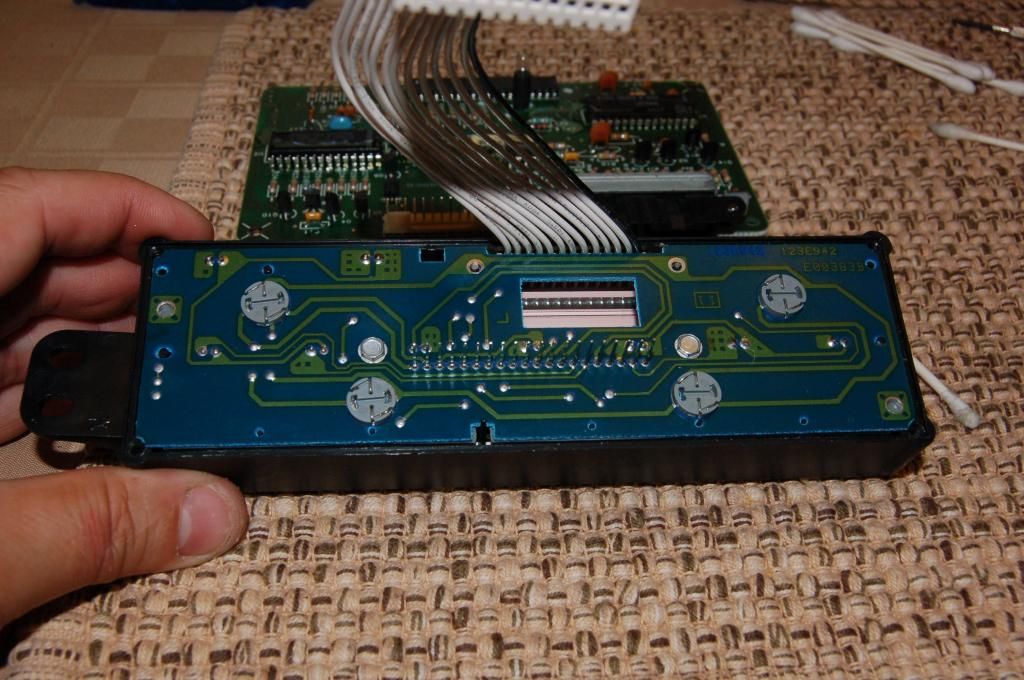
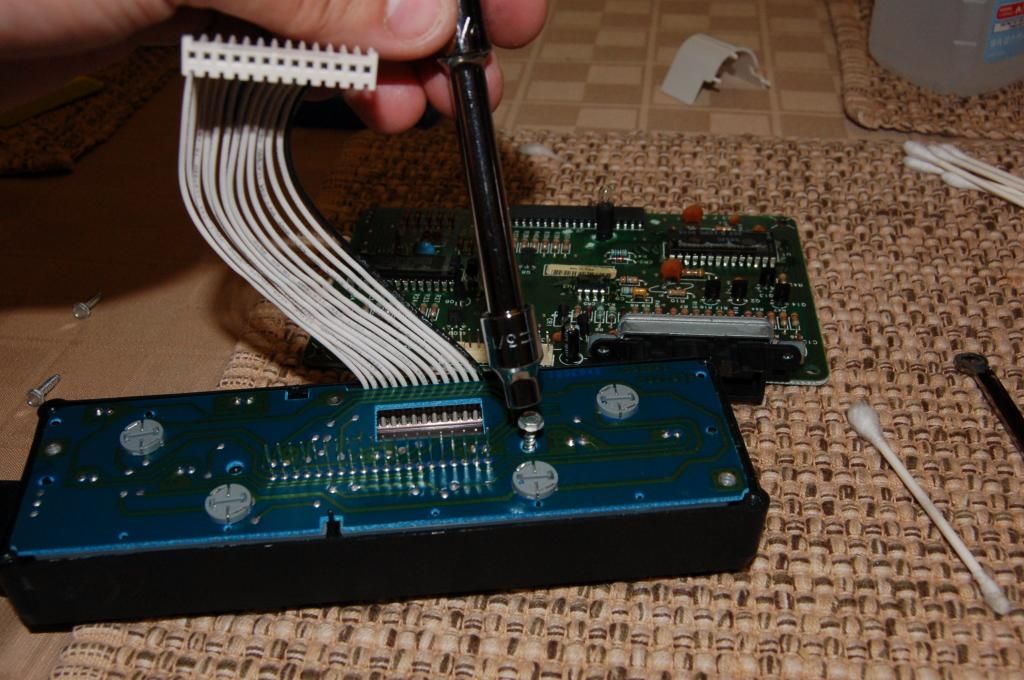
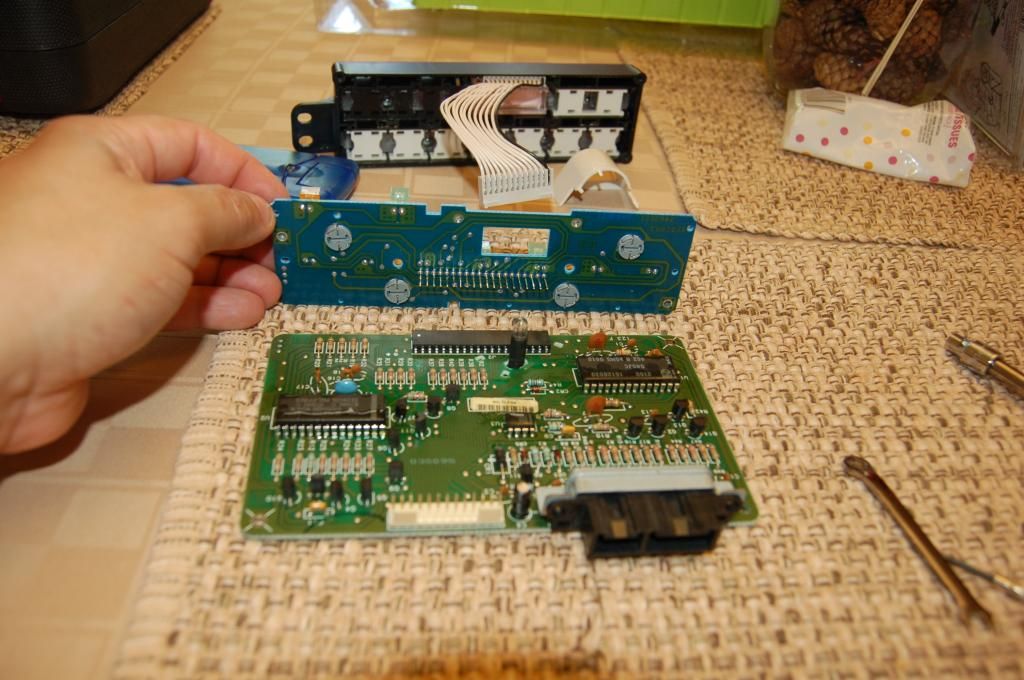
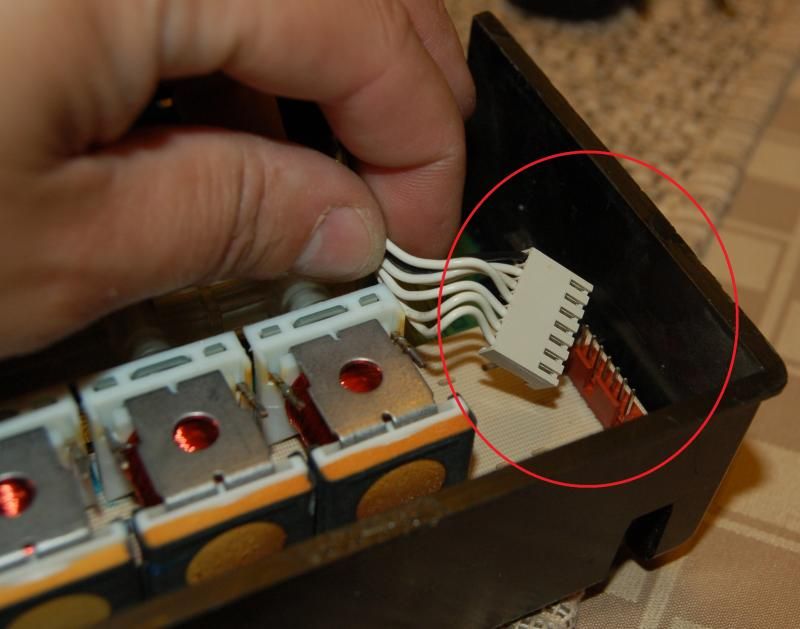
To get the controls start by lifting out the wiring harness.
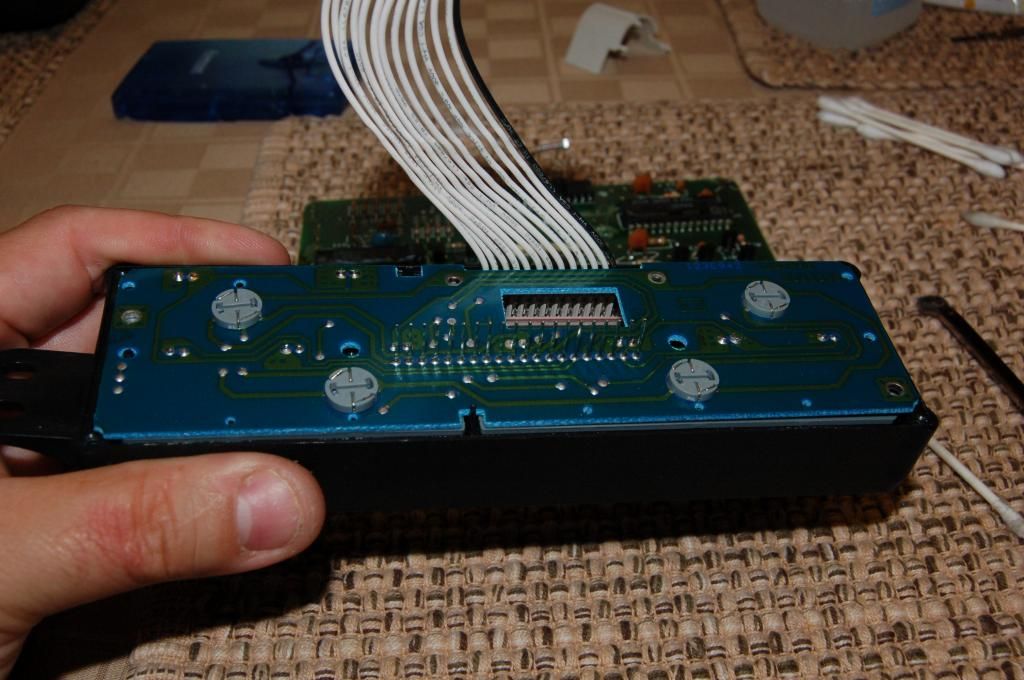
Then gently pry apart the board from the head. there is a pin socket holding the two together. you can also insert something plastic between the two to help get them apart. the trick is go slow and don't rush
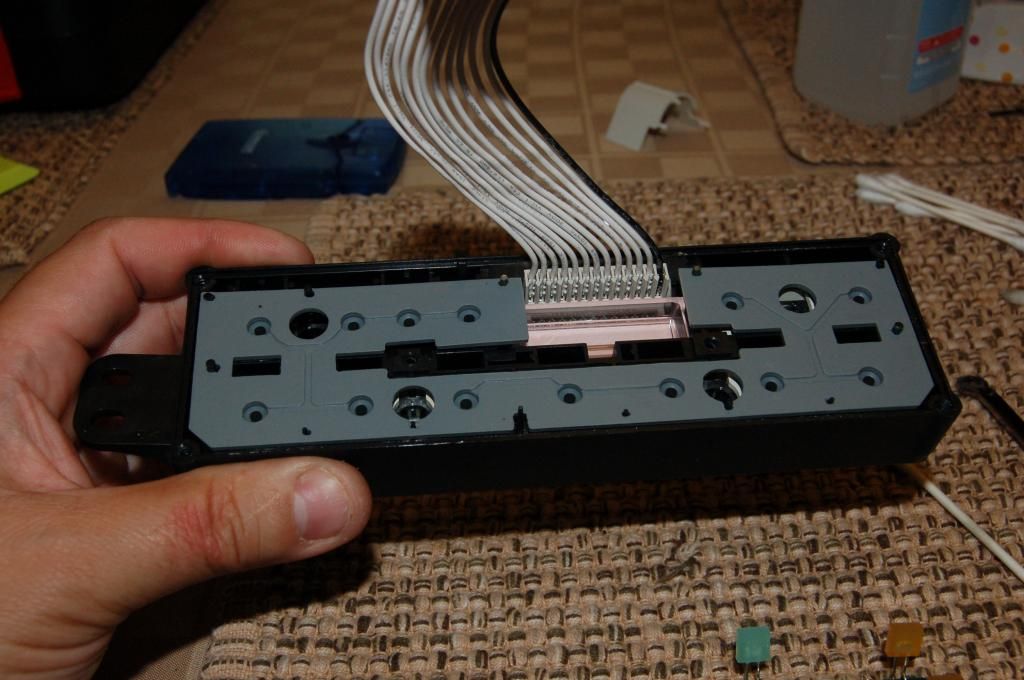
Once apart we can begin to take apart the head. First take the two screws out.
then begin to pull apart the head from the housing
once apart the rubber contacts may or may not still be attached to the housing.
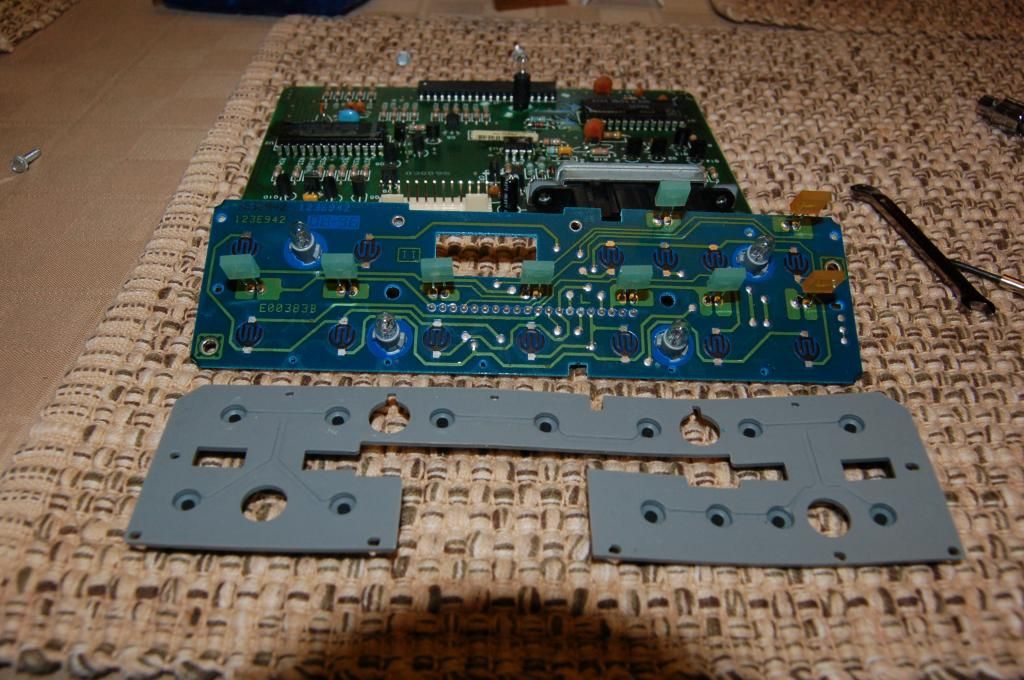
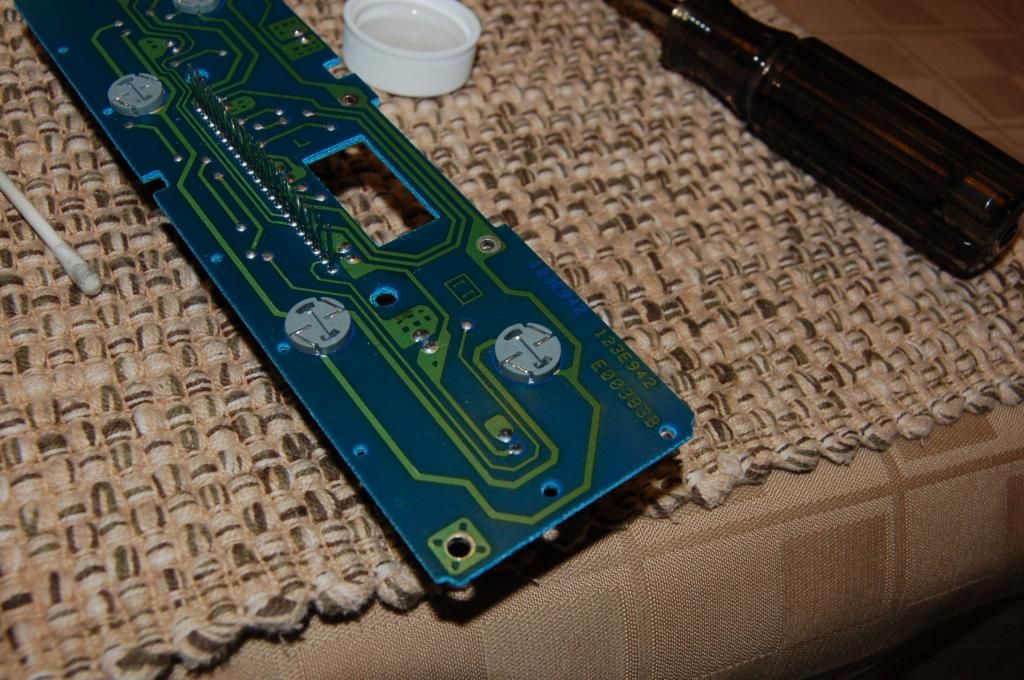
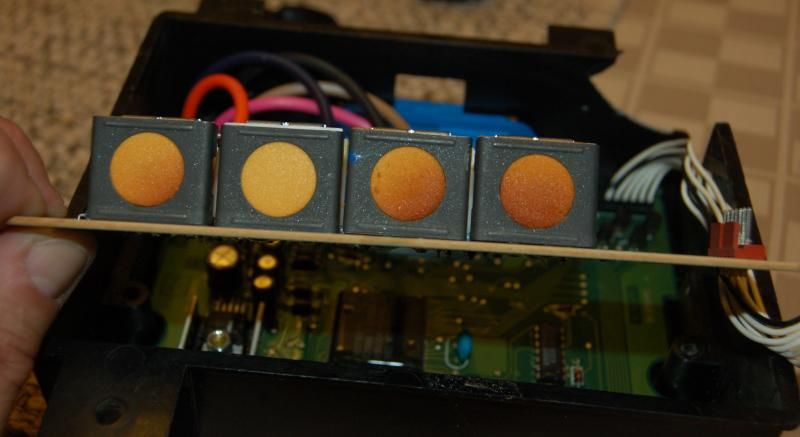
You should end up with these parts on your table
The dirt and residue that needs to be cleaned off resides between the rubber contacts and the front of the controls.
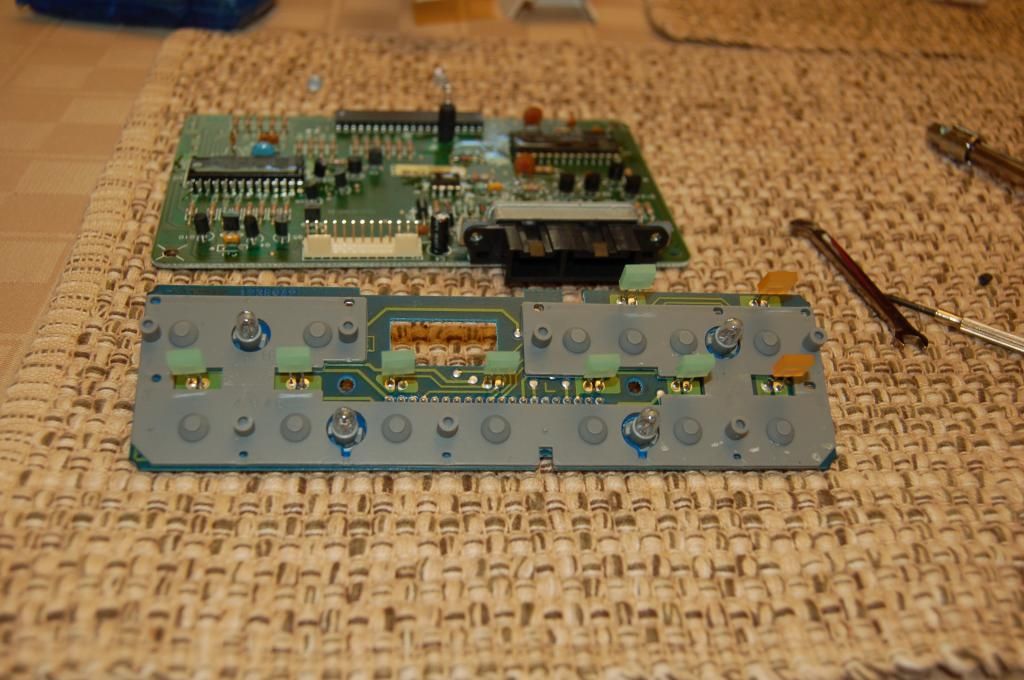
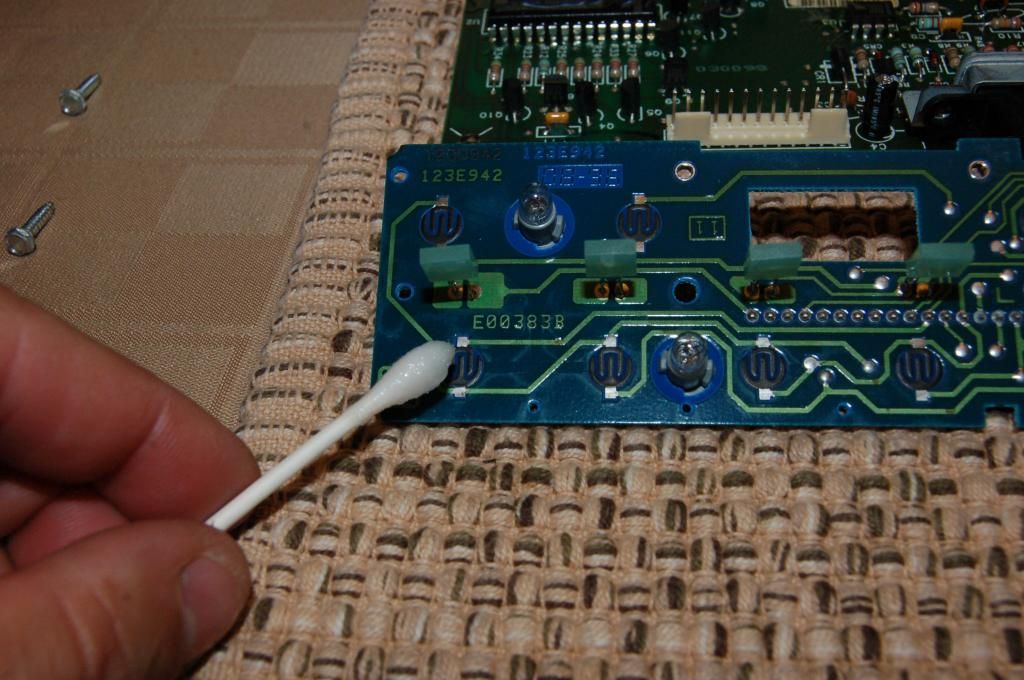
My head was not dirty and was not the cause of my problem but it was a good exercise anyway. Tools needed for the cleaning. Your solvent of choice, mine is 91% alch and q-tips.

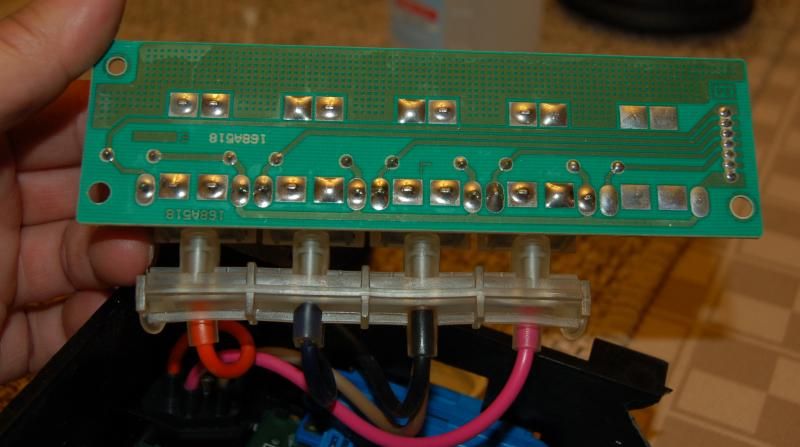
Dip q-tips in solvent and begin to clean contacts on board.
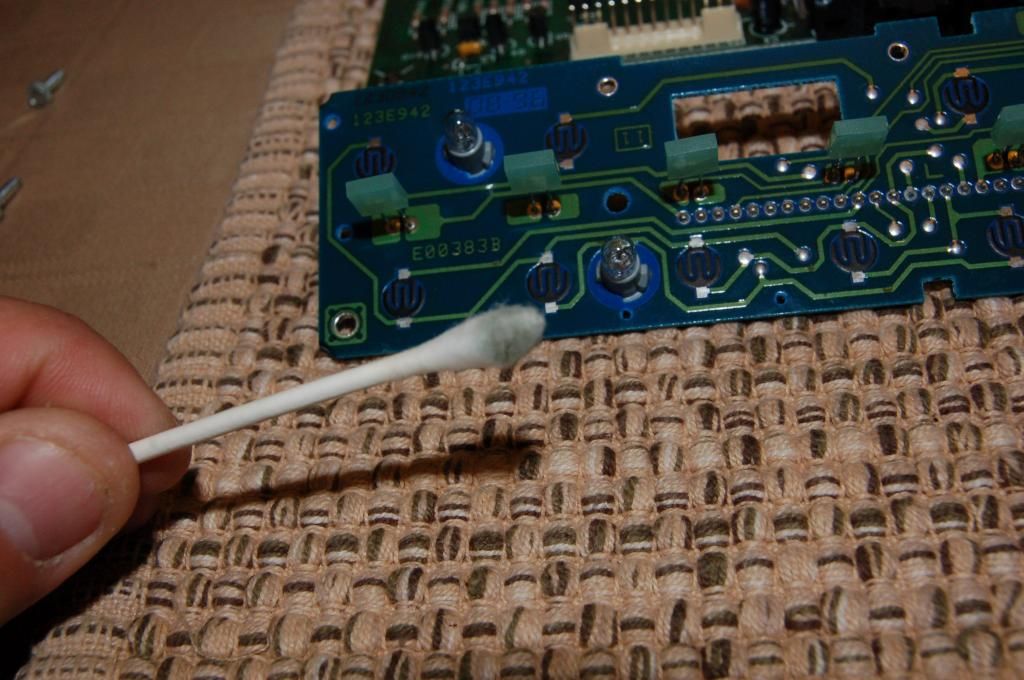
next give the rubber contacts a cleaning.
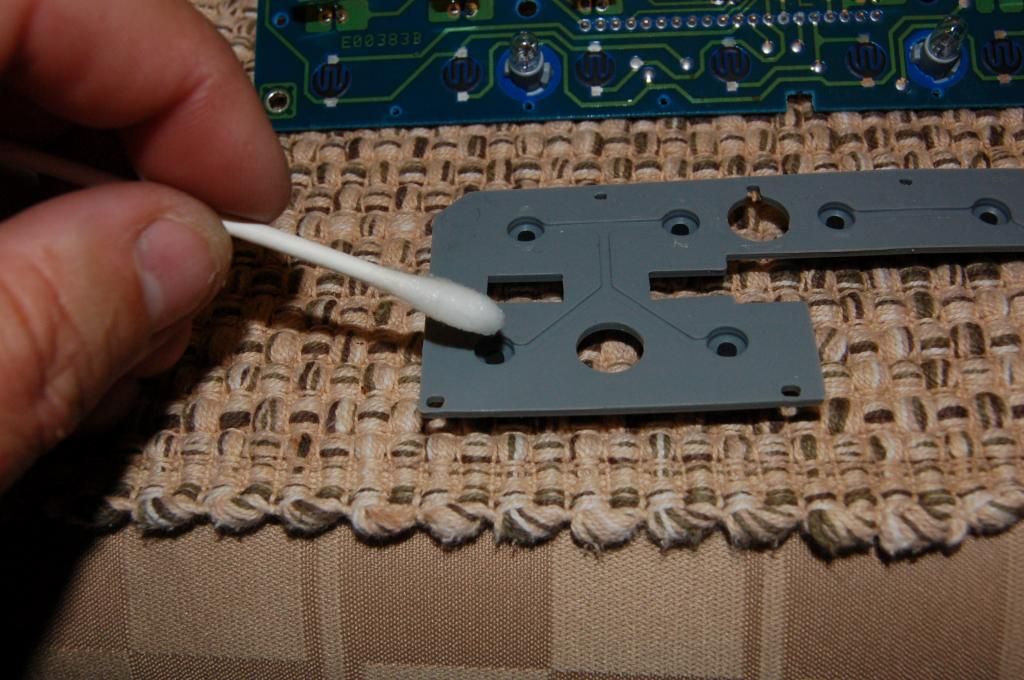
and if needed the housing itself if grimed up

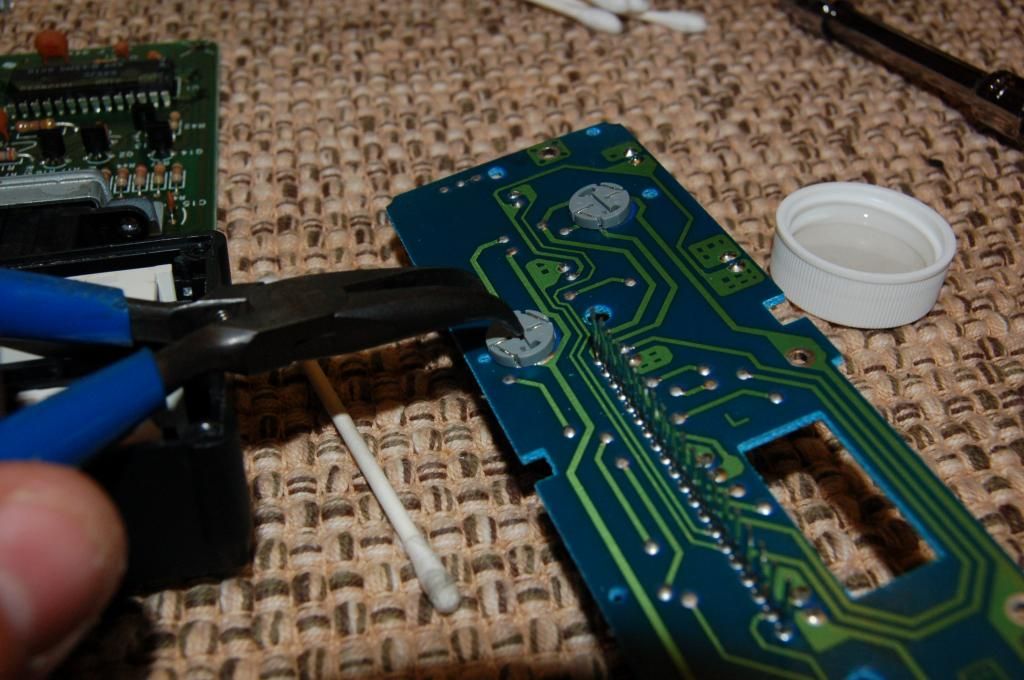
While your waiting to let it all dry you can verify buld function by taking them out and connecting to a dc power source if you have one.

and that's how you clean your head. The reassembly is just the inverse operation. I'll post the rest of that tomorrow. I gotta get running!
It's not hard, just don't be scared!
first have your head removed, that's another thread but don't worry, it's coming.
Here's your part #
Now we are going after six 3/16 nuts. 4 in the corners and two on the back. You might have to break out the small guns for this hard to reach one.
Once all the screws are removed slide the guts outta the housing. Here's the top, and the bottom. Give these a once over for any signs of damaged electronics though this is NOT the piece we will be focusing on when we are cleaning.
To get the controls start by lifting out the wiring harness.
Then gently pry apart the board from the head. there is a pin socket holding the two together. you can also insert something plastic between the two to help get them apart. the trick is go slow and don't rush
Once apart we can begin to take apart the head. First take the two screws out.
then begin to pull apart the head from the housing
once apart the rubber contacts may or may not still be attached to the housing.
You should end up with these parts on your table
The dirt and residue that needs to be cleaned off resides between the rubber contacts and the front of the controls.
My head was not dirty and was not the cause of my problem but it was a good exercise anyway. Tools needed for the cleaning. Your solvent of choice, mine is 91% alch and q-tips.
Dip q-tips in solvent and begin to clean contacts on board.
next give the rubber contacts a cleaning.
and if needed the housing itself if grimed up
While your waiting to let it all dry you can verify buld function by taking them out and connecting to a dc power source if you have one.
and that's how you clean your head. The reassembly is just the inverse operation. I'll post the rest of that tomorrow. I gotta get running!
Thread Starter
Instructor
Joined: Aug 2004
Posts: 174
Likes: 0
From: NWI IN
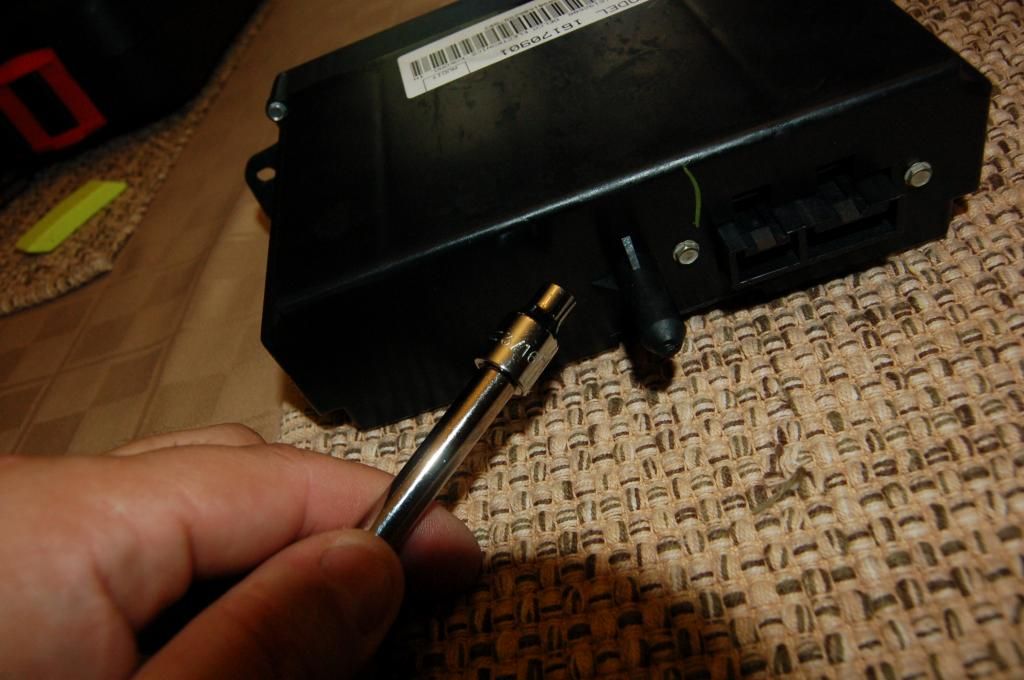
and that led to the programmer issue!!!!!!!!
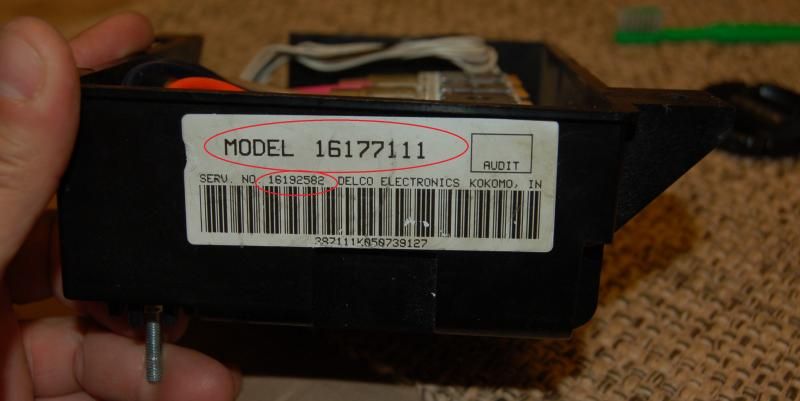
Yup, that's not a typo, I own a 1996 but I'll be reviewing the programmer for a 1995 as that's what was found in my car! So as of now I don't know if my problem is a compatibility issue or if this one is dead and I can get another one like it. The fact is the 1996 has it's own part number and I cant find any info on someone who has actually used one from a another year and documented it.
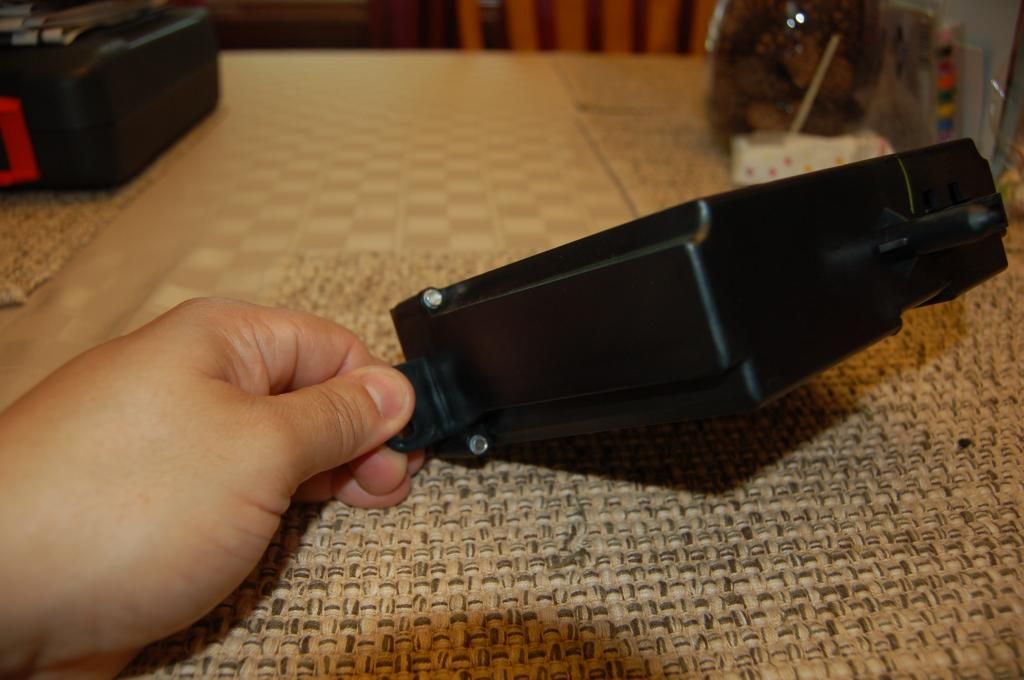
Backstory on removal.... take the driver seat out and prepare to get under the dash. I don't think there is any other way to do it. I'm 5' 7" and about 210 and it was about a 6/7 on the PITA scale.
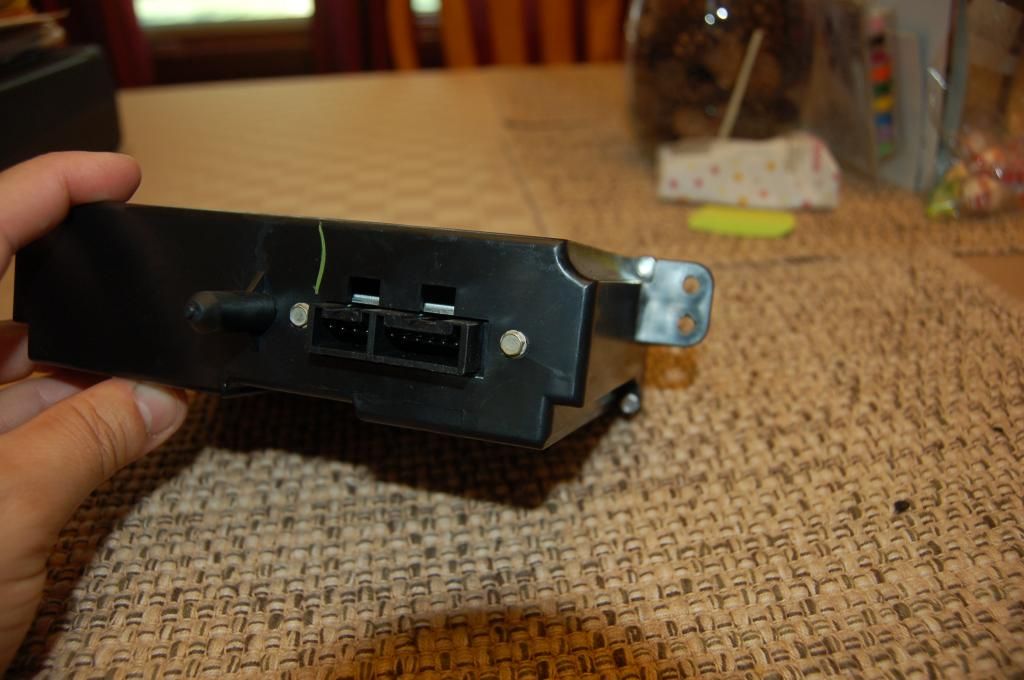
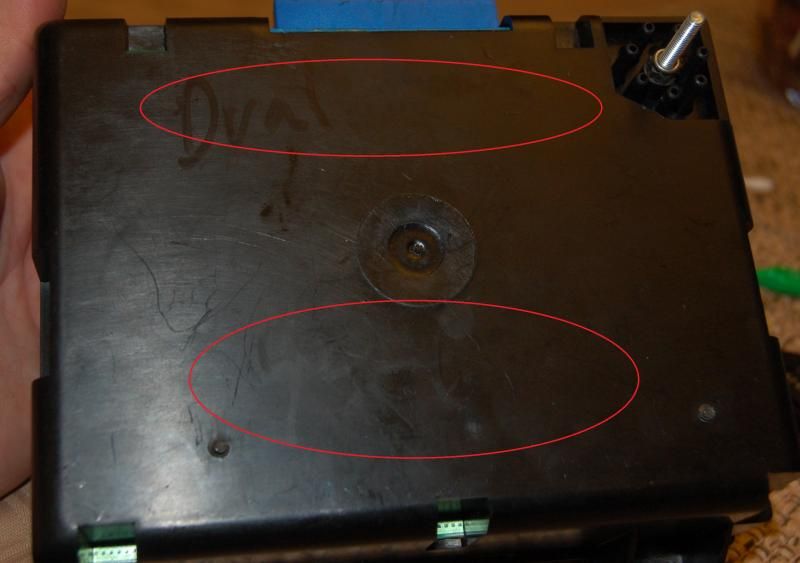
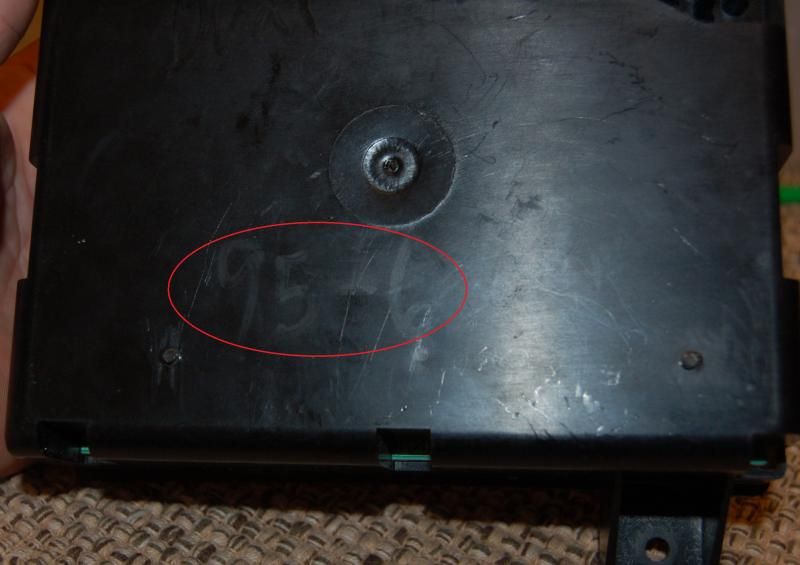
Once you bust hump, this is what you get. As you can see the part number is to a 1995 and someone one wrote on it "dual zone" and then "95-6"
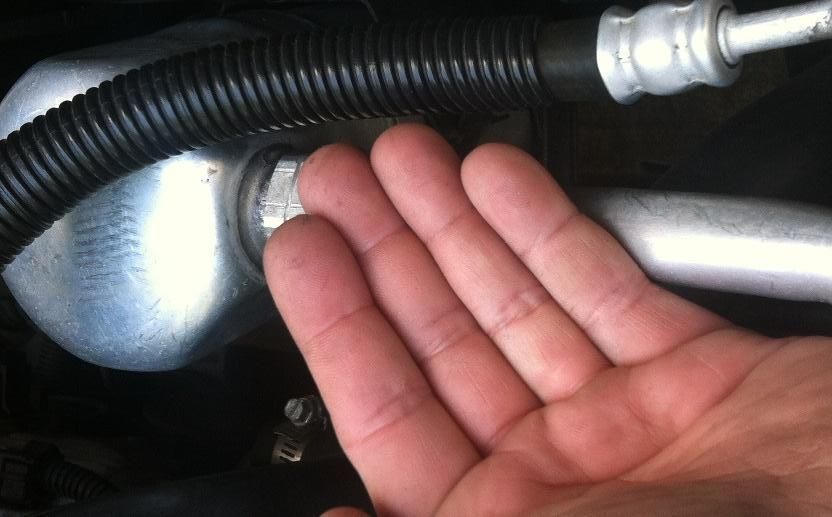
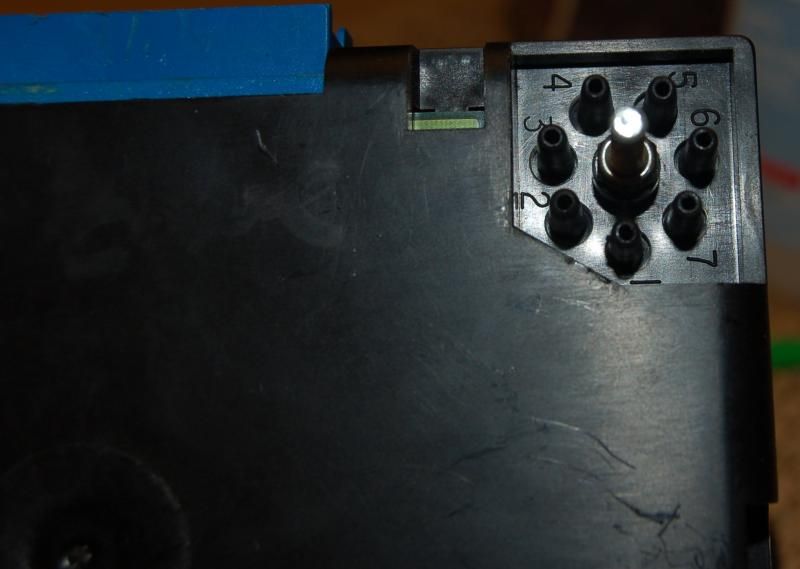
here's a close up of the nipples everyone always talks about. Not this issue in my situation
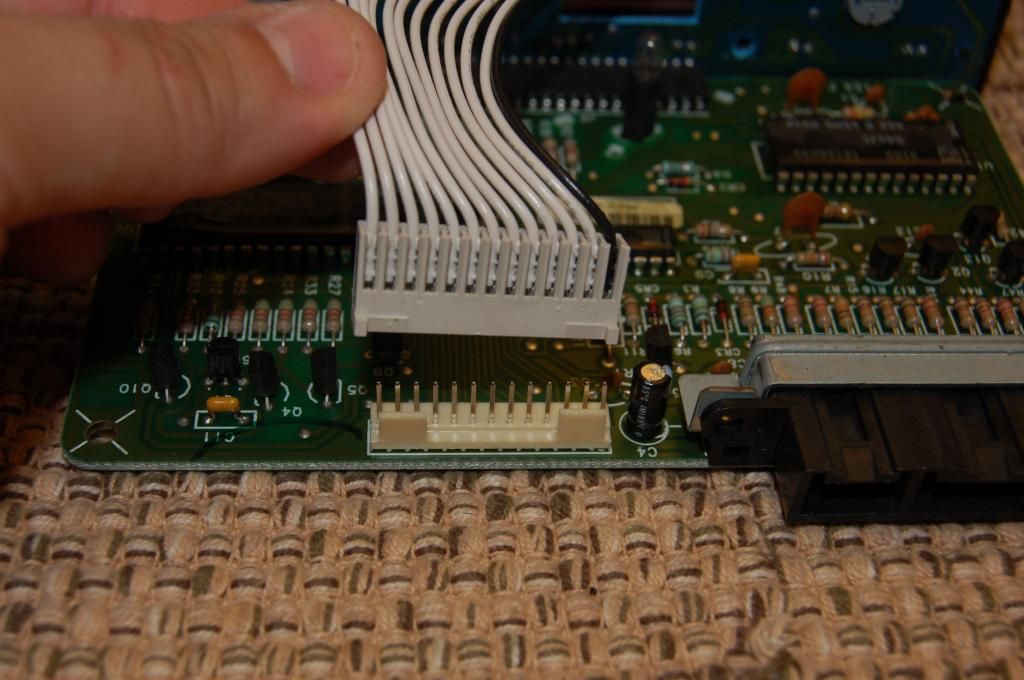
the back cover to this is a piece of cardboard taped on. Seriously, that's all that covers the boards. I was so pissed I took it off and forgot to take a pic. Once it's off go for the single connector in the corner and pull it off.
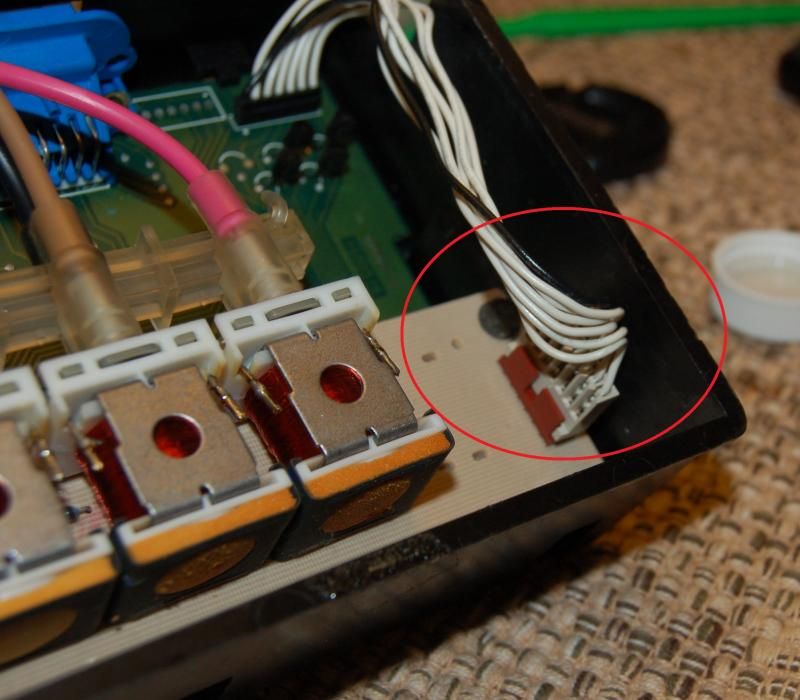
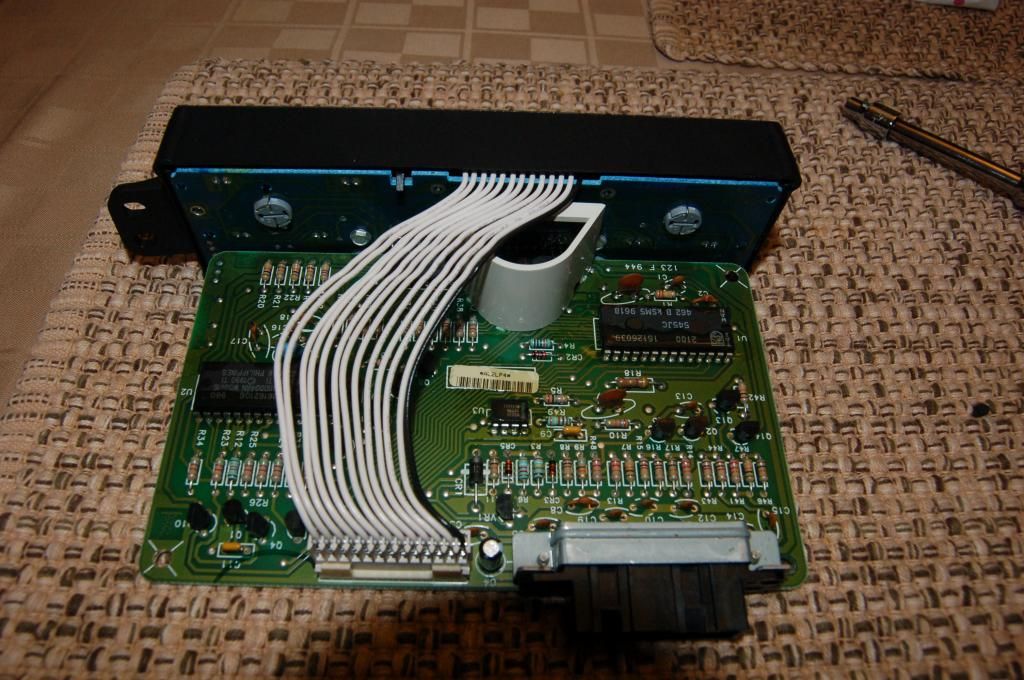
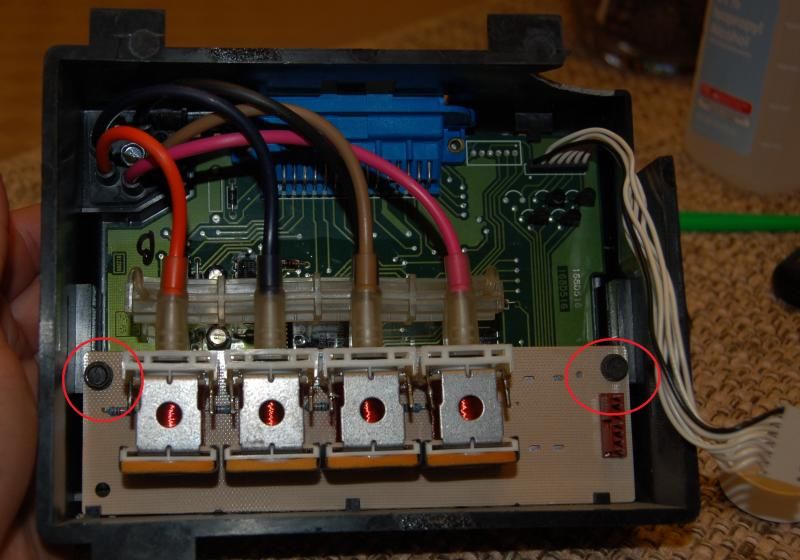
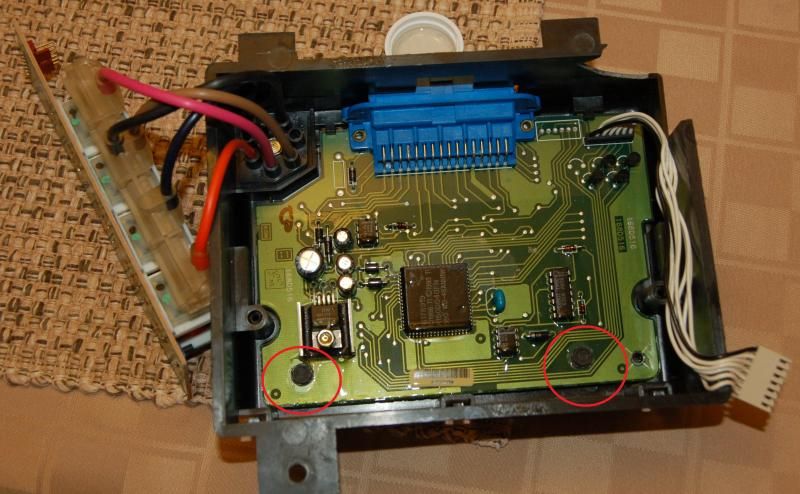
here's the inside in all it's glory. you'll need to pull the two screws I have circled in order to get the vacuum solenoid bank clear of the mother board
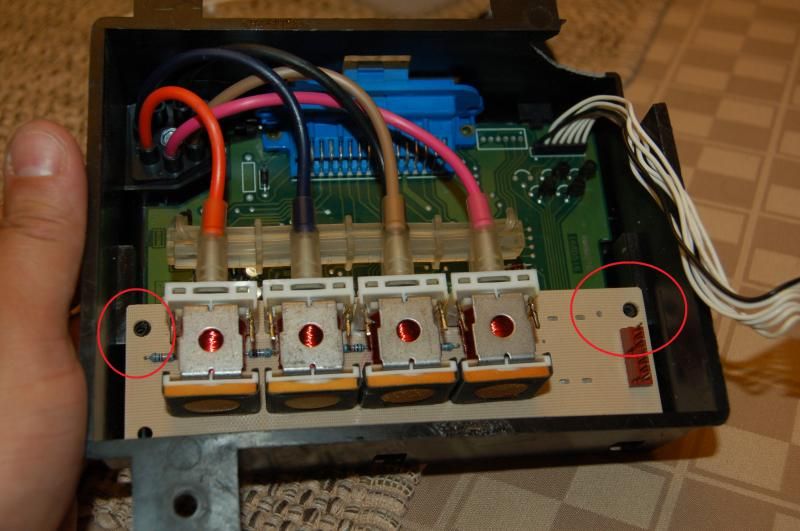
start lifting up and over then outta the way. Since my issue wasn't with these guys I just gave them the once over. Nothing visible for me to address so I left them alone.
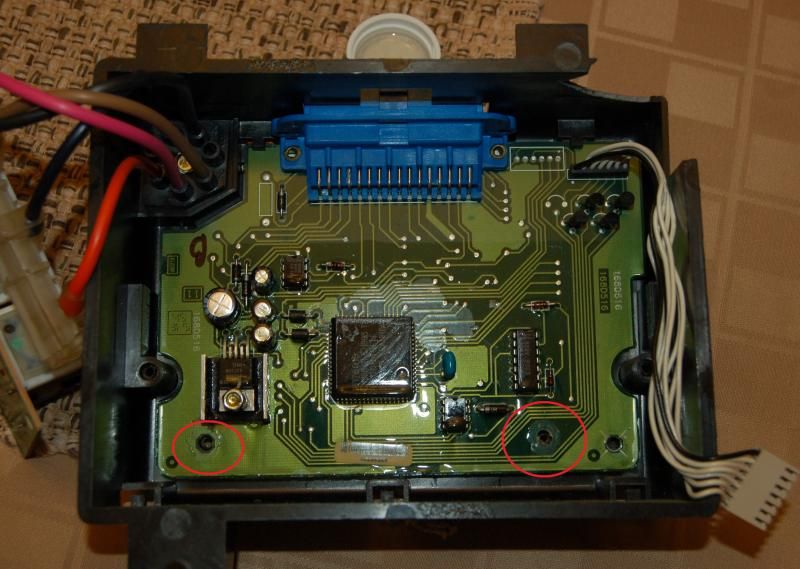
two more screws and then you can pull the board:
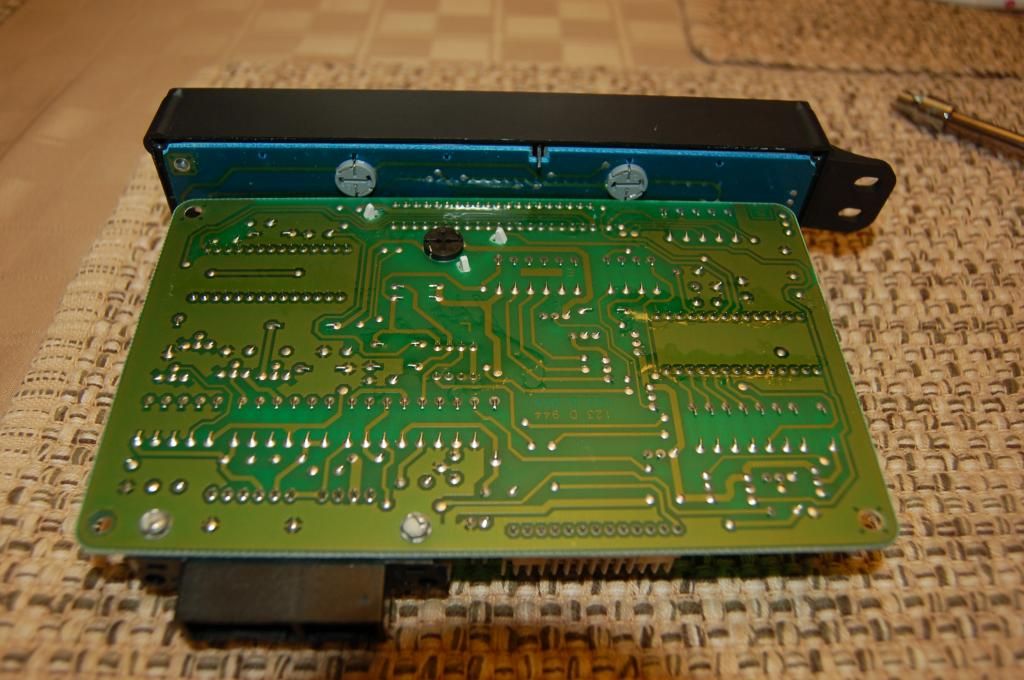
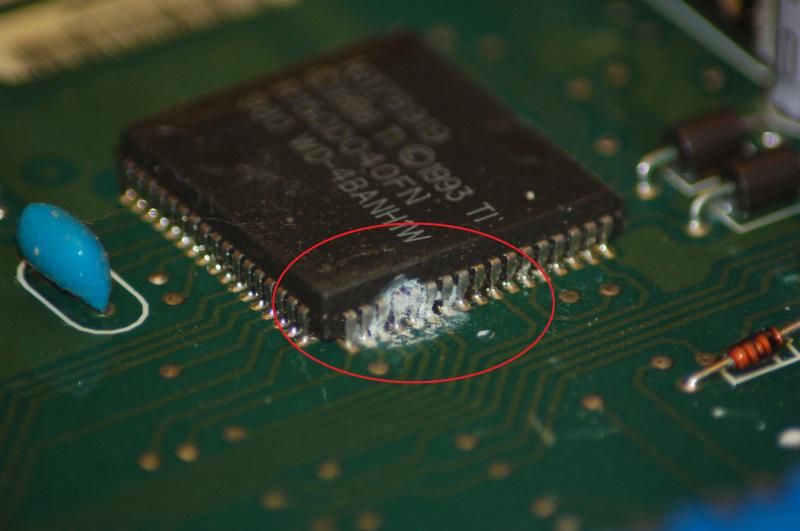
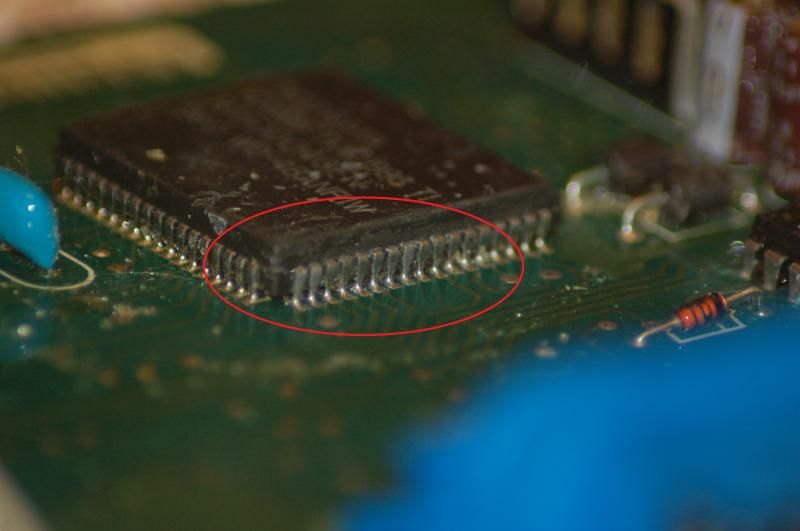
And here it is! The board doesn't seem to be that complex of a circuit with the exception of the couple of chips. I was hoping to find a blown cap or diode. No luck. What I did find and hope was the issue was the corrosion in one spot!

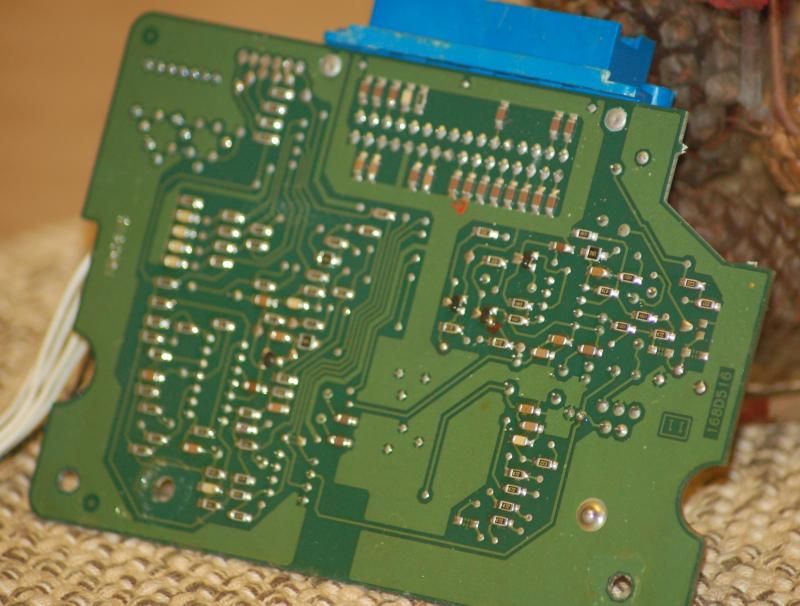
The reality is most electronics boards can be washed. People assume that water kills electronics and that isn't true. power on a circuit plus water kills boards! with that said I took my 91% alch and washed both sides of the board with my fingers crossed. You can see it cleaned the spot. to bad it didn't cure my AC problem
re assembly is straight forward. just reverse the process. and there you have it, you've talked another inspection!
Yup, that's not a typo, I own a 1996 but I'll be reviewing the programmer for a 1995 as that's what was found in my car! So as of now I don't know if my problem is a compatibility issue or if this one is dead and I can get another one like it. The fact is the 1996 has it's own part number and I cant find any info on someone who has actually used one from a another year and documented it.
Backstory on removal.... take the driver seat out and prepare to get under the dash. I don't think there is any other way to do it. I'm 5' 7" and about 210 and it was about a 6/7 on the PITA scale.
Once you bust hump, this is what you get. As you can see the part number is to a 1995 and someone one wrote on it "dual zone" and then "95-6"
here's a close up of the nipples everyone always talks about. Not this issue in my situation
the back cover to this is a piece of cardboard taped on. Seriously, that's all that covers the boards. I was so pissed I took it off and forgot to take a pic. Once it's off go for the single connector in the corner and pull it off.
here's the inside in all it's glory. you'll need to pull the two screws I have circled in order to get the vacuum solenoid bank clear of the mother board
start lifting up and over then outta the way. Since my issue wasn't with these guys I just gave them the once over. Nothing visible for me to address so I left them alone.
two more screws and then you can pull the board:
And here it is! The board doesn't seem to be that complex of a circuit with the exception of the couple of chips. I was hoping to find a blown cap or diode. No luck. What I did find and hope was the issue was the corrosion in one spot!
The reality is most electronics boards can be washed. People assume that water kills electronics and that isn't true. power on a circuit plus water kills boards! with that said I took my 91% alch and washed both sides of the board with my fingers crossed. You can see it cleaned the spot. to bad it didn't cure my AC problem
re assembly is straight forward. just reverse the process. and there you have it, you've talked another inspection!

Melting Slicks

Joined: Aug 1999
Posts: 2,240
Likes: 42
From: Baltimore, MD USA
Your static pressure of 60 psi after sitting all night and a ambient temp of 72F
indicates you're low on refrigerant.
The correct static pressure for R134A at 72F should be close to 73 psi and not 60 psi.
This static pressure won't tell you how much refrigerant is in the system but
from the pressure being 60 psi indicates you're low on refrigerant and have a leak

indicates you're low on refrigerant.
The correct static pressure for R134A at 72F should be close to 73 psi and not 60 psi.
This static pressure won't tell you how much refrigerant is in the system but
from the pressure being 60 psi indicates you're low on refrigerant and have a leak

Thread Starter
Instructor
Joined: Aug 2004
Posts: 174
Likes: 0
From: NWI IN
This car sat in storage for 18 months and had the same issue at that time. If it was a leak I would think there would be no pressure by now. Also, if there was low refrigerant why does the clutch not engage at all in the the ac modes yet engages and cools as shown in the videos, in the off position?
Melting Slicks
Joined: Aug 1999
Posts: 2,240
Likes: 42
From: Baltimore, MD USA
When the HVAC Control head is set for 60F the AC programmer should send a 12 volt
signal on the Dark Blue wire at the low pressure cycling switch. Use a meter and measure this voltage.
It should always be there as long as AC is requested. Press the Off button on the HVAC control head.
The voltage should go back to zero.
If that's correct there is no problem with the Programmer as far as the AC request
signal.
If you set the the control to 60F and the AC request signal is there and the low pressure cycling switch
is closed (indicating there is at least 46 psi in the system the clutch should engage.
If it doesn't with engine off you need to back probe and measure the 3 wire AC Pressure Transducer screwed
into the high side line.
Gray wire = 5 volts sensor reference voltage
Black wire = Sensor ground
Red/Black = Must be higher than .12 dc volts the feedback signal to PCM
The PCM will not enable the compressor clutch if the voltage is less than .12 volts.
It will also disable clutch operation if the high side pressure is over 429 psi 4.86 volts
The sensor is mounted on a schrader valve so can be replaced with out discharging
the system.
You really need to put a gauge on the High pressure side to monitor the pressure.
In your video the system is short cycling. That's an indication of low refrigerant.
The low pressure cycling switch shuts the compressor off at 23 psi to prevent icing in the evaporator.
As the pressure rises above 46 psi the low pressure cycling switch closes and the clutch engages.

Last edited by Hooked on Vettes; Jul 24, 2014 at 11:58 PM.
Corvette Stories
The Best of Corvette for Corvette Enthusiasts

150 hp to 1,250 hp: Every Corvette Generation Compared by the Specs That Matter
Joe Kucinski
8 Coolest Corvette Pace Cars (and Replicas) of All Time
Verdad Gallardo
Top 10 Corvette Engines RANKED by Peak Torque (70+ Years of Muscle!)
Joe Kucinski
Corvette ZR1X Will Be Pacing the Indy 500, And Could Probably Race, Too!
Verdad Gallardo
Top 10 Corvettes Coming to Mecum Indy 2026!
Brett Foote
Top 10 C9 Corvette MUST-HAVES to Fix These C8 Generation Flaws!
Michael S. Palmer
10 Revolutionary 'Corvette Firsts' Most People Don't Know
Joe Kucinski
5 Reasons to Upgrade to an LS6-Powered Corvette; 5 Reasons to Stay LT2
Michael S. Palmer
2027 Corvette vs The World: Every C8 vs Its Closest Competitor
Joe Kucinski
Le Mans Master

Joined: Dec 2000
Posts: 7,839
Likes: 22
From: San Diego, Ca
Off shouldn't send an a/c command and it's far easier to troubleshoot with a Tech 2 with the right cartridge which will emulate the Controls and communicate through the Body Module. If it works, then it needs a new Control Panel. If it doesn't it's the Programmer. You can also get the Data Stream Manually through the Controls so if you don't want to give a Dealer an hour of Diagnostic for 5 minutes of work, you might try that - see Tech Tips; the numerical representations are fairly easy to figure out for each component.
If you haven't, make sure the Low Pressure Switch has a good connection. Just disconnect it and plug it back in or jumper the harness with a paperclip. If it runs, try wriggling it around or holding the Connector on the Switch or replacing the Connector usually solves the problem (though on an S10 I once owned, I had to replace the Switch and the Connector to fix the intermittent - which was always when it was hot!).
Your static is probably ok, but if you want it exact, you'll need line temp not ambient and then if it doesn't match, there's something else in it - usually air. Static will be the same until there's nothing in it and it's not an indicator of low gas. That doesn't mean that it's full. In fact, after 10 years I'd be surprised if it is. The OEM's have long since admitted that they can't make a leakproof system which is one of the reasons they're reluctant to use flammable refrigerants.


Thread Starter
Instructor
Joined: Aug 2004
Posts: 174
Likes: 0
From: NWI IN
Have you tried pulling HVAC codes? Here is a link to a video explaining how to do it. -
C4 Corvette Climate Control Codes - YouTube
C4 Corvette Climate Control Codes - YouTube
this was done and is video # 4 in my post with the beginning of my trouble shooting. No codes
Thread Starter
Instructor
Joined: Aug 2004
Posts: 174
Likes: 0
From: NWI IN
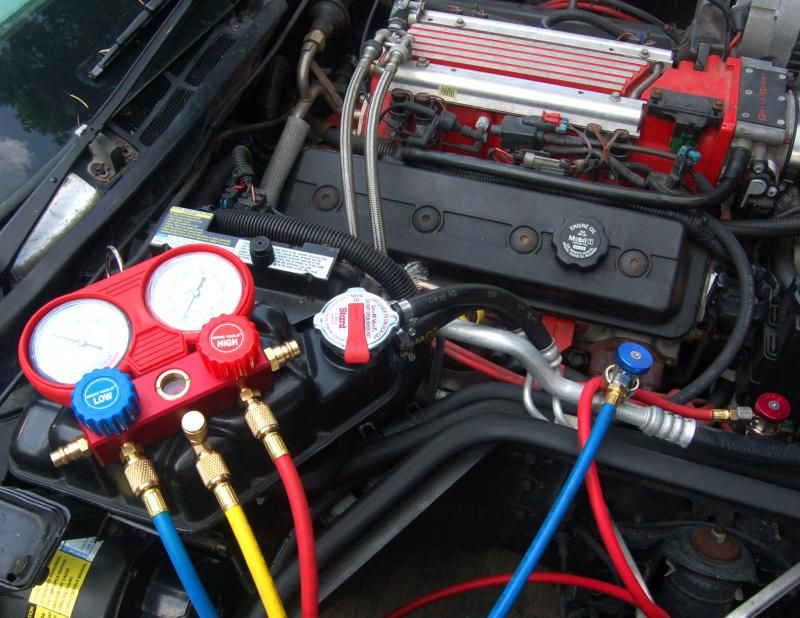
I borrowed a set of manifold gauges last week and forgot to mention that I tossed them on the car. I read that a static pressure of 50 or greater with the car off meant the system was charged.

Thanks for the tech advice guys, I have this weekend off and will TS a bit more. I will also call one of my buddies and see if he ha a tech 2. If the tech 2 will diagnosis in 5 minutes what's taken me two weeks maybe its worth the $50 to have it done.


Thanks for the tech advice guys, I have this weekend off and will TS a bit more. I will also call one of my buddies and see if he ha a tech 2. If the tech 2 will diagnosis in 5 minutes what's taken me two weeks maybe its worth the $50 to have it done.
Le Mans Master
Joined: Dec 2000
Posts: 7,839
Likes: 22
From: San Diego, Ca
Static pressure doesn't mean it's full. Pressure has nothing to do with volume.
You'll need a cartridge for the Tech 2 that can interface with the Body Module.
You're not looking for Codes. You want the Data Stream which is available numerically through the Control Panel.
You'll need a cartridge for the Tech 2 that can interface with the Body Module.
You're not looking for Codes. You want the Data Stream which is available numerically through the Control Panel.
Drifting


Joined: May 2007
Posts: 1,440
Likes: 19
From: SW Chicago Burbs IL
Le Mans Master
Joined: Dec 2000
Posts: 7,839
Likes: 22
From: San Diego, Ca
Melting Slicks
Joined: Aug 1999
Posts: 2,240
Likes: 42
From: Baltimore, MD USA
and that led to the programmer issue!!!!!!!!
Yup, that's not a typo, I own a 1996 but I'll be reviewing the programmer for a 1995 as that's what was found in my car! So as of now I don't know if my problem is a compatibility issue or if this one is dead and I can get another one like it. The fact is the 1996 has it's own part number and I cant find any info on someone who has actually used one from a another year and documented it.
Yup, that's not a typo, I own a 1996 but I'll be reviewing the programmer for a 1995 as that's what was found in my car! So as of now I don't know if my problem is a compatibility issue or if this one is dead and I can get another one like it. The fact is the 1996 has it's own part number and I cant find any info on someone who has actually used one from a another year and documented it.
You never mentioned the AC buttons have never worked properly since you've owned the vehicle.

The button problem is because of the 95 AC Programmer is not compatible with the 96.

The cooling problem is because you're low on refrigerant.

This guys problem describes your exact symptoms when using the wrong AC Programmer. He eventually used the hard nipples from the AC Programmer that didn't work on his 96.

Looks like 96 AC Programmers are in the $600.00 range.

Here's a link to the thread.
http://www.corvetteforum.guru/module...topic_id=19175
Burning Brakes

Joined: Mar 2013
Posts: 1,131
Likes: 5
From: Illinois/Wisconsin Line
Keep it Simple I know for a fact it's low. It's almost pulling down into Vacuum, Running and ur problem maybe with it pulling so low that ur Evap is Icing up and the Thermister is forcing a cut out and that will also explain why its not Sweating
Check for Icing/check the Thremistor and pump it up
An old mans 2 cents with a fresh look at this.
Good videos by the way
Check for Icing/check the Thremistor and pump it up
An old mans 2 cents with a fresh look at this.
Good videos by the way
Drifting
Joined: May 2007
Posts: 1,440
Likes: 19
From: SW Chicago Burbs IL
Just for future reference, the 96 FSM manual under 8A-66-2 states to use the Tech 1 with body systems cartridge for diagnosis. Hope this helps anyone in the future.