When you click on links to various merchants on this site and make a purchase, this can result in this site earning a commission. Affiliate programs and affiliations include, but are not limited to, the eBay Partner Network.
I finally have some weekends that I can dedicate to working on my 94. A few years back I overhauled the rear suspension, replaced every bushing for poly (no squeaks to date), replaced the rear wheel bearings and cleaned up the aluminum. Now the front end is due.
This evening I pulled the front wheels off and just took a look around. I couldn't coax any play out of the ball joints or tie rod ends but the rubber cups have perished and there is no doubt dirt in there eating them up. So right away I know I need upper and lower ***** joints and tie rod ends. The control arm bushings look dry rotted so the plan is to replace them with poly. Lastly, while the brake pads have plenty of meat left I don't particularly like them (I believe they are Hawk ceramics), they make noise and have a high effort pedal, cold bite isn't great either - looking for something a little more driver/cruising friendly. So the car needs discs and pads all around as well - and the rubber brake lines as those are original.
To tally it:
Upper + Lower Control Arm Bushes
Upper + Lower Ball Joints
Tie Rod Ends
Brake Discs and Pads - all corners
Brake Lines - all corners
This feels pricey just typing it out but I've done no price research yet. I believe new C4 control arms with bushings and ball joints installed are or used to be available. If so, that may be the most cost effective method to refurb the car. I'm not on a set budget but other responsibilities do supersede the Vette so I can't go nuts.
Assuming I can't or don't go with new control arms and instead refurb the existing set, are there any preferences among the members as far as ball joint/tie rod end brand? Anything to stay away from or be aware of? Anything else I should inspect while I have things apart? Thanks for reading, looking forward to your input. While this is something that I'm sure has been rehashed over and over, I'll take pictures to post as I go.
I am very curious to see what input you get and which route you choose. This is on my list of things that need to be done as well. I did find a couple of good threads that talk about the procedure. http://tech.corvettecentral.com/2014...shing-service/
Might do the ball joints at the same time just because. Also debating a brake upgrade at the same time.
I just replaced my tie rod ends, upper and lower ball joints last summer. I went with moog for everything. Stay away from "store brand" parts. They arent worth the effort it takes to install them. My front bushings were good but a few years ago I replaced the rear ones with energy suspension. Ive been happy with them. Ive also replaced my master cylinder, rotors, rebuilt my calipers and installed stainless brake lines. I used delco rotors with hawk hps pads and for just cruising Im happy with them. Mine are silent and work well.
I used Moog ball joints and tie rod ends on mine, they seemed to be good quality. For wheel bearings on the front I used Timken, no issues with them thus far. I hear SKF are the best wheel bearings but they are much more expensive. Poly bushings should work fine, get the black graphite impregnated ones, or if you want a little more performance Global West sells some cool Del-A-Lum control arm bushings, those are what I used on my lower control arms.
Thanks for the interest in my thread. I broke down the passenger side after work today. For all those that have gone before me battling the lower rear control arm bolt - I know your pain. That bolt was a 90 minute project in itself. I read a thread on the forum where someone removed the brace that the bolt doesn't clear. They said the motor isnt supported by it, but it really looked like the motor mount to frame bolts were bolted to it. I opted to fight the bolt, brace in place.
All the rubber cups on ball joints/tie rods were ripped to pieces. Amazingly, all the joints felt perfect, no slop or grit and still stiff like a brand new one. Still, they are contaminated and getting replaced. I was happy to see that the inner tie rod seemed to be in great shape. No signs of slop when I push/pull on it and they will hold the tie rod anywhere I place it, so they still seem tight. Wheel bearing felt great as well, no need to replace at this time. I likely won't have the time to work on the car again until the weekend.
Here are some pics.
My 1/2 impact was too bulky to reach the lower ball joint bolt. Conveniently, the hole above from the absent upper ball joint allows a 3/8 extension through and is perfectly inline with the castle nut below. With a 3/8 to 1/2 adapter I was able to still use the impact. Down side, as you can see I was not able to use my impact rated sockets.
The lower ball joint, rubber boot destroyed and a grease mess.
I didn't anticipate the aluminum shims on the UCA to fall out. I believe I have them allocated correctly as far as front ones vs back ones, but is there any specific order they need to be in? Seems to me that wouldnt matter. Do all C4s use the same # and thickness shims or is each car unique and shimmed as needed to factory align?
And last, the battle is won.
I'll def check out the Moog parts.
DMITTZ, any idea the brand name of the graphite impregnated bushings? Would like to check them out. The rear of the car was rebuilt with Energy Suspension poly and I have zero complaints.
The 'black' energy suspension bushings are graphite impregnated. But any bushing that is graphite impregnated should be fine, PST also makes graphite impregnated bushings that are suppose to be good. Using graphite impregnated poly helps reduce speaks a bit which is why I'm recommending it instead of the 'red' ones.
Great work on the suspension, best of luck with the rest of your project.
I agree with the recommendations for Moog joints. On the bushings, my only caveat is that if you happen to autocross or otherwise compete in any motorsports events, non-rubber bushings usually move you into a class that allows a lot of modifications, so you can't legally compete in Stock or Street classes anymore. On the lower control arm bushings, if you go with urethane you might consider offset (eccentric) bushings to gain a better range of negative camber.
The 'black' energy suspension bushings are graphite impregnated. But any bushing that is graphite impregnated should be fine, PST also makes graphite impregnated bushings that are suppose to be good. Using graphite impregnated poly helps reduce speaks a bit which is why I'm recommending it instead of the 'red' ones.
Great work on the suspension, best of luck with the rest of your project.
That must be what the "g" at the end of their part numbers means. I used the black ES ones in the rear of the car not knowing that - I based that decision on thinking red ones would look silly!
For future reference, that rear lower control arm bolt comes right out with those braces removed. You do have to remove the nut from the bottom of the engine mount, but there is another support there which allows removal of the braces without having to support the engine otherwise.
Be careful if you're doing the press work on those upper arms. Everything can only come apart and go back together one way, and you need to exercise caution and creativity with your fixtures as to not compress the ends of the control arm.
Depending upon how far you want to dig, there is two wearable items on the steering rack, the swaybar endlinks and frame mount bushings, and the pads at the end and center of the spring.
Last edited by wikdwizard; 02-09-2017 at 02:32 AM.
I did the same job a number of years ago - and you can add me to the list of those in favor of Moog Ball joints and Tie Rod ends. I got the full bushing kit for the C4 (I believe it was polygraphite) thru Summit Racing.
I had a problem getting the lower ball joints out of the control arms (even though I had access to a hydraulic press) - I ended up bringing the two lower control arms and the new ball joints to a local machine shop and they pressed out the old ball joints and pressed in the new ones for like $50. (I'm told it's all in having the right adapters to support the aluminum arms while applying load to the body of the old ball joint).
For the most part - the polyurethane front control arm bushings aren't too bad to install - the one exception is on the upper control arm - you have to support the arm as you press one of the bushings into place - the control arm is not strong enough to support pressing on one "ear" while resting the arm on the other "ear". The instructions in the kit were pretty good - but it basically came to getting a piece of scrap steel, and cutting / grinding it to fit snugly between the two mounting "ears" - that way the ear you're pressing on it is supported as you push the bushings in.
One other friendly word of advice - if the upper ball joints are OEM - they are riveted in. The normal replacement technique is to grind off the heads of the rivets, drive the rivets out, and remove the old ball joint. That sounds easy - doesn't it.... https://www.corvetteforum.com/forums...s/biggrin5.gif After bending several punches - you realize that the factory process of installing the rivets forces metal to expand outward. I would recommend drilling the rivets out or at least drilling most of them out - then driving out the remainder.
Remember - even if you put the same shims back in - your alignment may be way off when you reinstall everything. Use a level to check to see if the wheel is approaching vertical, and use a piece of string (or better yet - toe plates) to rough in the toe in, can get to a good alignment shop.
I've already picked up sway bar mounts and still need to source the end link ones. Not planning on touching the spring perch mounts, they seem ok.
I've spent about 500 in parts already, which covers all ball joints and tie rod ends (went with moog), discs and pads for all 4 corners, the poly
ushings and more. What is srviceable on the rack? Is it just the bushings on the mounts? I need to take a look at those.
So yesterday wigh had had a blizzard in the northeast which meant I got to work from home. Since I saved time on the commute I was able to work on the vette a bit. In 90 minutes I had the drivers side completely broken down! The lower control arm was easy since I developed a method that I'll explain a bit below.
The below pic was taken after the bolt was out but demonstrates my method. First remove the it from the rear bolt and slide he bolt through as far as it will go, then remove the front bolt and use a pry bar to slip the front of the arm out and slide it beneath the socket where it mounts. There is enough compliance in the rubber bushings to do this. From there, using 2 prybars (big and little) - use the bigger one to pry against the side of the mount to keep it from flexing. Use the small one through the tie down point and pry against the bolt shoulder. So with the two pry bars you are prying in opposite directions. Bolt comes right out.
5 minute job!
Sorry to break this into 2 posts - typing from my phone and it's quirky.
What i I want to mention is that when your prying you gotta be careful with the big bar. You can see in the pic that it easily flexes the metal. It didn't bend permananetly (it sprang back) but if you get too aggressive it might.
Here is a pic of the front of the arm slipped below its mount. This made the rear bolt more accessible because you can wiggle the arm around more freely. Make sure the car is high enough that the spring doesn't contact the perch in the lower arm. In my case I did use a small floor jack and hockey puck to lift the spring just a little for more clearance.
since the parts are aluminum I didn't want to use a hammer to break free any of the joints. A medium side puller works well and literally took no effort, could almost separate the joints by hand
Now waiting on parts but in the meantime I will be cleaning up the aluminum arms and removing the joints. I was planning on drilling the rivets first and then using my hydraulic press. I was a lot of scrap steel (I like to weld) and will make a brace to support the control arms so I can press the bushings out. Plenty to keep me busy until the parts arrive! So I've exceeded my budget of 500 by just a few bucks and haven't purchased the brake hoses yet. So looks like the budget just got bigger! Hopefully I don't find much else needing attention (money).
edit: sorry for the many MANY typos. These last few posts all from my phone.
Check those shocks out too......the C4 I am working on currently had those, and all four were junk.
The rack has the one mount bushing on the DS which looks like one of your lower control arm bushings, and an insulator that wraps around the OD of the rack on the PS.
Last edited by wikdwizard; 02-11-2017 at 02:05 AM.
Thanks for the tip on the rack, it makes sense to change those bushings out as they are likely inexpensive.
As as far as the shocks go, yep I know they are not the best. Monroe Sensatracs. Theyve been on the car since I bought it in 2009. I'm not sure if they are a gas shock either - they take effort to collapse and rebound slowly. Even if I pull on them while rebounding they offer resistance. I'm not sure they are blown. Regardless, I'm over what I had hoped to spend and I'll probably pass on shocks for now. They look easy enough to swap out that it doesn't seem imperative to do right now. I'll price them out anyway and if I can swing it maybe I'll go ahead and do it. Recommendations for a street car? Comfort is important to me.
They take effort to collapse and rebound slowly. Even if I pull on them while rebounding they offer resistance. I'm not sure they are blown. Regardless, I'm over what I had hoped to spend and I'll probably pass on shocks for now. They look easy enough to swap out that it doesn't seem imperative to do right now. I'll price them out anyway and if I can swing it maybe I'll go ahead and do it. Recommendations for a street car? Comfort is important to me.
They are super easy to replace at any time. There's no need to change shocks during this job just to save labor. If both fronts and both rears offer similar resistance to each other, and you see no obvious leaks of damper fluid, then they are probably fine. For comfort, believe it or not, I really my Koni yellows.
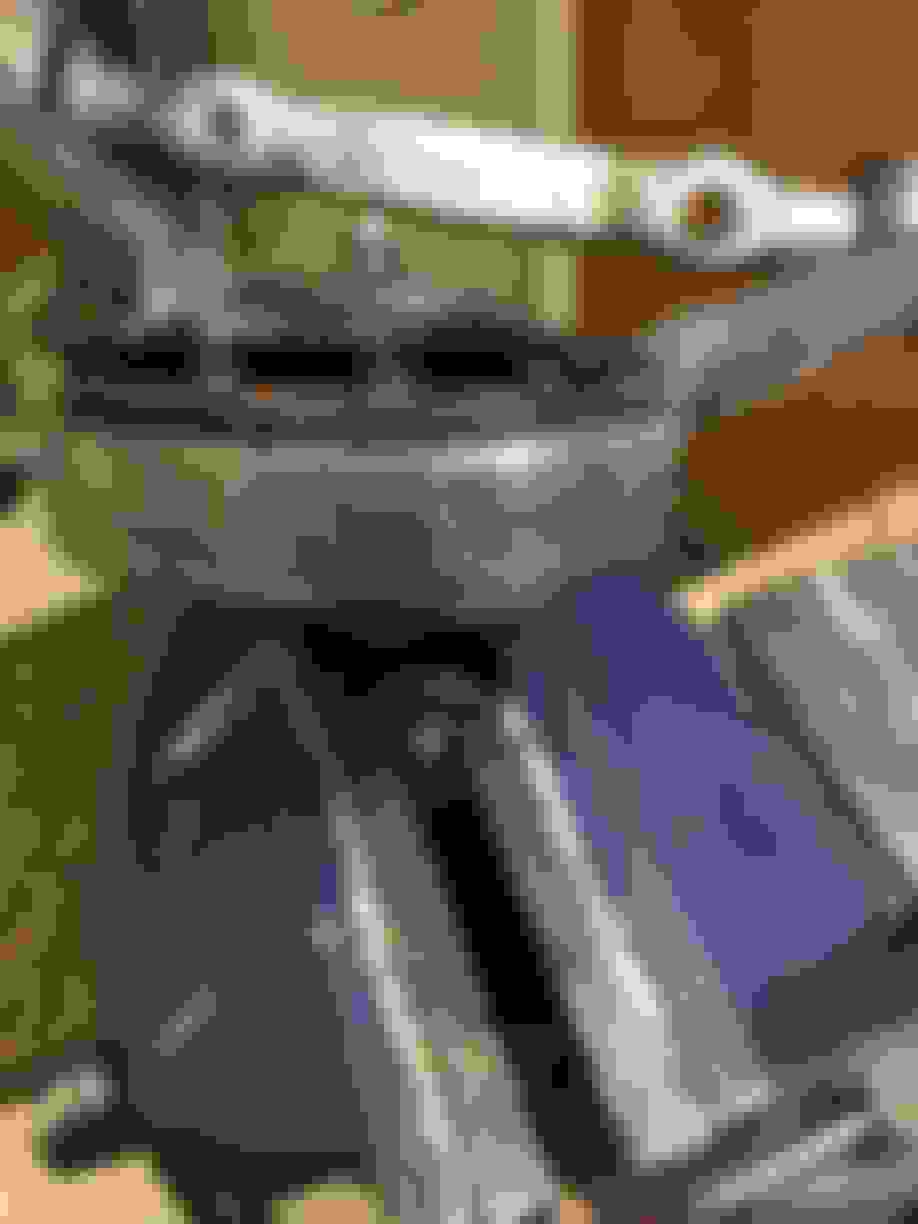
Todays progress.... I've removed the ball joints from upper and lower arms. The bushings have been pressed out of the lower arms. The upper arms I am stuck on this nut:
What does it take to break these free? I tried my impact - no go. I tried a breaker bar and the shaft seems to begin to flex so that seems like a bad idea. I cranked my air pressure up to 120 psi - still couldn't budge it! Its a good impact, 1/2 IngersolRand - its sheared plenty of wheel studs in its day. I have a steel brace made out of square stock that I grinded to fit snug in the A arm so I could press it out. But just stuck on these 4 nuts. Looking for advice here. Can someone confirm that these are 30mm? My 30mm socket felt a tad loose. I measured the nut with a caliper and got 29.4mm.
Here are some pics of todays work:
I first ground down the heads on the rivets for the upper ball joints, then used a sharp chisel to break the steel cap off the ball joint. I did this because then I could grind the rivets down further on the logic that the less rivet I need to push through the arm the better. Of note, to do this there are the 4 large rivet heads but also 5 small rivet heads that sandwich the steel plates that make the bottom of the joint.
Here it is with the backing plate coming off. After which I ground down the rivets again to the steel plate of the ball joint. Then I drilled, small bit first then bigger. All 4 straight through.
With the back plate off, I popped the ball/stud out the back. I did cheat and used my press to push the rivets through about 1/2 way. Then used a punch/hammer to finish the job.
Once the rivets were out the ball joint came out easily. And success:
I used the press to push the lower ball joints out. The arbor plates I have worked out well to support the control arm. No issues. Sorry, forgot to take pics of that.
For the lower control arm bushings I first used an oscillating multi tool to shear off the "ear" off the bushings to make them easier to push through. The sheared bushing:
Pushing these out was easy. The control arm didn't clear the press due to its "A" shape, so I had to find something to elevate it a little and still support the arm since I couldn't use the press arbor plates. A synchronizer from a busted Dodge transfer case was the perfect size. I used a large socket on the top side, big enough to push the bushing but small enough to clear the aluminum.
The last pic I'll leave you with is the brace I made for the upper control arm. It took a good deal of grinding to get it just perfect. It is super snug and essentially snaps into place. I'm pretty confident it will do its job. Now for those 4 nuts...
The shocks are super easy to swap out at any point; this is just a good time to assess their condition. As far as recommendations, they're one of those you get what you pay for things.
The only way I got those four large nuts loose was while the arms were still bolted to the car.
If you can I would make another brace for 180* from the one you fabbed up. The other way to do it is run one of your parallel bars through the "A" of the arm, and use the other to support the outside. Hard to explain; I knew I should have taken a picture when I went through that process.
Last edited by wikdwizard; 02-12-2017 at 02:55 AM.
 02-06-2017, 05:59 PM