


Help (again). '87 intake guru needed.
Thread Starter
Intermediate


Joined: Apr 2009
Posts: 46
Likes: 4
From: Midland MI
Hi Guys, it's me again,
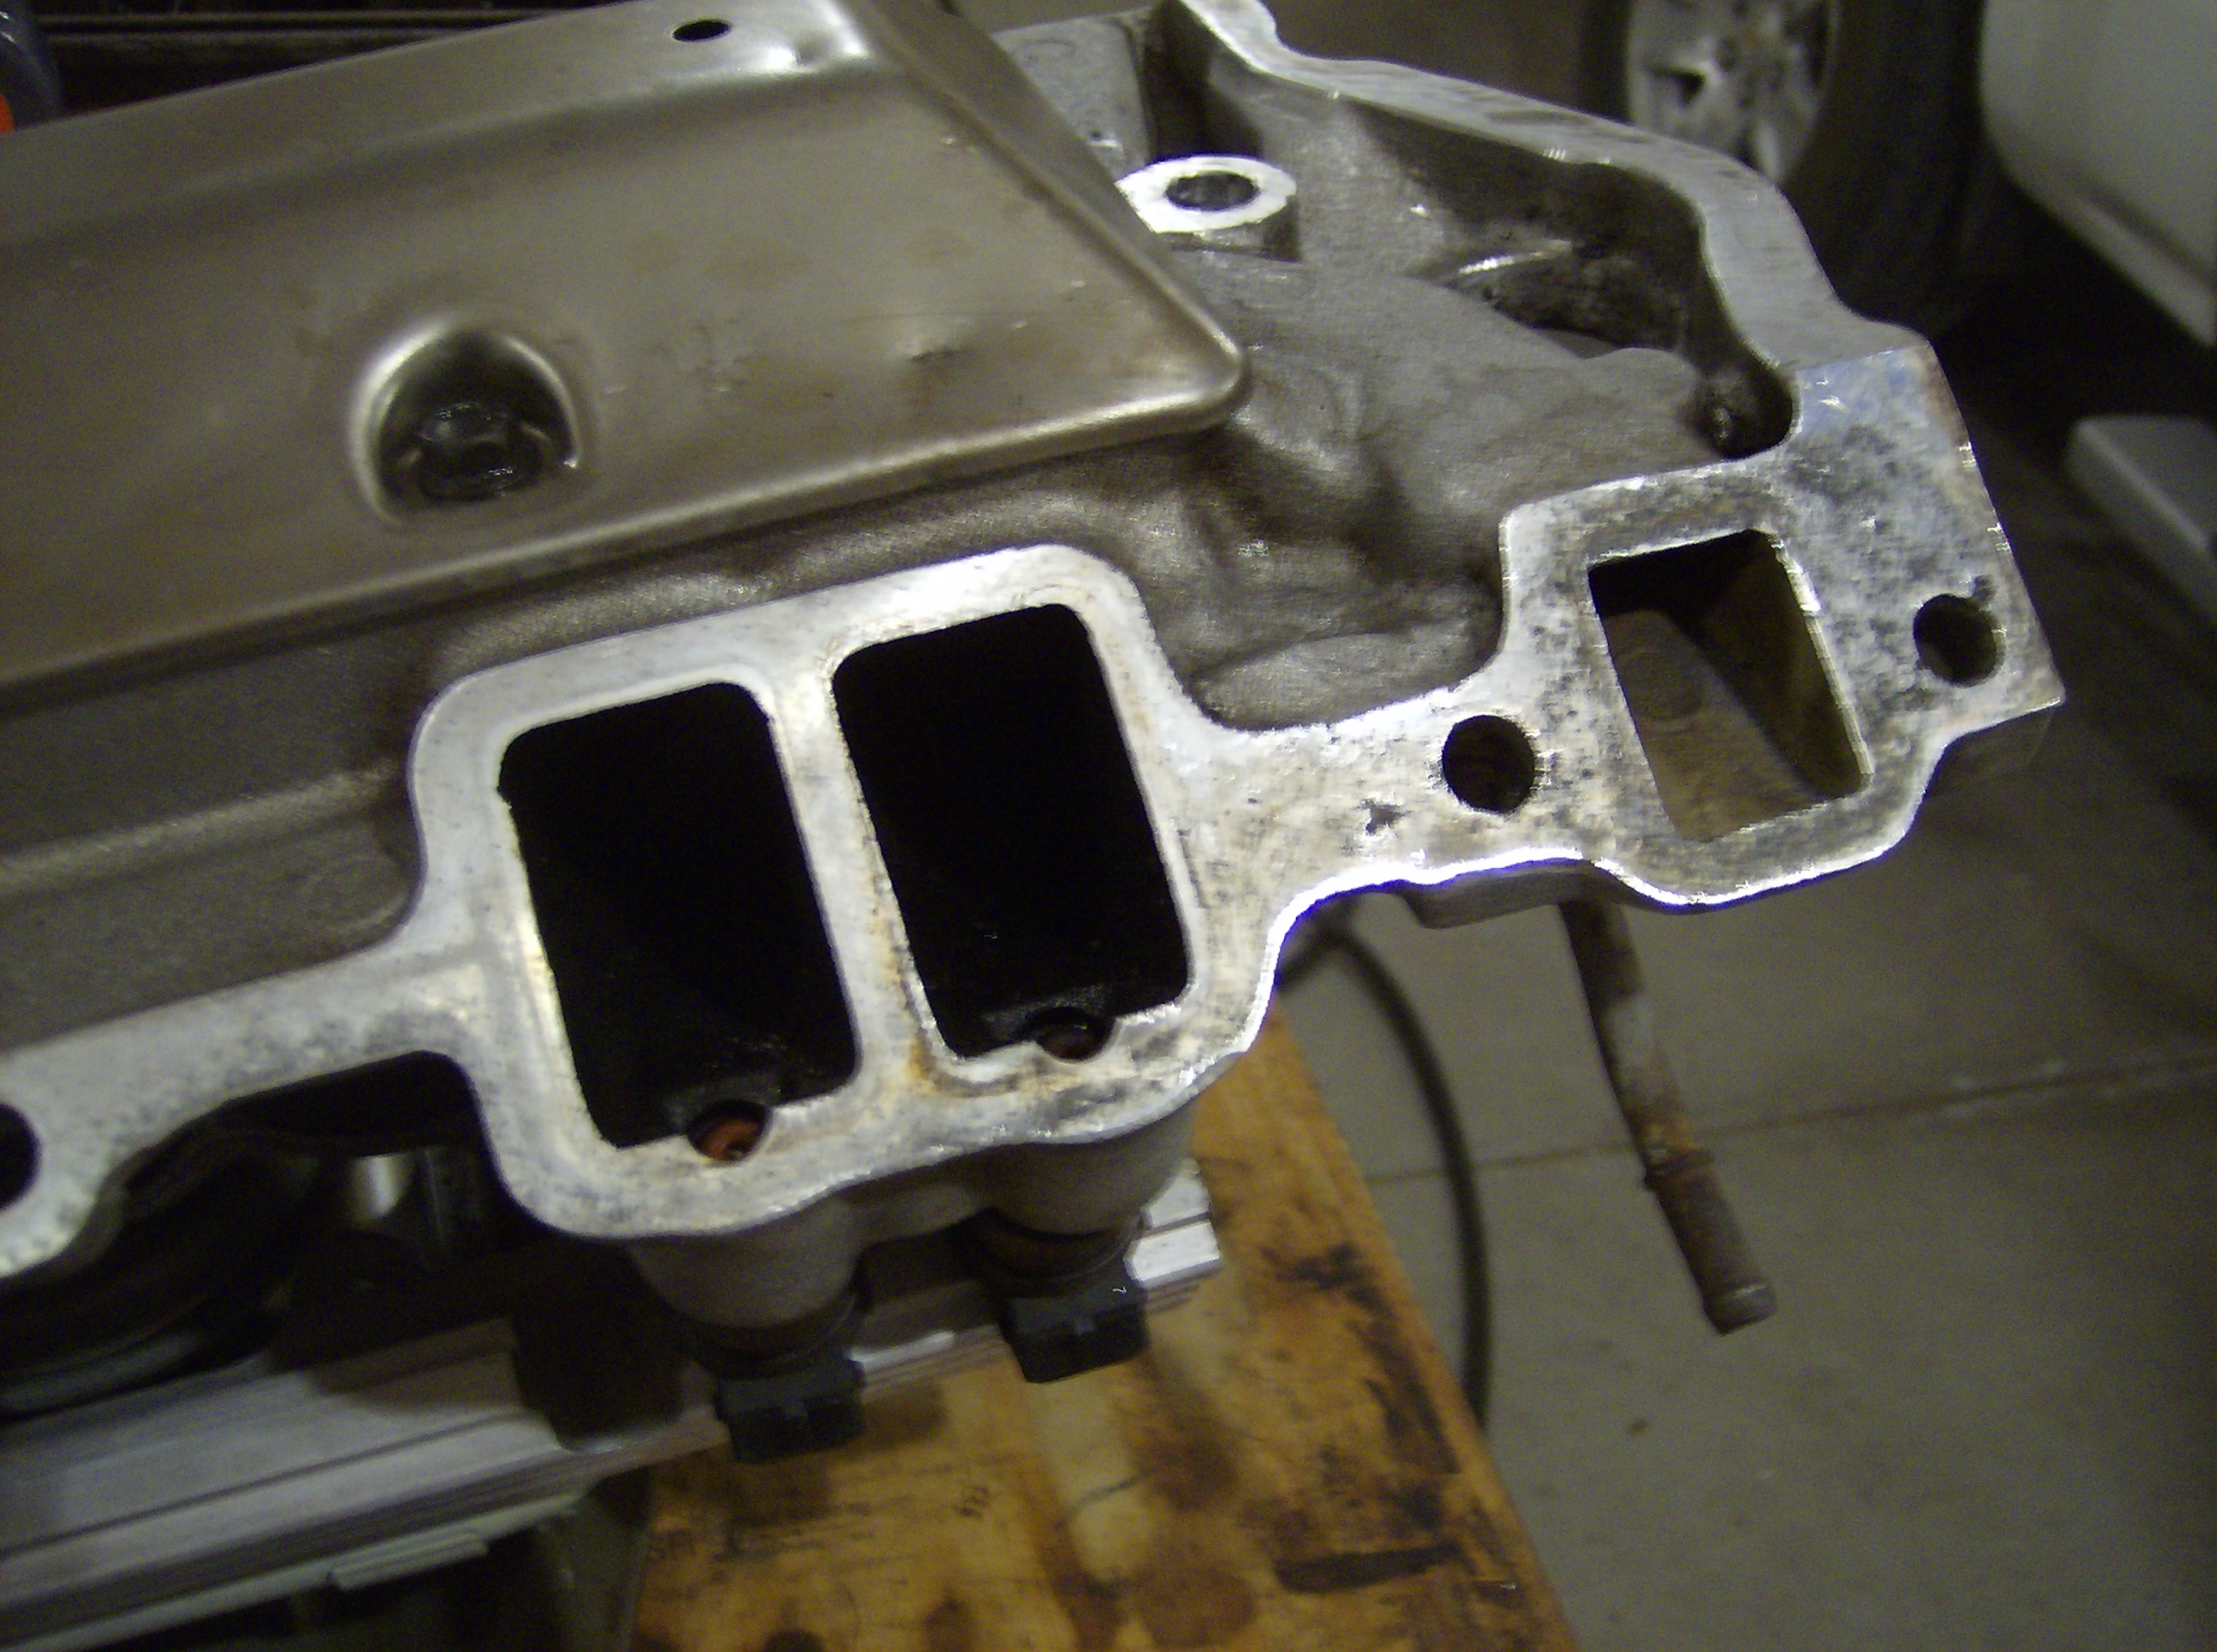
Still working on my rebuild and I may have run into the guilty culprit. As I stated before, I didn't see any head gasket catastrophic failure when I tore it apart. In fact, I just got news that the machine shop checked the heads and pressure tested them and all is good.
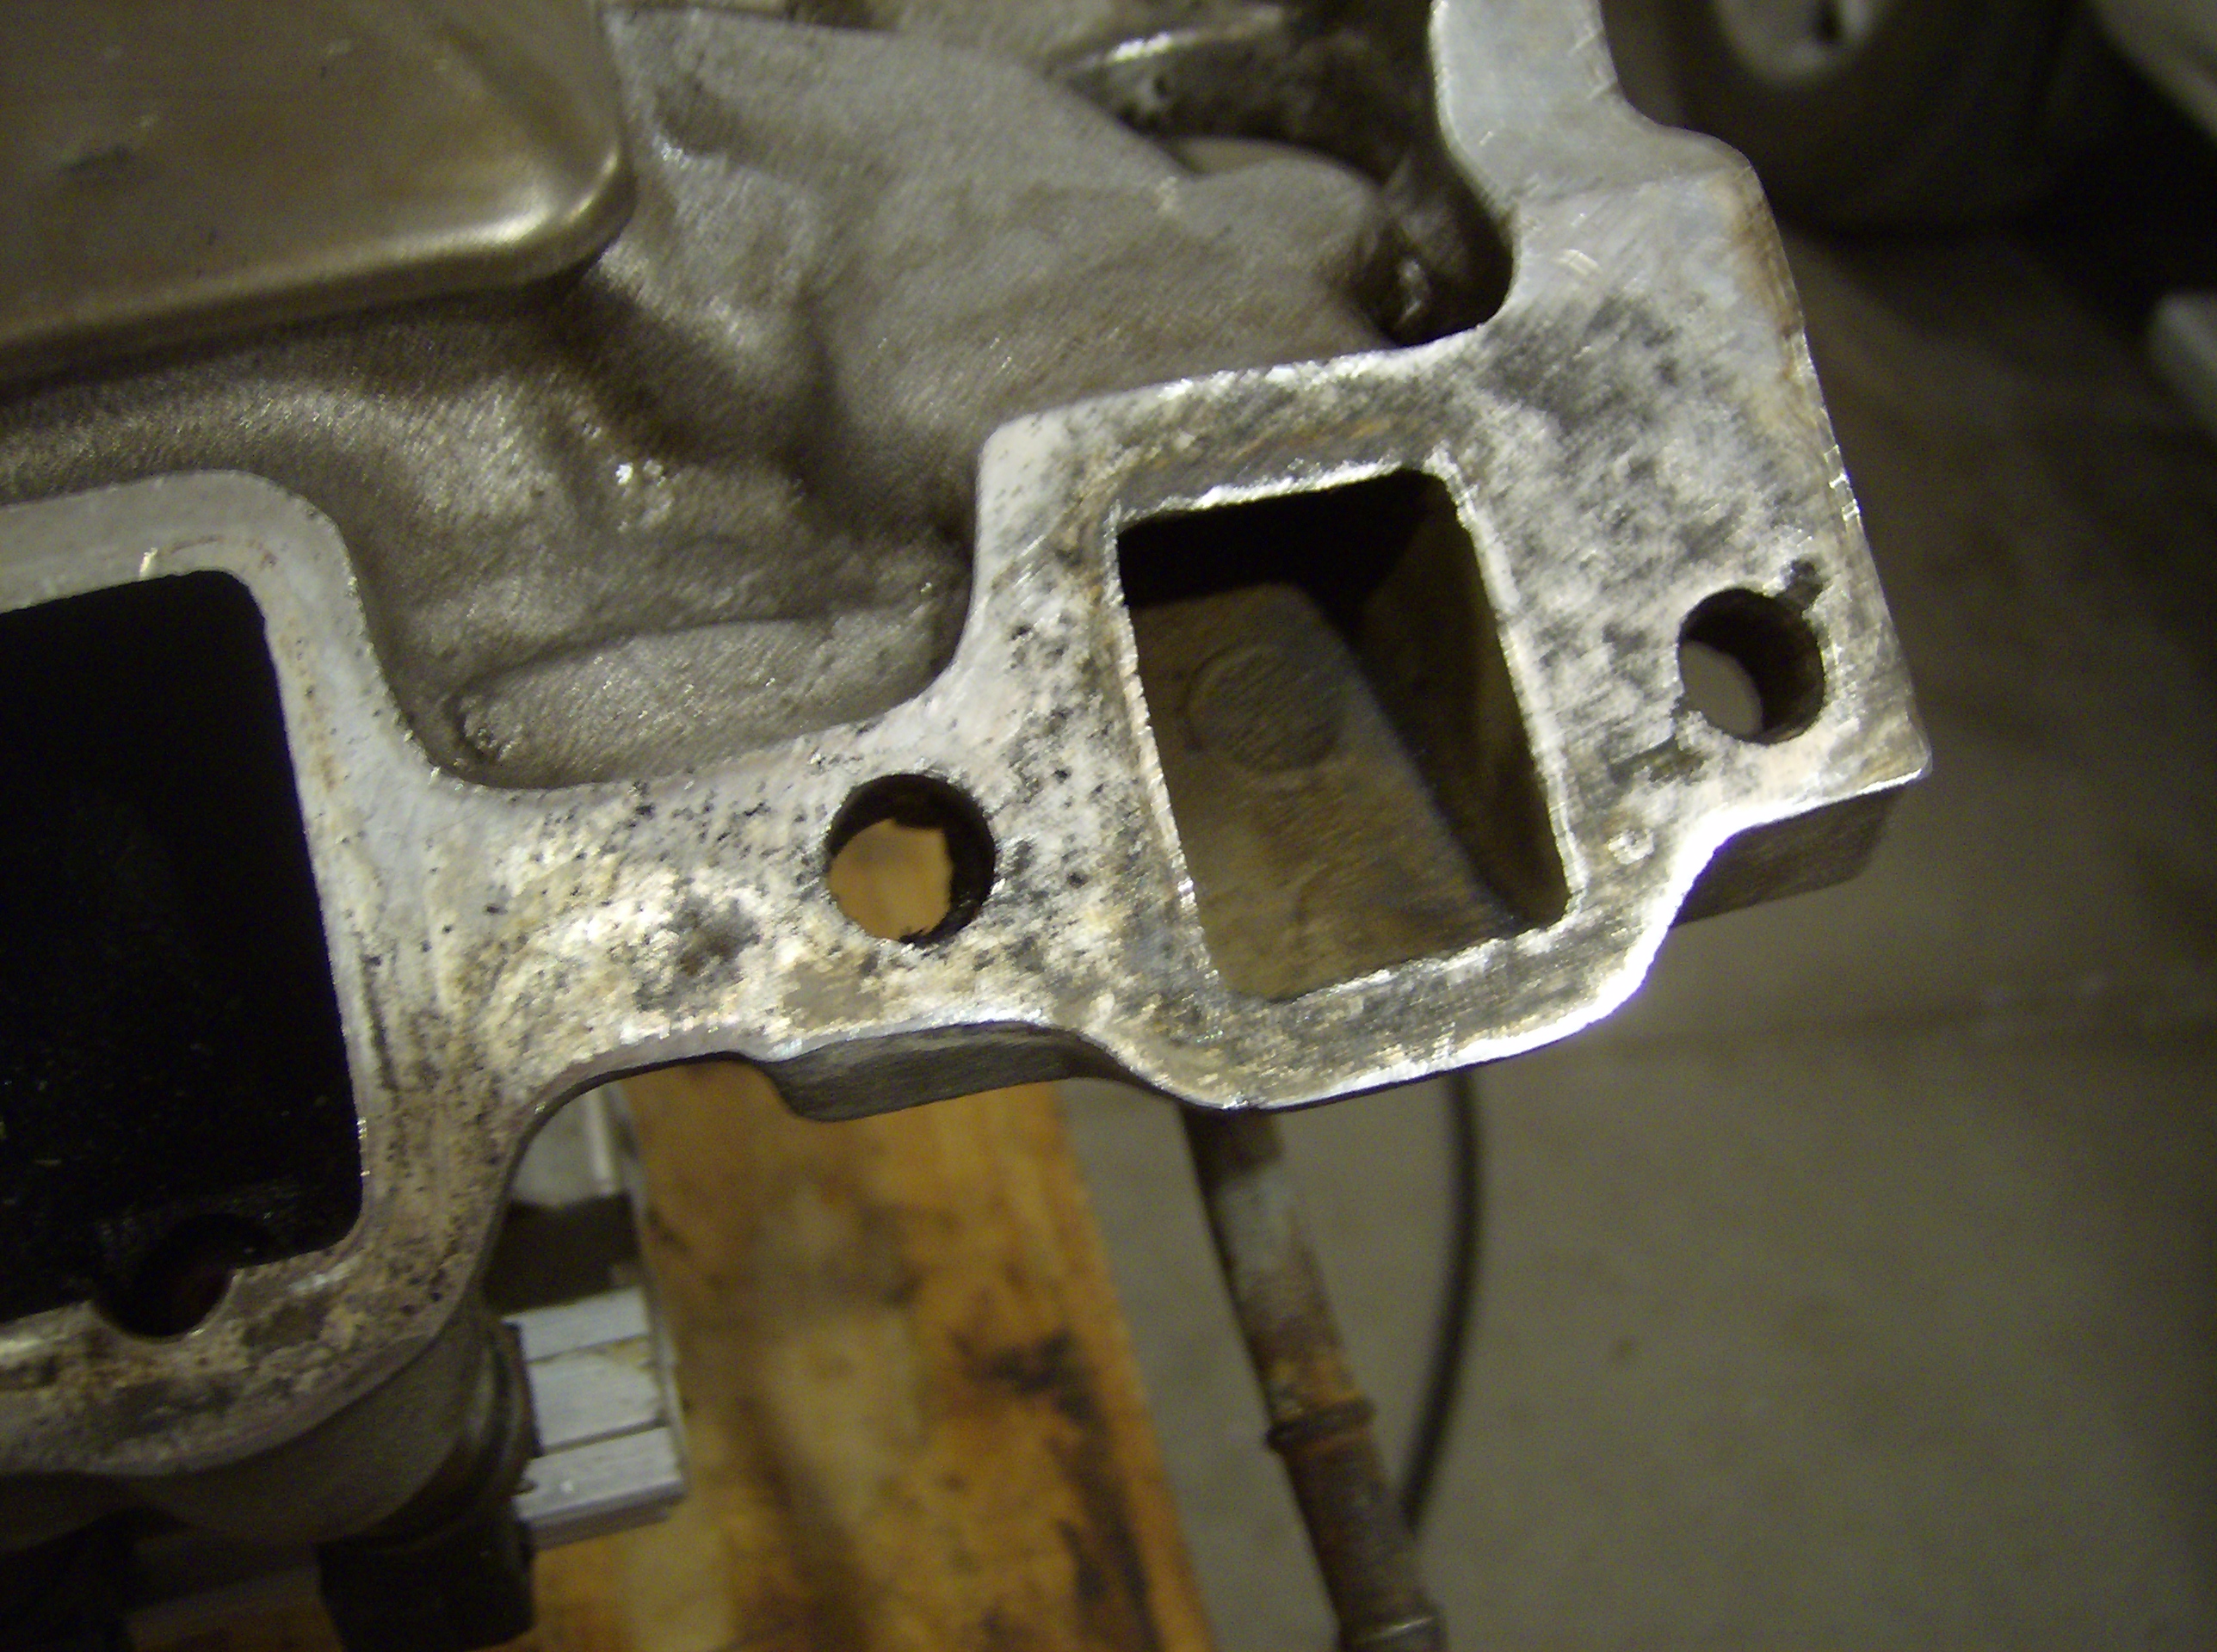
Take a look at the pictures, it's my intake back by the cylinder that I knew I was seeping a little. I was cleaning all the old gasket material off and this one doesn't want to clean up all that well. I found some major pitting and think it could be what caused most of my pain. So-
1. Do you think this is the culprit?
2. Is the manifold trash now or can it be fixed?
3. Can I use a sealer?
4. If it's trash, what is my "Plan B"???
Thanks,
Daron
Still working on my rebuild and I may have run into the guilty culprit. As I stated before, I didn't see any head gasket catastrophic failure when I tore it apart. In fact, I just got news that the machine shop checked the heads and pressure tested them and all is good.
Take a look at the pictures, it's my intake back by the cylinder that I knew I was seeping a little. I was cleaning all the old gasket material off and this one doesn't want to clean up all that well. I found some major pitting and think it could be what caused most of my pain. So-
1. Do you think this is the culprit?
2. Is the manifold trash now or can it be fixed?
3. Can I use a sealer?
4. If it's trash, what is my "Plan B"???
Thanks,
Daron
Thread Starter
Intermediate
Joined: Apr 2009
Posts: 46
Likes: 4
From: Midland MI
Thanks Kevova, it's got me a little worried that most of the surfaces are smooth and very little pitting and this one seems extremely rough. I see that you're in Michigan- I'm over by Mt. Pleasant. Any Corvette clubs in the area?
-Daron
-Daron
Le Mans Master


Joined: Sep 2013
Posts: 6,192
Likes: 750
From: near the thumb in the mitten
I'm in Mt Morris I have only been here since September. There are a lot of car cruises around. I haven't really checked out the Car Club thing yet, hopefully a little later in the year.
Thread Starter
Intermediate
Joined: Apr 2009
Posts: 46
Likes: 4
From: Midland MI
Oil Producer

Joined: Apr 2014
Posts: 9,365
Likes: 2,735
no problem, I pretty much guarantee it'll work, unless you have humungous pits or scratches and you don't torque down the gasket!When I made the tube I meant read the instructions on the tube of Hylomar.
however, watch YouTube, search hylomar, and you will see what it is and why it will most likely work for you. you could also try doing a search for "hylomar forum" on Google and you will get lots of posts in different forums that detail how others have used it and how amazing it is. I've never seen a company so bad with marketing with one of the best products in the world. They could sell 10 times the amount they do
however, watch YouTube, search hylomar, and you will see what it is and why it will most likely work for you. you could also try doing a search for "hylomar forum" on Google and you will get lots of posts in different forums that detail how others have used it and how amazing it is. I've never seen a company so bad with marketing with one of the best products in the world. They could sell 10 times the amount they do
Corvette Stories
The Best of Corvette for Corvette Enthusiasts

Top 10 Most Explosive Corvettes Ever Made: Power-to-Weight Ratio Ranked!
Joe Kucinski
150 hp to 1,250 hp: Every Corvette Generation Compared by the Specs That Matter
Joe Kucinski
8 Coolest Corvette Pace Cars (and Replicas) of All Time
Verdad Gallardo
Top 10 Corvette Engines RANKED by Peak Torque (70+ Years of Muscle!)
Joe Kucinski
Corvette ZR1X Will Be Pacing the Indy 500, And Could Probably Race, Too!
Verdad Gallardo
Top 10 Corvettes Coming to Mecum Indy 2026!
Brett Foote
Top 10 C9 Corvette MUST-HAVES to Fix These C8 Generation Flaws!
Michael S. Palmer
10 Revolutionary 'Corvette Firsts' Most People Don't Know
Joe Kucinski
5 Reasons to Upgrade to an LS6-Powered Corvette; 5 Reasons to Stay LT2
Michael S. PalmerMelting Slicks


Joined: Mar 2016
Posts: 2,778
Likes: 580
From: Langley BC
I would say you could either have a machine shop take a few thousands off the mating surface or you could spread JB weld in the pits and then sand off the excess.
It will probably be fine as is if you use a good sealant like Hylomar but if you are worried about it either of the ways I suggested should work.
It will probably be fine as is if you use a good sealant like Hylomar but if you are worried about it either of the ways I suggested should work.
Thread Starter
Intermediate
Joined: Apr 2009
Posts: 46
Likes: 4
From: Midland MI
I would say you could either have a machine shop take a few thousands off the mating surface or you could spread JB weld in the pits and then sand off the excess.
It will probably be fine as is if you use a good sealant like Hylomar but if you are worried about it either of the ways I suggested should work.
It will probably be fine as is if you use a good sealant like Hylomar but if you are worried about it either of the ways I suggested should work.
Oil Producer
Joined: Apr 2014
Posts: 9,365
Likes: 2,735
hylomar will work, if, you use it exactly as on the instructions, and change one thing....use it thick.
when u have two excellent mating surfaces u only need a slight skim of hylomar. in your case thicken it up over the pitted areas.
follow directions 100%. apply thick bead over both surfaces, then print the surfaces together, pull it apart, let sit. i let sit for 10min personally but just follow the directions.
follow factory torque spec procedure.
come back in a couple hrs and double check torque spec.
duting an 85 rebuild, i chose to use hylomar because of the BBAARRUUTTAALL experience i had cleaning off bubbas rtv. hylomar is reuseable. pull apart, make your repair, put it back together.
ive gone back to el cheapo cork gaskets but i print with hylomar. works amazing. and cheap.
i used hylomar on:
head gasket
intake gasket
tpi gaskets
tb gasket
exhaust gaskets
water pump gasket
trans pan 700r4) gasket
tailshaft gasket
many i cant recall haha.
the only place i didnt use it was the front/rear china wall. not sure why.
recently i used it as a gasket for the top sprayer arm in my dishwasher haha.
its worth a shot.
Melting Slicks
Joined: Mar 2016
Posts: 2,778
Likes: 580
From: Langley BC
The biggest pits are deeper than a few thousands, I'm going to give the Hylomar a shot- I've read some good stuff about it. I'm a little leery but I guess I've got to use a sealant around the water ports anyhow right? I'm assuming again that I use ONLY the Hylomar and skip the "right stuff" around them? Thanks again Dmittz, I should be paying you a consult fee by now, certainly will owe you a beer or two if you get state side to Michigan.
I have only used hylomar on my trans pan and the upper part of my super ram intake, it should work on the lower intake, but I haven't personally used it there yet. It seems like good stuff though.
If its any consultation A little over a year ago when I built my motor I used a little of the black RTV sealent on both sides of the lower intake gasket as well as at the front and back of the intake and I have had zero leaks/problems so putting the sealant of your choice on the lower intake gasket shouldn't be a problem. Best of luck with it

Thread Starter
Intermediate
Joined: Apr 2009
Posts: 46
Likes: 4
From: Midland MI
Your very welcome. I hope the hylomar or whichever sealant you choose gets those leaks sealed up for you.
I have only used hylomar on my trans pan and the upper part of my super ram intake, it should work on the lower intake, but I haven't personally used it there yet. It seems like good stuff though.
If its any consultation A little over a year ago when I built my motor I used a little of the black RTV sealent on both sides of the lower intake gasket as well as at the front and back of the intake and I have had zero leaks/problems so putting the sealant of your choice on the lower intake gasket shouldn't be a problem. Best of luck with it
Big thanks to Dmittz and Vikingtrad3r- I appreciate all the help. Haven't started putting it back together yet but I just KNOW there's going to be more questions. I've never been this far/deep into an engine so I'm questioning everything I'm running into. I would hate to get it back together and have something I did be the cause of another tear down. Standby for more!!!
Safety Car


Joined: Sep 2004
Posts: 3,953
Likes: 550
From: Mission Viejo CA
As with any fight against corrosion, you'll want to get as much of that oxide out of the pits in the aluminum surface. Wire brush, Aluminum Naval Jelly, or a sharp pick. Corrosion never sleeps!

Melting Slicks
Joined: Mar 2016
Posts: 2,778
Likes: 580
From: Langley BC

Thread Starter
Intermediate
Joined: Apr 2009
Posts: 46
Likes: 4
From: Midland MI
Thanks Hot Rod, good idea for the corrosion.
As for the organization, fortunately I did my homework before I jumped into this and the site (as usual) was a huge help. Everything is bagged and tagged, push rods and head bolts in a clearly index/marked box, vaccum lines taped labeled. I'm probably going to use new head bolts as most suggest on the heads, but at least I know what length bolts go where. The heads were cleaned, pressure checked, and the valves needed a little work. I had the "trees" cut off of the exhaust manifolds and braised. I'm just in the clean mode right now- 30 years of nasty grease and neglect no thanks to the previous owner. Debating what to clean the valve covers with- they're more brown then magnesium color. Pulled the A/C and all the smog stuff off. Going to slowly work to put it together once the Michigan weather lets up a bit more. Decided to hold off to make sure it works when all is back together before dropping any more bucks on getting it too pretty. Geez I hope this works.
As for the organization, fortunately I did my homework before I jumped into this and the site (as usual) was a huge help. Everything is bagged and tagged, push rods and head bolts in a clearly index/marked box, vaccum lines taped labeled. I'm probably going to use new head bolts as most suggest on the heads, but at least I know what length bolts go where. The heads were cleaned, pressure checked, and the valves needed a little work. I had the "trees" cut off of the exhaust manifolds and braised. I'm just in the clean mode right now- 30 years of nasty grease and neglect no thanks to the previous owner. Debating what to clean the valve covers with- they're more brown then magnesium color. Pulled the A/C and all the smog stuff off. Going to slowly work to put it together once the Michigan weather lets up a bit more. Decided to hold off to make sure it works when all is back together before dropping any more bucks on getting it too pretty. Geez I hope this works.


Drifting


Joined: Nov 2015
Posts: 1,709
Likes: 328
Finalist 2020 C4 of the Year - Unmodified
