When you click on links to various merchants on this site and make a purchase, this can result in this site earning a commission. Affiliate programs and affiliations include, but are not limited to, the eBay Partner Network.
It looks fine. Do you have the finish to meet the specs of the GM gasket requirements ?
So I am unsure of that due to not knowing the actual surface condition. However, the surface looks like a normal factory finish. I say that very carefully as we all know the eyes are not a very good way to tell.
Also my gaskets did not come with any kind of info about the required finish needed. They are a heavily graphite costed gasket so should be good. If not I’ll find out shortly.
no new updates either. Still just cleaning and had some other stuff come up with a buddies Caro that set me back a whole day since i usually only mess with the car 2-3 hours a day anyway.
I always retorque head gaskets by the way, regardless. There are a ton of camaro/firebird LT1 guys that have used the same gaskets and AL heads, do an "LT1" search and ask around - ya just cannot learn too much !
I always retorque head gaskets by the way, regardless. There are a ton of camaro/firebird LT1 guys that have used the same gaskets and AL heads, do an "LT1" search and ask around - ya just cannot learn too much !
I always have as well and never had any problems from it. I’m big on reading and learning. Sometimes I learn by mistakes but it’s still learning haha
just did it recently for a water pump job....requires a lot of cursing.....had to spin the engine to get the roller rocker out of the way......
Exactly that thing could not be a worse and awkward shape. I wish there was a better bracket made but until then it sounds like I’ll continue to remove and install the hard way.
Well, I finally got the head gasket a clean to myself standard for an install. I also got the old cam and all the timing gears pulled along with the new cam installed.
Decided to take a little break before I go back to work on it. Plan is to finish installing the timing gears and chain after lunch and then drop the oil pan and test for the timing cover and modify it as needed and hopefully get it installed today.
I also wish I would’ve just pulled the engine at this point since the only thing keeping it in the car is the transmission. However I have no hoist or stand setup at this house and don’t wanna buy them
Last edited by Red89'-L98; Nov 11, 2020 at 01:39 PM.
Well, I finally got the head gasket a clean to myself standard for an install. I also got the old cam and all the timing gears pulled along with the new cam installed.
Decided to take a little break before I go back to work on it. Plan is to finish installing the timing gears and chain after lunch and then drop the oil pan and test for the timing cover and modify it as needed and hopefully get it installed today.
I also wish I would’ve just pulled the engine at this point since the only thing keeping it in the car is the transmission. However I have no hoist or stand setup at this house and don’t wanna buy them
Ok, got kind of out of order on how I wanted to do things. I did not degree the cam yet as the kit was supposed to arrive today but is delayed.
I decided to do some more engine bag cleaning and prep for the oil pan removal (Removed oil cooler line and the diagonal braces underneath.) Other than that she is ready to be pulled and prepped for the new gasket and of course cam degreeing and timing cover install first.
I also got the driver side head installed today and just have to do a final wipe down of the passenger side and it’ll get installed as well. Things are going pretty smooth now that all the 30+ year old stuff is removed. Many of stuff required me to use an impact but I did manage to get it off with only 1 broken tool (stripped the threads on my balancer hub puller)
Currently, I have both heads on and torqued down along all the lifters and timing components installed. Cam was degreed and is spot on +/- 0.5 of a degree which is close enough for me and most likely just because of the tooling on my end. Guide plates are still a bit loose just for the time being. I will get those aligned properly and torqued as well. They seem to be a tight fit for the pushrod which is nice. Should have much wiggle at all and make setting those easy.
I broke out the pushrod checker today and got a good setup with it at 7 1/8 or 7.125 inches and it worked out great and was almost perfect for centering. I will have some pictures below for you all to look at. After I got the first one I checked all 16 valves for correct geometry and got almost exact wear patterns out of all of them. I am trying to decide between 7.100 or 7.150 pushrods since it is so close to the center. I'm leaning towards 7.100 due to the fact that it looks like it might just ever so slightly have the wear marks on the longer side. Let me know your thoughts, please.
Still gotta drop the oil pan and get those seals changed out along with the timing cover fitted and modified as necessary. My harmonic balancer installer just came in the other day, so I am gonna ensure the crank gear is installed all the way with it and then hopefully get the timing cover installed and balancer installed shortly after.
Also, does anyone know where I can look for what gear ratios came for 1989 rear ends? I know mine is roughly 3.xx as it just barely rotates more than 3 turns. Maybe a 1/10 of a turn more at most.
I'd say I am definitely over the hump and making good progress.
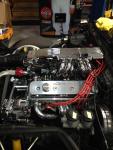
Here are the pics as promised and then some. I am only showing 4 of the valves as they're all the same. Here are the timing chain and a glimpse of the new valve covers. The last pic is the old cam.
I don't think I missed any updates that I did but who knows haha It's late and I'm tired.
You can pre-soak the timing chain in an oil bath,(warm to hot), with high moly content and it's supposed to give a longer/better life to the pins n bushings with less stretch.
You can pre-soak the timing chain in an oil bath,(warm to hot), with high moly content and it's supposed to give a longer/better life to the pins n bushings with less stretch.
Dang, wish I knew about that before I installed mine. May do some research and take it back off since it is only 3 bolts and it is all still exposed.
Not much was done today. Did some staring mostly and pulled the trigger on some Manely 7.100-inch push rods.
Also ordered a mail order tune from PCMofNC as a good initial tune for startup until I can get the equipment to do some data logging or get a dyno tune done.
Hi
I have the 88 to 91 a/c setup on my 85, can remove the valve cover without moving the a/c compressor. Am using the early valve covers however size wise there is no difference.
the trick is to angle the valve covers to clear the runners then lift up the back part and hold the leads to clear them. Its an acquired art, try it and see .
even with roller rockers, the valve covers come off easy.
Aftermarket ones need to compressor to be moved, however i use my std ones that have been clearanced for the 1.6 ratio roller rockers.
I use a thick valve cover gasket, works great for me.
As much as I wish I had some more updates, progress has been at a halt for quite a few weeks or more now. I am still waiting on the TPIS Mini Ram to be made and shipped out (been over 4 months now) so that I can button everything back up.
I still have some other stuff to do in the meantime but it has been hard to find the motivation to finish without having an end goal in sight. Once the Mini Ram is manufactured and shipped out, I will then hopefully be able to finish everything up and see how it all does.
I know what you mean on the motivation. I've been doing a top-end restore/replace on everything above the heads and the more I remove the more I decide to work on. Since I've got the plenum and runners off to re-seal the intake manifold (this originally to address what I thought was an oil leak), I may as well replace the injectors, fuel pressure regulator, valve cover seals, re-finish the valve covers, new water pump, new hoses, lines, gaskets, IAC, new radiator, fan motor, fix all the broken WeatherPak connectors with new ones, etc... What was originally a few weekends of planned work is now 2 months and counting.
Come to find out that by pulling everything off the motor, the real source of my oil loss has been the valve guide seals - which I'm now re-doing as well. Figured this out when I took the plugs out and saw the oil seepage from plug holes on #7 and #8.... I should have known this anyway before I started since the motor has 126K on it.
Good luck with your work. I also have a red '89 w/ ZF and it's a great car, which is why I'm doing all this.
Been gone for a while, but finally am back and able to work on the vehicle.
Not much new for now. Got the timing cover fitted and ready to install and have gotten all rocker arms adjusted and set.
Ran into a slight problem that I am gonna have to figure out though. I threaded the crank bolt in and it went in nice and smooth. After adjusting the rockers I went to remove the bolt to install the timing cover and it would not budge. Decided to break out the pretty damn powerful electric impact and it got a couple of rotations in the off direction on it but that was it. Not sure where to go from here. I am soaking it with pb blaster and gonna try again tomorrow and pray/use some heat if needed.
If anyone has some odd suggestions to try then let me know. Definitely gonna have to get the bolt out which could be a big problem. Especially if the threads are damaged, but the bolt is perfectly centered in the hole so I wouldn't think it is cross-threaded.
Designer Imagines A Corvette That Looks More Like a Corvette Than the Corvette
Slideshow: A Jaguar designer's personal project imagines what a modern front-engined Corvette might look like if Chevrolet revisited the golden age of the Stingray.