When you click on links to various merchants on this site and make a purchase, this can result in this site earning a commission. Affiliate programs and affiliations include, but are not limited to, the eBay Partner Network.
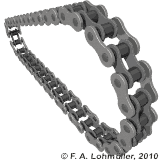
Secondary Chain Guide Rattle and the Chain Tensioners
Secondary Chain Guide Rattle and the Chain Tensioners
LH and RH Chain Tensioners are completely different including the Housing.
Unset LH chain tensioner..........................Unset/set RH chain tensioner (Photo by Craig)
LH Chain Tensioner Housing and RH Chain Tensioner Housing with Chain Tensioners installed (Photo provided by Jim Voters)
Additional Information regarding Secondary Chain Guide RattleBy Marc Haibeck. 1. On the right side Chain Tensioner Housing the tensioner oil inlet is pointed downward.
2. The right pivoting secondary chain guide taps on the cylinder head causing the Chain Guide Rattle on engine Start Up.
Background.
Background is provided regarding Timing Chains/Chain Guides and the LT5 Engine.
A. Timing Chains.
There is the single Primary Timing Chain (driven by a sprocket on the Crankshaft) and two Secondary Timing Chains/sprockets (driven by the Primary Timing Chain). These two Secondary Timing Chains drive the four Camshafts (each Secondary Timing Chain of different length driving the single Intake and single Exhaust Camshafts on each side). Each Camshaft having 8 lobes pushing on 8 lifters and 8 valves stems (4 Primary and 4 Secondary). Total 32 Valves (16 Intake and 16 Exhaust). The Secondary Timing Chains are lubricated from an Oil Port in the Dual Secondary Timing Chain Sprocket which Oil Port is Pressurized (Oil Pressure). That Pressurized Oil is slung around within the Timing Chain Cover Lubricating the Secondary as well as the Primary Timing Chains. It is Very Important to make sure that small Oil Port in the Dual Secondary Timing Chain Sprocket is Open and Functional.
B. Chain Guides.
Associated with the Two Secondary Timing Chains are two each Chain Guides for Each Secondary Timing Chain. One Chain Guide can rotate while the other chain guide is stationary. There is a third Chain Guide located in the top of each Cam Cover also that has been known to rarely fail. The Passenger Side Top Chain Guide is most prone to rarely fail but easy to see pending failure through the Oil Fill Port. The Primary Chain also has a chain Guide/Adjuster that can wear over time but such normal wear does not seem to cause any issues.
Timing Chain and Chain Guide Failures. I have only heard of two Failures of Secondary Timing Chains and both Failures were difficult to isolate the Cause.
Chain Guide Wear proceeds with two groves from the Chain Links. Once the Chain Rollers come into contact with the Guides, the wear of the Chain Guides is extremely slow (Changing Oil Regularly will actually "for all practical purposes" stop chain guide wear almost completely). The Engine has to be removed to change out Timing Chains and/or Chain Guides. The Cam Cover Top Chain Guide can be changed out with engine in car by removing the Cam Covers (not easy but there is a trick to everything related to the LT5)
Cam Cover Chain Guides clip onto a Chain Guide Holder held on by two small screws. Cam Cover Chain Guides
I switched from Scotch Brite to Marc Haibeck's new Cam Cover Vent filter material Cam Cover Filters
I think any kind of wire the size of a regular paper clip would work fine (bend straight a paper clip and cut so about 3/8 inch of the Paper Clip sticks out each side of the Cam Cover Filter Housing). Insert the straightened Paper Clip after the Cam Cover Filters are installed. Then.....bend each end of the wire sticking out of the Cam Cover Filter aluminum sides about 3/8 inch 90 deg so they will not drift out of place.
Be sure you do NOT loose those two dowel Pins aligning the Cam Covers with the Heads (one each end of the Head)
2. Applying A136 Cam Cover Sealant Apply A136 on the Heads (I actually apply A136 to the Head and not the Cam Cover after DEGREASING the surfaces) and in the grooves of the cam cover rubber end caps on both the Head AND Cam Covers
Make sure you clean the grooves and rubber caps completely before applying A136.....and...NOT TOO MUCH A136.....just use finger and smooth out flat on surfaces of Head. And make sure you have the 4 "O" rings in place set in each recess of the Head (one each spark plug hole).
AGAIN.......apply a small bead of A136 in center of mating surfaces on the Head and then smooth that bead out ALMOST to the edges of those surfaces with your finger (very thin surface of A136 ALMOST to the edges of the mating surfaces). You do not want a lot of A136 squeezed out and into the Head area during assembly of the Cam Covers onto the Heads.
When you get the Cam Covers installed, take a paper towel and wipe clean ANY excess A136 that might have squeezed out on each end of the Cam Covers around the rubber end caps and all around each Cam Cover. There should be not much at all squeezed out if you did not overdo the use of A136.
I do NOT apply A136 beyond the bolt hole on each side of each journal making sure I do not end up with A136 messing with the Cam Shafts. In other words....stay away from the Camshafts journals at least 1/4 inch more or less (I keep A136 just outside of the bolt hole edge) each side of each Journal.
I think I actually did everything above on the Cam Covers and NOT the Heads one time but definitely do not apply A136 on BOTH. Either the Heads OR Cam Covers but not on BOTH. Except where the Rubber End Caps are involved (apply A136 in BOTH Heads and Cam Cover Grooves that take the Rubber End Caps).
I have always disconnected the negative battery terminal if the vehicle is expected to sit for a couple weeks. I am now going with this battery disconnect. Always have full battery power even after a couple months of battery disconnect. No messing with having to have electrical power and hood open or partially closed and no concern about electrical shorts when sitting with power connected (and electrical cords) for a while.
1990 and 1991 Plenums and TB Coolant Blocking at IH
1. 1990 and 1991 Plenum Differences
On the 1990 Plenum there exists a block of rubber about 2 inches long and 1.5 inches wide by 3/4 inch high with two holes side by side all the way through the 1.5 inch length. The block of rubber slides onto the two Plenum Ports shown.
On the other end of that Rubber Tubing Adapter the charcoal canister vacuum line is plugged into the left port and the PCV vacuum is plugged into the right port (the hard PCV tube attached along the drivers side of Plenum coming from the PCV Dual Connector at rear of Plenum).
If this Rubber Tubing Adapter gets lost, one can separate the two male nipples shown just a tad (by bending) and use two separate rubber hose connectors (the rubber hose being approximately 3/16 inch ID and each hose being approximately two inches long).
The Rubber Tubing Adapter discussed here is only a 1990 LT5 item and does not exist on the 1991 LT5.
1990 Plenum with Throttle Body Coolant Nipple shown.
2. Throttle Body Coolant Blocking at Injector Housing.
As an aside...... The Top (smaller) male nipple shown on this 1990 photo (above photo) is the Throttle Body (TB) Coolant Nipple (Coolant Input Port). On this 1991 Plenum (below photo) I have BLOCKED the TB Coolant Input Port.
1991 Plenum with Throttle Body Ports plugged with red 1/8 inch pipe plug.
Normally on all 1990s and 1991s I only block TB Coolant at the Injector Housing and leave the TB male nipple in place on the Plenum shown in the 1990 Plenum (above photo) with the TB Coolant Hoses in Place so it appears TB Coolant is NOT blocked when in fact it is.You have to also then block the TB Coolant rubber hose returning to the Coolant Reservoir on the Passenger Side of the Plenum.
TB Coolant Nipple left in Place when Blocking TB Coolant at Injector Housing.
Coolant temperature stays at a constant 185 deg (70 deg F ambient) with 180 deg thermostat.* a. 1989-1996 C4 Type V8 All Part No. 1-16CV8996 b. Rated 800 Hp c. Manual transmission * Coolant Temperatures will climb a bit to the Fan Off Coolant Temperatures (200 deg F) with AC on (100 deg F ambient) See testing below.
2. Ron Davis Radiator Installation.
First....Drain Coolant from system and remove Air Cleaner, Air Cleaner Housing.
A. Removed Oil Cooler Adapter from Oil Cooler.
B. Removed three 10 mm bolts bottom Fan Housing.
C. Disconnect the two fans electrical.
D. Remove two 10 mm nuts and one 13 mm bolt on Passenger Side.
E. Remove one 10 mm nut and one 13 mm bolt on Drivers Side.
F. Remove two 10 mm horizontal bolts on Drivers side.
G. Remove two 10 mm horizontal bolts on Drivers side holding ??? to Drivers side of Radiator Shroud.
H. Disconnect Temp Sensor bottom of Shroud.
I. Remove five 10 mm bolts top Fan Housing.
J. Remove three 7 mm bolts left and right bottom side of Shroud.
K. Disconnect Vent coolant overflow hose top Passenger Side.
L. Lift Drivers Side Shroud clear of Hood Hindge.
L. Lift Passenger Side Shroud bending the lower tab up and around AC lines.
M. Lift and remove Fans.
N. Disconnect Top Radiator Hose.
O. Remove three 13mm bolts from Thermostat Housing (More Coolant will drain from the system).
P. Loosen short radiator Hose between Thermostat Housing and Radiator (Twist).
Q. Remove Thermostat and remove Thermostat Housing Half that was connected to Radiator.
R. Lift and remove Radiator.
S. Clean Oil Cooler, AC Condenser, and bottom of Radiator Housing.
Disconnect Oil Cooler Adapter .......................................Remove Shroud lifting Drivers Side First
Lift out Stock Radiator followed by Fans........................Trim center parts of Fan Housing 1/2 inch
Install Fans followed by Ron Davis Radiator and Shroud
3. Baseline Stock Radiator Testing at 100 deg F ambient temperature and 180 deg Thermostat (Fans on at 205 deg F and off at 200 deg F).
Testing a 1990 ZR1 with stock radiator (AC Condenser, Oil Cooler, Radiator Clean) at 100 deg F ambient temperature. Using Fan Controls for digital readout of coolant temperatures. Coolant mix is identical for the stock radiator and the Ron Davis Radiator.
Cruising 60 mph in 5th gear (AC Full ON fans at speed 10) coolant temperature 225 deg F
Did not cruise with AC OFF as temperature of coolant is not prohibitive.
Idling (AC Full ON fans at speed 10) coolant temperature 235 deg F
Idling (AC OFF) coolant temperature 230 deg F
4. Ron Davis Radiator Testing at 100 deg F ambient temperature and 180 deg Thermostat (Fans on at 205 deg F and off at 200 deg F).
Testing a 1990 ZR1 with Ron Davis radiator (AC Condenser, Oil Cooler Clean) Using Fan Controls for digital readout of coolant temperatures. Coolant mix will be identical for the stock radiator and the Ron Davis Radiator.
Cruising 60 mph in 5th gear (AC Full ON fans at speed 10) coolant temperature 197 deg F
Idling (AC Full ON fans at speed 10) coolant temperature 213 deg F
Did not cruise with AC OFF as temperature of coolant is not prohibitive.
Idling (AC OFF) coolant temperature 208 deg F
5. Testing of 1991 ZR1 with Ron Davis Radiator and 180 deg Thermostat (Fans on at 205 deg F and off at 200 deg F).
The 1991 ZR1 with Ron Davis Radiator, AC Full On, and 100 deg F ambient temperatures the Coolant temperatures stayed around 197 F cruise in 5th gear (60 mph) and rose to 213 F with AC Full On Idling (208 deg F with AC Off). This using the Fan Controls for Digital Read Out of Coolant Temperatures.
The testing of the 1991 ZR1 was conducted with identical Ron Davis Radiator with the identical AC Condenser, Oil Cooler, Coolant Fans and identical 180 deg Thermostat. The ambient temperature was 100 deg F. The 1991 ZR1 has SW Off Road Exhaust as compared to the 1990 ZR1 with Stock Exhaust.
6. Summary of Ron Davis Radiator Testing using a 1990 and 1991 ZR1 in HOT ambient temperatures cruising and in traffic (idling).
The objective here is to create a baseline of simple testing criteria to determine how ZR1 radiators (1990 and 1991) will function cruising and in traffic (idling). The simple baseline criteria are 100 deg ambient temperatures, 180 deg thermostat, and functioning AC.
Both the 1991 and the 1990 ZR1 Coolant temperatures on a HOT Day (100 deg F ambient) behaved the same with both Coolant Systems settling in at 197 deg F cruising at 60 mph in 5th gear with AC Full On. At a long term idling (more than 15 minutes) the coolant temperatures settled in at 213 deg F with AC Full On. With AC OFF the coolant temperatures dropped to 208 deg F.
Abbreviations
XfireZ51 posted This List Of Abbreviations
~T - Inverse Temperature ~AFR - Inverse Air Fuel Ratio #/Hr - Pounds per Hour ABS - Anti-lock Braking System A/C - Air Conditioning ADC - Analog to Digital Converter AE - Acceleration Enrichment AFPR - Adjustable Fuel Pressure Regulator AFR - Air Fuel Ratio AIR - Air Injection Reactor ATDC - After Top Dead Center ALDL - Assembly Line Diagnostic Link BARO - Barometric Pressure BBC - Big Block Chevy BBL - Barrel BCM - Body Control Module BDC - Bottom Dead Center BIN - Binary BLM - Block Learn Multiplier (long term fuel trim) BSFC - Brake Specific Fuel Consumption BPC - Base Pulse Constant BPW - Base Pulse Width BTDC - Before Top Dead Center CAFE - Corporate Average Fuel Economy CARB - California Air Resources Board C - Celsius CAT - Catalytic Converter CAT-CON - Catalytic Converter CCI - Computer Controlled Ignition CCP - Charcoal Cannister Purge CDI - Capacitive Discharge Ignition CEL - Check Engine Light CFI - Cross-Fire Injection CLT - Closed Loop Term (fueling correction) CNP - Coil Near Plug CTS - Coolant Temperature Sensor dTPS - Delta Throttle Position Sensor dMAP - Delta Manifold Absolute Pressure Sensor DC - Duty Cycle DE - Deceleration Enleanment (opposite of AE) DFCO - Decel Fuel Cut Off DIS - Distributorless Ignition System DRP - Distributor Reference Pulse EBL - EmBedded Lockers system ECM - Engine Control Module ECT - Engine Coolant Temperature EGR - Exhaust Gas Recirculation EGT - Exhaust Gas Temperature EPROM - Eraseable Programmable Read-only Memory ESC - Electronic Spark Control, knock detection & retard EST - Electronic Spark Timing, SA control F - Fahrenheit FAR - Fuel Air Ratio FPR - Fuel Pressure Regulator Ft/Lb - Foot Pounds (torque) GPS - Grams Per Second Gms/Sec - Grams per Second HEI - High Energy Ignition HP - Horse Power HYST - Hysteresis IAC - Idle Air Control (an actuator) IAT - Intake Air Temperature (sensor) INT - Integrator (short term fuel trim) Km - KiloMeters Km/L - Kilometers per Litre KPa - KiloPascals KPH - Kilometers Per Hour LDA - Lobe Displacement Angle (camshaft, same as LSA) LM - Launch Mode LSA - Lobe Separation Angle (camshaft, same as LDA) LV8 - Load Variable, 8-bit LV16 - Load Variable, 16-bit MAF - Mass Air Flow MAP - Manifold Absolute Pressure MAT - Manifold Air Temperature (sensor) MPG - Miles Per Gallon MPH - Miles Per Hour MPFI - Multi Port Fuel Injection mSec - milli-Seconds (.001 second) NB - Narrow Band O2 sensor N-Alpha - RPM & Throttle position for load N/V - Ratio of Engine speed (N) to Vehicle Speed (V) O2 - Oxygen Sensor value P/S - Power Steering PA3 - Knock Counts (PA3 is the name of the ECM counter) PCM - Powertrain Control Module PCV - Positive Crankcase Ventilation PE - Power Enrichment (see WOT) PPH - Pounds Per Hour PROM - Programmable Read-only Memory PSI - Pounds per Square Inch PW - Pulse Width PWM - Pulse Width Modulation RPM - Revolutions Per Minute SA - Spark Advance SBC - Small Block Chevy SD - Speed Density SES - Service Engine Soon TACH - Tachometer TBI - Throttle Body Injection TCC - Torque Converter Clutch TCM - Transmission Control Module TDC - Top Dead Center TF - Throttle Follower (IAC function) TPS - Throttle Position Sensor TSA - total spark advance uSec - micro-Seconds (.000001 seconds) UEGO - Universal Exhaust Gas Oxygen sensor (a WB unit) VAC - Vacuum VAFPR - Vacuum Adjusted Fuel Pressure Regulator VATS - Vehicle Anti-theft System VE - Volumetric Efficiency VRFPR - Vacuum Referenced Fuel Pressure Regulator VSS - Vehicle Speed Sensor WB - Wide Band O2 sensor WOT - Wide Open Throttle (see PE) WYSIWYG - What You See Is What You Get
Horsepower Losses from Angular Acceleration of Rotational Mass
1. Horsepower Losses from Angular Acceleration of Rotational Mass.
We strapped the car down and did a pull with the stock rotors: 313 TQ / 327 HP
Then actually jacked the car up ON THE DYNO and changed the rotors and ended up at 339 HP / 319 TQ. That's +12 HP and +7 TQ.
Really ??? Maybe the new rotors where thinner and there was less frictional resistance with the calipers
I do not get it
The DYNO is measuring pull and speed. You get a pull (force) at fixed speeds which is the horsepower. Or you get the force at the wheel to ground contact and the distance of that ground contact from center of wheel (torque) and the wheel rotational speed which you have horsepower. DYNOs of which one type is Inertial will measure this ground contact force (the inertial DYNO measures this indirectly by applying a ground tractive force to a massive rotating drum with the Moment of Inertia of the drum known).
A dynamometer or "dyno" for short, is a device for measuring force, torque, or power. For example, the power produced by an engine, motor or other rotating prime mover can be calculated by simultaneously measuring torque and rotational speed (RPM).
You are not measuring the rotational acceleration and resistance to that rotational acceleration of all the rotating components on the DYNO. That includes the wheel, rotors, hubs, wheel nuts, short shafts, differential components, drive shaft, clutch, pressure plate, flywheel, and crankshaft with all that is rotating on the front of the engine also (alternator, AC compressor, harmonic balancer, power steering pulley), and even camshafts.
Now...if they revved it up and measured instantaneous pull forces depending on how fast they were accelerating at any given instantaneous speed they would get a different number each speed depending on how fast they were accelerating through that speed. But I am not familiar with a DYNO that actually is acceleration dependent (able to change the rotating DYNO mass such that the rotational acceleration of the drive train components is identical to that of the acceleration of those components at WOT on an asphalt surface. Each car has a fixed mass and will accelerate on asphalt (excluding laying rubber) directly related to the torque output of the engine and gear ratio. Each Inertial DYNO has (I assume) a fixed mass and will accelerate (rotationally) directly related to the torque output of the engine and gear ratio.Now.....that fixed mass of the DYNO would have to be altered for each car mass to achieve the same drive train rotational accelerations as the car would see on asphalt. If not the same drive train accelerations, the differences achieved by using lighter brake rotors for example would be different depending on the DYNO mass used (depending on the mass of the Car).
The faster you accelerate the lower the horsepower numbers would be for each speed until you reach a constant speed in which the rotating masses (rotational acceleration) would not be sucking horsepower from your horsepower speed curve.
It all depends on the mass of the DYNO roller (for measurement of the effects of drive train rotational accelerations only). And in actuality, it all depends in real life on the mass of the car. The mass of the DYNO roller cannot necessarily duplicate the effects of the mass of the car which then results in different rotational accelerations of drive train components on the DYNO as compared to on asphalt. And each car mass is different to complicate the duplication of rotating masses effects on a DYNO as compared to the car on asphalt.
I doubt any inertial DYNO duplicates the rotational accelerations of drive train components as found at WOT on asphalt. I can calculate the benefits of rotational mass reduction much more accurately if the Moment of Inertia of your Rotors are known.
The moment of inertia, otherwise known as the angular mass or rotational inertia, of a rigid body determines the torque needed for a desired angular acceleration about a rotational axis.
Unless you have identical rotating accelerations of drive train masses on the DYNO and on Asphalt the horsepower losses for rotor angular accelerations will be different. You will get some savings in horsepower for lighter rotors but the numbers will be different on the DYNO as compared to Asphalt and from DYNO to DYNO having different rotating masses (drums). If you have a light weight DYNO drum your savings in going to lighter rotors will be greater. Same if you chopped 2,000 lbs off your ZR-1 ending up with a bit over 1,000 lbs......in that case your savings in horsepower using lighter rotors will be greater because your drive train angular accelerations on asphalt are much greater with a trap speed considerably greater.
2. Horsepower Advantages using Lighter Rotors Front and Rear on the ZR-1.
Performance AFX. These rotors weigh 16.5 lbs F and 14.5 lbs R.
Calculations of Horsepower gained by using lighter Rotors on the Front and Rear are included herein.
Performance A/FX Rotors Front: 16.5lbs Rear: 14.5lbs
Front 14 inches (1.16 ft) diameter (.58 ft radius) Rear 13 inches (1.08 ft) diameter (.54 ft radius)
Rear Axle: 3.73:1
B. The Simple Case first to see if we have potential using lighter weight Rotors.
Moment of Inertia.
Moment of Inertia I = 1/2 M x R x R
where M is mass in slugs (Weight/g) and R is radius in feet and I is moment of inertia in lbs divided by ft /sec^2 multiplied by ft^2 or lbs sec^2 ft (where ^ indicates power of or 2 is squared). g is acceleration of gravity or 32 ft/sec^2
For the Front Stock Rotors having a radius of .58 ft and weighing 27.5 lbs the mass will be .85 slugs.
For the Front Stock Rotors with a mass of .85 slugs and a Radius of .58 ft the Moment of Inertia will be .143 lb ft sec^2.
Angular acceleration.
Angular acceleration is in Radians per sec^2 and there are 2 pi radians per revolution or 6.28 radians per revolution. Just taking the Front Rotors as a quick example and lets assume the vehicle acceleration is constant for the quarter mile reaching a speed of 120 mph in 13 seconds using Nitto Invos with a 25.5 inch diameter. At 120 mph the tires having a circumference of 6.67 ft will be rotating at 26.4 revolutions per second (165.8 Radians per second). This rotation is achieved in 13 seconds so the angular acceleration will be 2.03 revolutions per sec^2 (12.75 radians per second^2) . This will also be the angular acceleration of the associated rotors.
Torque.
Torque = Moment of Inertia multiplied by angular acceleration or .143 lb ft sec^2 multiplied by 12.75 radians per second^2 Torque equals 1.82 ft lbs which is constant as the Rotor accelerates in the 1/4 mile assuming the angular acceleration is constant.
Horsepower to accelerate the rotor in rotation (Angular Acceleration).
To get HP which is variable as the rotor accelerates angularily.....we will look at the maximum angular velocity at 120 mph or 26.4 revolutions per second (165.8 Radians per second). There is 550 ft lbs per second in one HP.
HP = angular velocity multiplied by Torque.
We have 165.8 radians per second multiplied by 1.82 ft lbs or 301.7 ft lbs per second which is approximately .548hp (301.7/550) which is the horsepower generated at the angular velocity of 1,584rpm (26.4 revolutions per second) as the rotor is still accelerating angularily. This is the Horsepower required to angularily accelerate one rotor with constant angular acceleration in the 1/4 mile.
C. Comments and additional considerations. Now as one can imagine the vehicle acceleration is less in 3rd gear than in 1st but in 1st gear the car velocity is considerably less.. The .584 hp is for one single front stock rotor. As can be imagined without running the numbers for the lighter rotor, the hp for that rotor will be less and even if it were zero horsepower the savings in going to the lighter front rotor is only a bit over half a horsepower. Another observation is that at the green light the LT5 has ample horsepower to spin the tires at which time the lighter rotors (with tires spinning) will offer a bit more savings in horsepower but savings in horsepower with tires spinning is not required.
D. Summary of lighter Rotor Horsepower Savings.
Now as can be expected the Front Rotors are the Heaviest and assuming the rear Rotors have similar savings the maximum savings for all four Rotors would be a bit over 2 hp and that assumes the lighter weight rotors weigh nothing. That also assumes a higher rotational acceleration at 120 mph than can be expected as we are in 3rd gear. The assumptions in this first simple case are to get a ball park and if the ball park is so small as to be negligible, there is no need to adjust the assumptions expecting significantly greater savings in horsepower. In this case the assumption was a rather BIG assumption assuming the New Lighter Weight Rotors actually weighed nothing.
The very low Rotor Horsepower requirements for angular acceleration seems reasonable given he angular acceleration of the Rotors in the 1/4 mile to achieve 120 mph vehicle speed is very very low (2.03 revolutions per sec^2)
One would expect considerable more horsepower savings in going to a lighter flywheel since the flywheel is accelerated three times in the 1/4 mile and at much greater rpms approaching 7,000 rpm maximum.
1. Tools to Carry in the ZR1 behind the Seats 90'-91'.
Bottom Drivers Side. Volt Meter, Resistance Meter and 1/4 inch Metric Tools..................1/4 Inch Metric Tools with some additional items noted
Second Layer Drivers Side. Medium Channel Locks, Phillips and Flat Screw Driver, 1/4 Inch Socket Driver with 7mm Socket
(7mm socket used on all the interior Hush Panel and console screws and exterior ECM Chip Cover),
8mm Flex Open End Ratchet
Top Layer Drivers Side. Fuel Pump Jumper and ALDL Code Reader/Eraser .......................Plug in to ALDL and Hold Any Button then turn key on to ........................................ ........................................ .....................Read Associated CodesALDL Fault Code Flasher/Eraser
Bottom Passenger Side......................................... ..........................Bottom Top Box Passenger Side. 25 ft Nylon Tow Rope, Jumper Cables, Quart AMSOIL 10w-40.........Flex Head Ratchet Set (10mm, 12mm, 13mm, 14mm, 15mm) ........................................ ........................................ ......................(14mm Flex Head Ratchet used on Oil Pan Drain Plug)
Second Layer Top Box Passenger Side......................................... .Top Layer Top Box Passenger Side. 3/8 inch Socket Wrench with 3/8 to 1/2 inch adapter .................long 3/8 inch drive 3mm, 4mm, 5mm, 6mm, 7mm, 8mm, 10mm
(Belt Tensioner), 3/8 inch drive Torx 40, Short 3/8 inch drive .....Allen for (SS Bolts of TB, Coolant Manifolds, Throttle Cables)
Wobble Extension, Short 3/8 inch drive 6mm Allen
(Cam Covers), Tire Repair Kit, Swivel Spark Plug Socket
Tow Adapter Stored next to Passenger Seat......................Gorilla Lug Wrench
The Tow Adapter is made to engage the 1-1/4 inch square tubing of the frame support under the front of the ZR-1.
Tire Pressure Gauge in the Center Console
2. There is a BIG difference between the 90'/91' and the 95' (Maybe 93' and 94') in regard to the storage for the tools. On the 95' there is only one compartment (behind the Passenger Side) for tools. And there is NO Glove Box on the 95' But there is a Trick
The Bottom Seat Cushion is easily removed by pushing down on the wire clip in front of the Seat frame. The Cushion can then be easily removed totally and you will observe two straps going from the front to the rear of the frame.
Under those straps and above the bottom of the seat frame you can store your Manual and Jumper Cables on the Drivers Side. On the Passenger Side I store the Extension Hex Sockets and the ALDL Code Reader and Adapter.
Passenger Side Details.
Behind the Passenger Seat I store in layers......(1) quart of 10W-40 Amzoil, (2) channel locks, 3/8 inch socket wrench, Spark Plug Wrench, #5 Torx, (3) Screw Drivers, 1/4 inch socket wrench with 13mm socket, 10mm and 8mm flex head open end ratchet wrenches, #5 long Allen Head, (4) Volt Meter, 1/4 Inch Metric Tools with some additional items, Fuel Pig Tail for #2 Fuel Pump.
Beside the Passenger Seat I store the Lug Wrench and the Tow Adapter.
Regarding alternators and other spare parts. Anything original I think needs Restoration including the Alternator, Starter, Serpentine Belt, Belt Tensioner......I rebuild such that there is NO reason to carry those parts as spares.
And....I do carry Jumper Cables and the Tow Adapter.
 12-05-2014, 03:41 AM