






A&A install tips

Thread Starter
Burning Brakes

Joined: Mar 2005
Posts: 822
Likes: 1
From: Henderson Texas
 A&A install tips
Well guys, it looks like I will be receiving my A&A kit middle of next week and will be installing it myself. I was wondering if anyone out there that has already done the kit can point me in the right direction to some tech articles or links that can explain a few things to me such as
1. description of fuel pressure and bost gauge install (where are you tapping in for vacum? maybe a picture....and how do you pull the wires through the firewall.)
2. pinning the crank ( I bought the kit from A&A already) any tips or tricks to doing it.
3. routhing the pulleys around the alternator (supposedly there are changes between the alternators or bracketry that makes you route the belts differently....I have an 03 z06 if that makes a difference)
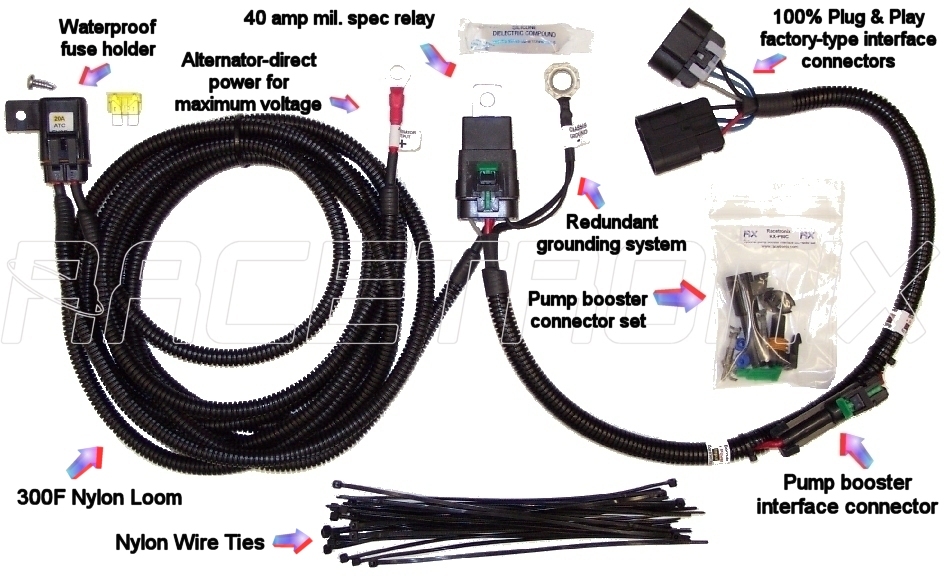
4. Racetronix new wiring harness for 03 and up c5's...anyone have any idea how this is going to interface with the KB BAP or any tips on putting it in and a good place to put it.
5. Any general tricks or anything that you might remember from your own personal installs that might help me out would be greatly appreciated.
1. description of fuel pressure and bost gauge install (where are you tapping in for vacum? maybe a picture....and how do you pull the wires through the firewall.)
2. pinning the crank ( I bought the kit from A&A already) any tips or tricks to doing it.
3. routhing the pulleys around the alternator (supposedly there are changes between the alternators or bracketry that makes you route the belts differently....I have an 03 z06 if that makes a difference)
4. Racetronix new wiring harness for 03 and up c5's...anyone have any idea how this is going to interface with the KB BAP or any tips on putting it in and a good place to put it.
5. Any general tricks or anything that you might remember from your own personal installs that might help me out would be greatly appreciated.
Former Vendor
Joined: Feb 2004
Posts: 10,876
Likes: 8
From: Las Vegas NV
St. Jude Donor '06 & '12
The only advice I can give you is keep Andy's number handy. He forwards his phone to his cell so you can pretty much call him 24/7. Believe it or not he eccourages it. I've talked to him at darn near 10 o'clock at night.
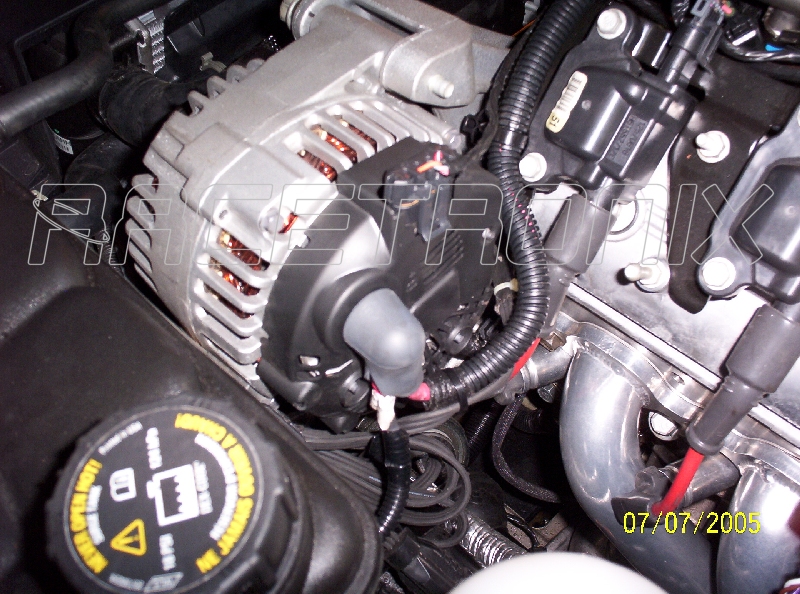
In regards to the Racatronics pump, I mounted the relay onto one of the fuel filter bolts right above the drivers side tank. Then I ran the wiring inside the tunnel (above the tunnel plate) all the way to the front. I then fished it up on the drivers side and mounted it to the alternator. I bundled up and zip tied the excess wires next to the master cyl.
Its pretty straight forward. If you go onto A&A's site the have install instructions..
Jeff
In regards to the Racatronics pump, I mounted the relay onto one of the fuel filter bolts right above the drivers side tank. Then I ran the wiring inside the tunnel (above the tunnel plate) all the way to the front. I then fished it up on the drivers side and mounted it to the alternator. I bundled up and zip tied the excess wires next to the master cyl.
Its pretty straight forward. If you go onto A&A's site the have install instructions..
Jeff
Burning Brakes


Joined: Sep 2002
Posts: 1,117
Likes: 1
From: Cedar Falls Iowa
Originally Posted by Brian Laser S4
You can use this as a supplement to Andy's pics. You can also hit me on AIM, I am more than happy to help.
My Build
Brian
My Build
Brian
Thanks in advance
Troy
Guest
Posts: n/a
Originally Posted by 1 Nasty Z
Hey Brian I have a A&A kit on order. I wonder if you could post a pic of your finished product showing the alignment of the front (center) air dam which has to be relocated per the instructions. I wonder how far off or rather how far forward it aligns with side air dams. So I guess I'm asking for a side picture. Would be very appreciated.
Thanks in advance
Troy
Thanks in advance
Troy
fyi, my dams are even all the way across. If you skirts are beat, now would be a good time to replace.
till tomorow
Brian
Corvette Stories
The Best of Corvette for Corvette Enthusiasts

10 Reasons the C6 Z06 is Still A Performance Benchmark After 20 Years
Joe Kucinski
How Much Horsepower Every Corvette Engine "LOST" in 1972
Joe Kucinski
Top 10 DOs and DON'Ts for Protecting Your Convertible Top!
Michael S. Palmer
Top 10 Most Explosive Corvettes Ever Made: Power-to-Weight Ratio Ranked!
Joe Kucinski
150 hp to 1,250 hp: Every Corvette Generation Compared by the Specs That Matter
Joe Kucinski
8 Coolest Corvette Pace Cars (and Replicas) of All Time
Verdad Gallardo
Top 10 Corvette Engines RANKED by Peak Torque (70+ Years of Muscle!)
Joe Kucinski
Corvette ZR1X Will Be Pacing the Indy 500, And Could Probably Race, Too!
Verdad Gallardo
Top 10 Corvettes Coming to Mecum Indy 2026!
Brett Foote
Melting Slicks

Joined: Jan 2003
Posts: 3,251
Likes: 4
The B*tch of it all was the crank pinning. After that the rest was a snap. All I can say is follow Andy's instructions carefully. If you don't have them ask him for them. Good luck.

Torque specs
Crank pinning
Torque specs
Crank pinning
Last edited by IM QUIKR; Aug 5, 2005 at 09:18 PM.

Supporting Vendor


Joined: Dec 2001
Posts: 1,573
Likes: 31
From: A dealer near you.
Originally Posted by exploder
4. Racetronix new wiring harness for 03 and up c5's...anyone have any idea how this is going to interface with the KB BAP or any tips on putting it in and a good place to put it.
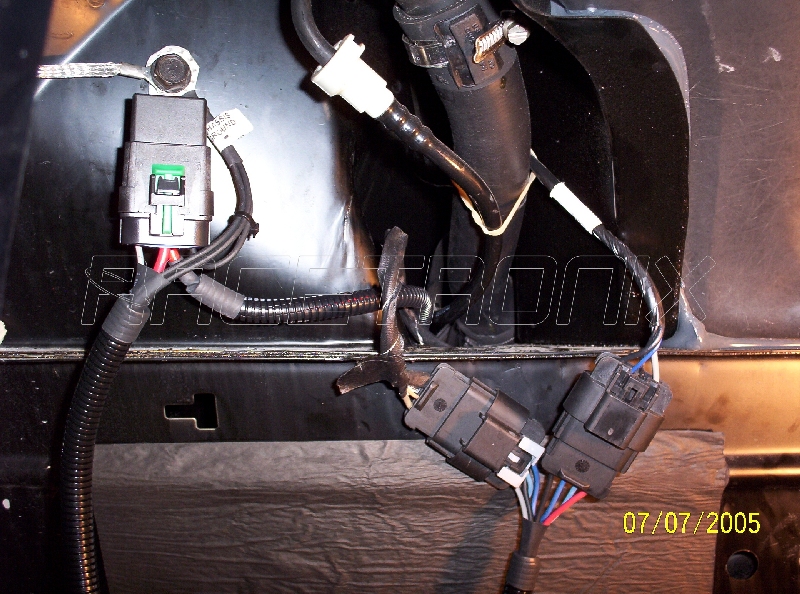
The Racetronix relay and BAP mount in the DS rear fenderwell where the filler neck is:
The grounds from the booster hook to the chassis and relay ground point. There is a booster connector set included with your harness. The male connector is installed on the booster B+ input and plugged into the female booster connector on the Racetronix harness. The female connector is installed on the booster's + output wire and plugged into the male connector on the Racetronix harness.
Guest
Posts: n/a
Undercaridge protection


Use the old holes and clips to secure the expanded metal to the nose on the front and then sandwich it between the cross bar and the skirt.
You will have to trim some of the tabs on the front side of the nose sdo the screen sits flush and nice. Take your time on this finish part of the build and do it last after you have made all your clearence adjustments in terms of the gap between the Rad, FMIC and condensor core.
Injectors Ford SVO #42

Brian
Use the old holes and clips to secure the expanded metal to the nose on the front and then sandwich it between the cross bar and the skirt.
You will have to trim some of the tabs on the front side of the nose sdo the screen sits flush and nice. Take your time on this finish part of the build and do it last after you have made all your clearence adjustments in terms of the gap between the Rad, FMIC and condensor core.
Injectors Ford SVO #42
Brian
Last edited by Brian@FI Performance; Aug 6, 2005 at 02:27 PM.

Le Mans Master


Joined: Sep 2001
Posts: 8,840
Likes: 43
From: State of Confusion.
1 Nasty Z: You might want to give some thought to a Big Mouth air dam for the front. I put one on my car and took the middle spoiler off, but you can mod the spoiler to fit back on if you'd like. I have a stock thermostat/cooling system and in 95° weather my coolant temps were around 200-205°, but then got on the highway and they dropped to under 200°. I'm going to put in a 170° thermostat and have the fans reset, and that should help some.
Big Mouth air dam
If I'm not mistaken, he's a supporting vendor here.
By the way you've got a WICKED looking car!
Big Mouth air dam
If I'm not mistaken, he's a supporting vendor here.
By the way you've got a WICKED looking car!