


Supercharged Heat Problems Try This Mod
Drifting


Joined: Jul 2002
Posts: 1,735
Likes: 14
From: Tucson AZ
You are not the first one to say the radiator did nothing. Most of the time it's because changing the radiator is only upgrading the cars ability to cool more. These new cars are "told" what temperature to run at by the ecm, thermostat, and fan controls. Unless you make other changes, as you did with air flow, nothing will happen. It's kind of like doubling the size of your furnace or AC in the house and setting the temperature at 70 degrees. You'll still get 70 degrees, but if you ask for 55 you might actually get there. It's all about capacity.
For the record, you make a great product and I don't "regret" getting one for my car AT ALL. I did notice that the "average" running temp is lower by about 20 degrees, so if someone tracks their car I think this is where your products would come into play (and that's what they're made for!)
As you mention it just didn't resolve my problem which was lack of air flow to the rad (any rad). Forum members tried to tell me flow was the problem but my rad was the original, car was 10-years old, I live in AZ....it seemed like a reasonable thing to do. I had reporgrammed the fans, tested them, had a 160 T-stat, etc. (readers, these are good, inexpensive steps as well).
I hope you didn't feel I was unhappy with your product, or was talking it down becuase that was not my intent. You and Ron Davis are the two leaders in the industry in my opinion, Davis is right here in my backyard and I chose your product over his, I felt it was a much better value.
Cheers....

Last edited by BobJ; Jul 1, 2009 at 08:03 AM.
Drifting
Joined: Oct 2006
Posts: 1,773
Likes: 2
From: San Diego CA
I have some pics at work, I'll post them tomorrow. It was fairly straight forward;
1) Remove the front bumper cover.
2) Remove heat exchanger
3) Remove or "shave" foam behind bumper cover to accomodate heat exchanger.
4) Brackets that come with KB heat exchanger can be used to mount it in new position. You have to flip/rotate them, it will make sense when you're looking at it.
5) Cut some hose for the new length, or get pre-molded hoses as required.
6) You'll want to do ONE BMF's front license plate mod to adequate air flow to the heat exhanger. I also removed the fog light housings to increase air flow (you don't need them).
7) Say goodbye to high coolant temps!!


Melting Slicks


Joined: Sep 2001
Posts: 2,218
Likes: 0
From: Glendale AZ
He was my solution to my severe overheating of my F/I 402.
As is I would get 230* eng temps at calm highway speeds and when I hit stop and go traffic it would climb to 260* real fast.
So I did a lot of research (thanks CF!) and did the following
A: ensured a 100% seal from the fans to the radiator
B: reworked the radiator shroud so it only sucked air from the bottom just like OEM.
C: made sure the lower Air dam was in place with the most room given to the radiator.

This is what I had to work with. A A and A FMIC, on a tiger shark nose

So I bought a junkyard OEM shroud and started test fitting.

Once I got the shape I wanted, time to use 5 min epoxy to set her in.

Woah thats ugly�. but it works! I used Kentucky chrome (aluminum foil tape) to seal up the radiator and rubber foam to seal up the front shroud.
Those ugly angle metal bits serve 2 parts. One they hold the shroud in place, and two they �pull� on the shroud to wrap around the Output part of the FMIC.

As you can see here I have some circular cut foam to make that output FMIC sealed up.
I had to tweak the air dam to get it at 100% OEM-ish fashion.
To complete the testing I drove around like a redneck with my hood off. Yee Haw!

cheers
cahd
As is I would get 230* eng temps at calm highway speeds and when I hit stop and go traffic it would climb to 260* real fast.
So I did a lot of research (thanks CF!) and did the following
A: ensured a 100% seal from the fans to the radiator
B: reworked the radiator shroud so it only sucked air from the bottom just like OEM.
C: made sure the lower Air dam was in place with the most room given to the radiator.
This is what I had to work with. A A and A FMIC, on a tiger shark nose
So I bought a junkyard OEM shroud and started test fitting.
Once I got the shape I wanted, time to use 5 min epoxy to set her in.
Woah thats ugly�. but it works! I used Kentucky chrome (aluminum foil tape) to seal up the radiator and rubber foam to seal up the front shroud.
Those ugly angle metal bits serve 2 parts. One they hold the shroud in place, and two they �pull� on the shroud to wrap around the Output part of the FMIC.
As you can see here I have some circular cut foam to make that output FMIC sealed up.
I had to tweak the air dam to get it at 100% OEM-ish fashion.
To complete the testing I drove around like a redneck with my hood off. Yee Haw!
cheers
cahd
Le Mans Master


Joined: Oct 2005
Posts: 7,088
Likes: 1,829
From: Metro Detroit Michigan
I made a few small changes to BMFs mod, in case anyone wants to incorporate them:
First, I made the cutout in the bumper cover smaller, leaving the license plate attachment points, so if anyone ever needs to put on a front plate, they won't need to purchase a new front bumper.
Second, I used a drum sander to get a super neat trim on the front piece, so that rubber molding doesn't need to be used to clean it up. It looks quite good this way.
Third, the original hot-melt adhesive started to let go after a hot drive (or maybe it was parking after the hot drive). Or maybe it had nothing to do with the heat.
To glue the second time, I roughed up the plastic gluing surface with sandpaper; put down a bead of silicone adhesive; pushed the screen into the bead so it oozed through; put another bead on top to join to what had oozed through.
A lot of other adhesives will do, but the silicone was handy, is pretty tough stuff, stays where you put it (doesn't run), and I thought it would be good to use something flexible and heat resistant.
Instructor

Joined: May 2006
Posts: 247
Likes: 0
From: Frisco TX
I made a few small changes to BMFs mod, in case anyone wants to incorporate them:
First, I made the cutout in the bumper cover smaller, leaving the license plate attachment points, so if anyone ever needs to put on a front plate, they won't need to purchase a new front bumper.
Second, I used a drum sander to get a super neat trim on the front piece, so that rubber molding doesn't need to be used to clean it up. It looks quite good this way.
 Got any pics you can post?
Le Mans Master
Joined: Oct 2005
Posts: 7,088
Likes: 1,829
From: Metro Detroit Michigan
Here's one. The area behind the screen can be trimmed back much farther, and still hold a license plate if necessary. I kept cutting more away and flexing to see if the area was still strong. When I got to this point, I thought, "Hmm, that looks kind of interesting" so I stopped. 
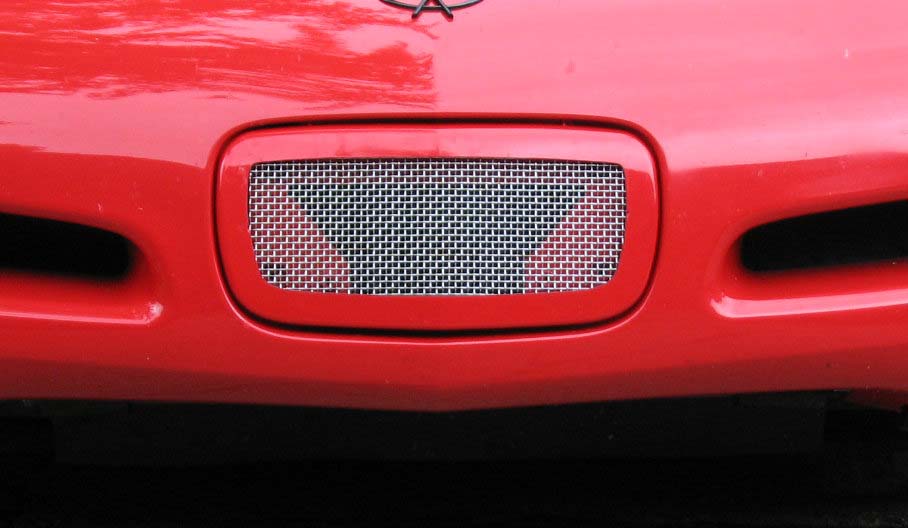
If I'd thought of it, maybe I would have made the opening in the shape of the Chevy Bow Tie.
If I'd thought of it, maybe I would have made the opening in the shape of the Chevy Bow Tie.
Last edited by Warp Factor; Jul 3, 2009 at 10:07 AM.
Corvette Stories
The Best of Corvette for Corvette Enthusiasts

Top 10 Most Expensive Corvettes Ever Sold on Bring A Trailer
Brett Foote
10 Things Every Corvette Owner Needs (2026 Edition)
Michael S. Palmer
8 Most "Only Corvette Owners Understand" Quirks and Problems
Pouria Savadkouei
10 Reasons the C6 Z06 is Still A Performance Benchmark After 20 Years
Joe Kucinski
How Much Horsepower Every Corvette Engine "LOST" in 1972
Joe Kucinski
Top 10 DOs and DON'Ts for Protecting Your Convertible Top!
Michael S. Palmer
Top 10 Most Explosive Corvettes Ever Made: Power-to-Weight Ratio Ranked!
Joe Kucinski
150 hp to 1,250 hp: Every Corvette Generation Compared by the Specs That Matter
Joe Kucinski