
ecs instal
 07-16-2015, 12:04 PM
#61
Drifting

Thread Starter

so the installation or the main part of it will take place on the 23th of july. the local mecanic will let me work on his lift, while hes on vacation. the apprentice will be there, in case i need help.
i will be removing the rack, pinning the crank, breaking the bracket, installing all idlers and tensioner, the head unit and the belt. if im lucky i will drive home. how long is that goint to take? what do you reckon?
all the radiator stuff i will do over the weekend and the rest afterwards.
im going to lose the airpump and im seriously considering getting ridd of the ac as well.
good news: i found the dipstick. its the round head allen screw in the head unit.
questions:
1. does the upper side of the radiator really move back, as you have to cut the upper hose?
2. how are the aluminum brackets attachet to the upper radiator support? they seem to short, the hole woud be on the corner more or less. im tempted to make my own with 4 holes.
edit: forget this. i didnt realise the sides have to be cut off. the brackets will do fine.
3. as my mafless pipe has no provisions for the iat sensor, is it really a good idea to use the rubber gromet and original sensor? would anybody know of a "plug and play" screw in sensor? (i dont want to mess with calibrating it, have done that before).
4. i want to remote mount the map sensor, probably into the booster line. while i believe the original will stay in place after 15 years, if i take it out and put in the new one i wont ever be sure what its doing back there. besides i read that the map maniford can break, basically ruining the intake. good idea or not?
5. dough let me have a 2 bar sd tune to play with. should i flash it in, install the injectors and and test it on the stock car?
btw, if anybody wonders about the stock tune and would like to have anything logged, now is the time to tell me.
Last edited by romandian; 07-17-2015 at 04:59 AM.
 07-17-2015, 01:23 PM
#62
Drifting
Thread Starter
so, i went looking for the special socket needed for the sc bracket. no luck, the local tool store didnt have it, could order it but i doubt i would have it by wendesday. this will keeep me bussy on monday.
its reallly hard to believe, the recessed holes are 23 mm, while a regular 17 mm socket is 24 mm.
"remove outer a/c tensioner dust shield". im lost. from the pulley? why? and what is outer, front of car?
also, why has alternator have to be removed? it doesnt seem to be in the way.
well, i tried to drain the radiator today. no luck. i turn the valve half a turn with an allen bit. nothing happens. i pull on it. nothing. i pull harder, nothing.
i pulled the hose on my jeep earlier this week, and what a freaking mess, despite the big catch pan i used. i woul really like to learn, how that valve works.
 07-17-2015, 03:09 PM
#64
Race Director

Member Since: May 2004
Location: Raleigh, NC
Posts: 16,664
Received 1,194 Likes
on
1,053 Posts
St. Jude Donor '15

I'd call ECS on that one. I know on the C6 kit the thick washer you have on the right side of the picture, between the tensioner and other bracket does not go there. I can't say for sure it doesn't go there on the C5 kit, though.
I didn't realize there was a special socket needed? Maybe I just got lucky. You could just take a grinder to outer edge of a socket IMO.
Here's what it looks like for a C6
I didn't realize there was a special socket needed? Maybe I just got lucky. You could just take a grinder to outer edge of a socket IMO.
Here's what it looks like for a C6
 07-17-2015, 10:38 PM
#65
Drifting
Thread Starter
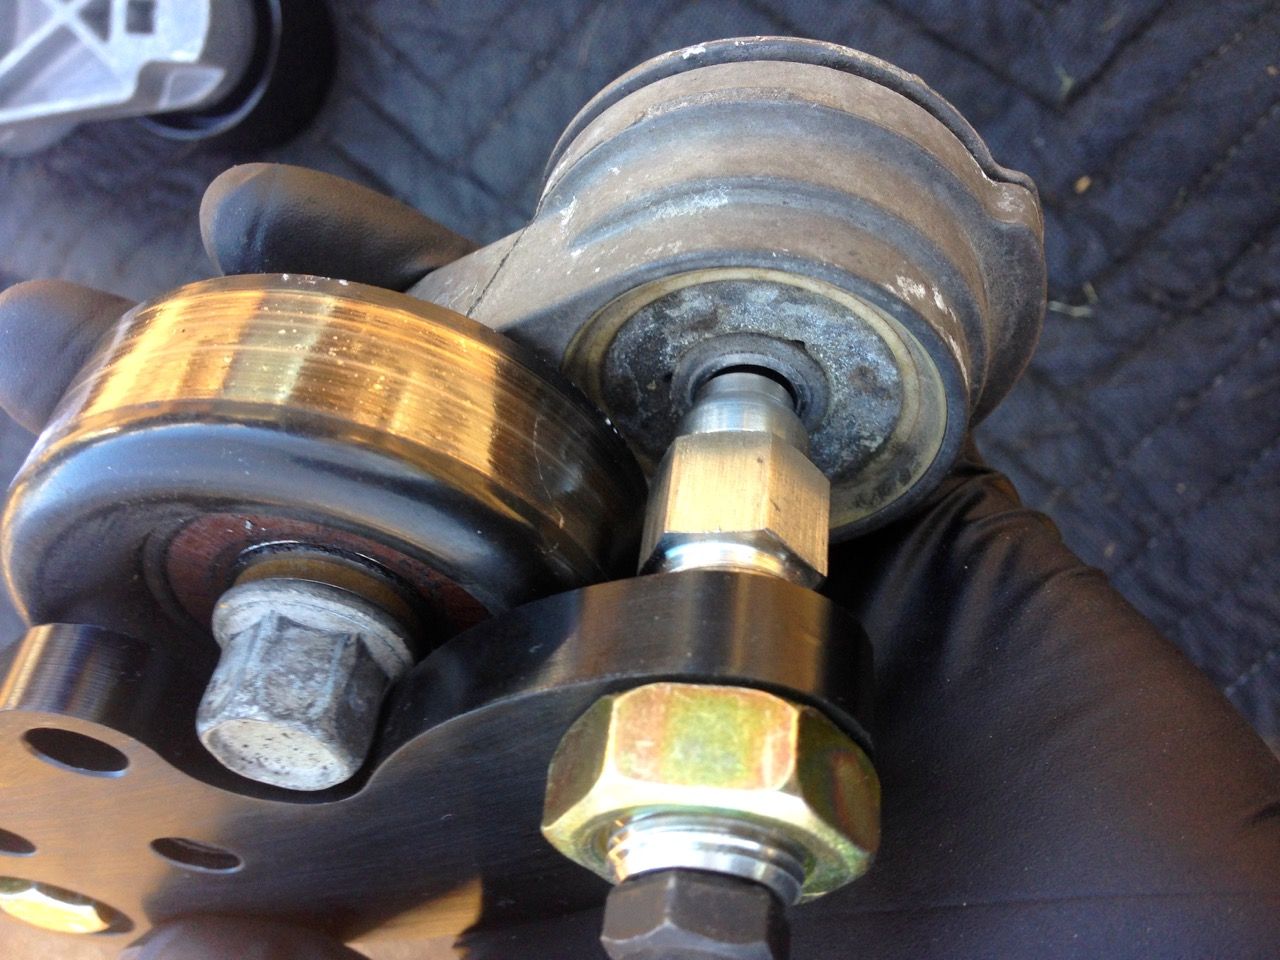
its not a washer, that flange seems to be non removable. maybe its the "dustshield" to be removed?
does your tensioner fit the profile of that nut?
does your tensioner fit the profile of that nut?
07-20-2015, 10:01 AM
#66
Drifting
Thread Starter
so i got this:
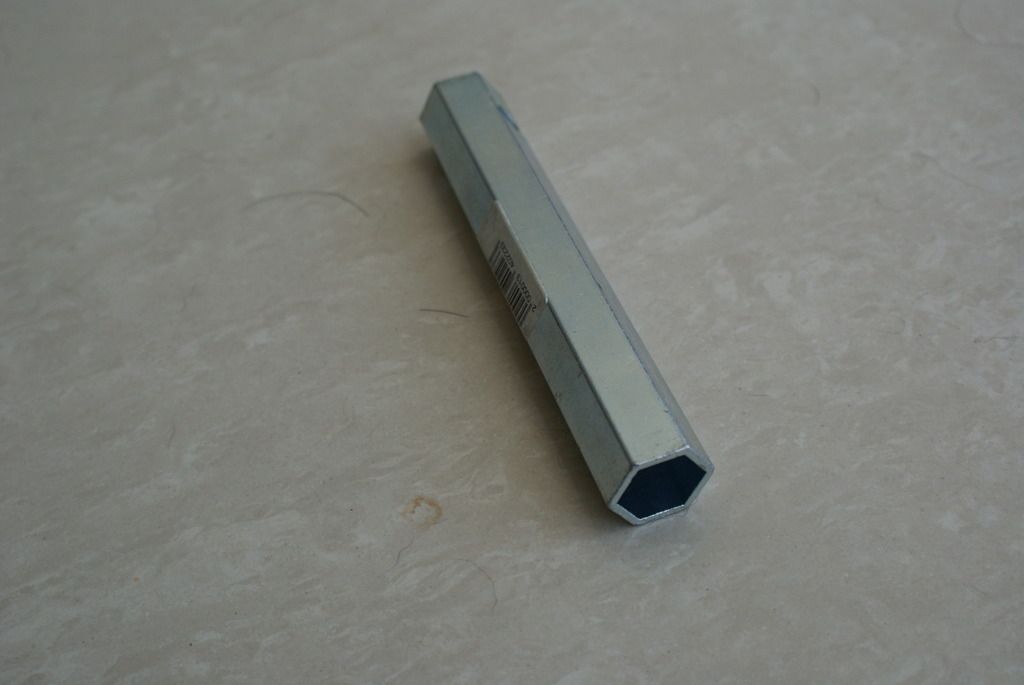
guess what. it doesnt fit the hole. even this is 23.5 mm. ill be grinding down a 3/8 socket tonight. crazy world.
on second thought, it might be wiser to butcher up the bracket and paint it.

guess what. it doesnt fit the hole. even this is 23.5 mm. ill be grinding down a 3/8 socket tonight. crazy world.
on second thought, it might be wiser to butcher up the bracket and paint it.
07-20-2015, 10:24 AM
#67
Race Director
Member Since: May 2004
Location: Raleigh, NC
Posts: 16,664
Received 1,194 Likes
on
1,053 Posts
St. Jude Donor '15
Sockets are much cheaper. I'd grind on a socket first.
07-20-2015, 11:46 AM
#68
Drifting
 I had to take an angle grinder to a socket to fit. Still need to find the proper socket though...
07-20-2015, 09:27 PM
I had to take an angle grinder to a socket to fit. Still need to find the proper socket though...
07-20-2015, 09:27 PM
#69
Race Director

Member Since: Dec 2010
Location: Atlanta, GA
Posts: 10,426
Received 1,261 Likes
on
1,056 Posts
2020 Corvette of the Year Finalist (performance mods)
C5 of Year Winner (performance mods) 2019

I used a thin wall impact socket to get to those 2 bolts that hold the main bracket to the head... never understood why they did that... go ahead and take that piece of hex and have about a 1" wide piece of it welded to your tensioner... mine developed some cracks in the 3/8 slot used to open it... solid aluminum hex would probably work better but the stuff you have might work... here is what mine ended up looking like before I took everything off
 07-21-2015, 01:59 PM
#71
Premium Supporting Vendor
Member Since: Oct 2004
Location: Providing the most proven supercharger kits for your C5/6/7 609-752-0321
Posts: 23,321
Received 1,090 Likes
on
658 Posts
We do not use any ground down or special sockets here? Std Snap on 17mm, but I'll open the hole more on the next batch to accommodate any brand socket.
Roman, you have an email.
Roman, you have an email.
07-21-2015, 02:00 PM
#72
Drifting
Kobalt and Craftsman sockets do not fit, so Snap-on must be thinner.
I had to grind down a Craftman to barely fit, but apparently a thin walled socket is perfect.
I had to grind down a Craftman to barely fit, but apparently a thin walled socket is perfect.
07-21-2015, 02:06 PM
#73
Premium Supporting Vendor
Member Since: Oct 2004
Location: Providing the most proven supercharger kits for your C5/6/7 609-752-0321
Posts: 23,321
Received 1,090 Likes
on
658 Posts
Go figure, prior to posting that I asked the techs here if anyone had to ground down a socket to fit that and they all looked at my strange and said no. I just went back out to ask if they all have Snap on, which they all do. I guess they are thinner, but I'm surprised this has not come up earlier.
07-21-2015, 04:36 PM
#74
Race Director
Member Since: May 2004
Location: Raleigh, NC
Posts: 16,664
Received 1,194 Likes
on
1,053 Posts
St. Jude Donor '15
I found that my gear wrench ones would NOT fit, but I had an old set from some tool set I got a long time ago.. and those fit.
Can't hurt to make them a little larger, then problem solved. I've seen it mentioned in another thread or two lately where people are doing their own installs.
Regardless.. easy fix.
Can't hurt to make them a little larger, then problem solved. I've seen it mentioned in another thread or two lately where people are doing their own installs.
Regardless.. easy fix.
07-21-2015, 05:14 PM
#75
Premium Supporting Vendor
Member Since: Oct 2004
Location: Providing the most proven supercharger kits for your C5/6/7 609-752-0321
Posts: 23,321
Received 1,090 Likes
on
658 Posts
I found that my gear wrench ones would NOT fit, but I had an old set from some tool set I got a long time ago.. and those fit.
Can't hurt to make them a little larger, then problem solved. I've seen it mentioned in another thread or two lately where people are doing their own installs.
Regardless.. easy fix.
Can't hurt to make them a little larger, then problem solved. I've seen it mentioned in another thread or two lately where people are doing their own installs.
Regardless.. easy fix.
 07-22-2015, 11:41 AM
#77
Drifting
Thread Starter
today i wanted to relocate the radiator. craddle went in, no problems, but for the life of me i cant straighten out the a/c lines.

did everybody really do this "with both hands"? i cant even move the thin line (top right) and the lower one is much sturdier. is there a trick or what tool to use?
the local mechanic thought i was crazy to even try that with the system charged, he said the lines were very brittle.

did everybody really do this "with both hands"? i cant even move the thin line (top right) and the lower one is much sturdier. is there a trick or what tool to use?
the local mechanic thought i was crazy to even try that with the system charged, he said the lines were very brittle.
07-22-2015, 11:57 AM
#78
Drifting
today i wanted to relocate the radiator. craddle went in, no problems, but for the life of me i cant straighten out the a/c lines.
did everybody really do this "with both hands"? i cant even move the thin line (top right) and the lower one is much sturdier. is there a trick or what tool to use?
the local mechanic thought i was crazy to even try that with the system charged, he said the lines were very brittle.
did everybody really do this "with both hands"? i cant even move the thin line (top right) and the lower one is much sturdier. is there a trick or what tool to use?
the local mechanic thought i was crazy to even try that with the system charged, he said the lines were very brittle.
07-22-2015, 12:54 PM
#79
Drifting
Thread Starter
i never considered myself a whimp, but other guys must have stronger hands. no way i can bend those lines. they have to come off. what a pain.
tomorrow im probably going to find out the stock a/c tensioner doesnt fit that weird nut. dough said they supply the tensioner with the kit. it didnt come with mine.
such is life, i guess. hopefully ill be able to pin the crank.
tomorrow im probably going to find out the stock a/c tensioner doesnt fit that weird nut. dough said they supply the tensioner with the kit. it didnt come with mine.
such is life, i guess. hopefully ill be able to pin the crank.
07-23-2015, 10:25 AM
#80
Drifting
Thread Starter
today was the "big day" but i got scared off. i just didnt see how the install was going to be done by the end of the day. the car got a new water pump and besides losening the steering rack and wondering how it might come out, that was it. also i was not sure about the a/c tensioner, so i called it off. dough is sending a tensioner my way, so im not unhappy. the intercooler seems to fit:
should there be no rubber gromets between intercooler and aluminum brackets?
also the helper had stronger hands and more courage, so the rad is in the cradle now. the problem might have been in the two lines crossing, being intalled wrong? i managed to bugger up one of the aluminum lines by taking pliers to it. bad idea. i hope there will be no leak.
i sure respect anyone that has done this in the driveway.
Last edited by romandian; 07-23-2015 at 01:15 PM.