


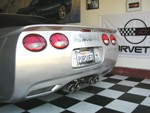

Hate to ask, flushmount tailghts pics needed.

Thread Starter
Drifting


Joined: Jul 2002
Posts: 1,270
Likes: 0
From: nicholasville kentucky
 Hate to ask, flushmount tailghts pics needed.
I know this has been beat to death, but I ran a serch and didn't see but one picture. Can someone post a couple of pictures and give me there opinon of how they like them. Thanks for any help. 

Melting Slicks


Joined: Apr 2005
Posts: 3,469
Likes: 4

I did mine with the Home Depot parts list that floats around this forum. It only took about a half hour, I really like the look, and it keeps the rear of your car cleaner... no crap collecting in the light wells. Best of all if you ever change your mind, it's real easy to go back to stock. Have at it!
(6) 1" L X 1/2 W X .194" Hole Size Nylon Spacers
(6) 1/4" L X 1/2" W X .194 Hole Size Nylon Spacers
(8) #8 x 2" Zinc Pan Head Screws
(1) Frost King Rubber Foam Weatherseal 3/8" W X 5/16" Thick x 10' Long (Adheasive backed)(I got the black weather stripping)
Simply unscrew tail lights, clean, put weather stripping around the tail light (where the red casing meets the black casing of the light) insert new screws and spacers on back side, screw back into mounting hole.
-The two center lights get one 1" spacer on each screw.
-The outside lights get three 1/4" spacers on each of the outer most
screw
-The inner screw on the outside most lights get one 1" spacer.
-Fit so the weather stripping looks good and screw them back in!
1" spacers $4.77
1/4 Spacers $3.42
Weather stripping $3.98
Pan head screws $.98


Premium Supporting Vendor


Joined: Oct 2004
Posts: 36,838
Likes: 438
From: Manassas Park VA
St. Jude Donor '07-'08,-'13-'14, '16-'17
Here you go...
Before:

After:


Heres the how to...
Flush Mounted Tail Lights
(6) 1" L X 1/2 W X .194" Hole Size Nylon Spacers
(6) 1/4" L X 1/2" W X .194 Hole Size Nylon Spacers
(8) #8 x 2" Zinc Pan Head Screws
(1) Frost King Rubber Foam Weatherseal 3/8" W X 5/16" Thick x 10' Long (Adheasive backed)(I got the black weather stripping)
Simply unscrew tail lights, clean, put weather stripping around the tail light (where the red casing meets the black casing of the light) insert new screws and spacers on back side, screw back into mounting hole.
-The two center lights get one 1" spacer on each screw.
-The outside lights get three 1/4" spacers on each of the outer most
screw
-The inner screw on the outside most lights get one 1" spacer.
-Fit so the weather stripping looks good and screw them back in!
1" spacers $4.77
1/4 Spacers $3.42
Weather stripping $3.98
Pan head screws $.98
Peace
Willfulone
Before:
After:
Heres the how to...
Flush Mounted Tail Lights
(6) 1" L X 1/2 W X .194" Hole Size Nylon Spacers
(6) 1/4" L X 1/2" W X .194 Hole Size Nylon Spacers
(8) #8 x 2" Zinc Pan Head Screws
(1) Frost King Rubber Foam Weatherseal 3/8" W X 5/16" Thick x 10' Long (Adheasive backed)(I got the black weather stripping)
Simply unscrew tail lights, clean, put weather stripping around the tail light (where the red casing meets the black casing of the light) insert new screws and spacers on back side, screw back into mounting hole.
-The two center lights get one 1" spacer on each screw.
-The outside lights get three 1/4" spacers on each of the outer most
screw
-The inner screw on the outside most lights get one 1" spacer.
-Fit so the weather stripping looks good and screw them back in!
1" spacers $4.77
1/4 Spacers $3.42
Weather stripping $3.98
Pan head screws $.98
Peace
Willfulone
__________________
..................Click for




..................Click for
Premium Supporting Vendor
Joined: Oct 2004
Posts: 36,838
Likes: 438
From: Manassas Park VA
St. Jude Donor '07-'08,-'13-'14, '16-'17
Originally Posted by rcs128
Willfulone, I don't know if the beltway is big enough for the two of us... blue coupes, same mod, same instructions...
j/k, of course.
j/k, of course.
I did that write up last fall when I did the mod. I did get the parts list off another thread though...
See you sitting in traffic
Peace
Willfulone
Corvette Stories
The Best of Corvette for Corvette Enthusiasts

Top 10 Most Explosive Corvettes Ever Made: Power-to-Weight Ratio Ranked!
Joe Kucinski
150 hp to 1,250 hp: Every Corvette Generation Compared by the Specs That Matter
Joe Kucinski
8 Coolest Corvette Pace Cars (and Replicas) of All Time
Verdad Gallardo
Top 10 Corvette Engines RANKED by Peak Torque (70+ Years of Muscle!)
Joe Kucinski
Corvette ZR1X Will Be Pacing the Indy 500, And Could Probably Race, Too!
Verdad Gallardo
Top 10 Corvettes Coming to Mecum Indy 2026!
Brett Foote
Top 10 C9 Corvette MUST-HAVES to Fix These C8 Generation Flaws!
Michael S. Palmer
10 Revolutionary 'Corvette Firsts' Most People Don't Know
Joe Kucinski
5 Reasons to Upgrade to an LS6-Powered Corvette; 5 Reasons to Stay LT2
Michael S. Palmer
Premium Supporting Vendor
Joined: Oct 2004
Posts: 36,838
Likes: 438
From: Manassas Park VA
St. Jude Donor '07-'08,-'13-'14, '16-'17
Originally Posted by Z06-JIM
I'm going to try and get mine done when I get off work this evening.
I'll post some pics when I finish with it.
I'll post some pics when I finish with it.
Jim,
Make sure you take before and after shots!
Peace
Willfulone
Team Owner


Joined: Aug 2004
Posts: 24,129
Likes: 1,038
From: The Beautiful Pacific Northwest
St. Jude Donor '05-'06-'07-'08-'09, '14-'15-'16-'17-'18
Originally Posted by Willfulone
In browsing after-market exhaust systems, I checked out the GHL Bullets and saw this nice-looking blue coupe showing off those magnificent-looking quad-pipes.
Great looking car you have there!

Premium Supporting Vendor
Joined: Oct 2004
Posts: 36,838
Likes: 438
From: Manassas Park VA
St. Jude Donor '07-'08,-'13-'14, '16-'17
Originally Posted by Red Racer
Ah hah! I knew I'd seen your car somewhere else!
In browsing after-market exhaust systems, I checked out the GHL Bullets and saw this nice-looking blue coupe showing off those magnificent-looking quad-pipes.
Great looking car you have there!
In browsing after-market exhaust systems, I checked out the GHL Bullets and saw this nice-looking blue coupe showing off those magnificent-looking quad-pipes.
Great looking car you have there!
I let the boys use the pic!
Peace
Willfulone


Melting Slicks
Joined: Apr 2005
Posts: 3,469
Likes: 4
Originally Posted by Willfulone
LOL to funny!
I did that write up last fall when I did the mod. I did get the parts list off another thread though...
See you sitting in traffic
Peace
Willfulone
I did that write up last fall when I did the mod. I did get the parts list off another thread though...
See you sitting in traffic
Peace
Willfulone
I actually have been keeping an eye out for your car when I'm in NoVa. Distinctive plate, and it was your pics and posts that inspired me to do the flush taillights. So if a NBM coupe ever pulls up next to you and a guy starts waving like a freak, it'll probably be me...
Melting Slicks

Joined: Nov 2004
Posts: 3,076
Likes: 0
From: Machine Silver Z06 The Golden State......... Bay Area
St. Jude Donor '05
Originally Posted by Willfulone
Wow, good eye
I let the boys use the pic!
Peace
Willfulone
I let the boys use the pic!
Peace
Willfulone
 But you've had yours longer than me so it's

Great pics Willfulone!
Wildcat99, I've got the flush mounts as well, like the look over stock.
Team Owner
Joined: Aug 2004
Posts: 24,129
Likes: 1,038
From: The Beautiful Pacific Northwest
St. Jude Donor '05-'06-'07-'08-'09, '14-'15-'16-'17-'18
Originally Posted by Target Chaser
Yeah, you beat me to it. But you've had yours longer than me so it's
Great pics Willfulone!
Wildcat99, I've got the flush mounts as well, like the look over stock.
But you've had yours longer than me so it's Great pics Willfulone!
Wildcat99, I've got the flush mounts as well, like the look over stock.
I thought for sure you'd have posted a pic of your GHL's by now...
You seem to be quite proud of them...