


 although in the meantime, that's a great solution Patches. I suppose the key is in the thickness of the epdm, correct?


ACA HID install prep - bulb jiggle "fix"
Thread Starter
Team Owner


Joined: Sep 2001
Posts: 23,283
Likes: 906
From: Lake Elsinore, CA
Thanks to jdmvette and Rupert for the posts detailing your fixes for ACA HID bulb jiggle. I took your suggestions to heart and opened mine up tonight before installing tomorrow and applied a similar fix.
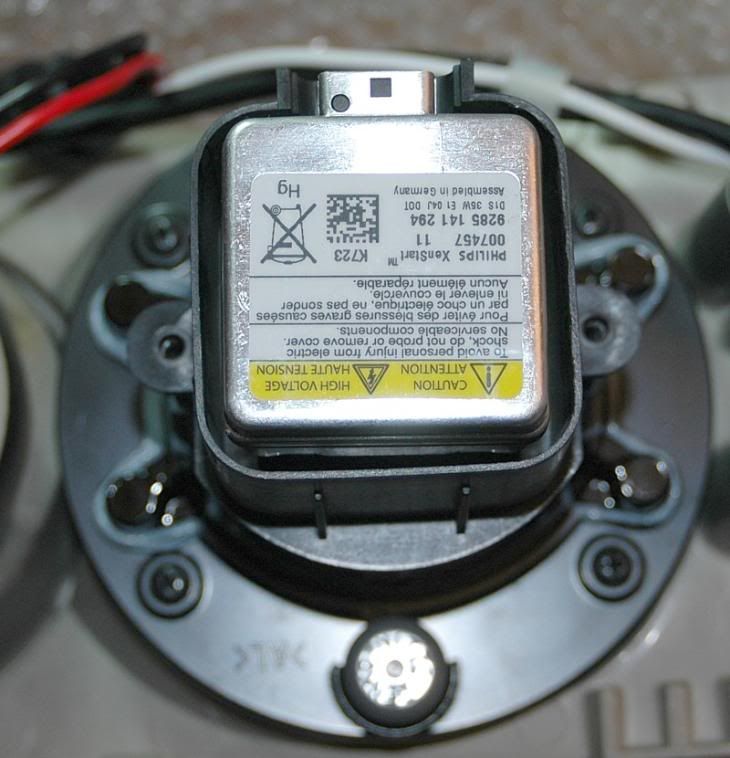
Despite the high build quality of these lights, there seems to be an issue concerning bulb jiggle that plagues them. The jiggle appears to be due to the way the bulb socket is fitted into the housing.
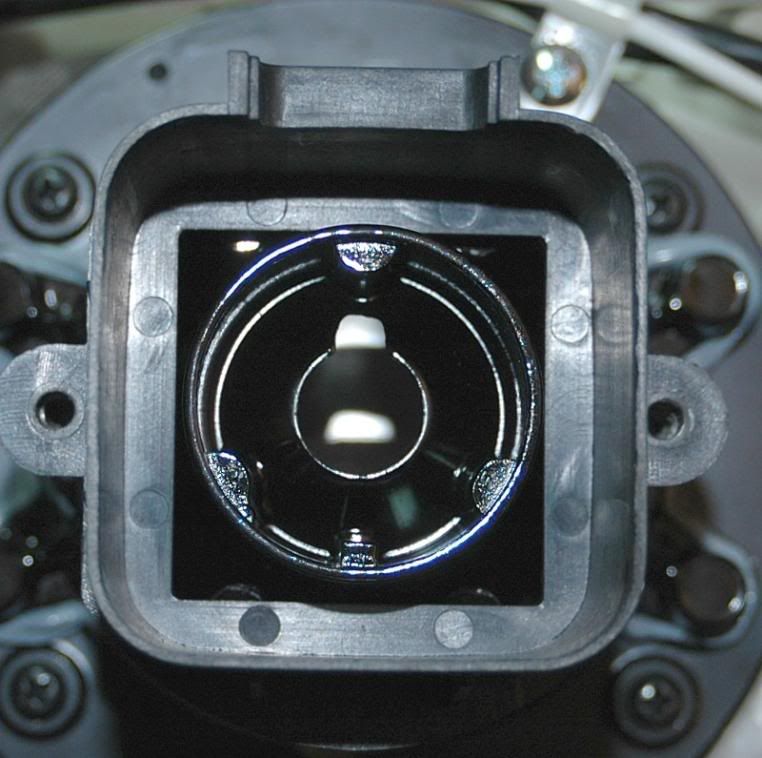
Here's a shot of the bulb as it sits in the housing. Notice the large gaps between the socket and housing. You can literally wobble the socket easily back and forth in the housing and it will fall out if you turn it upside-down.
The housing has a keyed recess that the socket simply slides into and sits there loose. There is no spring-loaded locking mechanism typical to headlight bulb mounts that hold them securely in place. The bulb stability depends on the axial squeeze placed on the back of the bulb socket, sandwiching it between the shoulder and the rear cap.
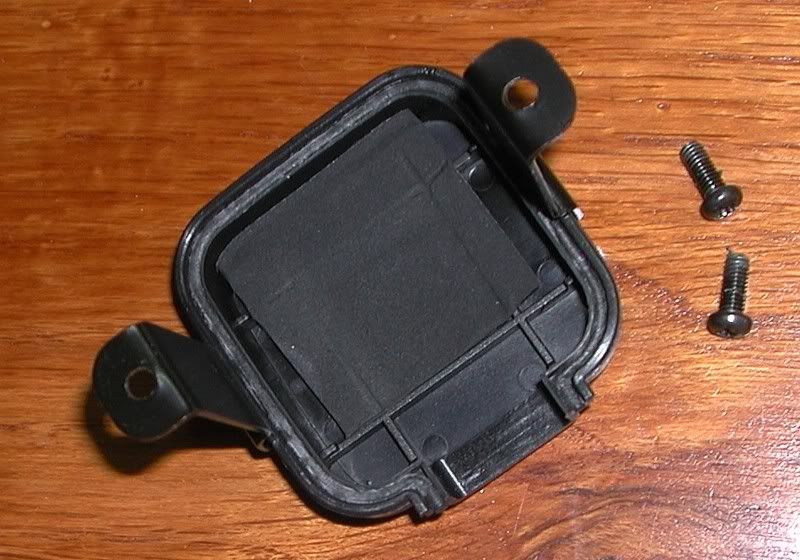
A pic of the housing without the bulb. The socket simply rests on the shoulder without being retained.
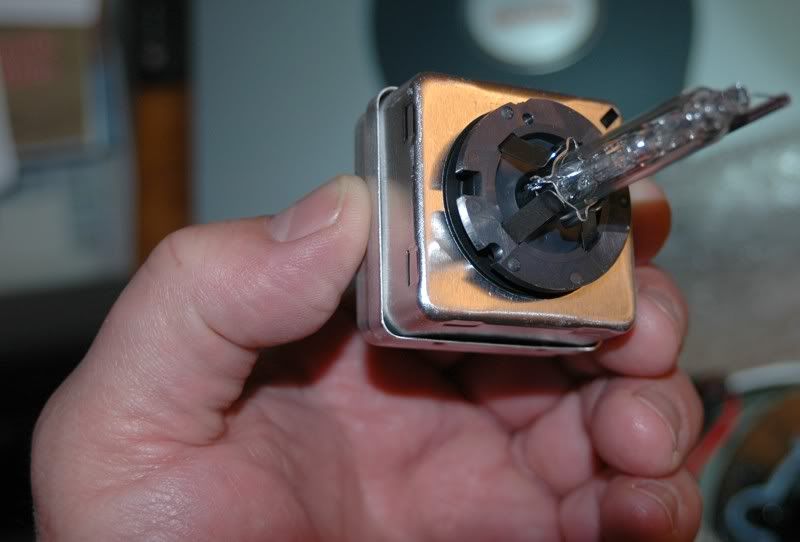
Here's the bulb and socket.
The cap has a thin piece of foam to act as a spacer and shock absorber to try and stabilize the bulb.
I took a cue from the other guys and found a sheet of high-durometer EPDM I had laying around to use to stabilize the socket. I cut some pieces to fit very snugly into the gaps and pushed them securely in place.

My HID bulb sockets are now rock-solid. There is absolutely no play left and the EPDM should remain stable over a long period of time. The pieces I cut are full-depth so they can't loosen and slip down into the housing. They'll never move out of place.
I had some thinner rubber sheet I cut to shape to put in the cap behind the socket to try and create more compression force but the assembly was already so tight and solid that I was afraid I'd strip the screw holes in the housing and that the cap gaskets wouldn't seal so I left them off. The caps went back on very tightly as it was.
Also, I think that eliminating the wobble the socket has side-to-side is a more effective approach as you can only put so much axial load on the screws before they strip the threads, Without the caps on, my bulbs are quite stable so the rear loading from the cap is less critical and I shouldn't have to worry about overtightening or, hopefully, having to go back in to retighten anytime soon.
Despite the high build quality of these lights, there seems to be an issue concerning bulb jiggle that plagues them. The jiggle appears to be due to the way the bulb socket is fitted into the housing.
Here's a shot of the bulb as it sits in the housing. Notice the large gaps between the socket and housing. You can literally wobble the socket easily back and forth in the housing and it will fall out if you turn it upside-down.
The housing has a keyed recess that the socket simply slides into and sits there loose. There is no spring-loaded locking mechanism typical to headlight bulb mounts that hold them securely in place. The bulb stability depends on the axial squeeze placed on the back of the bulb socket, sandwiching it between the shoulder and the rear cap.
A pic of the housing without the bulb. The socket simply rests on the shoulder without being retained.
Here's the bulb and socket.
The cap has a thin piece of foam to act as a spacer and shock absorber to try and stabilize the bulb.
I took a cue from the other guys and found a sheet of high-durometer EPDM I had laying around to use to stabilize the socket. I cut some pieces to fit very snugly into the gaps and pushed them securely in place.
My HID bulb sockets are now rock-solid. There is absolutely no play left and the EPDM should remain stable over a long period of time. The pieces I cut are full-depth so they can't loosen and slip down into the housing. They'll never move out of place.
I had some thinner rubber sheet I cut to shape to put in the cap behind the socket to try and create more compression force but the assembly was already so tight and solid that I was afraid I'd strip the screw holes in the housing and that the cap gaskets wouldn't seal so I left them off. The caps went back on very tightly as it was.
Also, I think that eliminating the wobble the socket has side-to-side is a more effective approach as you can only put so much axial load on the screws before they strip the threads, Without the caps on, my bulbs are quite stable so the rear loading from the cap is less critical and I shouldn't have to worry about overtightening or, hopefully, having to go back in to retighten anytime soon.
Thread Starter
Team Owner
Joined: Sep 2001
Posts: 23,283
Likes: 906
From: Lake Elsinore, CA
The ideal mount for these would be something like a quarter-turn locking interface between the socket base and mating housing that eliminates all the wobble and doesn't depend on end-loading the bulb to keep it in place. Look at the high beam bulb right next to it - the HID should mount smilarly.
I couldn't see a way to easily modify the housing to accomplish that without risking the housing integrity. Definitely a reason to continue looking for ways to improve upon this solution. In the meantime, Mrs. Patches needs to see at night.
I couldn't see a way to easily modify the housing to accomplish that without risking the housing integrity. Definitely a reason to continue looking for ways to improve upon this solution. In the meantime, Mrs. Patches needs to see at night.
Thread Starter
Team Owner
Joined: Sep 2001
Posts: 23,283
Likes: 906
From: Lake Elsinore, CA
Totally agree. It appears they may not have done any dynamic testing to check for stability.
On the bright side, I am already halfway through the install with no issues so far and am ready to put these puppies in the car. I will be posting the results after I've had a chance to finish up and create an installation thread.
On the bright side, I am already halfway through the install with no issues so far and am ready to put these puppies in the car. I will be posting the results after I've had a chance to finish up and create an installation thread.
Le Mans Master


Joined: Oct 2004
Posts: 9,369
Likes: 4
From: Zephyrhills, Florida
St. Jude Donor '06-'07-'08-'09-'10-'11-'12-'13
Thread Starter
Team Owner
Joined: Sep 2001
Posts: 23,283
Likes: 906
From: Lake Elsinore, CA
I just finished the install and all is well so I'm going to clean everything up and start uploading my pics to my desktop.
Thanks again, jdmvette.

Corvette Stories
The Best of Corvette for Corvette Enthusiasts

Top 10 Most Expensive Corvettes Ever Sold on Bring A Trailer
Brett Foote
10 Things Every Corvette Owner Needs (2026 Edition)
Michael S. Palmer
8 Most "Only Corvette Owners Understand" Quirks and Problems
Pouria Savadkouei
10 Reasons the C6 Z06 is Still A Performance Benchmark After 20 Years
Joe Kucinski
How Much Horsepower Every Corvette Engine "LOST" in 1972
Joe Kucinski
Top 10 DOs and DON'Ts for Protecting Your Convertible Top!
Michael S. Palmer
Top 10 Most Explosive Corvettes Ever Made: Power-to-Weight Ratio Ranked!
Joe Kucinski
150 hp to 1,250 hp: Every Corvette Generation Compared by the Specs That Matter
Joe Kucinski
8 Coolest Corvette Pace Cars (and Replicas) of All Time
Verdad GallardoLe Mans Master
Joined: May 2006
Posts: 5,747
Likes: 224
From: Hillsboro Oregon

I have tried, all links come back as dead and phone numbers as disconnected.

Pretty sure jdmvette has tried as well.
Le Mans Master


Joined: Nov 2000
Posts: 6,266
Likes: 156
From: Galloway Twp. NJ
Cruise-In VII Veteran
it should take about 2hrs for someone that has never done one before.
as long as you're mechanically inclined to begin with.

you need to remove your old headlight housings, run the new wiring harnesses, and mount the HID ballasts.
plus there's a little "modification" that needs to be done to the headlight doors to gain a little more adjustment room for the new housings.
then, of course, you will need to re-aim your new headlights.

Le Mans Master
Joined: May 2006
Posts: 5,747
Likes: 224
From: Hillsboro Oregon
Not really any harder than installing the bulb/ballast/harness kit....depending on how you do it. The only real difference is removing the OEM headlight assembly.
I would say three hours depending on how many beers are involved
Tech Contributor
Joined: Aug 1999
Posts: 16,376
Likes: 404
From: Should this thoughtful, valuable contribution meet with no acknowledgement or 'thanks' this post----
Patches, I'm looking forward to your color pics. The instructions I have are all black and white photos which makes it difficult to make out the details.
Drifting


Joined: Jun 2001
Posts: 1,283
Likes: 0
From: Milwaukee WI
Excellent tip for an amazing write-up!
Did you ever measure the thickness of the EPDM that you used? Where can I buy some of that if I don't happen to have it laying around?
It seems like Patches always has whatever he needs just laying around. I wish my garage worked liked that!
Did you ever measure the thickness of the EPDM that you used? Where can I buy some of that if I don't happen to have it laying around?
It seems like Patches always has whatever he needs just laying around. I wish my garage worked liked that!
Thread Starter
Team Owner
Joined: Sep 2001
Posts: 23,283
Likes: 906
From: Lake Elsinore, CA
1/8" thick high-durometer EPDM. I believe I got mine from mcmaster.com some time ago.
Since doing this, I've realized the entire headlight assembly needs to be made more rigid to eliminate the rest of the shaking. With the sharp cutoff the HIDs have, the jiggling inherent to this pop-up headlight design is magnified. You normally don't see this effect with the stock headlights because the edges of the light are so diffuse. I'll post what I do when I have that finished. I think a couple of others have already shored their's up.
Since doing this, I've realized the entire headlight assembly needs to be made more rigid to eliminate the rest of the shaking. With the sharp cutoff the HIDs have, the jiggling inherent to this pop-up headlight design is magnified. You normally don't see this effect with the stock headlights because the edges of the light are so diffuse. I'll post what I do when I have that finished. I think a couple of others have already shored their's up.
Last edited by Patches; Sep 7, 2009 at 04:09 PM.
Instructor


Joined: Jul 2004
Posts: 134
Likes: 1
From: Rancho Bernardo CA
1/8" thick high-durometer EPDM. I believe I got mine from mcmaster.com some time ago.
Since doing this, I've realized the entire headlight assembly needs to be made more rigid to eliminate the rest of the shaking. With the sharp cutoff the HIDs have, the jiggling inherent to this pop-up headlight design is magnified. You normally don't see this effect with the stock headlights because the edges of the light are so diffuse. I'll post what I do when I have that finished. I think a couple of others have already shored their's up.
Since doing this, I've realized the entire headlight assembly needs to be made more rigid to eliminate the rest of the shaking. With the sharp cutoff the HIDs have, the jiggling inherent to this pop-up headlight design is magnified. You normally don't see this effect with the stock headlights because the edges of the light are so diffuse. I'll post what I do when I have that finished. I think a couple of others have already shored their's up.
Patches, first of all, thank you for creating such a great set of install instructions.
I have installed the ACA's, and am having the jitter problem that seems to be based on the entire headlight assembly jitter, rather than the housing. Please let me know if you find a major fix for this.


Thread Starter
Team Owner
Joined: Sep 2001
Posts: 23,283
Likes: 906
From: Lake Elsinore, CA
Let me add one more critical update here before this one gets locked down for having cobwebs hangin' all over it. 
The bulb jiggle fix did help the issue somewhat but the primary issue here stems from the fact that the C5 headlight linkage and support structure was originally designed for halogen lamps and so did not require the rock-solid mount that HID's do due to their discreet cutoff and precise beam spread. This is why the C6 has fixed, exposed mounts for its HID's and so do, for that matter most modern cars with HID/Xenon lighting systems such as my dd Mini Cooper S with Bi-Xenons.
In subsequent forays into aftermarket HID setups for the C5, I received one of the first prototype sets of the low-opening JWM HID's and, in the process of installing those, fortified the stability of the headlight bracket/pivot system by reducing the slop as much as possible and also by installing the stabilizing spacer at the back of the headlight the designer so cleverly built into the system. So far, that seems to be the best combination of jiggle-mitigation I have seen short of going to a fixed-headlight mounting system.
So, although the fix above does help, approaching the problem from the stabilization/fortification of the housing pivot and support structure should produce the most significant results for those wnating to reduce the annoying jiggle in an HID setup installed in a set of retractable C5 headlights.
