
NEW Interior LED Mod Thread
 04-23-2008, 03:21 AM
#21
Le Mans Master

Thread Starter
Member Since: May 2006
Location: DuBois PA
Posts: 5,987
Likes: 0
Received 18 Likes
on
16 Posts
St. Jude Donor '11-'12-'13-'14-'15

Thanks tstar,
Well I was right, i talked my mom into letting me do it. I just ordered the lights and they should be here on thursday, and hopefully by thursday night i will have a complete blue led interior
 .
.
So thanks to everyone in this thread and the first thread
I cant wait till i get it done
Well I was right, i talked my mom into letting me do it.
I just ordered the lights and they should be here on thursday, and hopefully by thursday night i will have a complete blue led interior . So thanks to everyone in this thread and the first thread
I cant wait till i get it done

Tim


 04-23-2008, 05:16 PM
#23
Le Mans Master
Thread Starter
Member Since: May 2006
Location: DuBois PA
Posts: 5,987
Likes: 0
Received 18 Likes
on
16 Posts
St. Jude Donor '11-'12-'13-'14-'15
Yeah I experimented with them, they are extremely dim!!!! Unusable for this application really and they do not perform like a true Blacklight...
Tim
Tim
Last edited by tstar; 04-25-2008 at 03:19 PM.
04-28-2008, 07:13 PM
#24
Melting Slicks

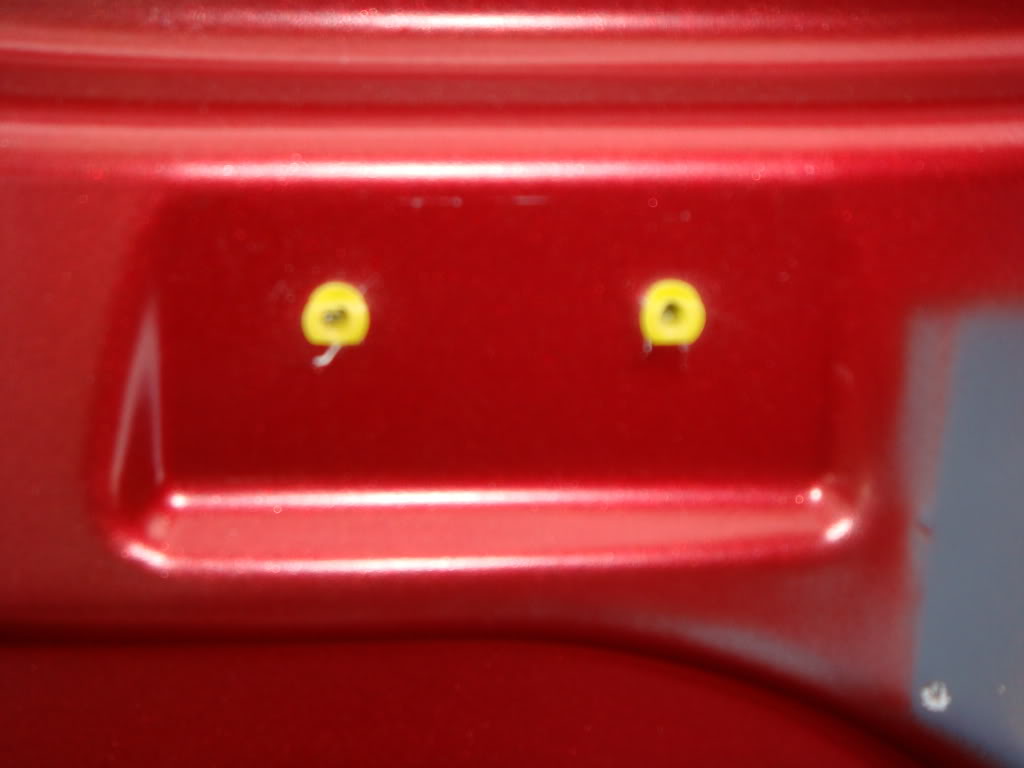
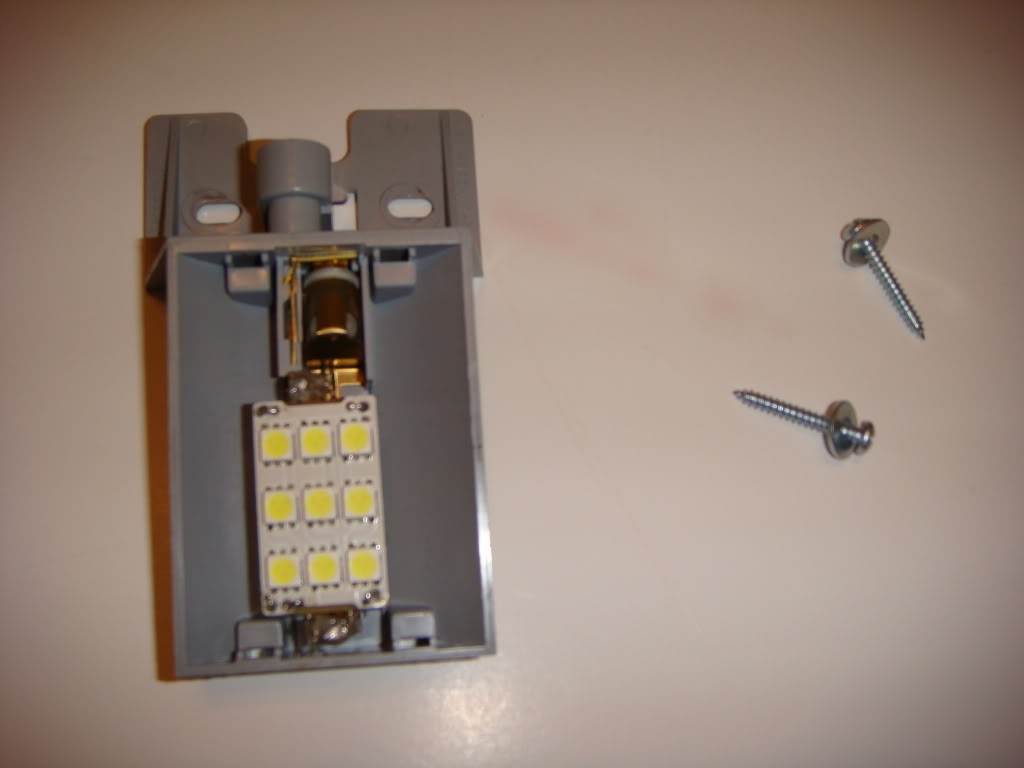
Tim you have the underhood light for 98-04's listed and a 516, it's actually a 561. Autolumination.com sell different LED's in the form of a 561 but they are not direct replacements they way they come, because the orientation of the LED's will be 90 degrees off when you hook the rigid loops of the LED onto the brass tabs in the light the LED's will face to the side instead of out. I decided to solder one in place. To do this you will have to remove the light from the hood. It's held on by 2 rivets. You can either drill out the rivet or use a door panel removal tool or a flat blade screwdriver and pry it out. If you pry it out just go slow and be careful and it will pop right out. Then just remove the rivets from the light and your all set. When you go to put it back in just put some wall anchors like you use in drywall in the holes in the hood and use screws and washers to hold it in place

I apologize for the blurry pic.
To solder the 561 LED into the underhood light just set it on the brass tabs, (I bent the tabs to help it sit flat) and solder it in place. I also put some automotive glue (Goop) on the solder joints but this is not really necessary just a little added insurance that it wont come apart with the vibration of being under the hood.
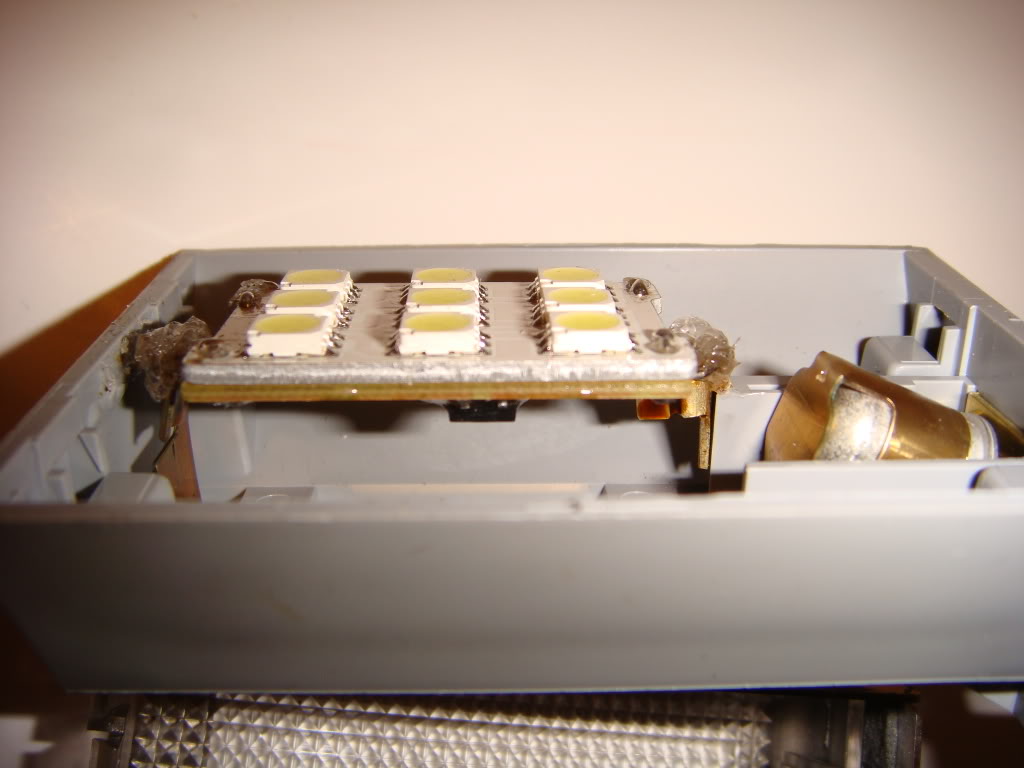

Once completed this is now quite a bit brighter than the original under hood light. Its almost bright enough to work by in the dark, almost but not quite. But if your stranded by the side of the road, this light will be much appreciated over the stock light.
I apologize for the blurry pic.
To solder the 561 LED into the underhood light just set it on the brass tabs, (I bent the tabs to help it sit flat) and solder it in place. I also put some automotive glue (Goop) on the solder joints but this is not really necessary just a little added insurance that it wont come apart with the vibration of being under the hood.
Once completed this is now quite a bit brighter than the original under hood light. Its almost bright enough to work by in the dark, almost but not quite. But if your stranded by the side of the road, this light will be much appreciated over the stock light.
04-29-2008, 03:57 AM
#25
Le Mans Master
Thread Starter
Member Since: May 2006
Location: DuBois PA
Posts: 5,987
Likes: 0
Received 18 Likes
on
16 Posts
St. Jude Donor '11-'12-'13-'14-'15
Larry, Thanx for clearing that up and posting an excellent fix!!!
I'm not familiar with a rigid loop bulb but is that small silver "can" some sort of adapter socket????
Tim
I'm not familiar with a rigid loop bulb but is that small silver "can" some sort of adapter socket????
Tim
04-29-2008, 04:17 AM
#26
Melting Slicks
Do you mean the round part on the outside, next to the screw holes? If that's what you are talking about, yes that is where you plug in the wiring harness. If you are talking about the round can like thing inside the brass, on the inside of the bulb compartment close to the bulb, actually it would be below the bulb when it is mounted and in it's correct position, I believe it is some kind of switch that will only turn on the light when the hood is in a certain position. If you move the under hood light assembly in a way that it would move as if you were closing or opening the hood you can hear it click as if it is completing or braking the circuit.
04-29-2008, 04:28 AM
#27
Le Mans Master
Thread Starter
Member Since: May 2006
Location: DuBois PA
Posts: 5,987
Likes: 0
Received 18 Likes
on
16 Posts
St. Jude Donor '11-'12-'13-'14-'15
I was talking about the on off "switch", that explains why there is no pin switch to activate the light. So to add additional lighting under the hood we would have to piggyback directly off the bulb... Thanx!
Tim
Tim
04-29-2008, 04:34 AM
#28
Melting Slicks
I don't see why you couldn't tap into the wiring that connects to the underhood light, but if you did, the light wouldn't come on until the switch in the light completed the circuit.
04-29-2008, 10:18 AM
#29
Melting Slicks
This is a good cliff's notes of the LED monster thread haha.
I'll throw in my 2 cents since I swapped out my lights on my SINGLE zone HVAC, I never put them in the other thread. I also never saw anyone else do a Single Zone HVAC LED swap, or at least put any pics of it up.
Disassembly is easy on the single zone HVAC. Everything is vacuum actuated, so when you disconnect the connectors/hoses in the back... the light hissing noise is normal The dials must be removed to take off the back cover. Once the back cover is unfastened, SLOWLY and CAREFULLY remove the back cover STRAIGHT OUT, do not angle it while removing it. There are some long, thin electrical contacts that are about 1.5" to 2" long. They go through small holes in the circuit board. When seperated, you'll have the skinny contacts on one side, and the circuit board on the other.
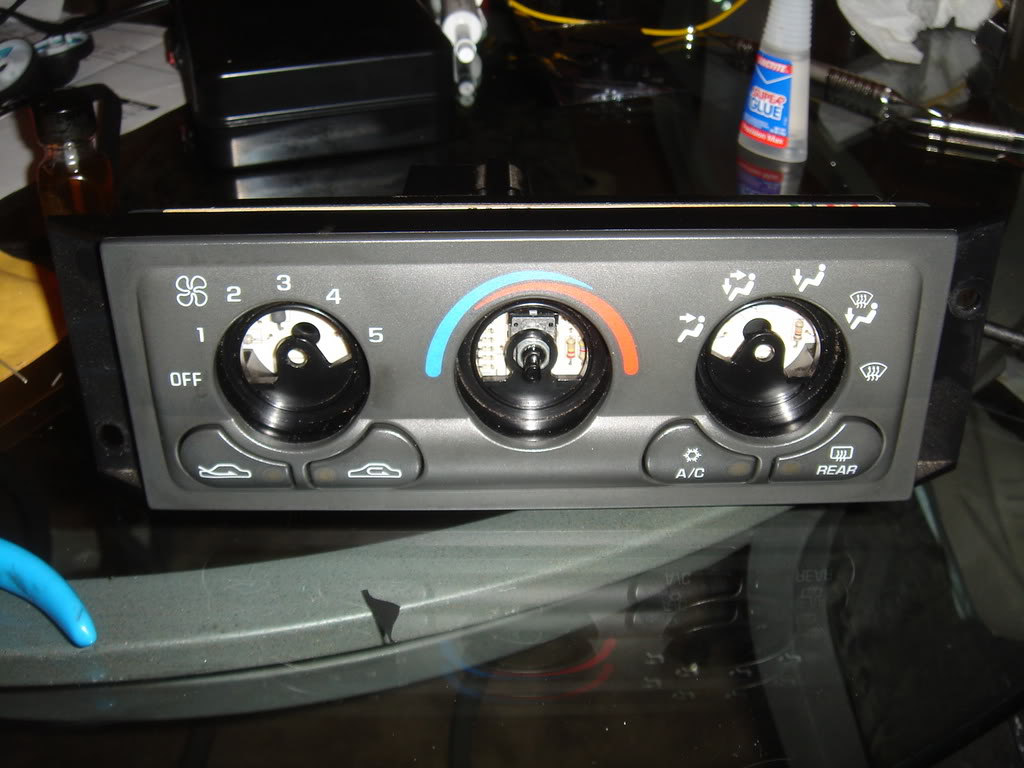
The 12v bulbs that need to be changed are circled. I used 3mm blue LED and 510 ohm resistors. Ignore the teal circles, that was for something else. The stock yellow LEDs are for the buttons when they are selected, I left these alone.
I don't have a picture of them lit up on the board, but you will have to cut the leads down to have enough room for the bulbs to fit. However, leave enough of the lead to be able to bend the LED 90 degrees and point it where you most need light. The same soldering/braiding process applies as all the other LED mods.
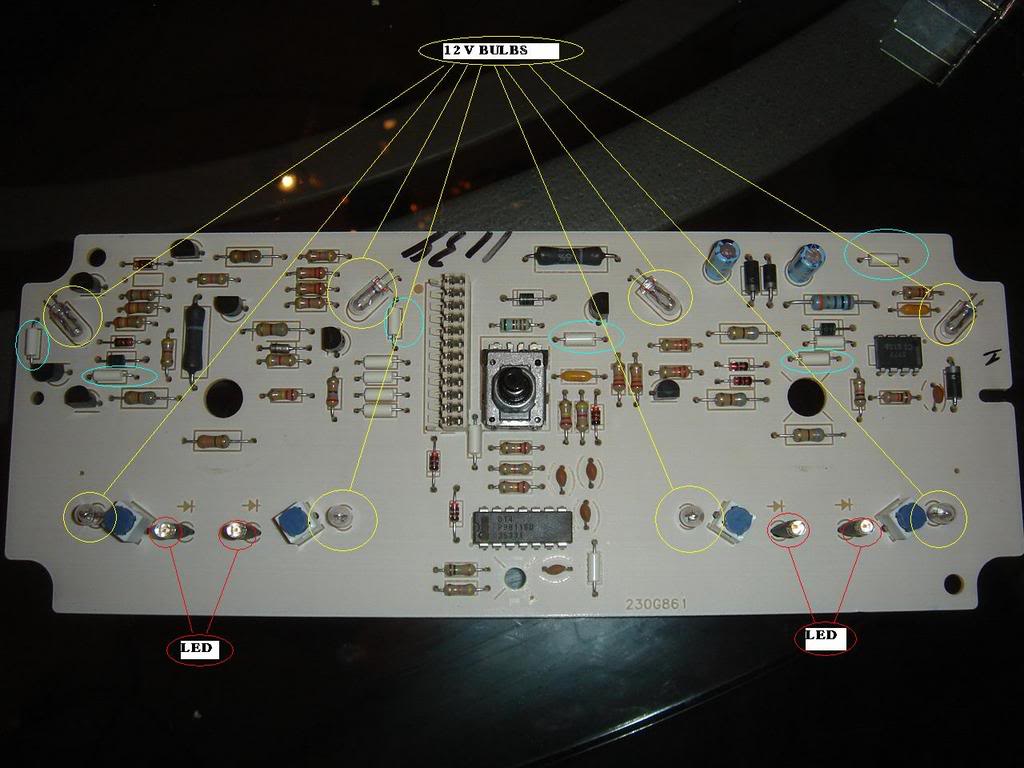
Sorry don't have a closeup of the finished product... the upper right bulb lost connection after I installed it too... bah!
I'll fix it when I get back from my deployment. I'll try grinding them down to disperse the light better too.
I'll throw in my 2 cents since I swapped out my lights on my SINGLE zone HVAC, I never put them in the other thread. I also never saw anyone else do a Single Zone HVAC LED swap, or at least put any pics of it up.
Disassembly is easy on the single zone HVAC. Everything is vacuum actuated, so when you disconnect the connectors/hoses in the back... the light hissing noise is normal
The dials must be removed to take off the back cover. Once the back cover is unfastened, SLOWLY and CAREFULLY remove the back cover STRAIGHT OUT, do not angle it while removing it. There are some long, thin electrical contacts that are about 1.5" to 2" long. They go through small holes in the circuit board. When seperated, you'll have the skinny contacts on one side, and the circuit board on the other.The 12v bulbs that need to be changed are circled. I used 3mm blue LED and 510 ohm resistors. Ignore the teal circles, that was for something else. The stock yellow LEDs are for the buttons when they are selected, I left these alone.
I don't have a picture of them lit up on the board, but you will have to cut the leads down to have enough room for the bulbs to fit. However, leave enough of the lead to be able to bend the LED 90 degrees and point it where you most need light. The same soldering/braiding process applies as all the other LED mods.
Sorry don't have a closeup of the finished product... the upper right bulb lost connection after I installed it too... bah!
I'll fix it when I get back from my deployment. I'll try grinding them down to disperse the light better too.
04-29-2008, 04:37 PM
#30
Le Mans Master
Thread Starter
Member Since: May 2006
Location: DuBois PA
Posts: 5,987
Likes: 0
Received 18 Likes
on
16 Posts
St. Jude Donor '11-'12-'13-'14-'15
Awesome!!!!!!!! I was hoping someone would fess up the swap on the Non dual HVAC!!!! I woner if you could shoehorn in some shaved 10mms???? They worked really good on the Rocker switches on the last one I did...
Great job!!!!!!!!!
Tim
Great job!!!!!!!!!
Tim
04-30-2008, 01:02 AM
#31
Melting Slicks
The light output on the 3mm was pretty even, the hotspots were because I didn't shave down the end, I think. There wasn't a lot of room to maneuver the 3mm in there, less than a half inch or so. I'd think a 10mm would be huge! I left the tiny stock yellow LED for the buttons alone because they looked like too much of a PITA.
When I get back, I'll adjust the post to include more dissassembly pictures when I open it back up to fix the one that isn't lighting up.
Next up is the footwells, mirror map lights and cargo area. I still have to finish the T/C button too, I think I'll use the tips I found in this thread.
When I get back, I'll adjust the post to include more dissassembly pictures when I open it back up to fix the one that isn't lighting up.
Next up is the footwells, mirror map lights and cargo area. I still have to finish the T/C button too, I think I'll use the tips I found in this thread.
05-08-2008, 11:38 AM
#32

I think I read it wrong before and accidently got 3 mm bulbs for the HVAC, will I be ok? I know you said make sure they meet up with the collars, Will it be much harder to the point where I should use 5 mm instead or can I make the 3 mm work?
05-08-2008, 11:07 PM
#34
Burning Brakes

Member Since: Mar 2007
Location: centennial colorado
Posts: 1,203
Likes: 0
Received 21 Likes
on
19 Posts

Ok so heres the story, im new to the CF but ive been looking at it for quite some time now. The CF has helped me with doing the HID lights and now this led mod . So ive already done the floorwells(white), cargo area(white), both door switches(blue), and the auto shifter(blue). Im planning to do the DIC and HUD in blue leds and that should be no problem. Im using the neo-wedges from oznium, execpt in the HUD because there the type a's, so im ordering them from autoillumination. But ok heres the real question im going to be using the neo-wedges out of the base for the hvac and the radio, ive already looked at the diagrams for the positive and neg. on the circuit boards so i know which is which, but since im using the neo-wedges, does anyone know how to tell which are the pos. and neg. leads on the leds??
BTW: My mom doesnt trust me in knowing how to solder the leds in, and she doesnt trust her skills in soldering either :o. But im pretty sure i can talk her into letting me do it. But JUST i case is there anyone in the nc area that would be able to do this for me??? Id rather do it myself but if i cant, id like someone to do it because i think, this mod is one of the BEST mods u can do .
.
Thanks in advance,
Corey
. So ive already done the floorwells(white), cargo area(white), both door switches(blue), and the auto shifter(blue). Im planning to do the DIC and HUD in blue leds and that should be no problem. Im using the neo-wedges from oznium, execpt in the HUD because there the type a's, so im ordering them from autoillumination. But ok heres the real question im going to be using the neo-wedges out of the base for the hvac and the radio, ive already looked at the diagrams for the positive and neg. on the circuit boards so i know which is which, but since im using the neo-wedges, does anyone know how to tell which are the pos. and neg. leads on the leds?? BTW: My mom doesnt trust me in knowing how to solder the leds in, and she doesnt trust her skills in soldering either :o. But im pretty sure i can talk her into letting me do it. But JUST i case is there anyone in the nc area that would be able to do this for me??? Id rather do it myself but if i cant, id like someone to do it because i think, this mod is one of the BEST mods u can do
.Thanks in advance,
Corey
05-09-2008, 03:22 AM
#35
Le Mans Master
Thread Starter
Member Since: May 2006
Location: DuBois PA
Posts: 5,987
Likes: 0
Received 18 Likes
on
16 Posts
St. Jude Donor '11-'12-'13-'14-'15
I use a Dremel with a cutoff wheel to lop the Heads off the LEDs, then grind it against the blade slightly to make it square, no sanding that way and it's very fast.
FYI I haven't really noticed a difference in light output between the various sized LEDs, or even the SMDs for that matter.
Tim
05-11-2008, 08:52 PM
#36
Drifting

Ok...I knew I shouldn't have started reading this thread. Now I'm hooked and I've gone too far to back out! 

I'm installing blue led's and I've done my door switches, adjustable shock switch, and the traction control button (I used the "drilled hole in the middle of the button" method and used the LED from a neo wedge that I'd busted the plastic base on).
Now I'm moving on to the automatic shift light. I just want to make sure I order the right bulb. Tstar, you listed the "194 Matrix Super Star bulbs" for $7.99. Is that the same as this one I found using your link? 194 168 W5W 2825 Matrix Bulbs Emits Light in all Directions
The price on the website is $6.99, so I want to make sure I'm not ordering the wrong one.
Thanks!
Rick
05-11-2008, 09:10 PM
#37
AAH! So I tested it out with the 9 v battery. And the ones I put in worked. But At first I put it to the orange ones and I think I burned it out. It went tzzz and smoked. Did I ruin all of it or just maybe the one orange one that I did that too!!!??? I'm so mad at myself for doing that. Bad idea!
05-12-2008, 07:28 AM
#38
Le Mans Master
Thread Starter
Member Since: May 2006
Location: DuBois PA
Posts: 5,987
Likes: 0
Received 18 Likes
on
16 Posts
St. Jude Donor '11-'12-'13-'14-'15
It's a damn addiction! Any 194 based bulb should work in there, the bulb you described sounds like it would work better then the one I listed. I have a MN6 so I relied on other modders!
Tim
Ok...I knew I shouldn't have started reading this thread. Now I'm hooked and I've gone too far to back out!
I'm installing blue led's and I've done my door switches, adjustable shock switch, and the traction control button (I used the "drilled hole in the middle of the button" method and used the LED from a neo wedge that I'd busted the plastic base on).
Now I'm moving on to the automatic shift light. I just want to make sure I order the right bulb. Tstar, you listed the "194 Matrix Super Star bulbs" for $7.99. Is that the same as this one I found using your link? 194 168 W5W 2825 Matrix Bulbs Emits Light in all Directions
The price on the website is $6.99, so I want to make sure I'm not ordering the wrong one.
Thanks!
Rick
05-12-2008, 07:31 AM
#39
Le Mans Master
Thread Starter
Member Since: May 2006
Location: DuBois PA
Posts: 5,987
Likes: 0
Received 18 Likes
on
16 Posts
St. Jude Donor '11-'12-'13-'14-'15
AAH! So I tested it out with the 9 v battery. And the ones I put in worked. But At first I put it to the orange ones and I think I burned it out. It went tzzz and smoked. Did I ruin all of it or just maybe the one orange one that I did that too!!!??? I'm so mad at myself for doing that. Bad idea!
Tim
05-12-2008, 09:32 AM
#40
Ok cool, I'll just replace them with the 3 mm blue ones I ordered originally for the other ones. Oh well, live and learn!

