




Radioflyer Install Question
Thread Starter
Melting Slicks


Joined: Aug 2007
Posts: 2,123
Likes: 2
From: Humble TX
St. Jude Donor '09-'10-'11-'12
 Radioflyer Install Question
I've watched the video three times and can not figure out where George is indicating to attach the ground wire on the harness. Any of you who already completed the install help me out here.

Le Mans Master

Joined: Dec 2005
Posts: 6,420
Likes: 5
From: "This is not a psychotic episode, but a cleansing moment of clarity."
There is a nut on the firewall right behind the battery. You can't locate it? Isn't there a photo that came with the instructions that shows you where it is? You remove the nut from the stud, place the ground strap on and tighten down the nut again.
Thread Starter
Melting Slicks
Joined: Aug 2007
Posts: 2,123
Likes: 2
From: Humble TX
St. Jude Donor '09-'10-'11-'12

Advanced

Joined: Sep 2008
Posts: 63
Likes: 0
From: Northern VA
You can see a picture in the PDF version of the install I believe.
On another note. How long is it taking people to do aiming and adjusting?
I've spent 2 days already on just aiming and adjusting and it still isn't right. It's such a big balancing act.
You have to have the headlights aimed, but they may not fit the housing very well and the halo rings won't completely show. Then you have to adjust it so you can see the halo rings. Now it doesn't aim properly and you also have to worry about the headlights clearing the bumper. Then if you turn them too much the adjusting screw pops out of the plastic washer meaning you have to hammer it back in. Then, then, then.... LOL you get the point!!
Please tell me I am not alone!!!
On another note. How long is it taking people to do aiming and adjusting?
I've spent 2 days already on just aiming and adjusting and it still isn't right. It's such a big balancing act.
You have to have the headlights aimed, but they may not fit the housing very well and the halo rings won't completely show. Then you have to adjust it so you can see the halo rings. Now it doesn't aim properly and you also have to worry about the headlights clearing the bumper. Then if you turn them too much the adjusting screw pops out of the plastic washer meaning you have to hammer it back in. Then, then, then.... LOL you get the point!!
Please tell me I am not alone!!!
Le Mans Master
Joined: Dec 2005
Posts: 6,420
Likes: 5
From: "This is not a psychotic episode, but a cleansing moment of clarity."
You can see a picture in the PDF version of the install I believe.
On another note. How long is it taking people to do aiming and adjusting?
I've spent 2 days already on just aiming and adjusting and it still isn't right. It's such a big balancing act.
You have to have the headlights aimed, but they may not fit the housing very well and the halo rings won't completely show. Then you have to adjust it so you can see the halo rings. Now it doesn't aim properly and you also have to worry about the headlights clearing the bumper. Then if you turn them too much the adjusting screw pops out of the plastic washer meaning you have to hammer it back in. Then, then, then.... LOL you get the point!!
Please tell me I am not alone!!!
On another note. How long is it taking people to do aiming and adjusting?
I've spent 2 days already on just aiming and adjusting and it still isn't right. It's such a big balancing act.
You have to have the headlights aimed, but they may not fit the housing very well and the halo rings won't completely show. Then you have to adjust it so you can see the halo rings. Now it doesn't aim properly and you also have to worry about the headlights clearing the bumper. Then if you turn them too much the adjusting screw pops out of the plastic washer meaning you have to hammer it back in. Then, then, then.... LOL you get the point!!
Please tell me I am not alone!!!
Were you in on the first or second GP? I thought that George was going to shorten the length of those bolts in the second go round. I wound up taking my Dremel cut off wheel and knocking a good 1/4" of those bolts on the outside (the two on the outside of the main beam) and that took care of that problem.
BTW, for any of you guys that have the adjuster screw pop out of the plastic cup, remove the plastic cup from the frame, place it on the ball end of the screw, THEN press them both into the frame TOGETHER.
As for the rest of the aiming, I took the easy way out.
I used my other vehicle with HID as a reference. Took note of where the brightest part of the pattern hit the sectional garage door, pulled the Vette up to the same distance and adjusted accordingly, stepping back behind the car to make sure the lights were lining up straight. To adjust the high beams, I just put the brightest part of the beams just slightly higher than the main beam hot spots. So far, no one has flashed me and I've got great coverage.
As far as the halo rings showing, just make sure you can see them when you are looking at the car head on.

Last edited by JMc; May 4, 2009 at 04:22 PM.
Corvette Stories
The Best of Corvette for Corvette Enthusiasts

10 Reasons the C6 Z06 is Still A Performance Benchmark After 20 Years
Joe Kucinski
How Much Horsepower Every Corvette Engine "LOST" in 1972
Joe Kucinski
Top 10 DOs and DON'Ts for Protecting Your Convertible Top!
Michael S. Palmer
Top 10 Most Explosive Corvettes Ever Made: Power-to-Weight Ratio Ranked!
Joe Kucinski
150 hp to 1,250 hp: Every Corvette Generation Compared by the Specs That Matter
Joe Kucinski
8 Coolest Corvette Pace Cars (and Replicas) of All Time
Verdad Gallardo
Top 10 Corvette Engines RANKED by Peak Torque (70+ Years of Muscle!)
Joe Kucinski
Corvette ZR1X Will Be Pacing the Indy 500, And Could Probably Race, Too!
Verdad Gallardo
Top 10 Corvettes Coming to Mecum Indy 2026!
Brett Foote
Advanced
Joined: Sep 2008
Posts: 63
Likes: 0
From: Northern VA

You are not alone. The adjusters will only pop out when the module backs up against the stainless screws that are used with the spacers to mount the kit to the stock platform.
Were you in on the first or second GP? I thought that George was going to shorten the length of those bolts in the second go round. I wound up taking my Dremel cut off wheel and knocking a good 1/4" of those bolts on the outside (the two on the outside of the main beam) and that took care of that problem.
BTW, for any of you guys that have the adjuster screw pop out of the plastic cup, remove the plastic cup from the frame, place it on the ball end of the screw, THEN press them both into the frame TOGETHER.
As for the rest of the aiming, I took the easy way out.
I used my other vehicle with HID as a reference. Took note of where the brightest part of the pattern hit the sectional garage door, pulled the Vette up to the same distance and adjusted accordingly, stepping back behind the car to make sure the lights were lining up straight. To adjust the high beams, I just put the brightest part of the beams just slightly higher than the main beam hot spots. So far, no one has flashed me and I've got great coverage.
As far as the halo rings showing, just make sure you can see them when you are looking at the car head on.
Were you in on the first or second GP? I thought that George was going to shorten the length of those bolts in the second go round. I wound up taking my Dremel cut off wheel and knocking a good 1/4" of those bolts on the outside (the two on the outside of the main beam) and that took care of that problem.
BTW, for any of you guys that have the adjuster screw pop out of the plastic cup, remove the plastic cup from the frame, place it on the ball end of the screw, THEN press them both into the frame TOGETHER.
As for the rest of the aiming, I took the easy way out.
I used my other vehicle with HID as a reference. Took note of where the brightest part of the pattern hit the sectional garage door, pulled the Vette up to the same distance and adjusted accordingly, stepping back behind the car to make sure the lights were lining up straight. To adjust the high beams, I just put the brightest part of the beams just slightly higher than the main beam hot spots. So far, no one has flashed me and I've got great coverage.
As far as the halo rings showing, just make sure you can see them when you are looking at the car head on.
I was in on the second GP. Although, I'm not really sure why they pop out in the first place. It doesn't appear to be backing up into anything. I will be aiming and adjusting them all of tomorrow night so I will find out.
I don't know why I didn't just put the plastic cup on the ball end first! Sounds much more logical. I already have my 7mm socket ready for when it pops out so I can just hammer it in
Here's to another 4 hours of adjusting!!!
Advanced
Joined: Sep 2008
Posts: 63
Likes: 0
From: Northern VA
Le Mans Master
Joined: Dec 2005
Posts: 6,420
Likes: 5
From: "This is not a psychotic episode, but a cleansing moment of clarity."
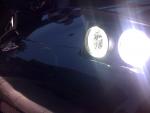
Tupilo - With the shrouds off, check the two mounting bolts on the outside of the housing, next to the outer edge of the HID projector. What happens, is that the back of the projector housing, if pushed back far enough, will back into the tip of the mounting bolt, which prohibits the housing from traveling any further. As you continue to turn the adjuster screw anyway, it simply has no other option but to pop out of the socket. This is only happening on the HID projector side(s) of the lamps, yes?

I've only marked one of the bolts, but either one that is visible here can wreak havoc on your adjustments if they are too long and you're pushing the lamps too far back. This pic was right when I discovered what the problem was and before I shortened them.
Last edited by JMc; May 4, 2009 at 06:15 PM.

Former Vendor
Joined: Nov 2005
Posts: 8,995
Likes: 2
From: Spring Texas
St. Jude Donor '08
If you're referring to the ground wire off of the relay, there's a small 10mm bolt to the rear/outside of the battery area:

The Aiming problem the JMc experienced has been corrected in all kits of the second GP by the use of shorter mounting bolts.
The Aiming problem the JMc experienced has been corrected in all kits of the second GP by the use of shorter mounting bolts.
Advanced
Joined: Sep 2008
Posts: 63
Likes: 0
From: Northern VA
JMc thanks for the picture and tips. When it finally stops raining I will try to adjust again. I'll keep you guys updated. Thanks again!
I'm assuming you do NOT have RadioFlyer's Light Cannons in that case!
Tupilo - With the shrouds off, check the two mounting bolts on the outside of the housing, next to the outer edge of the HID projector. What happens, is that the back of the projector housing, if pushed back far enough, will back into the tip of the mounting bolt, which prohibits the housing from traveling any further. As you continue to turn the adjuster screw anyway, it simply has no other option but to pop out of the socket. This is only happening on the HID projector side(s) of the lamps, yes?
I've only marked one of the bolts, but either one that is visible here can wreak havoc on your adjustments if they are too long and you're pushing the lamps too far back. This pic was right when I discovered what the problem was and before I shortened them.
Tupilo - With the shrouds off, check the two mounting bolts on the outside of the housing, next to the outer edge of the HID projector. What happens, is that the back of the projector housing, if pushed back far enough, will back into the tip of the mounting bolt, which prohibits the housing from traveling any further. As you continue to turn the adjuster screw anyway, it simply has no other option but to pop out of the socket. This is only happening on the HID projector side(s) of the lamps, yes?
I've only marked one of the bolts, but either one that is visible here can wreak havoc on your adjustments if they are too long and you're pushing the lamps too far back. This pic was right when I discovered what the problem was and before I shortened them.

Drifting

Joined: Feb 2009
Posts: 1,379
Likes: 1
From: MA
Tulipo, yes, I had the same issues that you are going through now. Funny when you mentioned it all as I went through the same exact things but I'll say, once you get it all sorted out and adjusted, and you just can't wait for night to drive, it is all worth it in the end. I can't wait to drive at night just so I can use the lights and with 4300K HID bulbs that I bought and that JMc suggested, all the better, though we/JMc and I are both wondering what 5000K bulbs look like.
I prefer to go to a dark, totally unlit road and aim my lights that way, then I know exactly where my lights are and where they will be.
I prefer to go to a dark, totally unlit road and aim my lights that way, then I know exactly where my lights are and where they will be.
Advanced
Joined: Sep 2008
Posts: 63
Likes: 0
From: Northern VA
When it's finally all sorted out I will post pics of my 5000k kit. The color really does look great. Almost looks like a silver when looking directly at it.
Just waiting for the rain to stop so I can work on my adjustments!
1
Just waiting for the rain to stop so I can work on my adjustments!
1
Tulipo, yes, I had the same issues that you are going through now. Funny when you mentioned it all as I went through the same exact things but I'll say, once you get it all sorted out and adjusted, and you just can't wait for night to drive, it is all worth it in the end. I can't wait to drive at night just so I can use the lights and with 4300K HID bulbs that I bought and that JMc suggested, all the better, though we/JMc and I are both wondering what 5000K bulbs look like.
I prefer to go to a dark, totally unlit road and aim my lights that way, then I know exactly where my lights are and where they will be.
I prefer to go to a dark, totally unlit road and aim my lights that way, then I know exactly where my lights are and where they will be.
Le Mans Master
Joined: Dec 2005
Posts: 6,420
Likes: 5
From: "This is not a psychotic episode, but a cleansing moment of clarity."
Well Tupilo, you've answered my question, then. I've seen some HID's on the road that had that brilliant, silver metallic look to them and I was wondering if those might be the 5000k. I love that look. Those look like "headlamps from the future" to me.